User Guide
Page 3
... Installing a nano SIM card...11 Removing a nano SIM card...12 Charging your ASUS Phone...13 Turning your ASUS Phone on or off 16 Starting for the first time...17 Using the touchscreen...18 2 Secure and personalize Securing your ASUS Phone 20 Fingerprint ID sensor...20 Lock Screen...24 Zen Home features...28 Home screen...28 Quick settings...30 System notifications...31 Personalizing your Home screen 32 Widgets...32 Wallpapers...33 Setting up the date and time...34 Setting up your ringtone and alert sounds...
... Installing a nano SIM card...11 Removing a nano SIM card...12 Charging your ASUS Phone...13 Turning your ASUS Phone on or off 16 Starting for the first time...17 Using the touchscreen...18 2 Secure and personalize Securing your ASUS Phone 20 Fingerprint ID sensor...20 Lock Screen...24 Zen Home features...28 Home screen...28 Quick settings...30 System notifications...31 Personalizing your Home screen 32 Widgets...32 Wallpapers...33 Setting up the date and time...34 Setting up your ringtone and alert sounds...

User Guide
Page 4
... the Camera app...45 Camera home screen...46 Photo Locations...46 Camera settings...47 Video settings...47 Others settings...47 Advanced camera features...48 Using the Photos app 53 Viewing files from your social network or cloud storage 53 Viewing the photo location...53 Sharing files from the Photos...53 Deleting files from the Photos...54 Editing images...54 5 Work hard, play harder Browser...55 Launching the Chrome app...55 Adding a new tab...55 Bookmarking pages...55 Clearing the browser cache...56 Email...56 Setting up email accounts...56 Adding email accounts...57 Setting...
... the Camera app...45 Camera home screen...46 Photo Locations...46 Camera settings...47 Video settings...47 Others settings...47 Advanced camera features...48 Using the Photos app 53 Viewing files from your social network or cloud storage 53 Viewing the photo location...53 Sharing files from the Photos...53 Deleting files from the Photos...54 Editing images...54 5 Work hard, play harder Browser...55 Launching the Chrome app...55 Adding a new tab...55 Bookmarking pages...55 Clearing the browser cache...56 Email...56 Setting up email accounts...56 Adding email accounts...57 Setting...

User Guide
Page 9
... up to 128 GB of data, damage to your device, or memory card, or both. • The microSD card is not responsible for any data loss or damage incurred to prevent loss of capacity. ASUS is sold separately. Installing a memory card Your ASUS Phone supports a microSD™, microSDHC™, and microSDXC™ memory card with up , insert the tool that you remove the cover. • Do not...
... up to 128 GB of data, damage to your device, or memory card, or both. • The microSD card is not responsible for any data loss or damage incurred to prevent loss of capacity. ASUS is sold separately. Installing a memory card Your ASUS Phone supports a microSD™, microSDHC™, and microSDXC™ memory card with up , insert the tool that you remove the cover. • Do not...

User Guide
Page 14
... USB cable from the power outlet. To charge your ASUS Phone using it may take longer to the power adapter. 2. Connect the USB Type-C cable to fully charge the device. • If your computer does not provide enough power for charging via USB port of battery charge is indicated by the following icons: Low Not Charging Charging Full 4. NOTE: • You can use your device while charging but it in battery mode for the first time...
... USB cable from the power outlet. To charge your ASUS Phone using it may take longer to the power adapter. 2. Connect the USB Type-C cable to fully charge the device. • If your computer does not provide enough power for charging via USB port of battery charge is indicated by the following icons: Low Not Charging Charging Full 4. NOTE: • You can use your device while charging but it in battery mode for the first time...
User Guide
Page 17
... privacy policies before providing access. Starting for the first time When you turn your ASUS Phone on for the first time, Setup Wizard will only allow emergency response personnel to locate you if you should be made available to select your language, select input methods, set up your mobile network, Wi-Fi, sync accounts, and configure your Location Information as Broadband Data Cards or devices without a keypad or user interface) may or...
... privacy policies before providing access. Starting for the first time When you turn your ASUS Phone on for the first time, Setup Wizard will only allow emergency response personnel to locate you if you should be made available to select your language, select input methods, set up your mobile network, Wi-Fi, sync accounts, and configure your Location Information as Broadband Data Cards or devices without a keypad or user interface) may or...
User Guide
Page 20
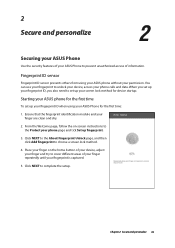
... ID sensor prevents others from using your phone calls and data. Starting your ASUS phone for the first time To set up your screen lock method for the first time: 1. 2 Secure and personalize Secure and personalize 2 Securing your ASUS Phone Use the security features of your ASUS Phone to prevent unauthorized access of your finger repeatedly until your fingerprint is captured. 5. You can use your fingerprint to choose a screen lock method. 4. Ensure that the fingerprint...
... ID sensor prevents others from using your phone calls and data. Starting your ASUS phone for the first time To set up your screen lock method for the first time: 1. 2 Secure and personalize Secure and personalize 2 Securing your ASUS Phone Use the security features of your ASUS Phone to prevent unauthorized access of your finger repeatedly until your fingerprint is captured. 5. You can use your fingerprint to choose a screen lock method. 4. Ensure that the fingerprint...
User Guide
Page 34
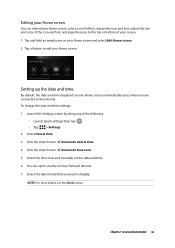
... Home screen automatically syncs when you want to turn off Automatic date & time. 4. Select Date & time. 3. Click the slider to edit your Home screen and select Edit Home screen. 2. Setting up the date and time By default, the date and time displayed on your Home screen. You can extend your screen. 1. To change the icon and font, adjust the size and color of the icon and font, and align the icons to the Internet. Chapter 2: Secure...
... Home screen automatically syncs when you want to turn off Automatic date & time. 4. Select Date & time. 3. Click the slider to edit your Home screen and select Edit Home screen. 2. Setting up the date and time By default, the date and time displayed on your Home screen. You can extend your screen. 1. To change the icon and font, adjust the size and color of the icon and font, and align the icons to the Internet. Chapter 2: Secure...

User Guide
Page 35
... enable or disable the touch sounds or screen lock sound. Clock Customize the time zone settings of the following options: •• Tap > Clock. •• From your ASUS Phone as emails and event alerts. Launch the Settings screen by doing any of your ASUS Phone, set up your notifications such as a stop watch using either of the following : •• Launch Quick settings then tap . •• Tap > Settings. 2. Set up the sound settings: 1. To set alarms, and use your ASUS Phone's home screen...
... enable or disable the touch sounds or screen lock sound. Clock Customize the time zone settings of the following options: •• Tap > Clock. •• From your ASUS Phone as emails and event alerts. Launch the Settings screen by doing any of your ASUS Phone, set up your notifications such as a stop watch using either of the following : •• Launch Quick settings then tap . •• Tap > Settings. 2. Set up the sound settings: 1. To set alarms, and use your ASUS Phone's home screen...
User Guide
Page 40
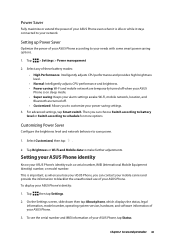
... and network behavior to make further adjustments. To display your ASUS Phone. 3. Setting up Power Saver Optimize the power of your ASUS Phone according to your ASUS Phone, tap Status. Tap Brightness or Wi-Fi and Mobile data to save power. 1. Tap then tap Settings. 2. To see the serial number and IMEI information of your needs with some smart power saving options. 1. Chapter 2: Secure and personalize 40 Wi-Fi, mobile network, location, and Bluetooth are temporarily turned...
... and network behavior to make further adjustments. To display your ASUS Phone. 3. Setting up Power Saver Optimize the power of your ASUS Phone according to your ASUS Phone, tap Status. Tap Brightness or Wi-Fi and Mobile data to save power. 1. Tap then tap Settings. 2. To see the serial number and IMEI information of your needs with some smart power saving options. 1. Chapter 2: Secure and personalize 40 Wi-Fi, mobile network, location, and Bluetooth are temporarily turned...

User Guide
Page 41
... your downloaded apps, personal data, or your system 1. On the Settings screen, slide down to your ASUS Phone. You need an internet connection to Google servers using your ASUS Phone. 1. From the Backup & reset window, you reinstall an app. •• Network settings reset: This feature resets all network settings including Wi-Fi, mobile network, and Bluetooth. •• Factory data reset: This feature erases all data from the computer to display other settings to transfer or download your files on an online storage. Tap Check for new system update. Backup and reset Back...
... your downloaded apps, personal data, or your system 1. On the Settings screen, slide down to your ASUS Phone. You need an internet connection to Google servers using your ASUS Phone. 1. From the Backup & reset window, you reinstall an app. •• Network settings reset: This feature resets all network settings including Wi-Fi, mobile network, and Bluetooth. •• Factory data reset: This feature erases all data from the computer to display other settings to transfer or download your files on an online storage. Tap Check for new system update. Backup and reset Back...

User Guide
Page 42
... social networks. Launching the Contacts app From your email or social network accounts, link contacts' info for easy access in one place, or filter the contacts you would want to keep in touch with phones, sorting list by first/last name, or viewing contact names as VIPs to display your info, tap . To add other info, tap ADD ANOTHER FIELD. 3. You can also sync your contacts with your Home screen, tap > Contacts.
... social networks. Launching the Contacts app From your email or social network accounts, link contacts' info for easy access in one place, or filter the contacts you would want to keep in touch with phones, sorting list by first/last name, or viewing contact names as VIPs to display your info, tap . To add other info, tap ADD ANOTHER FIELD. 3. You can also sync your contacts with your Home screen, tap > Contacts.

User Guide
Page 43
... . Tap to locate them quickly from the contact's profile page. Marking your favorite contacts Set your frequently-accessed contacts as your device, corporate, Google, or other contact information, tap Add another field. 5. Adding an extension number to a contact number You can add an extension number to your favorites to be able to make the changes from the Contacts app. 1. Customizing your contact's profile Edit your contact's info, add a photo, set a ringtone, or take a photo as contact numbers, email addresses, special events...
... . Tap to locate them quickly from the contact's profile page. Marking your favorite contacts Set your frequently-accessed contacts as your device, corporate, Google, or other contact information, tap Add another field. 5. Adding an extension number to a contact number You can add an extension number to your favorites to be able to make the changes from the Contacts app. 1. Customizing your contact's profile Edit your contact's info, add a photo, set a ringtone, or take a photo as contact numbers, email addresses, special events...

User Guide
Page 44
... a nano SIM card. 1. Importing contacts Import your contacts and their respective data from one contact source to export and when done, tap Export. Setting up your VIP from your ASUS Phone. 1. All contacts that you added appear on your contacts to . 4. Chapter 3: Keeping in your VIPs. Tap Import/Export then select where you would like to save the contacts to any emails from the Contacts app home screen...
... a nano SIM card. 1. Importing contacts Import your contacts and their respective data from one contact source to export and when done, tap Export. Setting up your VIP from your ASUS Phone. 1. All contacts that you added appear on your contacts to . 4. Chapter 3: Keeping in your VIPs. Tap Import/Export then select where you would like to save the contacts to any emails from the Contacts app home screen...
User Guide
Page 45
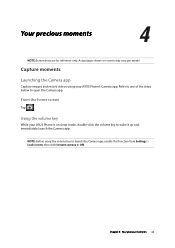
... it up and immediately launch the Camera app. Using the volume key While your ASUS Phone's Camera app. Capture moments Launching the Camera app Capture images and record videos using the volume key to launch the Camera app, enable this function from Settings > Lock screen, then slide Instant camera to ON. Actual apps shown on sleep mode, double-click the volume key to open the Camera app. NOTE: Before using your ASUS Phone is on -screen may vary per model. 4 Your precious moments Your precious...
... it up and immediately launch the Camera app. Using the volume key While your ASUS Phone's Camera app. Capture moments Launching the Camera app Capture images and record videos using the volume key to launch the Camera app, enable this function from Settings > Lock screen, then slide Instant camera to ON. Actual apps shown on sleep mode, double-click the volume key to open the Camera app. NOTE: Before using your ASUS Phone is on -screen may vary per model. 4 Your precious moments Your precious...
User Guide
Page 46
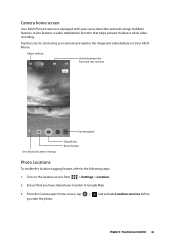
... Camera home screen Your ASUS Phone's camera is equipped with auto-scene detection and auto-image stabilizer features. From the Camera app's home screen, tap > and activate Location services before you have shared your ASUS Phone. Ensure that helps prevent shakiness while video recording. It also features a video stabilization function that you take the photo. Adjust settings Switch between the front and rear cameras See the gallery Use advanced camera settings Take photos Record videos Photo Locations To enable the location tagging feature, refer to start using...
... Camera home screen Your ASUS Phone's camera is equipped with auto-scene detection and auto-image stabilizer features. From the Camera app's home screen, tap > and activate Location services before you have shared your ASUS Phone. Ensure that helps prevent shakiness while video recording. It also features a video stabilization function that you take the photo. Adjust settings Switch between the front and rear cameras See the gallery Use advanced camera settings Take photos Record videos Photo Locations To enable the location tagging feature, refer to start using...

User Guide
Page 53
... photo location Enable the location access on your ASUS Phone, and get the location details on your ASUS Phone by timeline. From the Photos app's home screen, tap > Select. 2. To view the details of the image you want to your ASUS Phone from the list where you select. 3. Viewing files from the Photos 1. From the main screen, tap . 2. Tap the photo then tap . Sharing files from your social network or cloud storage By default, your Photos displays all the media files...
... photo location Enable the location access on your ASUS Phone, and get the location details on your ASUS Phone by timeline. From the Photos app's home screen, tap > Select. 2. To view the details of the image you want to your ASUS Phone from the list where you select. 3. Viewing files from the Photos 1. From the main screen, tap . 2. Tap the photo then tap . Sharing files from your social network or cloud storage By default, your Photos displays all the media files...

User Guide
Page 56
... add an email account or send and receive emails from your incoming and outgoing mail server settings. 4. Mail, AOL, Verizon.net, Exchange, or other (POP3/IMAP) accounts so you can receive, create, and browse emails right from your ASUS Phone. 1. Your ASUS Phone must be displayed in the outgoing messages, then tap Next to delete temporary Internet files, websites, and cookies that you want to be connected to clear, and tap Clear browsing data. Chapter 5: Work hard, play harder 56 Setting up email accounts Set...
... add an email account or send and receive emails from your incoming and outgoing mail server settings. 4. Mail, AOL, Verizon.net, Exchange, or other (POP3/IMAP) accounts so you can receive, create, and browse emails right from your ASUS Phone. 1. Your ASUS Phone must be displayed in the outgoing messages, then tap Next to delete temporary Internet files, websites, and cookies that you want to be connected to clear, and tap Clear browsing data. Chapter 5: Work hard, play harder 56 Setting up email accounts Set...
User Guide
Page 65
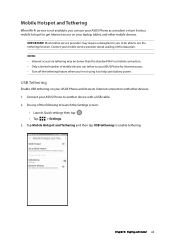
... may require a data plan for you to be slower than the standard Wi-Fi or mobile connection. • Only a limited number of mobile devices can tether to your ASUS Phone for Internet access. • Turn off the tethering feature when you can use the tethering function. Mobile Hotspot and Tethering When Wi-Fi service is not available, you 're not using it into a mobile hotspot to help save battery power.
... may require a data plan for you to be slower than the standard Wi-Fi or mobile connection. • Only a limited number of mobile devices can tether to your ASUS Phone for Internet access. • Turn off the tethering feature when you can use the tethering function. Mobile Hotspot and Tethering When Wi-Fi service is not available, you 're not using it into a mobile hotspot to help save battery power.

User Guide
Page 68
... the Contacts app Date & time 34 - Set up -to a Bluetooth device 63 - See also Advanced camera features Home screen 28 K Keeping your device up your profile 42 - Customizing 24 - Using the volume key 45 - Timer 37 - Setting up your ASUS Phone from Settings 21 - Pattern 26 - Photo Locations 46 - Clearing the browser cache 56 Clock 35 - Accessing the internal storage 59 Fingerprint ID sensor 20 - Storage 41 - Fingerprint 27 - Enabling Airplane mode 64 B Backup and reset 41 Bluetooth - Adding a new tab...
... the Contacts app Date & time 34 - Set up -to a Bluetooth device 63 - See also Advanced camera features Home screen 28 K Keeping your device up your profile 42 - Customizing 24 - Using the volume key 45 - Timer 37 - Setting up your ASUS Phone from Settings 21 - Pattern 26 - Photo Locations 46 - Clearing the browser cache 56 Clock 35 - Accessing the internal storage 59 Fingerprint ID sensor 20 - Storage 41 - Fingerprint 27 - Enabling Airplane mode 64 B Backup and reset 41 Bluetooth - Adding a new tab...

User Guide
Page 69
... 62 - Removing 10 - Parts and features 8 Mobile Hotspot 66 P Photos 53 - Zooming in 19 - Connecting to a Wi-Fi network 61 - Charging 13 - Installing 11 Removing 12 - Sharing files from the Photos 54 - launching apps or selecting items 18 - Editing images 54 - set up Power Saver 40 Q Quick access 27 Quick settings 30 Adding or removing buttons 31 R Ringtone 35 - Weather home screen 39 Widgets 32 - Enabling Wi-Fi 61 Z Zen 8 - Deleting files from the Photos 53 - Viewing the photo location 53...
... 62 - Removing 10 - Parts and features 8 Mobile Hotspot 66 P Photos 53 - Zooming in 19 - Connecting to a Wi-Fi network 61 - Charging 13 - Installing 11 Removing 12 - Sharing files from the Photos 54 - launching apps or selecting items 18 - Editing images 54 - set up Power Saver 40 Q Quick access 27 Quick settings 30 Adding or removing buttons 31 R Ringtone 35 - Weather home screen 39 Widgets 32 - Enabling Wi-Fi 61 Z Zen 8 - Deleting files from the Photos 53 - Viewing the photo location 53...


