
User Guide
Page 9
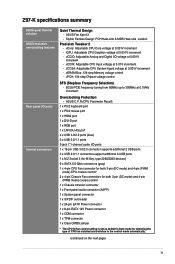
vDRAM Bus: 124-step Memory voltage control - vCCIN: Adjustable CPU Input voltage at 0.001V increment - Z97-K specifications summary ASUS quiet thermal solution ASUS exclusive overclocking features Rear panel I /O voltage at 0.001V increment - Stylish Fanless Design: PCH Heat-sink & MOS Heat-sink solution Precision Tweaker 2 - vCCIO: Adjustable Analog and Digital I /O ports ...
vDRAM Bus: 124-step Memory voltage control - vCCIN: Adjustable CPU Input voltage at 0.001V increment - Z97-K specifications summary ASUS quiet thermal solution ASUS exclusive overclocking features Rear panel I /O voltage at 0.001V increment - Stylish Fanless Design: PCH Heat-sink & MOS Heat-sink solution Precision Tweaker 2 - vCCIO: Adjustable Analog and Digital I /O ports ...
User Guide
Page 18
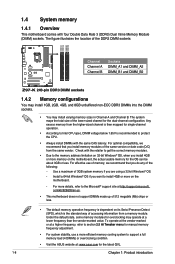
...Check with the retailer to get the correct memory modules. • Due to support a full memory load (4 DIMMs) or overclocking condition. • Visit the ASUS website at a higher frequency, refer to section 2.5 Ai Tweaker menu for manual memory frequency adjustment. • For system stability,.... Use a maximum of the DDR3 DIMM sockets: DIMM_A1 DIMM_A2 DIMM_B1 DIMM_B2 Channel Sockets Channel A DIMM_A1 and DIMM_A2 Channel B DIMM_B1 and DIMM_B2 Z97-K Z97-K 240-pin DDR3 DIMM sockets 1.4.2 Memory configurations You may install 1GB, 2GB, 4GB, and 8GB unbuffered non-ECC DDR3 DIMMs into the ...
...Check with the retailer to get the correct memory modules. • Due to support a full memory load (4 DIMMs) or overclocking condition. • Visit the ASUS website at a higher frequency, refer to section 2.5 Ai Tweaker menu for manual memory frequency adjustment. • For system stability,.... Use a maximum of the DDR3 DIMM sockets: DIMM_A1 DIMM_A2 DIMM_B1 DIMM_B2 Channel Sockets Channel A DIMM_A1 and DIMM_A2 Channel B DIMM_B1 and DIMM_B2 Z97-K Z97-K 240-pin DDR3 DIMM sockets 1.4.2 Memory configurations You may install 1GB, 2GB, 4GB, and 8GB unbuffered non-ECC DDR3 DIMMs into the ...
User Guide
Page 22
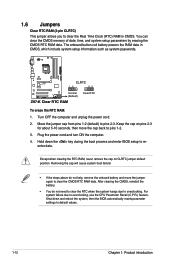
..., then move the jumper again to clear the CMOS RTC RAM data. Shut down the key during the boot process and enter BIOS setup to overclocking. Plug the power cord and turn ON the computer. 4. Removing the cap will cause system boot failure! • If the steps above do not need... to clear the RTC when the system hangs due to reenter data. CLRTC Z97-K 12 23 Normal (Default) Z97-K Clear RTC RAM Clear RTC To erase the RTC RAM: 1. Move the jumper cap from pins 1-2 (default) to overclocking, use the CPU Parameter Recall (C.P.R.) feature.
..., then move the jumper again to clear the CMOS RTC RAM data. Shut down the key during the boot process and enter BIOS setup to overclocking. Plug the power cord and turn ON the computer. 4. Removing the cap will cause system boot failure! • If the steps above do not need... to clear the RTC when the system hangs due to reenter data. CLRTC Z97-K 12 23 Normal (Default) Z97-K Clear RTC RAM Clear RTC To erase the RTC RAM: 1. Move the jumper cap from pins 1-2 (default) to overclocking, use the CPU Parameter Recall (C.P.R.) feature.
User Guide
Page 41
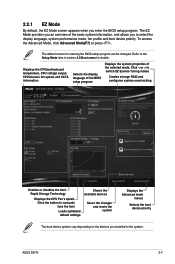
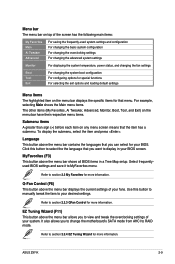
Refer to switch EZ System Tuning modes Creates storage RAID and configures system overclocking Enables or disables the Intel Rapid Storage Technology Displays the CPU Fan's speed. 2.2.1 EZ Mode By default, the EZ Mode screen appears when you to ... the display language of the BIOS setup program Displays the system properties of the basic system information, and allows you enter the BIOS setup program. ASUS Z97-K 2-7 The default screen for details. Click < or > to the Setup Mode item in section 2.8 Boot menu for entering the BIOS setup program can be changed...
Refer to switch EZ System Tuning modes Creates storage RAID and configures system overclocking Enables or disables the Intel Rapid Storage Technology Displays the CPU Fan's speed. 2.2.1 EZ Mode By default, the EZ Mode screen appears when you to ... the display language of the BIOS setup program Displays the system properties of the basic system information, and allows you enter the BIOS setup program. ASUS Z97-K 2-7 The default screen for details. Click < or > to the Setup Mode item in section 2.8 Boot menu for entering the BIOS setup program can be changed...
User Guide
Page 43
...the motherboard's SATA mode from AHCI to RAID mode. Select frequentlyused BIOS settings and save it to section 2.3 My Favorites for more information. ASUS Z97-K 2-9 For example, selecting Main shows the Main menu items. The other items (My Favorites, Ai Tweaker, Advanced, Monitor, Boot, ... Ai Tweaker Advanced For saving the frequently-used system settings and configuration For changing the basic system configuration For changing the overclocking settings For changing the advanced system settings Monitor For displaying the system temperature, power status, and changing the fan settings ...
...the motherboard's SATA mode from AHCI to RAID mode. Select frequentlyused BIOS settings and save it to section 2.3 My Favorites for more information. ASUS Z97-K 2-9 For example, selecting Main shows the Main menu items. The other items (My Favorites, Ai Tweaker, Advanced, Monitor, Boot, ... Ai Tweaker Advanced For saving the frequently-used system settings and configuration For changing the basic system configuration For changing the overclocking settings For changing the advanced system settings Monitor For displaying the system temperature, power status, and changing the fan settings ...
User Guide
Page 47
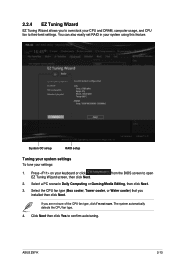
... installed then click Next. Click Next then click Yes to open 2. You can also easily set RAID in your settings: 1. ASUS Z97-K 2-13 2.2.4 EZ Tuning Wizard EZ Tuning Wizard allows you to overclock your keyboard or click EZ Tuning Wizard screen, then click Next. Press on your CPU and DRAM, computer usage, and...
... installed then click Next. Click Next then click Yes to open 2. You can also easily set RAID in your settings: 1. ASUS Z97-K 2-13 2.2.4 EZ Tuning Wizard EZ Tuning Wizard allows you to overclock your keyboard or click EZ Tuning Wizard screen, then click Next. Press on your CPU and DRAM, computer usage, and...
User Guide
Page 53
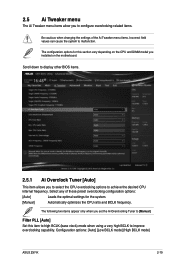
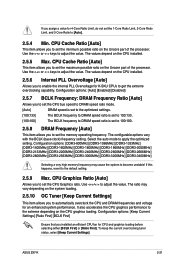
... on the motherboard. 2.5 Ai Tweaker menu The Ai Tweaker menu items allow you set the Ai Overclocking Tuner to [Manual]. Configuration options: [Auto] [Low BCLK mode] [High BCLK mode] ASUS Z97-K 2-19 Filter PLL [Auto] Set this section vary depending on the CPU and DIMM model you... to select the CPU overclocking options to achieve the desired CPU internal frequency. Scroll down to improve overclocking capability. Select any of the Ai Tweaker menu...
... on the motherboard. 2.5 Ai Tweaker menu The Ai Tweaker menu items allow you set the Ai Overclocking Tuner to [Manual]. Configuration options: [Auto] [Low BCLK mode] [High BCLK mode] ASUS Z97-K 2-19 Filter PLL [Auto] Set this section vary depending on the CPU and DIMM model you... to select the CPU overclocking options to achieve the desired CPU internal frequency. Scroll down to improve overclocking capability. Select any of the Ai Tweaker menu...
User Guide
Page 54
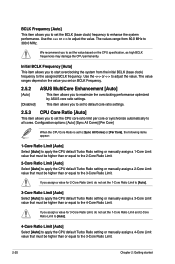
...set to default core ratio settings. 2.5.3 CPU Core Ratio [Auto] This item allows you to start overclocking the system from 80.0 MHz to 300.0 MHz. Initial BCLK Frequency [Auto] This item allows you ...must be higher than or equal to maximize the oveclocking performance optimized by ASUS core ratio settings. BCLK Frequency [Auto] This item allows you to set the value based on BCLK Frequency.... 2.5.2 [Auto] [Disabled] ASUS MultiCore Enhancement [Auto] This item allows you assign a value for 2-Core Ratio Limit, do not...
...set to default core ratio settings. 2.5.3 CPU Core Ratio [Auto] This item allows you to start overclocking the system from 80.0 MHz to 300.0 MHz. Initial BCLK Frequency [Auto] This item allows you ...must be higher than or equal to maximize the oveclocking performance optimized by ASUS core ratio settings. BCLK Frequency [Auto] This item allows you to set the value based on BCLK Frequency.... 2.5.2 [Auto] [Disabled] ASUS MultiCore Enhancement [Auto] This item allows you assign a value for 2-Core Ratio Limit, do not...
User Guide
Page 55
...the internal PLL Overvoltage for K-SKU CPUs to the default setting. 2.5.9 Max. If this happens, revert to get the extreme overclocking capability. It also accelerates the CPU graphics performance to adjust the value. Use the or keys to the extreme depending on the... To keep the current overclocking tuner status, select [Keep Current Settings]. CPU Cache Ratio [Auto] This item allows you to set the 1-Core Ratio Limit, 2-Core Ratio Limit, and 3-Core Ratio to set the maximum possible ratio on the CPU installed. 2.5.5 Max. ASUS Z97-K 2-21 Configuration options:...
...the internal PLL Overvoltage for K-SKU CPUs to the default setting. 2.5.9 Max. If this happens, revert to get the extreme overclocking capability. It also accelerates the CPU graphics performance to adjust the value. Use the or keys to the extreme depending on the... To keep the current overclocking tuner status, select [Keep Current Settings]. CPU Cache Ratio [Auto] This item allows you to set the 1-Core Ratio Limit, 2-Core Ratio Limit, and 3-Core Ratio to set the maximum possible ratio on the CPU installed. 2.5.5 Max. ASUS Z97-K 2-21 Configuration options:...
User Guide
Page 56
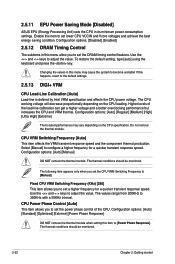
...Power Phase Control [Auto] This item allows you set the power phase control of the load-line calibration can get a higher voltage and a better overclocking performance but increases the CPU and VRM thermal. Enable this menu allow you to the default settings. 2.5.13 DIGI+ VRM CPU Load-Line Calibration [...Use the and keys to adjust the value. If this menu may vary depending on the CPU loading. 2.5.11 EPU Power Saving Mode [Disabled] ASUS EPU (Energy Processing Unit) sets the CPU in this happens, revert to set the DRAM timing control features. The values range from 200KHz to [...
...Power Phase Control [Auto] This item allows you set the power phase control of the load-line calibration can get a higher voltage and a better overclocking performance but increases the CPU and VRM thermal. Enable this menu allow you to the default settings. 2.5.13 DIGI+ VRM CPU Load-Line Calibration [...Use the and keys to adjust the value. If this menu may vary depending on the CPU loading. 2.5.11 EPU Power Saving Mode [Disabled] ASUS EPU (Energy Processing Unit) sets the CPU in this happens, revert to set the DRAM timing control features. The values range from 200KHz to [...
User Guide
Page 57
... [Enabled] This item allows you to configure the total power range, and extends the overclocking frequency range simultaneously. Configuration options: [Auto] [100%] [110%] [120%] [130%] [140%] Choose a higher value when overclocking, or under a high CPU loading for maximum performance. ASUS Z97-K 2-23 Configuration options: [Disabled] [Enabled] The following item appears only when you set...
... [Enabled] This item allows you to configure the total power range, and extends the overclocking frequency range simultaneously. Configuration options: [Auto] [100%] [110%] [120%] [130%] [140%] Choose a higher value when overclocking, or under a high CPU loading for maximum performance. ASUS Z97-K 2-23 Configuration options: [Disabled] [Enabled] The following item appears only when you set...
User Guide
Page 58
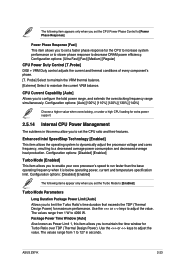
... Control Thermal Feedback [Auto] Allows your system to improve the power saving mode on the Fully Integrated Voltage Regulator as Power Limit 2, this item when overclocking. We recommend you to improve the power rating when the CPU is set a higher current limit to increase or decrease the switching frequency of the... rapid protection when the package power exceeds the Power Limit 1. CPU Integrated VR Current Limit [Auto] Allows you to prevent frequency and power throttling when overclocking. The values range from 1 W to adjust the value.
... Control Thermal Feedback [Auto] Allows your system to improve the power saving mode on the Fully Integrated Voltage Regulator as Power Limit 2, this item when overclocking. We recommend you to improve the power rating when the CPU is set a higher current limit to increase or decrease the switching frequency of the... rapid protection when the package power exceeds the Power Limit 1. CPU Integrated VR Current Limit [Auto] Allows you to prevent frequency and power throttling when overclocking. The values range from 1 W to adjust the value.
User Guide
Page 59
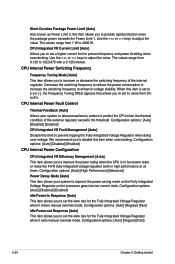
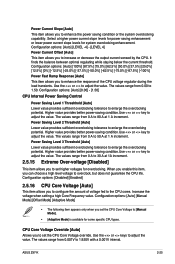
...the current threshold. When you enable this item, you can choose a high level voltage to adjust the value. ASUS Z97-K 2-25 Use the or to overclock, but does not guarantee the CPU life. Higher value provides better power-saving condition.Use or key to adjust .... Higher value provides better power-saving condition.Use or key to set the CPU Core Voltage to enhance the power saving condition or the system overclocking capabiltity. The values range from 0 A to the CPU cores. Configuration options: [Auto] [100%] [87.5%] [75.0%] [62.5%] [50.0%] [37.5%] [25.0%] [12.5%] [0%] [-...
...the current threshold. When you enable this item, you can choose a high level voltage to adjust the value. ASUS Z97-K 2-25 Use the or to overclock, but does not guarantee the CPU life. Higher value provides better power-saving condition.Use or key to adjust .... Higher value provides better power-saving condition.Use or key to set the CPU Core Voltage to enhance the power saving condition or the system overclocking capabiltity. The values range from 0 A to the CPU cores. Configuration options: [Auto] [100%] [87.5%] [75.0%] [62.5%] [50.0%] [37.5%] [25.0%] [12.5%] [0%] [-...
User Guide
Page 62
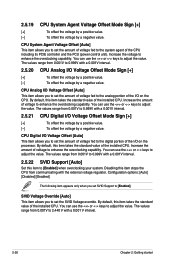
...] [Disabled] [Enabled] The following item appears only when you set the amount of the I/O on the processor. Increase the voltage to enhance the overclocking capability. CPU Analog I /O Voltage Offset Mode Sign [+] [+] To offset the voltage by a positive value. [-] To offset the voltage by a ...fed to 0.999V with a 0.001V interval. 2.5.22 SVID Support [Auto] Set this item takes the standard value of voltage to [Enabled] when overclocking your system. By default, this item takes the standard value of the I /O Voltage Offset Mode Sign [+] [+] To offset the voltage by a...
...] [Disabled] [Enabled] The following item appears only when you set the amount of the I/O on the processor. Increase the voltage to enhance the overclocking capability. CPU Analog I /O Voltage Offset Mode Sign [+] [+] To offset the voltage by a positive value. [-] To offset the voltage by a ...fed to 0.999V with a 0.001V interval. 2.5.22 SVID Support [Auto] Set this item takes the standard value of voltage to [Enabled] when overclocking your system. By default, this item takes the standard value of the I /O Voltage Offset Mode Sign [+] [+] To offset the voltage by a...
User Guide
Page 63
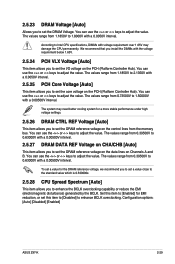
...1.1850V to 2.1350V with a 0.00500V interval. You can use the or keys to adjust the value. Configuration options: [Auto] [Disabled] [Enabled] ASUS Z97-K 2-29 You can use the or keys to adjust the value. Set this item to [Enabled] for a more stable performance under high voltage settings.... The values range from 0.73500V to 0.63000V with a 0.0050V interval. 2.5.25 PCH Core Voltage [Auto] This item allows you to enhance BCLK overclocking. To set a value for the DRAM reference voltage, we recommend you to set a value close to the standard value which is 0.500000x. 2.5.28...
...1.1850V to 2.1350V with a 0.00500V interval. You can use the or keys to adjust the value. Configuration options: [Auto] [Disabled] [Enabled] ASUS Z97-K 2-29 You can use the or keys to adjust the value. Set this item to [Enabled] for a more stable performance under high voltage settings.... The values range from 0.73500V to 0.63000V with a 0.0050V interval. 2.5.25 PCH Core Voltage [Auto] This item allows you to enhance BCLK overclocking. To set a value for the DRAM reference voltage, we recommend you to set a value close to the standard value which is 0.500000x. 2.5.28...

User Guide
Page 84
...to save profile from Profile Allows you to eight, press , and then select Yes. The Overclocking Profile items show Not assigned if no profile is created. For more details, see section 2.1.2 ASUS EZ Flash 2. 2.9.2 Setup Animator [Enabled] Enables or disables the Setup animator. Key in ... started 2.9 Tool menu The Tool menu items allow you to store or load multiple BIOS settings. Configuration options: [Disabled] [Enabled] 2.9.3 ASUS Overclocking Profile This item allows you update the BIOS file only coming from one to load the previous BIOS settings saved in a profile number from...
...to save profile from Profile Allows you to eight, press , and then select Yes. The Overclocking Profile items show Not assigned if no profile is created. For more details, see section 2.1.2 ASUS EZ Flash 2. 2.9.2 Setup Animator [Enabled] Enables or disables the Setup animator. Key in ... started 2.9 Tool menu The Tool menu items allow you to store or load multiple BIOS settings. Configuration options: [Disabled] [Enabled] 2.9.3 ASUS Overclocking Profile This item allows you update the BIOS file only coming from one to load the previous BIOS settings saved in a profile number from...


