
-Manual
Page 2
...TO CHANGE AT ANY TIME WITHOUT NOTICE, AND SHOULD NOT BE CONSTRUED AS A COMMITMENT BY ASUS. E5743 First Edition V1 March 2010 Copyright © 2010 ASUSTeK COMPUTER INC. ASUS PROVIDES THIS MANUAL "AS IS" WITHOUT WARRANTY OF ANY KIND, EITHER EXPRESS OR IMPLIED, INCLUDING BUT NOT ...to the owners' benefit, without the express written permission of this manual may or may be reproduced, transmitted, transcribed, stored in a retrieval system, or translated into any means, except documentation kept by ASUS; ASUS ASSUMES NO RESPONSIBILITY OR LIABILITY FOR ANY ERRORS OR INACCURACIES THAT MAY ...
...TO CHANGE AT ANY TIME WITHOUT NOTICE, AND SHOULD NOT BE CONSTRUED AS A COMMITMENT BY ASUS. E5743 First Edition V1 March 2010 Copyright © 2010 ASUSTeK COMPUTER INC. ASUS PROVIDES THIS MANUAL "AS IS" WITHOUT WARRANTY OF ANY KIND, EITHER EXPRESS OR IMPLIED, INCLUDING BUT NOT ...to the owners' benefit, without the express written permission of this manual may or may be reproduced, transmitted, transcribed, stored in a retrieval system, or translated into any means, except documentation kept by ASUS; ASUS ASSUMES NO RESPONSIBILITY OR LIABILITY FOR ANY ERRORS OR INACCURACIES THAT MAY ...

-Manual
Page 8
If you add a device. • Before connecting or removing signal cables from the motherboard, ensure that all power cables are connected. Check local regulations for the devices are unplugged before the signal cables are unplugged. • Seek ...dust, humidity, and temperature extremes. If you are not damaged. Operation safety • Before installing the motherboard and adding devices on a stable surface. • If you are using the product, make sure all the manuals that came with the product, contact a qualified service technician or your local power company. • If...
If you add a device. • Before connecting or removing signal cables from the motherboard, ensure that all power cables are connected. Check local regulations for the devices are unplugged before the signal cables are unplugged. • Seek ...dust, humidity, and temperature extremes. If you are not damaged. Operation safety • Before installing the motherboard and adding devices on a stable surface. • If you are using the product, make sure all the manuals that came with the product, contact a qualified service technician or your local power company. • If...

-Manual
Page 10
... less-than and greaterthan sign means that you must type the command exactly as shown, then supply the required item or value enclosed in this manual. Conventions used throughout this guide To make sure that you must press the enclosed key. Example: means that you complete a task. NOTE: Tips and additional...
... less-than and greaterthan sign means that you must type the command exactly as shown, then supply the required item or value enclosed in this manual. Conventions used throughout this guide To make sure that you must press the enclosed key. Example: means that you complete a task. NOTE: Tips and additional...
-Manual
Page 105
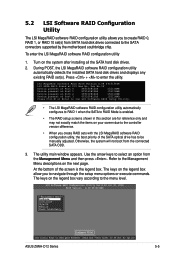
...automatically detects the installed SATA hard disk drives and displays any existing RAID set (s) from SATA hard disk drives connected to be manually adjusted. Use the arrow keys to navigate through the setup menu options or execute commands. The keys on your screen due ... SATA connectors supported by the motherboard southbridge chip. Otherwise, the system will not boot from the connected SATA ODD. 3. To enter the LSI MegaRAID software RAID configuration utility 1. Refer to Navigate Between Items And Press Enter To Select An Option ASUS Z8NH-D12 Series 5-5 The utility main ...
...automatically detects the installed SATA hard disk drives and displays any existing RAID set (s) from SATA hard disk drives connected to be manually adjusted. Use the arrow keys to navigate through the setup menu options or execute commands. The keys on your screen due ... SATA connectors supported by the motherboard southbridge chip. Otherwise, the system will not boot from the connected SATA ODD. 3. To enter the LSI MegaRAID software RAID configuration utility 1. Refer to Navigate Between Items And Press Enter To Select An Option ASUS Z8NH-D12 Series 5-5 The utility main ...

-Manual
Page 106
... create a RAID 0, RAID 1, or RAID 10 set using two types of a created RAID set 5.2.1 Creating a RAID set The LSI Software RAID Configuration Utility allows you manually set the virtual drive parameters. In Easy Configuration, the virtual drive parameters are set automatically. Using Easy Configuration To create a RAID set using the Easy...
... create a RAID 0, RAID 1, or RAID 10 set using two types of a created RAID set 5.2.1 Creating a RAID set The LSI Software RAID Configuration Utility allows you manually set the virtual drive parameters. In Easy Configuration, the virtual drive parameters are set automatically. Using Easy Configuration To create a RAID set using the Easy...

-Manual
Page 117
... A00-00 1 FAIL A00-01 Port # 1 DISK 77247MB HDS728080PLA380 PF20A60A SPACE-(De)Select,F10-Start Rebuild,F2-Drive Information,F3-View Virtual Drives ASUS Z8NH-D12 Series 5-17 To rebuild a failed hard disk drive 1. From the Management Menu, select Rebuild, and then press . LSI Software RAID Configuration Utility... connected to rebuild, and then press . Select the drive you want to the SATA ports. 5.2.4 Rebuilding failed drives You can manually rebuild failed hard disk drives using the Rebuild command in the Management Menu. LSI Software RAID Configuration Utility Ver A.60 Jul 30,...
... A00-00 1 FAIL A00-01 Port # 1 DISK 77247MB HDS728080PLA380 PF20A60A SPACE-(De)Select,F10-Start Rebuild,F2-Drive Information,F3-View Virtual Drives ASUS Z8NH-D12 Series 5-17 To rebuild a failed hard disk drive 1. From the Management Menu, select Rebuild, and then press . LSI Software RAID Configuration Utility... connected to rebuild, and then press . Select the drive you want to the SATA ports. 5.2.4 Rebuilding failed drives You can manually rebuild failed hard disk drives using the Rebuild command in the Management Menu. LSI Software RAID Configuration Utility Ver A.60 Jul 30,...

-Manual
Page 124
When you enable WriteCache, you may manually enable the RAID controller's WriteCache option after creating a RAID set to turn on the option. The WriteCache function is recommended for RAID 1 and RAID 10 ...
When you enable WriteCache, you may manually enable the RAID controller's WriteCache option after creating a RAID set to turn on the option. The WriteCache function is recommended for RAID 1 and RAID 10 ...

-Manual
Page 140
... the Windows® OS installation CD. Windows Setup Press F6 if you need to specify additional mass storage devices for which you have chosen to manually specify an adapter. The Window® Setup starts. 2. Press when the message "Press F6 if you need to specify an additional device. Windows Setup Setup...
... the Windows® OS installation CD. Windows Setup Press F6 if you need to specify additional mass storage devices for which you have chosen to manually specify an adapter. The Window® Setup starts. 2. Press when the message "Press F6 if you need to specify an additional device. Windows Setup Setup...

-Manual
Page 145
Installation Method What type of the type needed for this installation type. Local CDROM Hard drive NFS image FTP HTTP OK Back 10. 9. Press to be installed? Would you like to select OK. Select the media and press to manually select your driver or use a driver disk? No driver found Unable to select OK. Select driver Use a driver disk Back ASUS Z8NH-D12 Series 6-11 Select the media and press to find any devices of media contains the packages to continue. Press to continue.
Installation Method What type of the type needed for this installation type. Local CDROM Hard drive NFS image FTP HTTP OK Back 10. 9. Press to be installed? Would you like to select OK. Select the media and press to manually select your driver or use a driver disk? No driver found Unable to select OK. Select driver Use a driver disk Back ASUS Z8NH-D12 Series 6-11 Select the media and press to find any devices of media contains the packages to continue. Press to continue.

-Manual
Page 153
... a Windows operating system. You need to the optical drive. To install the Intel® chipset software: 1. Insert the motherboard/system support DVD to manually install the Intel® chipset software on the system. Click the item Intel Chipset Device Software from the menu. ASUS Z8NH-D12 Series 6-19 Restart the computer, then log on with Administrator privileges. 2. The...
... a Windows operating system. You need to the optical drive. To install the Intel® chipset software: 1. Insert the motherboard/system support DVD to manually install the Intel® chipset software on the system. Click the item Intel Chipset Device Software from the menu. ASUS Z8NH-D12 Series 6-19 Restart the computer, then log on with Administrator privileges. 2. The...

-Manual
Page 161
... in your computer. 4. When the ASPEED InstallShield Wizard window appears, click Next to manually install the ASPEED display driver on a Windows® operating system. You need to continue. Click ASPEED AST2050 Display Driver. 4. ASUS Z8NH-D12 Series 6-27 Insert the motherboard/system support DVD to install the ASPEED display driver. 6.4 Display driver installation This section...
... in your computer. 4. When the ASPEED InstallShield Wizard window appears, click Next to manually install the ASPEED display driver on a Windows® operating system. You need to continue. Click ASPEED AST2050 Display Driver. 4. ASUS Z8NH-D12 Series 6-27 Insert the motherboard/system support DVD to install the ASPEED display driver. 6.4 Display driver installation This section...
-Manual
Page 164
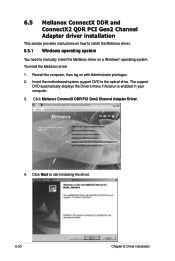
...support DVD automatically displays the Drivers menu if Autorun is enabled in your computer. 3. Click Mellanox ConnectX DDR PCI Gen2 Channel Adapter Driver. 4. Insert the motherboard/system support DVD to start installing the driver. 6-30 Chapter 6: Driver installation Click Next to the optical drive. To install the Mellanox driver 1. 6.5 Mellanox... PCI Gen2 Channel Adapter driver installation This section provides instructions on how to install the Mellanox driver. 6.5.1 Windows operating system You need to manually install the Mellanox driver on with Administrator privileges. 2.
...support DVD automatically displays the Drivers menu if Autorun is enabled in your computer. 3. Click Mellanox ConnectX DDR PCI Gen2 Channel Adapter Driver. 4. Insert the motherboard/system support DVD to start installing the driver. 6-30 Chapter 6: Driver installation Click Next to the optical drive. To install the Mellanox driver 1. 6.5 Mellanox... PCI Gen2 Channel Adapter driver installation This section provides instructions on how to install the Mellanox driver. 6.5.1 Windows operating system You need to manually install the Mellanox driver on with Administrator privileges. 2.

-Manual
Page 168
... driver version and operating system. 6-34 Chapter 6: Driver installation For users using SUSE Linux Enterprise Server OS, follow the general instructions in this section to manually mount the Mellanox driver on the desktop and copy the latest Mellanox driver to the folder. Type the command line and mount the driver to...
... driver version and operating system. 6-34 Chapter 6: Driver installation For users using SUSE Linux Enterprise Server OS, follow the general instructions in this section to manually mount the Mellanox driver on the desktop and copy the latest Mellanox driver to the folder. Type the command line and mount the driver to...


