
User Guide
Page 2
...LOSS OF USE OR DATA, INTERRUPTION OF BUSINESS AND THE LIKE), EVEN IF ASUS HAS BEEN ADVISED OF THE POSSIBILITY OF SUCH DAMAGES ARISING FROM ANY DEFECT OR ERROR IN THIS MANUAL OR PRODUCT. ASUS ASSUMES NO RESPONSIBILITY OR LIABILITY FOR ANY ERRORS OR INACCURACIES THAT MAY APPEAR IN... THIS MANUAL, INCLUDING THE PRODUCTS AND SOFTWARE DESCRIBED IN IT. No part of ASUSTeK COMPUTER INC. ("ASUS"). SPECIFICATIONS AND INFORMATION CONTAINED IN THIS MANUAL ARE FURNISHED FOR INFORMATIONAL USE ONLY, AND ARE SUBJECT TO CHANGE AT...
...LOSS OF USE OR DATA, INTERRUPTION OF BUSINESS AND THE LIKE), EVEN IF ASUS HAS BEEN ADVISED OF THE POSSIBILITY OF SUCH DAMAGES ARISING FROM ANY DEFECT OR ERROR IN THIS MANUAL OR PRODUCT. ASUS ASSUMES NO RESPONSIBILITY OR LIABILITY FOR ANY ERRORS OR INACCURACIES THAT MAY APPEAR IN... THIS MANUAL, INCLUDING THE PRODUCTS AND SOFTWARE DESCRIBED IN IT. No part of ASUSTeK COMPUTER INC. ("ASUS"). SPECIFICATIONS AND INFORMATION CONTAINED IN THIS MANUAL ARE FURNISHED FOR INFORMATIONAL USE ONLY, AND ARE SUBJECT TO CHANGE AT...
User Guide
Page 8
... and staples away from connectors, slots, sockets and circuitry. • Avoid dust, humidity, and temperature extremes. Operation safety • Before installing the motherboard and adding devices on a stable surface. • If you encounter technical problems with the package. • Before using the product, ensure all power... supply is broken, do not try to fix it may become wet. • Place the product on it, carefully read all the manuals that all cables are correctly connected and the power cables are unplugged before using , contact your local power company. • If the...
... and staples away from connectors, slots, sockets and circuitry. • Avoid dust, humidity, and temperature extremes. Operation safety • Before installing the motherboard and adding devices on a stable surface. • If you encounter technical problems with the package. • Before using the product, ensure all power... supply is broken, do not try to fix it may become wet. • Place the product on it, carefully read all the manuals that all cables are correctly connected and the power cables are unplugged before using , contact your local power company. • If the...

User Guide
Page 10
... of the following symbols used in the less-than and greater-than sign means that you must press the enclosed key. Keys enclosed in this manual.
... of the following symbols used in the less-than and greater-than sign means that you must press the enclosed key. Keys enclosed in this manual.
User Guide
Page 107
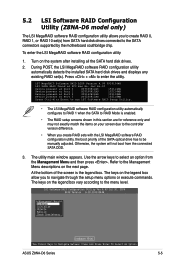
... the boot priority of the SATA optical drive has to the SATA connectors supported by the motherboard southbridge chip. LSI MegaRAID Software RAID BIOS Version A.08 09161344R LSI SATA RAID Found at...disk drives and displays any existing RAID set (s) from SATA hard disk drives connected to be manually adjusted. Refer to the menu level. At the bottom of the screen is enabled. •...drives. 2. Use the arrow keys to Navigate Between Items And Press Enter To Select An Option ASUS Z8NA-D6 Series 5-5 LSI Software RAID Configuration Utility Ver A.60 Jul 30, 2008 BIOS Version A.08....
... the boot priority of the SATA optical drive has to the SATA connectors supported by the motherboard southbridge chip. LSI MegaRAID Software RAID BIOS Version A.08 09161344R LSI SATA RAID Found at...disk drives and displays any existing RAID set (s) from SATA hard disk drives connected to be manually adjusted. Refer to the menu level. At the bottom of the screen is enabled. •...drives. 2. Use the arrow keys to Navigate Between Items And Press Enter To Select An Option ASUS Z8NA-D6 Series 5-5 LSI Software RAID Configuration Utility Ver A.60 Jul 30, 2008 BIOS Version A.08....

User Guide
Page 108
... you to check the data consistency of the virtual drives of a created RAID set 5.2.1 Creating a RAID set The LSI Software RAID Configuration Utility allows you manually set the virtual drive parameters. In New Configuration, you to create a RAID 0, RAID 1, or RAID 10 set using the Easy Configuration or the New Configuration...
... you to check the data consistency of the virtual drives of a created RAID set 5.2.1 Creating a RAID set The LSI Software RAID Configuration Utility allows you manually set the virtual drive parameters. In New Configuration, you to create a RAID 0, RAID 1, or RAID 10 set using the Easy Configuration or the New Configuration...
User Guide
Page 119
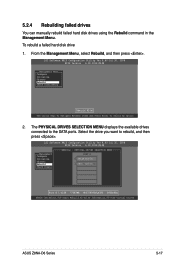
... 0 ONLIN A00-00 1 FAIL A00-01 Port # 1 DISK 77247MB HDS728080PLA380 PF20A60A SPACE-(De)Select,F10-Start Rebuild,F2-Drive Information,F3-View Virtual Drives ASUS Z8NA-D6 Series 5-17 From the Management Menu, select Rebuild, and then press . Select the drive you want to the SATA ports. LSI Software RAID Configuration Utility...Ver A.60 Jul 30, 2008 BIOS Version A.08.09161344R Management Menu Configure Initialize Objects Rebuild Check Consistency REBUILD - 5.2.4 Rebuilding failed drives You can manually rebuild failed hard disk drives using the Rebuild command in the Management Menu.
... 0 ONLIN A00-00 1 FAIL A00-01 Port # 1 DISK 77247MB HDS728080PLA380 PF20A60A SPACE-(De)Select,F10-Start Rebuild,F2-Drive Information,F3-View Virtual Drives ASUS Z8NA-D6 Series 5-17 From the Management Menu, select Rebuild, and then press . Select the drive you want to the SATA ports. LSI Software RAID Configuration Utility...Ver A.60 Jul 30, 2008 BIOS Version A.08.09161344R Management Menu Configure Initialize Objects Rebuild Check Consistency REBUILD - 5.2.4 Rebuilding failed drives You can manually rebuild failed hard disk drives using the Rebuild command in the Management Menu.

User Guide
Page 126
... Through) or On(Write Back) Use Cursor Keys To Navigate Between Items And Press Enter To Select An Option 3. When you enable WriteCache, you may manually enable the RAID controller's WriteCache option after creating a RAID set to turn on the option.
... Through) or On(Write Back) Use Cursor Keys To Navigate Between Items And Press Enter To Select An Option 3. When you enable WriteCache, you may manually enable the RAID controller's WriteCache option after creating a RAID set to turn on the option.
User Guide
Page 142
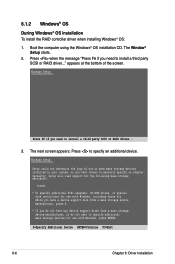
... the RAID controller driver when installing Windows® OS: 1. The next screen appears. S=Specify Additional Device ENTER=Continue F3=Exit 6-6 Chapter 6: Driver installation Press to manually specify an adapter. Boot the computer using the Windows® OS installation CD. The Window® Setup starts. 2. Windows Setup Setup could not determine the...
... the RAID controller driver when installing Windows® OS: 1. The next screen appears. S=Specify Additional Device ENTER=Continue F3=Exit 6-6 Chapter 6: Driver installation Press to manually specify an adapter. Boot the computer using the Windows® OS installation CD. The Window® Setup starts. 2. Windows Setup Setup could not determine the...

User Guide
Page 151
Insert the motherboard/system support DVD to manually install the Intel® chipset software on a Windows operating system. To install the Intel® chipset software: 1. Restart the computer, then log on the system. ASUS Z8NA-D6 6-15 Click the item Intel Chipset Device Software from the menu. You need to the optical drive. The support DVD...
Insert the motherboard/system support DVD to manually install the Intel® chipset software on a Windows operating system. To install the Intel® chipset software: 1. Restart the computer, then log on the system. ASUS Z8NA-D6 6-15 Click the item Intel Chipset Device Software from the menu. You need to the optical drive. The support DVD...

User Guide
Page 159
You need to the optical drive. To install the ASPEED display driver 1. Insert the motherboard/system support DVD to manually install the ASPEED display driver on a Windows® operating system. When the ASPEED InstallShield Wizard window appears, click Next to install the ASPEED display driver. 6.4 ... Autorun is enabled in your computer. 3. The Drivers menu if Autorun is enabled in your computer. Restart the computer, then log on with Administrator privileges. 2. ASUS Z8NA-D6 6-23
You need to the optical drive. To install the ASPEED display driver 1. Insert the motherboard/system support DVD to manually install the ASPEED display driver on a Windows® operating system. When the ASPEED InstallShield Wizard window appears, click Next to install the ASPEED display driver. 6.4 ... Autorun is enabled in your computer. 3. The Drivers menu if Autorun is enabled in your computer. Restart the computer, then log on with Administrator privileges. 2. ASUS Z8NA-D6 6-23


