User Guide
Page 4
...Z8NA-D6 model only 2-22 2.5.12 Installing the audio card 2-23 2.5.13 Connect Thermal sensor cable 2-23 2.6 Jumpers 2-24 2.7 Connectors 2-29 2.7.1 Rear panel connectors 2-29 2.7.2 Internal connectors 2-30 Chapter 3: Powering up 3.1 Starting up for the first time 3-3 3.2 Powering off the computer 3-4 3.2.1 Using the OS shut down function 3-4 Chapter 4: BIOS setup 4.1 Managing and updating your BIOS... 4-3 4.1.1 AFUDOS utility 4-3 4.1.2 ASUS CrashFree BIOS 3 utility 4-6 4.2 BIOS setup program 4-7 4.2.1 BIOS menu screen 4-8...
...Z8NA-D6 model only 2-22 2.5.12 Installing the audio card 2-23 2.5.13 Connect Thermal sensor cable 2-23 2.6 Jumpers 2-24 2.7 Connectors 2-29 2.7.1 Rear panel connectors 2-29 2.7.2 Internal connectors 2-30 Chapter 3: Powering up 3.1 Starting up for the first time 3-3 3.2 Powering off the computer 3-4 3.2.1 Using the OS shut down function 3-4 Chapter 4: BIOS setup 4.1 Managing and updating your BIOS... 4-3 4.1.1 AFUDOS utility 4-3 4.1.2 ASUS CrashFree BIOS 3 utility 4-6 4.2 BIOS setup program 4-7 4.2.1 BIOS menu screen 4-8...
User Guide
Page 9
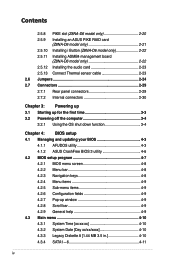
... provides instructions for setting up sequence and ways of shutting down the system. • Chapter 4: BIOS setup This chapter tells how to change system settings through the BIOS Setup menus. ASUS websites The ASUS website provides updated information on the motherboard. • Chapter 3: Powering up This chapter describes the power up , creating, and configuring RAID sets...
... provides instructions for setting up sequence and ways of shutting down the system. • Chapter 4: BIOS setup This chapter tells how to change system settings through the BIOS Setup menus. ASUS websites The ASUS website provides updated information on the motherboard. • Chapter 3: Powering up This chapter describes the power up , creating, and configuring RAID sets...
User Guide
Page 48
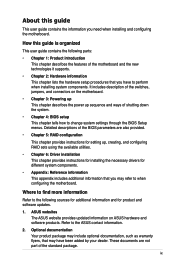
Prepare a USB flash disk that contains the original or latest BIOS for the motherboard (XXXXXX.ROM) and the AFUDOS.EXE utility. 2. Set the jumper back to pins 2-3. 3. To update the BIOS: 1. Insert the USB flash and turn on the system. 2-28 Chapter 2: Hardware information Turn on the system to quickly update or recover the BIOS settings when it becomes corrupted. 8. Shut down the system. 5. Set the jumper to pins 1-2. 6. Force BIOS recovery setting (3-pin RECOVERY1) This jumper allows you to update the BIOS. 4.
Prepare a USB flash disk that contains the original or latest BIOS for the motherboard (XXXXXX.ROM) and the AFUDOS.EXE utility. 2. Set the jumper back to pins 2-3. 3. To update the BIOS: 1. Insert the USB flash and turn on the system. 2-28 Chapter 2: Hardware information Turn on the system to quickly update or recover the BIOS settings when it becomes corrupted. 8. Shut down the system. 5. Set the jumper to pins 1-2. 6. Force BIOS recovery setting (3-pin RECOVERY1) This jumper allows you to update the BIOS. 4.

User Guide
Page 64
Chapter summary 4 4.1 Managing and updating your BIOS 4-1 4.2 BIOS setup program 4-7 4.3 Main menu 4-10 4.4 Advanced menu 4-17 4.5 Server menu 4-34 4.6 Boot menu 4-36 4.7 Exit menu 4-40 ASUS Z8NA-D6 Series
Chapter summary 4 4.1 Managing and updating your BIOS 4-1 4.2 BIOS setup program 4-7 4.3 Main menu 4-10 4.4 Advanced menu 4-17 4.5 Server menu 4-34 4.6 Boot menu 4-36 4.7 Exit menu 4-40 ASUS Z8NA-D6 Series

User Guide
Page 65
... mode using a bootable USB flash disk drive with the updated BIOS file. AFUDOS utility (Updates the BIOS in case you can use as shown. 1. A:\>afudos /oOLDBIOS1.rom Main filename Extension name ASUS Z8NA-D6 Series 4-3 Save a copy of the original motherboard BIOS file to manage and update the motherboard Basic Input/Output System (BIOS) setup: 1. This utility also allows you to copy...
... mode using a bootable USB flash disk drive with the updated BIOS file. AFUDOS utility (Updates the BIOS in case you can use as shown. 1. A:\>afudos /oOLDBIOS1.rom Main filename Extension name ASUS Z8NA-D6 Series 4-3 Save a copy of the original motherboard BIOS file to manage and update the motherboard Basic Input/Output System (BIOS) setup: 1. This utility also allows you to copy...

User Guide
Page 66
... the DOS prompt after copying the current BIOS file. ok A:\> The utility returns to file...... Boot the system in DOS mode, then at www.asus.com and download the latest BIOS file for the motherboard. A:\>afudos /i8036A0.ROM AMI Firmware Update Utility - Erasing flash ...... done Writing ...flash ...... 0x0008CC00 (9%) DO NOT shut down or reset the system while updating the BIOS to the USB flash disk drive...
... the DOS prompt after copying the current BIOS file. ok A:\> The utility returns to file...... Boot the system in DOS mode, then at www.asus.com and download the latest BIOS file for the motherboard. A:\>afudos /i8036A0.ROM AMI Firmware Update Utility - Erasing flash ...... done Writing ...flash ...... 0x0008CC00 (9%) DO NOT shut down or reset the system while updating the BIOS to the USB flash disk drive...

User Guide
Page 67
done Advance Check ...... Reboot the system from the hard disk drive. WARNING!! A:\>afudos /i8036A0.ROM AMI Firmware Update Utility - Version 1.19(ASUS V2.07(03.11.24BB)) Copyright (C) 2002 American Megatrends, Inc. Do not turn off power during flash BIOS Reading file ....... done Writing flash ...... done Verifying flash .... 5. All rights reserved. Erasing flash ...... done Please restart your computer A:\> ASUS Z8NA-D6 Series 4-5 The utility returns to the DOS prompt after the BIOS update process is completed. done Reading flash ......
done Advance Check ...... Reboot the system from the hard disk drive. WARNING!! A:\>afudos /i8036A0.ROM AMI Firmware Update Utility - Version 1.19(ASUS V2.07(03.11.24BB)) Copyright (C) 2002 American Megatrends, Inc. Do not turn off power during flash BIOS Reading file ....... done Writing flash ...... done Verifying flash .... 5. All rights reserved. Erasing flash ...... done Please restart your computer A:\> ASUS Z8NA-D6 Series 4-5 The utility returns to the DOS prompt after the BIOS update process is completed. done Reading flash ......

User Guide
Page 68
... not be the latest BIOS version for this utility. 4.1.2 ASUS CrashFree BIOS 3 utility The ASUS CrashFree BIOS 3 is an auto recovery tool that contains the updated BIOS file. The utility will automatically recover the BIOS. Visit the ASUS website at www.asus.com to download the latest BIOS file. 4-6 Chapter 4: BIOS setup You can update a corrupted BIOS file using this motherboard. It resets the system...
... not be the latest BIOS version for this utility. 4.1.2 ASUS CrashFree BIOS 3 utility The ASUS CrashFree BIOS 3 is an auto recovery tool that contains the updated BIOS file. The utility will automatically recover the BIOS. Visit the ASUS website at www.asus.com to download the latest BIOS file. 4-6 Chapter 4: BIOS setup You can update a corrupted BIOS file using this motherboard. It resets the system...

User Guide
Page 69
..., you can change the power management settings. Do this motherboard. ASUS Z8NA-D6 Series 4-7 Use the BIOS Setup program when you are installing a motherboard, reconfiguring your screen. • Visit the ASUS website (www.asus.com) to reconfigure your system using the provided utility described in section 4.1 Managing and updating your selections from the available options using this section are...
..., you can change the power management settings. Do this motherboard. ASUS Z8NA-D6 Series 4-7 Use the BIOS Setup program when you are installing a motherboard, reconfiguring your screen. • Visit the ASUS website (www.asus.com) to reconfigure your system using the provided utility described in section 4.1 Managing and updating your selections from the available options using this section are...

User Guide
Page 118
... the pop-up menu, and then press to abort initialization. LSI Software RAID Configuration Utility Ver A.60 Jul 30, 2008 BIOS Version A.08.09161344R Vitual Drive(1) Virtual Drive 0 Objects Management MAednaupter Configure Virtual Drive Initialize Physical Drive Objects Rebuild Check Consistency ...Select An Option 4. 3. View/Update PYaersameters No Initilize Will Destroy Data On Selected VD(s) Use Cursor Keys To Navigate Between Items And Press Enter To Select An Option 5. LSI Software RAID Configuration Utility Ver A.60 Jul 30, 2008 BIOS Version A.08.09161344R Vitual Drive(1)...
... the pop-up menu, and then press to abort initialization. LSI Software RAID Configuration Utility Ver A.60 Jul 30, 2008 BIOS Version A.08.09161344R Vitual Drive(1) Virtual Drive 0 Objects Management MAednaupter Configure Virtual Drive Initialize Physical Drive Objects Rebuild Check Consistency ...Select An Option 4. 3. View/Update PYaersameters No Initilize Will Destroy Data On Selected VD(s) Use Cursor Keys To Navigate Between Items And Press Enter To Select An Option 5. LSI Software RAID Configuration Utility Ver A.60 Jul 30, 2008 BIOS Version A.08.09161344R Vitual Drive(1)...


