
User Guide
Page 44
... and move the cap back to clear the Real Time Clock (RTC) RAM in CMOS, which include system setup information such as system passwords. 2.6 Jumpers 1. Move the jumper cap from pins 1-2 (default) to re-enter data. To erase the RTC RAM: 1. You can clear the CMOS memory of date, time, and system... setup parameters by erasing the CMOS RTC RAM data. Hold down the key during the boot process and enter BIOS setup to pins 2-3. The onboard button cell battery powers the RAM data in CMOS. Plug the power...
... and move the cap back to clear the Real Time Clock (RTC) RAM in CMOS, which include system setup information such as system passwords. 2.6 Jumpers 1. Move the jumper cap from pins 1-2 (default) to re-enter data. To erase the RTC RAM: 1. You can clear the CMOS memory of date, time, and system... setup parameters by erasing the CMOS RTC RAM data. Hold down the key during the boot process and enter BIOS setup to pins 2-3. The onboard button cell battery powers the RAM data in CMOS. Plug the power...

User Guide
Page 61
...Connect the power cord to enter the BIOS Setup. Connect the power cord to the power connector at the back of the system chassis. 4. Monitor b. Check the jumper settings and connections or call your monitor complies with the last device on self-test or POST. ASUS Z8NA-D6 Series 3-3 External SCSI ... all the connections, replace the system case cover. 2. For systems with a surge protector. 5. Turn on . Ensure that is equipped with ATX power supplies, the system LED lights up when you turned on the power, the system may light up or switch between orange and green after...
...Connect the power cord to enter the BIOS Setup. Connect the power cord to the power connector at the back of the system chassis. 4. Monitor b. Check the jumper settings and connections or call your monitor complies with the last device on self-test or POST. ASUS Z8NA-D6 Series 3-3 External SCSI ... all the connections, replace the system case cover. 2. For systems with a surge protector. 5. Turn on . Ensure that is equipped with ATX power supplies, the system LED lights up when you turned on the power, the system may light up or switch between orange and green after...

User Guide
Page 66
...65533;�p�r�e�s�s���. You need to type the exact BIOS filename at www.asus.com and download the latest BIOS file for the motherboard. Erasing flash ...... Reading flash ..... Updating the BIOS file To update the BIOS file using the AFUDOS ...;�d�r�iv��e��. ok A:\> The utility returns to prevent system boot failure! 4-4 Chapter 4: BIOS setup Do not turn off power during flash BIOS Reading file ....... Save the BIOS file to the bootable�U��S��B&#...
...65533;�p�r�e�s�s���. You need to type the exact BIOS filename at www.asus.com and download the latest BIOS file for the motherboard. Erasing flash ...... Reading flash ..... Updating the BIOS file To update the BIOS file using the AFUDOS ...;�d�r�iv��e��. ok A:\> The utility returns to prevent system boot failure! 4-4 Chapter 4: BIOS setup Do not turn off power during flash BIOS Reading file ....... Save the BIOS file to the bootable�U��S��B&#...

User Guide
Page 69
... easy to enter the Setup utility; When you start up the computer, the system provides you wish to enter Setup after changing ...system off and then back on the motherboard stores the Setup utility. 4.2 BIOS setup program This motherboard supports a programmable Low-Pin Count (LPC...Setup program is designed to make your system, or prompted to run this utility. Being a menu-driven program, it as possible. Select the Load Setup Defaults item under the Exit Menu. See section 4.8 Exit Menu. • The BIOS setup screens shown in this last option only if the first two failed. ASUS Z8NA-D6...
... easy to enter the Setup utility; When you start up the computer, the system provides you wish to enter Setup after changing ...system off and then back on the motherboard stores the Setup utility. 4.2 BIOS setup program This motherboard supports a programmable Low-Pin Count (LPC...Setup program is designed to make your system, or prompted to run this utility. Being a menu-driven program, it as possible. Select the Load Setup Defaults item under the Exit Menu. See section 4.8 Exit Menu. • The BIOS setup screens shown in this last option only if the first two failed. ASUS Z8NA-D6...

User Guide
Page 70
.... Use the navigation keys to select a field. 4.2.1 BIOS menu screen Menu items Menu bar Configuration fields General help Main Advanced BIOS SETUP UTILITY Server Boot Exit System Time [13:44:30] System Date [Fri, 02/27/2009] Legacy Diskette A [1.44M, 3.5 in... : [ST3160812AS] : [Not Detected] : [Not Detected] : [Not Detected] : [Not Detected] : [Not Detected] IDE Configuration AHCI Configuration System Information Use [ENTER], [TAB] or [SHIFT-TAB] to select items in the menu and change the settings. The navigation keys differ from one screen to configure system Date...
.... Use the navigation keys to select a field. 4.2.1 BIOS menu screen Menu items Menu bar Configuration fields General help Main Advanced BIOS SETUP UTILITY Server Boot Exit System Time [13:44:30] System Date [Fri, 02/27/2009] Legacy Diskette A [1.44M, 3.5 in... : [ST3160812AS] : [Not Detected] : [Not Detected] : [Not Detected] : [Not Detected] : [Not Detected] IDE Configuration AHCI Configuration System Information Use [ENTER], [TAB] or [SHIFT-TAB] to select items in the menu and change the settings. The navigation keys differ from one screen to configure system Date...

User Guide
Page 72
... Date [Day xx/xx/xxxx] Allows you an overview of floppy drive installed. 4.3 Main menu When you enter the BIOS Setup program, the Main menu screen appears, giving you to select a field. Main Advanced BIOS SETUP UTILITY Server Boot Exit System Time [13:44:30] System Date [Fri, 02/27/2009] Legacy Diskette...
... Date [Day xx/xx/xxxx] Allows you an overview of floppy drive installed. 4.3 Main menu When you enter the BIOS Setup program, the Main menu screen appears, giving you to select a field. Main Advanced BIOS SETUP UTILITY Server Boot Exit System Time [13:44:30] System Date [Fri, 02/27/2009] Legacy Diskette...
User Guide
Page 73
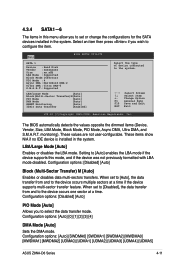
...Auto], the data transfer from and to the system. ←→ Select Screen ↑↓ Select Item +- Main BIOS SETUP UTILITY SATA 1 Device :Hard Disk Vendor :xxxxxxxxx Size :xx.xGB LBA Mode :Supported Block Mode:16Sectors PIO Mode :4 Async...the DMA mode. Configuration options: [Auto] [SWDMA0] [SWDMA1] [SWDMA2] [MWDMA0] [MWDMA1] [MWDMA2] [UDMA0] [UDMA1] [UDMA2] [UDMA3] [UDMA4] [UDMA5] ASUS Z8NA-D6 Series 4-11 LBA/Large Mode [Auto] Enables or disables the LBA mode. These values are not user-configurable. Configuration options: [Disabled] [Auto] PIO Mode [Auto...
...Auto], the data transfer from and to the system. ←→ Select Screen ↑↓ Select Item +- Main BIOS SETUP UTILITY SATA 1 Device :Hard Disk Vendor :xxxxxxxxx Size :xx.xGB LBA Mode :Supported Block Mode:16Sectors PIO Mode :4 Async...the DMA mode. Configuration options: [Auto] [SWDMA0] [SWDMA1] [SWDMA2] [MWDMA0] [MWDMA1] [MWDMA2] [UDMA0] [UDMA1] [UDMA2] [UDMA3] [UDMA4] [UDMA5] ASUS Z8NA-D6 Series 4-11 LBA/Large Mode [Auto] Enables or disables the LBA mode. These values are not user-configurable. Configuration options: [Disabled] [Auto] PIO Mode [Auto...
User Guide
Page 75
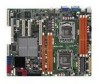
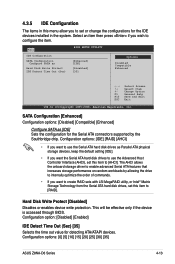
... Out (Sec) [35] Options Disabled Compatible Enhanced ←→ Select Screen ↑↓ Select Item +- Configuration options: [0] [5] [10] [15] [20] [25] [30] [35] ASUS Z8NA-D6 Series 4-13 Main BIOS SETUP UTILITY IDE Configuration SATA Configuration [Enhanced] Configure SATA as [IDE] Sets the configuration for detecting ATA/ATAPI devices. This will be effective only...
... Out (Sec) [35] Options Disabled Compatible Enhanced ←→ Select Screen ↑↓ Select Item +- Configuration options: [0] [5] [10] [15] [20] [25] [30] [35] ASUS Z8NA-D6 Series 4-13 Main BIOS SETUP UTILITY IDE Configuration SATA Configuration [Enhanced] Configure SATA as [IDE] Sets the configuration for detecting ATA/ATAPI devices. This will be effective only...

User Guide
Page 76
... SATA Port1 Device :Not Detected SATA Port0 [Auto] SMART Monitoring [Enabled] Select the type of SATA devices. Configuration options: [Disabled] [Enabled] 4-14 Chapter 4: BIOS setup Congifuration options: [0] [5] [10] [15] [20] [25] [30] [35] SATA Port1-6 [XXXX] Displays the status of auto-detection of device connected to the ... for SATA CD/DVD devices in AHCI mode need to wait ready longer. ←→ Select Screen ↑↓ Select Item Enter Go to Sub Screen F1 General Help F10 Save and Exit ESC Exit v02.61 (C)Copyright 1985-2008, American Megatrends, Inc. Main BIOS...
... SATA Port1 Device :Not Detected SATA Port0 [Auto] SMART Monitoring [Enabled] Select the type of SATA devices. Configuration options: [Disabled] [Enabled] 4-14 Chapter 4: BIOS setup Congifuration options: [0] [5] [10] [15] [20] [25] [30] [35] SATA Port1-6 [XXXX] Displays the status of auto-detection of device connected to the ... for SATA CD/DVD devices in AHCI mode need to wait ready longer. ←→ Select Screen ↑↓ Select Item Enter Go to Sub Screen F1 General Help F10 Save and Exit ESC Exit v02.61 (C)Copyright 1985-2008, American Megatrends, Inc. Main BIOS...
User Guide
Page 77
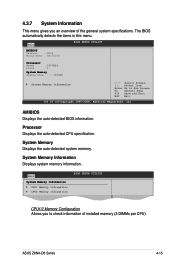
... menu. Processor Displays the auto-detected CPU specification. ASUS Z8NA-D6 Series 4-15 Main BIOS SETUP UTILITY AMIBIOS Version :0204 Build Date :02/16/09 Processor Speed Count :2400MHZ :1 System Memory Usable Size : 1024MB System Memory Information ←→ Select Screen ↑↓ Select Item Enter Go to check information of the general system specifications...
... menu. Processor Displays the auto-detected CPU specification. ASUS Z8NA-D6 Series 4-15 Main BIOS SETUP UTILITY AMIBIOS Version :0204 Build Date :02/16/09 Processor Speed Count :2400MHZ :1 System Memory Usable Size : 1024MB System Memory Information ←→ Select Screen ↑↓ Select Item Enter Go to check information of the general system specifications...
User Guide
Page 79
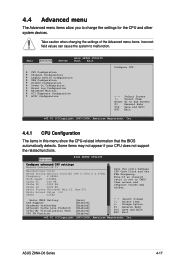
...in this menu show the CPU-related information that the BIOS automatically detects. ASUS Z8NA-D6 Series 4-17 Main Advanced Server BIOS SETUP UTILITY Boot Exit CPU Configuration Chipset Configuration Legacy Device Configuration USB Configuration PCIPnP Configuration... Power On Configuration Event Log Configuration Hardware Monitor PCI Exppress Configuration ACPI Configuration Configure CPU. ←→ Select Screen ↑↓ Select Item Enter...
...in this menu show the CPU-related information that the BIOS automatically detects. ASUS Z8NA-D6 Series 4-17 Main Advanced Server BIOS SETUP UTILITY Boot Exit CPU Configuration Chipset Configuration Legacy Device Configuration USB Configuration PCIPnP Configuration... Power On Configuration Event Log Configuration Hardware Monitor PCI Exppress Configuration ACPI Configuration Configure CPU. ←→ Select Screen ↑↓ Select Item Enter...
User Guide
Page 83
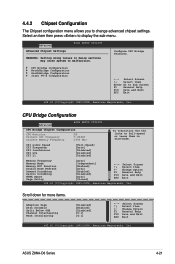
... Select Screen Select Item Change Option General Help Save and Exit Exit v02.61 (C)Copyright 1985-2008, American Megatrends, Inc. ASUS Z8NA-D6 Series 4-21 4.4.2 Chipset Configuration The Chipset configuration menu allows you to display the sub-menu. Select an item then press ... SouthBridge Configuration Intel VT-d Configuration ←→ Select Screen ↑↓ Select Item Enter Go to malfunction. CPU Bridge Configuration Advanced BIOS SETUP UTILITY CPU Bridge Chipset Configuration CPU REeVvIiSsIiOoNn :B0 Current CSI Frequency :65.480606GT Current Memory...
... Select Screen Select Item Change Option General Help Save and Exit Exit v02.61 (C)Copyright 1985-2008, American Megatrends, Inc. ASUS Z8NA-D6 Series 4-21 4.4.2 Chipset Configuration The Chipset configuration menu allows you to display the sub-menu. Select an item then press ... SouthBridge Configuration Intel VT-d Configuration ←→ Select Screen ↑↓ Select Item Enter Go to malfunction. CPU Bridge Configuration Advanced BIOS SETUP UTILITY CPU Bridge Chipset Configuration CPU REeVvIiSsIiOoNn :B0 Current CSI Frequency :65.480606GT Current Memory...

User Guide
Page 90
... PME#(Wake On LAN) [Disabled] When set the alarm date, highlight this item and press the or key to configure alarm time. 4-28 Chapter 4: BIOS setup Configuration options: [Disabled] [Enabled] The following items appear only when the Resume On RTC Alarm item is set to [Enabled]. When set to [Power On...], the system will reboot after an AC power loss. 4.4.6 Power On Configuration Advanced BIOS SETUP UTILITY APM Configuration Restore on state, whatever the system state was before the AC power loss.
... PME#(Wake On LAN) [Disabled] When set the alarm date, highlight this item and press the or key to configure alarm time. 4-28 Chapter 4: BIOS setup Configuration options: [Disabled] [Enabled] The following items appear only when the Resume On RTC Alarm item is set to [Enabled]. When set to [Power On...], the system will reboot after an AC power loss. 4.4.6 Power On Configuration Advanced BIOS SETUP UTILITY APM Configuration Restore on state, whatever the system state was before the AC power loss.

User Guide
Page 91
Mark all events as read Press to clear all events on the Event Log. Clear Event Log Press to mark all the events as read. ASUS Z8NA-D6 Series 4-29 Scroll down for more items. P1VTT Voltage P2VTT Voltage +1.1V_IOH Voltage +12V Voltage +5V Voltage +3.3V Voltage +5VSB Voltage +3.3VSB ..., Inc. View Event Log Press to read all the unread event log. 4.4.7 Event Log Configuration Main Advanced Event Logging details BIOS SETUP UTILITY View Event Log Mark all event as read Clear Event Log View all unread events on the event log. 4.4.8 Hardware Monitor Advanced ...
Mark all events as read Press to clear all events on the Event Log. Clear Event Log Press to mark all the events as read. ASUS Z8NA-D6 Series 4-29 Scroll down for more items. P1VTT Voltage P2VTT Voltage +1.1V_IOH Voltage +12V Voltage +5V Voltage +3.3V Voltage +5VSB Voltage +3.3VSB ..., Inc. View Event Log Press to read all the unread event log. 4.4.7 Event Log Configuration Main Advanced Event Logging details BIOS SETUP UTILITY View Event Log Mark all event as read Clear Event Log View all unread events on the event log. 4.4.8 Hardware Monitor Advanced ...

User Guide
Page 96
...Configuration options: [Disabled] [Enabled] The following items appear only when Remote Access is set to display the configuration options. Server BIOS SETUP UTILITY Configure Remote Access type and parameters Remote Access [Enabled] Serial port number Base Address, IRQ Serial Port Mode Flow Control Redirection... The items in this menu allows you to configure the Remote Access features. 4.5 Server menu Main Advanced Server BIOS SETUP UTILITY Boot Exit Remote Access Configuration Configure Remote Access. ←→ Select Screen ↑↓ Select Item +-
...Configuration options: [Disabled] [Enabled] The following items appear only when Remote Access is set to display the configuration options. Server BIOS SETUP UTILITY Configure Remote Access type and parameters Remote Access [Enabled] Serial port number Base Address, IRQ Serial Port Mode Flow Control Redirection... The items in this menu allows you to configure the Remote Access features. 4.5 Server menu Main Advanced Server BIOS SETUP UTILITY Boot Exit Remote Access Configuration Configure Remote Access. ←→ Select Screen ↑↓ Select Item +-

User Guide
Page 98
...sequence from the available devices. Configuration options: [xxxxx Drive] [Disabled] 4-36 Chapter 4: BIOS setup Main Advanced Server BIOS SETUP UTILITY Boot Exit Boot Settings Boot Device Priority Removable Drives Boot Settings Configuration Security Specifies the Boot ...Device Priority sequence. 4.6 Boot menu The Boot menu items allow you set the CD-ROM drive as the first boot device. ←→ Select Screen ↑↓ Select Item Enter...
...sequence from the available devices. Configuration options: [xxxxx Drive] [Disabled] 4-36 Chapter 4: BIOS setup Main Advanced Server BIOS SETUP UTILITY Boot Exit Boot Settings Boot Device Priority Removable Drives Boot Settings Configuration Security Specifies the Boot ...Device Priority sequence. 4.6 Boot menu The Boot menu items allow you set the CD-ROM drive as the first boot device. ←→ Select Screen ↑↓ Select Item Enter...
User Guide
Page 100
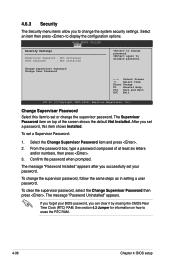
...Change User Password ←→ Select Screen ↑↓ Select Item Enter Change F1 General Help F10 Save and Exit ESC Exit v02.61 (C)... If you forget your password. To set or change the system security settings. BIOS SETUP UTILITY Boot Security Settings Supervisor Password : Not Installed User Password : Not Installed to erase the RTC RAM. 4-38... Chapter 4: BIOS setup again to display the configuration options. To change password. Confirm the password when prompted. To...
...Change User Password ←→ Select Screen ↑↓ Select Item Enter Change F1 General Help F10 Save and Exit ESC Exit v02.61 (C)... If you forget your password. To set or change the system security settings. BIOS SETUP UTILITY Boot Security Settings Supervisor Password : Not Installed User Password : Not Installed to erase the RTC RAM. 4-38... Chapter 4: BIOS setup again to display the configuration options. To change password. Confirm the password when prompted. To...
User Guide
Page 101
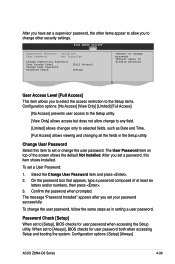
... change the user password. Configuration options: [Setup] [Always] ASUS Z8NA-D6 Series 4-39 Change User Password Select this item shows Installed. To change the user password, follow the same steps as Date and Time. [Full Access] allows viewing and changing all the fields in setting a user password. Password Check [Setup] When set to [Always], BIOS...
... change the user password. Configuration options: [Setup] [Always] ASUS Z8NA-D6 Series 4-39 Change User Password Select this item shows Installed. To change the user password, follow the same steps as Date and Time. [Full Access] allows viewing and changing all the fields in setting a user password. Password Check [Setup] When set to [Always], BIOS...

User Guide
Page 102
... the non-volatile RAM. 4-40 Chapter 4: BIOS setup Exit & Discard Changes Select this option from this operation. ←→ Select Screen ↑↓ Select Item Enter Go to the BIOS items. Main Advanced Server BIOS SETUP UTILITY Boot Exit Exit Options Exit & Save Changes Exit... & Discard Changes Discard Changes Load Setup Defaults Exit system setup after saving the changes. Select one of the ...
... the non-volatile RAM. 4-40 Chapter 4: BIOS setup Exit & Discard Changes Select this option from this operation. ←→ Select Screen ↑↓ Select Item Enter Go to the BIOS items. Main Advanced Server BIOS SETUP UTILITY Boot Exit Exit Options Exit & Save Changes Exit... & Discard Changes Discard Changes Load Setup Defaults Exit system setup after saving the changes. Select one of the ...

User Guide
Page 106
...in the system user guide. 2. To do this: 1. Go to [RAID] 4. Refer to Chapter 4 for details on entering and navigating through the BIOS Setup. 5.1.4 RAID configuration utilities Depending on the RAID connectors that you use, you can create a RAID set from SATA hard ... use the RAID configuration utility. 5-4 Chapter 5: RAID configuration 5.1.2 Installing hard disk drives The motherboard supports Serial ATA for RAID set using the utilities embedded in each RAID controller. Enter the BIOS Setup during POST. 2. Press to the SATA connector on the Serial ATA connectors supported by Intel®...
...in the system user guide. 2. To do this: 1. Go to [RAID] 4. Refer to Chapter 4 for details on entering and navigating through the BIOS Setup. 5.1.4 RAID configuration utilities Depending on the RAID connectors that you use, you can create a RAID set from SATA hard ... use the RAID configuration utility. 5-4 Chapter 5: RAID configuration 5.1.2 Installing hard disk drives The motherboard supports Serial ATA for RAID set using the utilities embedded in each RAID controller. Enter the BIOS Setup during POST. 2. Press to the SATA connector on the Serial ATA connectors supported by Intel®...


