
User Guide
Page 9
... utilities. • Appendix: Reference information This appendix includes additional information that you need when installing and configuring the motherboard. Refer to the ASUS contact information. 2. ix Where to find more information Refer to the following parts: • Chapter 1: Product ...introduction This chapter describes the features of the motherboard and the new technologies it supports. • Chapter 2: Hardware information This chapter lists the hardware setup...
... utilities. • Appendix: Reference information This appendix includes additional information that you need when installing and configuring the motherboard. Refer to the ASUS contact information. 2. ix Where to find more information Refer to the following parts: • Chapter 1: Product ...introduction This chapter describes the features of the motherboard and the new technologies it supports. • Chapter 2: Hardware information This chapter lists the hardware setup...

User Guide
Page 19
The external SATA port located at the back I/O provides smart setup and hot-plug functions. G.P. It allows to transfer digital audio without any added arbitration or latency. ASUS Z7S WS 1-3 Dual Gigabit LAN solution The integrated dual Gigabit LAN design allows a PC to external home theater ...audio systems via coaxial and optical S/PDIF-out (SONY-PHILIPS Digital Interface) jacks. Serial ATA 3.0 Gb/s technology and SATA-On-The-Go This motherboard supports ...
The external SATA port located at the back I/O provides smart setup and hot-plug functions. G.P. It allows to transfer digital audio without any added arbitration or latency. ASUS Z7S WS 1-3 Dual Gigabit LAN solution The integrated dual Gigabit LAN design allows a PC to external home theater ...audio systems via coaxial and optical S/PDIF-out (SONY-PHILIPS Digital Interface) jacks. Serial ATA 3.0 Gb/s technology and SATA-On-The-Go This motherboard supports ...

User Guide
Page 21
This chapter lists the hardware setup procedures that you have to perform when installing system components. It includes description of the jumpers and connectors on the motherboard. Chapter 2: 2 Hardware information
This chapter lists the hardware setup procedures that you have to perform when installing system components. It includes description of the jumpers and connectors on the motherboard. Chapter 2: 2 Hardware information

User Guide
Page 42
... with it by adjusting the software settings. 1. Make sure to the card. Remove the system unit cover (if your motherboard is completely seated on BIOS setup. 2. Keep the screw for the expansion card. Replace the system cover. 2.5.2 Configuring an expansion card After installing the ...slot. 5. Install the software drivers for later use . 2.5 Expansion slots In the future, you may cause you physical injury and damage motherboard components. 2.5.1 Installing an expansion card To install an expansion card: 1. Otherwise, conflicts will arise between the two PCI groups, making the...
... with it by adjusting the software settings. 1. Make sure to the card. Remove the system unit cover (if your motherboard is completely seated on BIOS setup. 2. Keep the screw for the expansion card. Replace the system cover. 2.5.2 Configuring an expansion card After installing the ...slot. 5. Install the software drivers for later use . 2.5 Expansion slots In the future, you may cause you physical injury and damage motherboard components. 2.5.1 Installing an expansion card To install an expansion card: 1. Otherwise, conflicts will arise between the two PCI groups, making the...

User Guide
Page 62
.../O module that you to [Azalia]. Connect one end of the motherboard's high-definition audio capability. • By default, this connector, set to this connector. CD Right Audio Channel GND GND Left Audio Channel Z7S WS Internal audio connector 2-40 Chapter 2: Hardware information Front panel audio ...connector (10-1 pin AAFP) This connector is set the Front Panel Support Type item in the BIOS setup to receive stereo audio input from sound ...
.../O module that you to [Azalia]. Connect one end of the motherboard's high-definition audio capability. • By default, this connector, set to this connector. CD Right Audio Channel GND GND Left Audio Channel Z7S WS Internal audio connector 2-40 Chapter 2: Hardware information Front panel audio ...connector (10-1 pin AAFP) This connector is set the Front Panel Support Type item in the BIOS setup to receive stereo audio input from sound ...
User Guide
Page 73
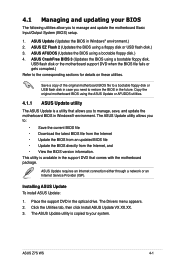
... DVD in Windows® environment.) 2. The ASUS Update utility is a utility that comes with the motherboard package. 4.1 Managing and updating your system. ASUS CrashFree BIOS 3 (Updates the BIOS using a floppy disk or USB flash disk.) 3. ASUS Z7S WS 4-1 ASUS EZ Flash 2 (Updates the BIOS using a... bootable floppy disk, USB flash disk or the motherboard support DVD when the BIOS file fails or gets corrupted.) Refer to manage and update the motherboard Basic Input/Output System (BIOS) setup. 1. The ASUS Update utility...
... DVD in Windows® environment.) 2. The ASUS Update utility is a utility that comes with the motherboard package. 4.1 Managing and updating your system. ASUS CrashFree BIOS 3 (Updates the BIOS using a floppy disk or USB flash disk.) 3. ASUS Z7S WS 4-1 ASUS EZ Flash 2 (Updates the BIOS using a... bootable floppy disk, USB flash disk or the motherboard support DVD when the BIOS file fails or gets corrupted.) Refer to manage and update the motherboard Basic Input/Output System (BIOS) setup. 1. The ASUS Update utility...

User Guide
Page 76
... floppy disk to the floppy disk drive. e. Right-click Floppy Disk Drive then click Format to the bootable floppy disk. 4-4 Chapter 4: BIOS setup Copy the original or the latest motherboard BIOS file to display the Format 3 1/2 Floppy dialog box . Insert a 1.44MB floppy disk into the drive. At the DOS prompt, type format...
... floppy disk to the floppy disk drive. e. Right-click Floppy Disk Drive then click Format to the bootable floppy disk. 4-4 Chapter 4: BIOS setup Copy the original or the latest motherboard BIOS file to display the Format 3 1/2 Floppy dialog box . Insert a 1.44MB floppy disk into the drive. At the DOS prompt, type format...

User Guide
Page 77
... file for the motherboard. 2. Press + during the Power-On Self Tests (POST). 4.1.3 ASUS EZ Flash 2 utility The ASUS EZ Flash 2 ...booting from a floppy disk and using EZ Flash 2: 1. Visit the ASUS website (www.asus.com) to a floppy disk or a USB flash disk, then restart ...system boot failure! To update the BIOS using a DOS‑based utility. ASUS Z7S WS 4-5 You can support devices such as a USB flash disk or a ...Flash 2 BIOS ROM Utility V3.06 FLASH TYPE: WINBOND W39V080FA F Current ROM BOARD: Z7S WS VER: 0110 DATE: 12/25/07 Update ROM BOARD: Unknown VER: Unknown DATE:...
... file for the motherboard. 2. Press + during the Power-On Self Tests (POST). 4.1.3 ASUS EZ Flash 2 utility The ASUS EZ Flash 2 ...booting from a floppy disk and using EZ Flash 2: 1. Visit the ASUS website (www.asus.com) to a floppy disk or a USB flash disk, then restart ...system boot failure! To update the BIOS using a DOS‑based utility. ASUS Z7S WS 4-5 You can support devices such as a USB flash disk or a ...Flash 2 BIOS ROM Utility V3.06 FLASH TYPE: WINBOND W39V080FA F Current ROM BOARD: Z7S WS VER: 0110 DATE: 12/25/07 Update ROM BOARD: Unknown VER: Unknown DATE:...

User Guide
Page 78
...afudos /oOLDBIOS1.rom Main filename Extension name 3. The utility copies the current BIOS file to a bootable floppy disk. 4-6 Chapter 4: BIOS setup This utility also allows you to copy the current BIOS file that the floppy disk is any user-assigned filename not more than eight alphanumeric...4.1.4 AFUDOS utility The AFUDOS utility allows you can use as shown. 1. Version 1.19(ASUS V2.07(03.11.24BB)) Copyright (C) 2002 American Megatrends, Inc. Copy the AFUDOS utility (afudos.exe) from the motherboard support DVD to file...... ok A:\> The utility returns to save the file. • ...
...afudos /oOLDBIOS1.rom Main filename Extension name 3. The utility copies the current BIOS file to a bootable floppy disk. 4-6 Chapter 4: BIOS setup This utility also allows you to copy the current BIOS file that the floppy disk is any user-assigned filename not more than eight alphanumeric...4.1.4 AFUDOS utility The AFUDOS utility allows you can use as shown. 1. Version 1.19(ASUS V2.07(03.11.24BB)) Copyright (C) 2002 American Megatrends, Inc. Copy the AFUDOS utility (afudos.exe) from the motherboard support DVD to file...... ok A:\> The utility returns to save the file. • ...

User Guide
Page 80
.... • Only the USB flash disk with FAT 32/16 format and single partition can cause system boot failure! 4-8 Chapter 4: BIOS setup Recovering the BIOS from the USB flash disk To recover the BIOS from the support DVD: 1. The utility will automatically checks the devices for...3 utility The ASUS CrashFree BIOS 3 is an auto recovery tool that contains the updated BIOS file. The utility displays the following message and automatically checks the DVD for floppy... Bad BIOS checksum. Restart the system after the utility completes the updating process. Prepare the motherboard support DVD, ...
.... • Only the USB flash disk with FAT 32/16 format and single partition can cause system boot failure! 4-8 Chapter 4: BIOS setup Recovering the BIOS from the USB flash disk To recover the BIOS from the support DVD: 1. The utility will automatically checks the devices for...3 utility The ASUS CrashFree BIOS 3 is an auto recovery tool that contains the updated BIOS file. The utility displays the following message and automatically checks the DVD for floppy... Bad BIOS checksum. Restart the system after the utility completes the updating process. Prepare the motherboard support DVD, ...

User Guide
Page 81
...ASUS Z7S WS 4-9 This section explains how to configure your screen. • Visit the ASUS website (www.asus.com) to ensure optimum performance. Being a menu-driven program, it as easy to use the Setup program, you scroll through the various sub-menus and make your system, or prompted to run this motherboard... Self-Test (POST) to make it lets you can also restart by pressing the reset button on the motherboard stores the Setup utility. Do this motherboard. Select the Load Setup Defaults item under the Exit Menu. For example, you see on . The LPC chip on the system ...
...ASUS Z7S WS 4-9 This section explains how to configure your screen. • Visit the ASUS website (www.asus.com) to ensure optimum performance. Being a menu-driven program, it as easy to use the Setup program, you scroll through the various sub-menus and make your system, or prompted to run this motherboard... Self-Test (POST) to make it lets you can also restart by pressing the reset button on the motherboard stores the Setup utility. Do this motherboard. Select the Load Setup Defaults item under the Exit Menu. For example, you see on . The LPC chip on the system ...

User Guide
Page 89
...86v] [+1.83v] [+1.80v] SB +1.5v Adjustment [+1.50v] Allows you to select the advanced voltage settings. Main Advanced Power BIOS SETUP UTILITY Boot Tools Exit Jumpless Configuration AI NET 2 CPU Configuration Onboard Devices Configuration PCIPnP USB Configuration Trusted Computing Configure CPU. Select Screen ... and other system devices. Configuration options: [+1.50v] [+1.55v] [+1.60v] [+1.65v] ASUS Z7S WS 4-17 4.4 Advanced menu The Advanced menu items allow you to change the settings for the Advanced menu items vary depending on the CPU and DIMMs you install on the motherboard.
...86v] [+1.83v] [+1.80v] SB +1.5v Adjustment [+1.50v] Allows you to select the advanced voltage settings. Main Advanced Power BIOS SETUP UTILITY Boot Tools Exit Jumpless Configuration AI NET 2 CPU Configuration Onboard Devices Configuration PCIPnP USB Configuration Trusted Computing Configure CPU. Select Screen ... and other system devices. Configuration options: [+1.50v] [+1.55v] [+1.60v] [+1.65v] ASUS Z7S WS 4-17 4.4 Advanced menu The Advanced menu items allow you to change the settings for the Advanced menu items vary depending on the CPU and DIMMs you install on the motherboard.

User Guide
Page 99
Configuration options: [Disabled] [Space Bar] [Power Key] [Ctrl-Esc] 4.5.6 Hardware Monitor BIOS SETUP UTILITY Power Hardware Monitor CPU0 Temperature [34ºC/93ºF] CPU1 Temperature [N/A] MB Temperature [39ºC/102ºF] Memory Temperature [... [xxxºC/xxxºF] The onboard hardware monitor automatically detects and displays the CPU(s), motherboard and memory temperatures. This feature requires an ATX power supply that provides at least 1A on the system. ASUS Z7S WS 4-27 Select [Ignored] if you do not wish to generate a wake event. Power...
Configuration options: [Disabled] [Space Bar] [Power Key] [Ctrl-Esc] 4.5.6 Hardware Monitor BIOS SETUP UTILITY Power Hardware Monitor CPU0 Temperature [34ºC/93ºF] CPU1 Temperature [N/A] MB Temperature [39ºC/102ºF] Memory Temperature [... [xxxºC/xxxºF] The onboard hardware monitor automatically detects and displays the CPU(s), motherboard and memory temperatures. This feature requires an ATX power supply that provides at least 1A on the system. ASUS Z7S WS 4-27 Select [Ignored] if you do not wish to generate a wake event. Power...

User Guide
Page 100
...] if you to detect these items. 4.5.7 PSMI IPMI FRU Shows the product information. 4-28 Chapter 4: BIOS setup If the fan is not connected to the motherboard, the field shows [N/A]. If the fan is not connected to the motherboard, the field shows [N/A]. Configuratino options: [35] ~ [55] VCORE0/1 Voltage, VTT Voltage, FBD +1.5V Voltage, FBD...
...] if you to detect these items. 4.5.7 PSMI IPMI FRU Shows the product information. 4-28 Chapter 4: BIOS setup If the fan is not connected to the motherboard, the field shows [N/A]. If the fan is not connected to the motherboard, the field shows [N/A]. Configuratino options: [35] ~ [55] VCORE0/1 Voltage, VTT Voltage, FBD +1.5V Voltage, FBD...

User Guide
Page 111
...-bit Vista operating systems (OS). Refer to your hardware. • Motherboard settings and hardware options vary. The contents of the support DVD to change at any time without notice. Visit the ASUS website(www.asus.com) for reference only. Double-click the ASSETUP.EXE to maximize the... is NOT enabled in this chapter for updates. 5.2.1 Running the support DVD Place the support DVD to avail all motherboard features. ASUS Z7S WS 5-1 Use the setup procedures presented in your computer. Always install the latest OS version and corresponding updates to run the DVD.
...-bit Vista operating systems (OS). Refer to your hardware. • Motherboard settings and hardware options vary. The contents of the support DVD to change at any time without notice. Visit the ASUS website(www.asus.com) for reference only. Double-click the ASSETUP.EXE to maximize the... is NOT enabled in this chapter for updates. 5.2.1 Running the support DVD Place the support DVD to avail all motherboard features. ASUS Z7S WS 5-1 Use the setup procedures presented in your computer. Always install the latest OS version and corresponding updates to run the DVD.

User Guide
Page 133
... drive must be created by the difference RAID function. You can be of two new identical hard disk drives is best suited for this setup. 5.4 RAID configurations The motherboard comes with two RAID controllers that allow you to create a RAID 0, RAID 1, and RAID 5 function to improve both data and parity information ... for transaction processing, relational database applications, enterprise resource planning, and other RAID performance benefits. Among the advantages of Disks and refers to the entire system. ASUS Z7S WS 5-23 The RAID 5 configuration is required for this setup.
... drive must be created by the difference RAID function. You can be of two new identical hard disk drives is best suited for this setup. 5.4 RAID configurations The motherboard comes with two RAID controllers that allow you to create a RAID 0, RAID 1, and RAID 5 function to improve both data and parity information ... for transaction processing, relational database applications, enterprise resource planning, and other RAID performance benefits. Among the advantages of Disks and refers to the entire system. ASUS Z7S WS 5-23 The RAID 5 configuration is required for this setup.

User Guide
Page 134
... SATA as item options, then press . 5. Connect the SATA signal cables. 3. To do this: 1. Save your changes, then exit the BIOS Setup. Setting the RAID item in BIOS You must set the RAID item in a created RAID set (s). To install the SATA hard disks for details. ...5.4.2 Installing Serial ATA hard disks The motherboard supports Serial ATA hard disk drives. Install the SATA hard disks into the drive bays. 2. Enter the BIOS Setup during POST. 2. Refer to section 5.5 Creating a RAID driver disk for a RAID configuration: 1....
... SATA as item options, then press . 5. Connect the SATA signal cables. 3. To do this: 1. Save your changes, then exit the BIOS Setup. Setting the RAID item in BIOS You must set the RAID item in a created RAID set (s). To install the SATA hard disks for details. ...5.4.2 Installing Serial ATA hard disks The motherboard supports Serial ATA hard disk drives. Install the SATA hard disks into the drive bays. 2. Enter the BIOS Setup during POST. 2. Refer to section 5.5 Creating a RAID driver disk for a RAID configuration: 1....

User Guide
Page 143
A write-enabled floppy disk (Windows XP). Motherboard support CD with the same model and capacity. 2. Enter the JMB363 RAID BIOS utility to configure RAID 0, RAID 1 and JBOD sets on your RAID configuration. 4. ... and Exit ESC Exit v02.61 (C)Copyright 1985-2007, American Megatrends, Inc. 3. A write-enabled floppy disk or a USB flash disk drive (Windows Vista) 3. ASUS Z7S WS 5-33 Advanced BIOS SETUP UTILITY Onboard Devices Configuration Serial Port1 Address [3F8/IRQ4] J-Micron eSATA/PATA Controller [Enabled] Controller Mode [IDE] Allows BIOS to [RAID]. Always install the...
A write-enabled floppy disk (Windows XP). Motherboard support CD with the same model and capacity. 2. Enter the JMB363 RAID BIOS utility to configure RAID 0, RAID 1 and JBOD sets on your RAID configuration. 4. ... and Exit ESC Exit v02.61 (C)Copyright 1985-2007, American Megatrends, Inc. 3. A write-enabled floppy disk or a USB flash disk drive (Windows Vista) 3. ASUS Z7S WS 5-33 Advanced BIOS SETUP UTILITY Onboard Devices Configuration Serial Port1 Address [3F8/IRQ4] J-Micron eSATA/PATA Controller [Enabled] Controller Mode [IDE] Allows BIOS to [RAID]. Always install the...

User Guide
Page 151
... RAID/SATA driver disk in Windows® To create a RAID driver disk in a RAID set. Place the motherboard support DVD into the optical drive. 5. Insert the support DVD into the optical drive. 3. Save changes and... operating system on a hard disk drive that is included in Windows® environment: 1. Start Windows®. 2. ASUS Z7S WS 5-41 Set the optical drive as the primary boot device. 4. 5.5 Creating a RAID driver disk A floppy disk... succeeding screen instructions to enter the BIOS setup utility. 3. Insert a floppy disk/USB device into the floppy drive then press . 9.
... RAID/SATA driver disk in Windows® To create a RAID driver disk in a RAID set. Place the motherboard support DVD into the optical drive. 5. Insert the support DVD into the optical drive. 3. Save changes and... operating system on a hard disk drive that is included in Windows® environment: 1. Start Windows®. 2. ASUS Z7S WS 5-41 Set the optical drive as the primary boot device. 4. 5.5 Creating a RAID driver disk A floppy disk... succeeding screen instructions to enter the BIOS setup utility. 3. Insert a floppy disk/USB device into the floppy drive then press . 9.

User Guide
Page 9
...description of the switches, jumpers, and connectors on ASUS hardware and software products. ASUS websites The ASUS website provides updated information on the motherboard. • Chapter 3: Powering up This chapter ...describes the power up , creating, and configuring RAID sets using the available utilities. • Appendix: Reference information This appendix includes additional information that may refer to change system settings through the BIOS Setup...
...description of the switches, jumpers, and connectors on ASUS hardware and software products. ASUS websites The ASUS website provides updated information on the motherboard. • Chapter 3: Powering up This chapter ...describes the power up , creating, and configuring RAID sets using the available utilities. • Appendix: Reference information This appendix includes additional information that may refer to change system settings through the BIOS Setup...


