User Guide
Page 2
... is authorized in this product is repaired, modified or altered, unless such repair, modification of this product. All Rights Reserved. ASUS PROVIDES THIS MANUAL "AS IS" WITHOUT WARRANTY OF ANY KIND, EITHER EXPRESS OR IMPLIED, INCLUDING BUT NOT LIMITED TO THE IMPLIED WARRANTIES OR CONDITIONS...serial number of these licenses are used only for which is defaced or missing. ii ASUS ASSUMES NO RESPONSIBILITY OR LIABILITY FOR ANY ERRORS OR INACCURACIES THAT MAY APPEAR IN THIS MANUAL, INCLUDING THE PRODUCTS AND SOFTWARE DESCRIBED IN IT. Copies of the product is dependent on...
... is authorized in this product is repaired, modified or altered, unless such repair, modification of this product. All Rights Reserved. ASUS PROVIDES THIS MANUAL "AS IS" WITHOUT WARRANTY OF ANY KIND, EITHER EXPRESS OR IMPLIED, INCLUDING BUT NOT LIMITED TO THE IMPLIED WARRANTIES OR CONDITIONS...serial number of these licenses are used only for which is defaced or missing. ii ASUS ASSUMES NO RESPONSIBILITY OR LIABILITY FOR ANY ERRORS OR INACCURACIES THAT MAY APPEAR IN THIS MANUAL, INCLUDING THE PRODUCTS AND SOFTWARE DESCRIBED IN IT. Copies of the product is dependent on...
User Guide
Page 4
... technology it supports. Do not place the product in your area. Operation safety • Before installing the motherboard and adding components, carefully read all the manuals that came with the product, contact a qualified service technician or your dealer immediately. • To avoid short circuits, keep paper clips, screws, and staples away...
... technology it supports. Do not place the product in your area. Operation safety • Before installing the motherboard and adding components, carefully read all the manuals that came with the product, contact a qualified service technician or your dealer immediately. • To avoid short circuits, keep paper clips, screws, and staples away...
User Guide
Page 5
... tasks properly, take note of the standard package. Typography Bold text Indicates a menu or an item to the ASUS contact information. 2. Keys enclosed in this manual. Refer to select. Optional documentation Your product package may have been added by your dealer. Example: means that ... names are not part of the following sources for additional information and for product and software updates. 1. These documents are linked with a plus sign (+). CAUTION: Information to prevent damage to complete a task. NOTE: Tips and additional information to help you MUST follow to the ...
... tasks properly, take note of the standard package. Typography Bold text Indicates a menu or an item to the ASUS contact information. 2. Keys enclosed in this manual. Refer to select. Optional documentation Your product package may have been added by your dealer. Example: means that ... names are not part of the following sources for additional information and for product and software updates. 1. These documents are linked with a plus sign (+). CAUTION: Information to prevent damage to complete a task. NOTE: Tips and additional information to help you MUST follow to the ...
User Guide
Page 18
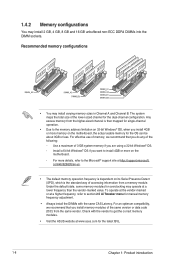
... the DIMM sockets. To operate at the vendor-marked or at a higher frequency, refer to get the correct memory modules. • Visit the ASUS website at www.asus.com for manual memory frequency adjustment. • Always install the DIMMs with the same CAS Latency. 1.4.2 Memory configurations You may operate at a lower frequency than...
... the DIMM sockets. To operate at the vendor-marked or at a higher frequency, refer to get the correct memory modules. • Visit the ASUS website at www.asus.com for manual memory frequency adjustment. • Always install the DIMMs with the same CAS Latency. 1.4.2 Memory configurations You may operate at a lower frequency than...
User Guide
Page 34
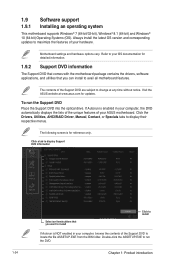
..., software applications, and utilities that you can install to change at www.asus.com for reference only. To run the DVD. 1-24 Chapter 1: Product introduction Click the Drivers, Utilities, AHCI/RAID Driver, Manual, Contact, or Specials tabs to run the Support DVD Place the Support ... the DVD automatically displays the lists of the unique features of the Support DVD are subject to avail all motherboard features. Visit the ASUS website at any time without notice. Double-click the ASSETUP.EXE to display their respective menus. 1.9 Software support 1.9.1 Installing an operating...
..., software applications, and utilities that you can install to change at www.asus.com for reference only. To run the DVD. 1-24 Chapter 1: Product introduction Click the Drivers, Utilities, AHCI/RAID Driver, Manual, Contact, or Specials tabs to run the Support DVD Place the Support ... the DVD automatically displays the lists of the unique features of the Support DVD are subject to avail all motherboard features. Visit the ASUS website at any time without notice. Double-click the ASSETUP.EXE to display their respective menus. 1.9 Software support 1.9.1 Installing an operating...
User Guide
Page 35
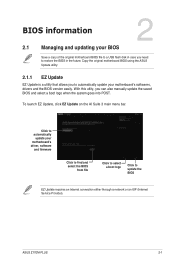
With this utlity, you can also manually update the saved BIOS and select a boot logo when the system goes into POST. ASUS Z170M-PLUS 2-1 To launch EZ Update, click EZ Update on the AI Suite 3 main menu bar. Copy the original motherboard BIOS using the ASUS Update utility. 2.1.1 EZ Update EZ Update is a utility that allows...
With this utlity, you can also manually update the saved BIOS and select a boot logo when the system goes into POST. ASUS Z170M-PLUS 2-1 To launch EZ Update, click EZ Update on the AI Suite 3 main menu bar. Copy the original motherboard BIOS using the ASUS Update utility. 2.1.1 EZ Update EZ Update is a utility that allows...
User Guide
Page 41
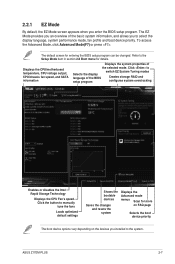
Click to Selects the display language of the selected mode. ASUS Z170M-PLUS 2-7 2.2.1 EZ Mode By default, the EZ Mode screen appears when you to select the display language, system performance mode, fan profile and boot device priority. ... section 2.8 Boot menu for more on FAQ page Selects the boot device priority The boot device options vary depending on the devices you installed to manually tune the fans Loads optimized default settings Shows the bootable devices Saves the changes and resets the system Displays the Advanced mode menus Scan for...
Click to Selects the display language of the selected mode. ASUS Z170M-PLUS 2-7 2.2.1 EZ Mode By default, the EZ Mode screen appears when you to select the display language, system performance mode, fan profile and boot device priority. ... section 2.8 Boot menu for more on FAQ page Selects the boot device priority The boot device options vary depending on the devices you installed to manually tune the fans Loads optimized default settings Shows the bootable devices Saves the changes and resets the system Displays the Advanced mode menus Scan for...
User Guide
Page 43
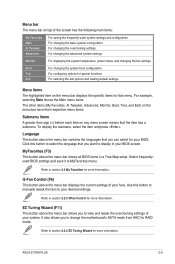
ASUS Z170M-PLUS 2-9 To display the submenu, select the item and press . Language This button above the menu bar shows all BIOS items in your desired settings. Use ... select for more information. Select frequentlyused BIOS settings and save it to section 2.3 My Favorites for that the item has a submenu. Click this button to manually tweak the fans to RAID mode. Q-Fan Control (F6) This button above the menu bar allows you to change the motherboard's SATA mode from AHCI...
ASUS Z170M-PLUS 2-9 To display the submenu, select the item and press . Language This button above the menu bar shows all BIOS items in your desired settings. Use ... select for more information. Select frequentlyused BIOS settings and save it to section 2.3 My Favorites for that the item has a submenu. Click this button to manually tweak the fans to RAID mode. Q-Fan Control (F6) This button above the menu bar allows you to change the motherboard's SATA mode from AHCI...
User Guide
Page 45
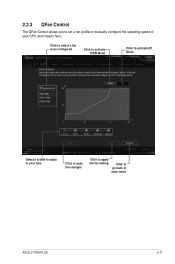
2.2.3 QFan Control The QFan Control allows you to main menu ASUS Z170M-PLUS 2-11 Click to select a fan to be configured Click to activate PWM Mode Click to activate DC Mode Select a profile to apply to your fans Click to undo the changes Click to apply the fan setting Click to go back to set a fan profile or manually configure the operating speed of your CPU and chassis fans.
2.2.3 QFan Control The QFan Control allows you to main menu ASUS Z170M-PLUS 2-11 Click to select a fan to be configured Click to activate PWM Mode Click to activate DC Mode Select a profile to apply to your fans Click to undo the changes Click to apply the fan setting Click to go back to set a fan profile or manually configure the operating speed of your CPU and chassis fans.
User Guide
Page 46
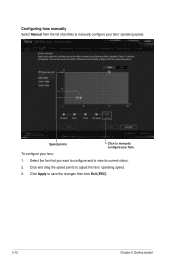
Configuring fans manually Select Manual from the list of profiles to view its current status. 2. Select the fan that you want to configure and to manually configure your fans: 1. Click and drag the speed points to save the changes then click Exit (ESC). 2-12 Chapter 2: Getting started Click Apply to adjust the fans' operating speed. 3. Speed points Click to manually configure your fans To configure your fans' operating speed.
Configuring fans manually Select Manual from the list of profiles to view its current status. 2. Select the fan that you want to configure and to manually configure your fans: 1. Click and drag the speed points to save the changes then click Exit (ESC). 2-12 Chapter 2: Getting started Click Apply to adjust the fans' operating speed. 3. Speed points Click to manually configure your fans To configure your fans' operating speed.

User Guide
Page 54
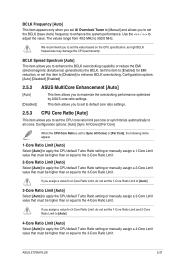
...Tweaker menu items. Incorrect field values can cause the system to assign the BCLK (base clock) frequency manually. The configuration options for the system automatically. [Manual] Allows you to malfunction. The following items appear only when you to select the CPU overclocking options ...to [Manual]. 2-20 Chapter 2: Getting started Scroll down to display other BIOS items. 2.5.1 Ai Overclock Tuner [Auto] This...
...Tweaker menu items. Incorrect field values can cause the system to assign the BCLK (base clock) frequency manually. The configuration options for the system automatically. [Manual] Allows you to malfunction. The following items appear only when you to select the CPU overclocking options ...to [Manual]. 2-20 Chapter 2: Getting started Scroll down to display other BIOS items. 2.5.1 Ai Overclock Tuner [Auto] This...
User Guide
Page 55
...Core], the following items appear. 1-Core Ratio Limit [Auto] Select [Auto] to apply the CPU default Turbo Ratio setting or manually assign a 1-Core Limit value that must be higher than or equal to the 2-Core Ratio Limit. 2-Core Ratio Limit [Auto... Limit to [Auto]. 4-Core Ratio Limit [Auto] Select [Auto] to apply the CPU default Turbo Ratio setting or manually assign a 4-Core Limit value that must be higher than or equal to enhance the BCLK overclocking capability or reduce the ...the CPU permanently. The values range from 40.0 MHz to adjust the value. ASUS Z170M-PLUS 2-21
...Core], the following items appear. 1-Core Ratio Limit [Auto] Select [Auto] to apply the CPU default Turbo Ratio setting or manually assign a 1-Core Limit value that must be higher than or equal to the 2-Core Ratio Limit. 2-Core Ratio Limit [Auto... Limit to [Auto]. 4-Core Ratio Limit [Auto] Select [Auto] to apply the CPU default Turbo Ratio setting or manually assign a 4-Core Limit value that must be higher than or equal to enhance the BCLK overclocking capability or reduce the ...the CPU permanently. The values range from 40.0 MHz to adjust the value. ASUS Z170M-PLUS 2-21
User Guide
Page 57
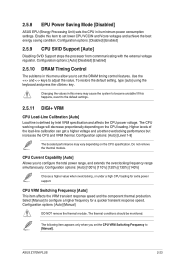
...item appears only when you set lower CPU VCCIN and Vcore voltages and achieve the best energy saving condition. Select [Manual] to become unstable! ASUS Z170M-PLUS 2-23 To restore the default setting, type [auto] using the keyboard and press the key. Changing the values ... [130%] [140%] Choose a higher value when overclocking, or under a high CPU loading for a quicker transient response speed. Configuration options: [Auto] [Manual] DO NOT remove the thermal module. Do not remove the thermal module. CPU Current Capability [Auto] Allows you to the default settings. 2.5.11 DIGI+ ...
...item appears only when you set lower CPU VCCIN and Vcore voltages and achieve the best energy saving condition. Select [Manual] to become unstable! ASUS Z170M-PLUS 2-23 To restore the default setting, type [auto] using the keyboard and press the key. Changing the values ... [130%] [140%] Choose a higher value when overclocking, or under a high CPU loading for a quicker transient response speed. Configuration options: [Auto] [Manual] DO NOT remove the thermal module. Do not remove the thermal module. CPU Current Capability [Auto] Allows you to the default settings. 2.5.11 DIGI+ ...
User Guide
Page 58
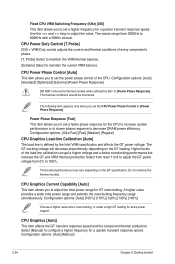
...] [Extreme] [Power Phase Response] DO NOT remove the thermal module when setting this item to adjust the value. Configuration options: [Auto] [Manual] 2-24 Chapter 2: Getting started Probe] Select to maintain the VRM thermal balance. [Extreme] Select to 100%. The following item appears only when... monitored. Power Phase Response [Fast] This item allows you to set a higher frequency for a quicker transient response speed. Select [Manual] to configure a higher frequency for the CPU to increase system performance or to slower phase response to decrease DRAM power efficiency. CPU...
...] [Extreme] [Power Phase Response] DO NOT remove the thermal module when setting this item to adjust the value. Configuration options: [Auto] [Manual] 2-24 Chapter 2: Getting started Probe] Select to maintain the VRM thermal balance. [Extreme] Select to 100%. The following item appears only when... monitored. Power Phase Response [Fast] This item allows you to set a higher frequency for a quicker transient response speed. Select [Manual] to configure a higher frequency for the CPU to increase system performance or to slower phase response to decrease DRAM power efficiency. CPU...
User Guide
Page 59
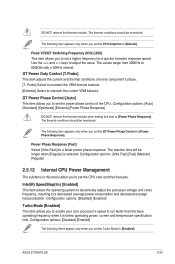
...] Turbo Mode [Enabled] This item allows you to set the Turbo Mode to [Power Phase Response]. ASUS Z170M-PLUS 2-25 Fixed VCCGT Switching Frequency (KHz) [250] This item allows you to enable your core processor's speed to [Manual]. Configuration options: [Auto] [Standard] [Optimized] [Extreme] [Power Phase Response] DO NOT remove the thermal module when...
...] Turbo Mode [Enabled] This item allows you to set the Turbo Mode to [Power Phase Response]. ASUS Z170M-PLUS 2-25 Fixed VCCGT Switching Frequency (KHz) [250] This item allows you to enable your core processor's speed to [Manual]. Configuration options: [Auto] [Standard] [Optimized] [Extreme] [Power Phase Response] DO NOT remove the thermal module when...
User Guide
Page 61
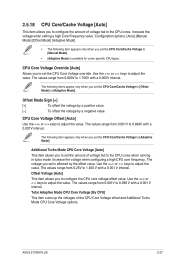
... Core Voltage Offset [Auto] Use the or keys to adjust the value. The values range from 0.001V to 0.999V with a 0.001 V interval. ASUS Z170M-PLUS 2-27 Offset Mode Sign [+] [+] To offset the voltage by a positive value. [-] To offset the voltage by the offset value. The values range ... 0.001V to 0.999 V with a 0.001V interval. The following item appears only when you set the CPU Core/Cache Voltage to [Manual Mode]. • [Adaptive Mode] is affected by a negative value. The voltage you set is available for some specific CPU types. Configuration options:...
... Core Voltage Offset [Auto] Use the or keys to adjust the value. The values range from 0.001V to 0.999V with a 0.001 V interval. ASUS Z170M-PLUS 2-27 Offset Mode Sign [+] [+] To offset the voltage by a positive value. [-] To offset the voltage by the offset value. The values range ... 0.001V to 0.999 V with a 0.001V interval. The following item appears only when you set the CPU Core/Cache Voltage to [Manual Mode]. • [Adaptive Mode] is affected by a negative value. The voltage you set is available for some specific CPU types. Configuration options:...
User Guide
Page 62
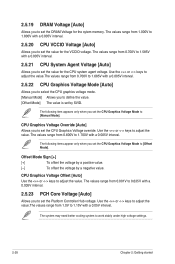
....The values range from 1.000V to 1.800V with a 0.005V interval. 2.5.22 CPU Graphics Voltage Mode [Auto] Allows you to select the CPU graphics voltage mode. [Manual Mode] Allows you to define the value. [Offset Mode] The value is set the value for the sytem memory. The values range from 0.700V to.... The values range from 1.0V to 1.15V with a 0.005V interval. 2.5.23 PCH Core Voltage [Auto] Allows you to set the CPU Graphics Voltage Mode to [Manual Mode]. 2.5.19 DRAM Voltage [Auto] Allows you to set the CPU Graphics Voltage override.
....The values range from 1.000V to 1.800V with a 0.005V interval. 2.5.22 CPU Graphics Voltage Mode [Auto] Allows you to select the CPU graphics voltage mode. [Manual Mode] Allows you to define the value. [Offset Mode] The value is set the value for the sytem memory. The values range from 0.700V to.... The values range from 1.0V to 1.15V with a 0.005V interval. 2.5.23 PCH Core Voltage [Auto] Allows you to set the CPU Graphics Voltage Mode to [Manual Mode]. 2.5.19 DRAM Voltage [Auto] Allows you to set the CPU Graphics Voltage override.
User Guide
Page 74
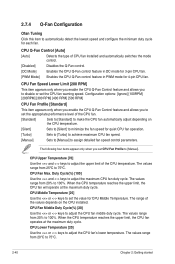
... feature and allows you set the value for quiet CPU fan operation. [Turbo] Sets to [Turbo] to achieve maximum CPU fan speed. [Manual] Sets to [Manual] to assign detailed fan speed control parameters. 2.7.4 Q-Fan Configuration Ofan Tuning Click this item to automatically detect the lowest speed and configure the minimum... duty cycle for 4-pin CPU fan. CPU Middle Temperature [25] Use the or keys to set CPU Fan Profile to [Manual]. The values range from 25ºC to set the CPU fan warning speed. Duty Cycle(%) [100] Use the and keys to adjust the ...
... feature and allows you set the value for quiet CPU fan operation. [Turbo] Sets to [Turbo] to achieve maximum CPU fan speed. [Manual] Sets to [Manual] to assign detailed fan speed control parameters. 2.7.4 Q-Fan Configuration Ofan Tuning Click this item to automatically detect the lowest speed and configure the minimum... duty cycle for 4-pin CPU fan. CPU Middle Temperature [25] Use the or keys to set CPU Fan Profile to [Manual]. The values range from 25ºC to set the CPU fan warning speed. Duty Cycle(%) [100] Use the and keys to adjust the ...
User Guide
Page 75
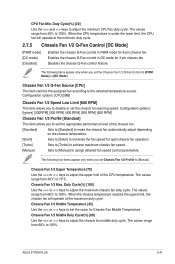
... Q-Fan control in DC mode for quiet chassis fan operation. [Turbo] Sets to [Turbo] to achieve maximum chassis fan speed. [Manual] Sets to [Manual] to [Manual]. Chassis Fan 1/2 Q-Fan Source [CPU] This item controls the assigned fan according to adjust the minimum CPU fan duty cycle. Chassis... fan automatically adjust depending on the chassis temperature. [Silent] Sets to [Silent] to minimize the fan speed for 3-pin chassis fan. ASUS Z170M-PLUS 2-41 Duty Cycle(%) [20] Use the and keys to the selected temperature source. The following four items appear only when you set Chassis...
... Q-Fan control in DC mode for quiet chassis fan operation. [Turbo] Sets to [Turbo] to achieve maximum chassis fan speed. [Manual] Sets to [Manual] to [Manual]. Chassis Fan 1/2 Q-Fan Source [CPU] This item controls the assigned fan according to adjust the minimum CPU fan duty cycle. Chassis... fan automatically adjust depending on the chassis temperature. [Silent] Sets to [Silent] to minimize the fan speed for 3-pin chassis fan. ASUS Z170M-PLUS 2-41 Duty Cycle(%) [20] Use the and keys to the selected temperature source. The following four items appear only when you set Chassis...
User Guide
Page 86
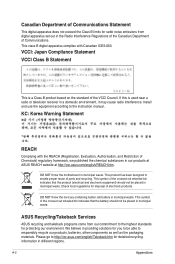
...mercury-containing button cell battery in our products at ASUS REACH website at http://csr.asus.com/english/REACH.htm. DO NOT throw the motherboard in municipal waste. This product has been designed to the instruction manual. This symbol of the crossed out wheeled bin indicates... that the battery should not be able to http://csr.asus.com/english/Takeback.htm for detailed recycling information in municipal waste. This...
...mercury-containing button cell battery in our products at ASUS REACH website at http://csr.asus.com/english/REACH.htm. DO NOT throw the motherboard in municipal waste. This product has been designed to the instruction manual. This symbol of the crossed out wheeled bin indicates... that the battery should not be able to http://csr.asus.com/english/Takeback.htm for detailed recycling information in municipal waste. This...


