Users Manual
Page 3
... 1.1 Welcome 1-1 1.2 Package contents 1-1 1.3 Monitor introduction 1-2 1.3.1 Front view 1-2 1.3.2 Back view 1-4 1.3.3 QuickFit Function 1-5 Chapter 2: Setup 2.1 Assembling the monitor arm/base 2-1 2.2 Detaching the arm/base (for VESA wall mount 2-2 2.3 Adjusting the monitor 2-3 2.4 Connecting the cables 2-3 2.5 Turning on the monitor 2-4 Chapter 3: General instructions 3.1 OSD (On-Screen Display) menu 3-1 3.1.1 How to reconfigure 3-1 3.1.2 OSD function introduction 3-2 3.2 Specifications summary 3-8 3.3 Troubleshooting (FAQ 3-10 3.4 Supported operating modes 3-11 iii
... 1.1 Welcome 1-1 1.2 Package contents 1-1 1.3 Monitor introduction 1-2 1.3.1 Front view 1-2 1.3.2 Back view 1-4 1.3.3 QuickFit Function 1-5 Chapter 2: Setup 2.1 Assembling the monitor arm/base 2-1 2.2 Detaching the arm/base (for VESA wall mount 2-2 2.3 Adjusting the monitor 2-3 2.4 Connecting the cables 2-3 2.5 Turning on the monitor 2-4 Chapter 3: General instructions 3.1 OSD (On-Screen Display) menu 3-1 3.1.1 How to reconfigure 3-1 3.1.2 OSD function introduction 3-2 3.2 Specifications summary 3-8 3.3 Troubleshooting (FAQ 3-10 3.4 Supported operating modes 3-11 iii

Users Manual
Page 4
...uses and can be determined by turning the equipment off and on a circuit different from digital apparatus set out in the Radio Interference Regulations of the Canadian Department of Communications Statement This digital apparatus does not exceed the Class B limits for compliance could void the user...radiate radio frequency energy and, if not installed and used in accordance with Canadian ICES-003. This equipment has been tested and found to radio communications. The use of shielded cables for a Class B digital device, pursuant to Part 15 of the monitor to the graphics card is subject ...
...uses and can be determined by turning the equipment off and on a circuit different from digital apparatus set out in the Radio Interference Regulations of the Canadian Department of Communications Statement This digital apparatus does not exceed the Class B limits for compliance could void the user...radiate radio frequency energy and, if not installed and used in accordance with Canadian ICES-003. This equipment has been tested and found to radio communications. The use of shielded cables for a Class B digital device, pursuant to Part 15 of the monitor to the graphics card is subject ...
Users Manual
Page 6
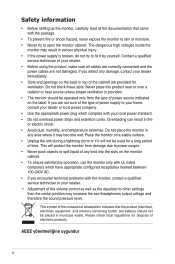
... monitor from damage due to other settings than the center position may result in municipal waste. Place the monitor on the back or top of time. Please check local regulations for a long period of the cabinet are not damaged. If you encounter technical problems with your retailer. • Adjustment of the volume control as well as the equalizer to power...
... monitor from damage due to other settings than the center position may result in municipal waste. Place the monitor on the back or top of time. Please check local regulations for a long period of the cabinet are not damaged. If you encounter technical problems with your retailer. • Adjustment of the volume control as well as the equalizer to power...
Users Manual
Page 7
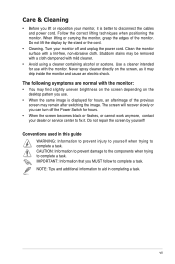
... lift the display by yourself! Care & Cleaning • Before you lift or reposition your monitor, it is displayed for hours, an afterimage of the monitor. The screen will recover slowly or you MUST follow to fix it. IMPORTANT: Information that you can turn off the Power Switch for use . • When the same image is better to aid in this guide WARNING: Information...
... lift the display by yourself! Care & Cleaning • Before you lift or reposition your monitor, it is displayed for hours, an afterimage of the monitor. The screen will recover slowly or you MUST follow to fix it. IMPORTANT: Information that you can turn off the Power Switch for use . • When the same image is better to aid in this guide WARNING: Information...

Users Manual
Page 9
... experience that enhance your retailer immediately. ASUS VP247 Series LCD Monitor 1-1 Thank you ! 1.2 Package contents Check your package for purchasing the ASUS® LCD monitor! The latest widescreen LCD monitor from ASUS provides a broader, brighter and crystal-clear display, plus a host of features that the monitor brings to you for the following items: LCD monitor Monitor base Quick start guide Warranty card Power cord DVI cable (optional) HDMI cable (optional) VGA cable (optional) Audio cable (optional) If any of the above...
... experience that enhance your retailer immediately. ASUS VP247 Series LCD Monitor 1-1 Thank you ! 1.2 Package contents Check your package for purchasing the ASUS® LCD monitor! The latest widescreen LCD monitor from ASUS provides a broader, brighter and crystal-clear display, plus a host of features that the monitor brings to you for the following items: LCD monitor Monitor base Quick start guide Warranty card Power cord DVI cable (optional) HDMI cable (optional) VGA cable (optional) Audio cable (optional) If any of the above...
Users Manual
Page 10
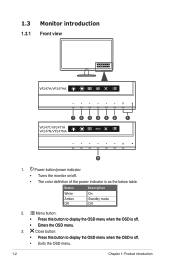
... this button to display the OSD menu when the OSD is as the below table. Status Description White Amber Off On Standby mode Off 2. 1.3 Monitor introduction 1.3.1 Front view Auto VP247H/VP247HA 765432 1 VP247T/VP247TA Auto VP247N/VP247NA 8 1. Power button/power indicator • Turns the monitor on/off. • The color definition of the power indicator is off . • Exits the OSD menu. 1-2 Chapter 1: Product introduction Close button: • Press this button to display the OSD menu...
... this button to display the OSD menu when the OSD is as the below table. Status Description White Amber Off On Standby mode Off 2. 1.3 Monitor introduction 1.3.1 Front view Auto VP247H/VP247HA 765432 1 VP247T/VP247TA Auto VP247N/VP247NA 8 1. Power button/power indicator • Turns the monitor on/off. • The color definition of the power indicator is off . • Exits the OSD menu. 1-2 Chapter 1: Product introduction Close button: • Press this button to display the OSD menu...
Users Manual
Page 11
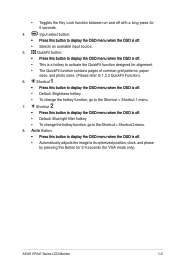
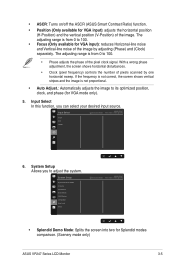
...; Default: Brightness hotkey • To change the hotkey function, go to display the OSD menu when the OSD is off. • Automatically adjusts the image to its optimized position, clock, and phase by pressing this button to display the OSD menu when the OSD is off. • Selects an available input source. 5. Shortcut • Press this button to the Shortcut > Shortcut 1 menu. 7. ASUS VP247 Series LCD Monitor 1-3 Input select button: • Press this button to display the OSD menu when...
...; Default: Brightness hotkey • To change the hotkey function, go to display the OSD menu when the OSD is off. • Automatically adjusts the image to its optimized position, clock, and phase by pressing this button to display the OSD menu when the OSD is off. • Selects an available input source. 5. Shortcut • Press this button to the Shortcut > Shortcut 1 menu. 7. ASUS VP247 Series LCD Monitor 1-3 Input select button: • Press this button to display the OSD menu when...
Users Manual
Page 12
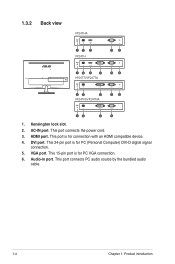
AC-IN port. This 24-pin port is for connection with an HDMI compatible device. 4. Audio-in port. This port is for PC VGA connection. 6. This port connects PC audio source by the bundled audio cable. 1-4 Chapter 1: Product introduction Kensington lock slot. 2. HDMI port. This 15-pin port is for PC (Personal Computer) DVI-D digital signal connection. 5. This port connects the power cord. 3. 1.3.2 Back view VP247HA 12 3 VP247H 56 12 3 4 VP247T/VP247TA 56 12 4 VP247N/VP247NA 56 12 4 5 1. VGA port. DVI port.
AC-IN port. This 24-pin port is for connection with an HDMI compatible device. 4. Audio-in port. This port is for PC VGA connection. 6. This port connects PC audio source by the bundled audio cable. 1-4 Chapter 1: Product introduction Kensington lock slot. 2. HDMI port. This 15-pin port is for PC (Personal Computer) DVI-D digital signal connection. 5. This port connects the power cord. 3. 1.3.2 Back view VP247HA 12 3 VP247H 56 12 3 4 VP247T/VP247TA 56 12 4 VP247N/VP247NA 56 12 4 5 1. VGA port. DVI port.
Users Manual
Page 17
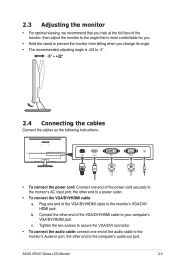
... of the VGA/DVI/HDMI cable to the computer's audio-out port. ASUS VP247 Series LCD Monitor 2-3 Tighten the two screws to secure the VGA/DVI connector. • To connect the audio cable: connect one end of the audio cable to the monitor's Audio-in port, the other end to the monitor's VGA/DVI/ HDMI jack. b. Connect the other end of the VGA/DVI/HDMI cable to a power outlet. • To connect the VGA/DVI/HDMI cable: a. 2.3 Adjusting the monitor • For optimal viewing, we recommend that you look at the full...
... of the VGA/DVI/HDMI cable to the computer's audio-out port. ASUS VP247 Series LCD Monitor 2-3 Tighten the two screws to secure the VGA/DVI connector. • To connect the audio cable: connect one end of the audio cable to the monitor's Audio-in port, the other end to the monitor's VGA/DVI/ HDMI jack. b. Connect the other end of the VGA/DVI/HDMI cable to a power outlet. • To connect the VGA/DVI/HDMI cable: a. 2.3 Adjusting the monitor • For optimal viewing, we recommend that you look at the full...
Users Manual
Page 18
See page 1-2 for the location of the power button. The power indicator lights up in the OSD menu. 2.5 Turning on the monitor Press the power button . When these cables are connected, you can choose the desired signal from the Input Select item in white to show that the monitor is ON. 2-4 Chapter 2: Setup
See page 1-2 for the location of the power button. The power indicator lights up in the OSD menu. 2.5 Turning on the monitor Press the power button . When these cables are connected, you can choose the desired signal from the Input Select item in white to show that the monitor is ON. 2-4 Chapter 2: Setup
Users Manual
Page 19
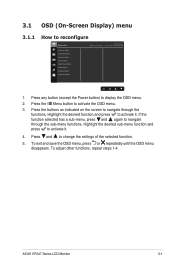
... . ASUS VP247 Series LCD Monitor 3-1 Highlight the desired sub-menu function and press to activate it . 4. To adjust other functions, repeat steps 1-4. 3.1 OSD (On-Screen Display) menu 3.1.1 How to navigate through the sub-menu functions. If the function selected has a sub-menu, press and again to change the settings of the selected function. 5. Press and to navigate through the functions. Press any button (except the Power button...
... . ASUS VP247 Series LCD Monitor 3-1 Highlight the desired sub-menu function and press to activate it . 4. To adjust other functions, repeat steps 1-4. 3.1 OSD (On-Screen Display) menu 3.1.1 How to navigate through the sub-menu functions. If the function selected has a sub-menu, press and again to change the settings of the selected function. 5. Press and to navigate through the functions. Press any button (except the Power button...
Users Manual
Page 21
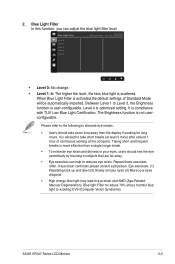
... the display if working at the computer. Taking short and frequent breaks is optimized setting. Eye exercises: (1) Repeating look up and down (2) Slowly roll your eyes (3) Move your eyes, users should take short breaks (at least 5 mins) after around 1 hour of Standard Mode will be automatically imported. ASUS VP247 Series LCD Monitor 3-3 2. If eye strain continues please consult a physician. When Blue Light...
... the display if working at the computer. Taking short and frequent breaks is optimized setting. Eye exercises: (1) Repeating look up and down (2) Slowly roll your eyes (3) Move your eyes, users should take short breaks (at least 5 mins) after around 1 hour of Standard Mode will be automatically imported. ASUS VP247 Series LCD Monitor 3-3 2. If eye strain continues please consult a physician. When Blue Light...
Users Manual
Page 22
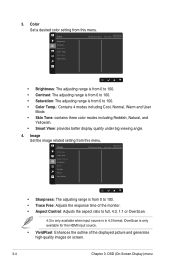
... input source is in 4:3 format. Skin Tone Smart View • Brightness: The adjusting range is from 0 to 100. • Contrast: The adjusting range is from 0 to 100. • Saturation: The adjusting range is from 0 to 100. • Trace Free: Adjusts the response time of the displayed picture and generates high-quality images on screen. 3-4 Chapter 3: OSD (On-Screen Display) menu Image ASUS VP247 Standard Mode VGA 1920 x 1080 @ 60Hz Sharpness Trace Free Aspect Control VividPixel ASCR Position Focus Auto Adjust...
... input source is in 4:3 format. Skin Tone Smart View • Brightness: The adjusting range is from 0 to 100. • Contrast: The adjusting range is from 0 to 100. • Saturation: The adjusting range is from 0 to 100. • Trace Free: Adjusts the response time of the displayed picture and generates high-quality images on screen. 3-4 Chapter 3: OSD (On-Screen Display) menu Image ASUS VP247 Standard Mode VGA 1920 x 1080 @ 60Hz Sharpness Trace Free Aspect Control VividPixel ASCR Position Focus Auto Adjust...
Users Manual
Page 23
... pixels scanned by adjusting (Phase) and (Clock) separately. Input Select Standard Mode ASUS VP247 VGA 1920 x 1080 @ 60Hz VGA DVI HDMI 6. System Setup Allows you can select your desired input source. • ASCR: Turns on/off the ASCR (ASUS Smart Contrast Ratio) function. • Position (Only available for Splendid modes comparison. (Scenery mode only) ASUS VP247 Series LCD Monitor 3-5 With a wrong phase adjustment, the screen shows horizontal disturbances. • Clock (pixel frequency) controls the number of the image by one horizontal...
... pixels scanned by adjusting (Phase) and (Clock) separately. Input Select Standard Mode ASUS VP247 VGA 1920 x 1080 @ 60Hz VGA DVI HDMI 6. System Setup Allows you can select your desired input source. • ASCR: Turns on/off the ASCR (ASUS Smart Contrast Ratio) function. • Position (Only available for Splendid modes comparison. (Scenery mode only) ASUS VP247 Series LCD Monitor 3-5 With a wrong phase adjustment, the screen shows horizontal disturbances. • Clock (pixel frequency) controls the number of the image by one horizontal...
Users Manual
Page 24
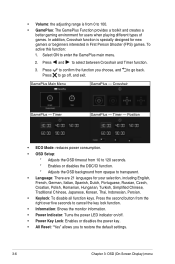
...; Power Key Lock: Enables or disables the power key. • All Reset: "Yes" allows you choose, and to go off, and exit. Press to go back. GamePlus Main Menu GamePlus - • Volume: the adjusting range is specially designed for new gamers or beginners interested in First Person Shooter (FPS) games. Crosshair GamePlus - Position • ECO Mode: reduces power consumption. • OSD Setup: * Adjusts the OSD timeout...
...; Power Key Lock: Enables or disables the power key. • All Reset: "Yes" allows you choose, and to go off, and exit. Press to go back. GamePlus Main Menu GamePlus - • Volume: the adjusting range is specially designed for new gamers or beginners interested in First Person Shooter (FPS) games. Crosshair GamePlus - Position • ECO Mode: reduces power consumption. • OSD Setup: * Adjusts the OSD timeout...
Users Manual
Page 25
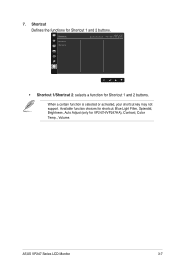
7. Shortcut ASUS VP247 Standard Mode VGA 1920 x 1080 @ 60Hz Shortcut 1 Shortcut 2 • Shortcut 1/Shortcut 2: selects a function for VP247H/VP247HA), Contrast, Color Temp., Volume. Available function choices for shortcut: Blue Light Filter, Splendid, Brightness, Auto Adjust (only for Shortcut 1 and 2 buttons. When a certain function is selected or activated, your shortcut key may not support. ASUS VP247 Series LCD Monitor 3-7 Shortcut Defines the functions for Shortcut 1 and 2 buttons.
7. Shortcut ASUS VP247 Standard Mode VGA 1920 x 1080 @ 60Hz Shortcut 1 Shortcut 2 • Shortcut 1/Shortcut 2: selects a function for VP247H/VP247HA), Contrast, Color Temp., Volume. Available function choices for shortcut: Blue Light Filter, Splendid, Brightness, Auto Adjust (only for Shortcut 1 and 2 buttons. When a certain function is selected or activated, your shortcut key may not support. ASUS VP247 Series LCD Monitor 3-7 Shortcut Defines the functions for Shortcut 1 and 2 buttons.
Users Manual
Page 26
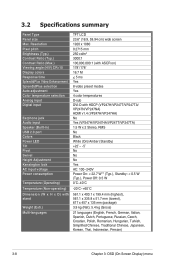
... summary Panel Type Panel size Max. Resolution Pixel pitch Brightness (Typ.) Contrast Ratio (Typ.) Contrast Ratio (Max.) Viewing angle (H/V) CR>10 Display colors Response time SplendidPlus Video Enhancement SplendidPlus selection Auto adjustment Color temperature selection Analog input Digital input Earphone jack Audio input Speaker (Built-in) USB 2.0 port Colors Power LED Tilt Pivot Swivel Height Adjustment Kensington lock AC input voltage Power consumption Temperature (Operating) Temperature (Non-operating) Dimension (W x H x D) with stand Weight (Esti.) Multi-languages TFT LCD 23...
... summary Panel Type Panel size Max. Resolution Pixel pitch Brightness (Typ.) Contrast Ratio (Typ.) Contrast Ratio (Max.) Viewing angle (H/V) CR>10 Display colors Response time SplendidPlus Video Enhancement SplendidPlus selection Auto adjustment Color temperature selection Analog input Digital input Earphone jack Audio input Speaker (Built-in) USB 2.0 port Colors Power LED Tilt Pivot Swivel Height Adjustment Kensington lock AC input voltage Power consumption Temperature (Operating) Temperature (Non-operating) Dimension (W x H x D) with stand Weight (Esti.) Multi-languages TFT LCD 23...
Users Manual
Page 27
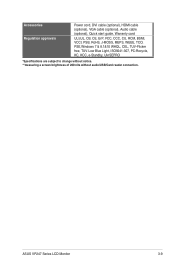
Accessories Regulation approvals Power cord, DVI cable (optional), HDMI cable (optional), VGA cable (optional), Audio cable (optional), Quick start guide, Warranty card UL/cUL, CB, CE, ErP, FCC, CCC, CU, RCM, BSMI, VCCI, PSB, RoHS, J-MOSS, MEPS, WEEE, TCO, PSE,Windows 7 & 8.1&10 WHQL, CEL, TUV-Flicker free, TUV-Low Blue Light, ISO9241-307, PC-Recycle, KC, KCC, e-Standby, UkrSEPRO *Specifications are subject to change without notice. **measuring a screen brightness of 200 nits without audio/USB/Card reader connection. ASUS VP247 Series LCD Monitor 3-9
Accessories Regulation approvals Power cord, DVI cable (optional), HDMI cable (optional), VGA cable (optional), Audio cable (optional), Quick start guide, Warranty card UL/cUL, CB, CE, ErP, FCC, CCC, CU, RCM, BSMI, VCCI, PSB, RoHS, J-MOSS, MEPS, WEEE, TCO, PSE,Windows 7 & 8.1&10 WHQL, CEL, TUV-Flicker free, TUV-Low Blue Light, ISO9241-307, PC-Recycle, KC, KCC, e-Standby, UkrSEPRO *Specifications are subject to change without notice. **measuring a screen brightness of 200 nits without audio/USB/Card reader connection. ASUS VP247 Series LCD Monitor 3-9
Users Manual
Page 28
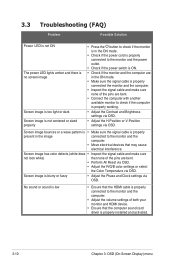
... Reset via OSD. • Adjust the R/G/B color settings or select the Color Temperature via OSD. Screen image is properly present in the ON mode. • Make sure the signal cable is properly connected the monitor and the computer. • Inspect the signal cable and make sure not look white) that the computer sound card driver is properly working. • Adjust the Contrast and Brightness settings via OSD. • Adjust the H-Position or V-Position settings via OSD. 3.3 Troubleshooting (FAQ) Problem Possible Solution Power LED is not ON The power LED lights...
... Reset via OSD. • Adjust the R/G/B color settings or select the Color Temperature via OSD. Screen image is properly present in the ON mode. • Make sure the signal cable is properly connected the monitor and the computer. • Inspect the signal cable and make sure not look white) that the computer sound card driver is properly working. • Adjust the Contrast and Brightness settings via OSD. • Adjust the H-Position or V-Position settings via OSD. 3.3 Troubleshooting (FAQ) Problem Possible Solution Power LED is not ON The power LED lights...
VP247 Series Quick Start Guide
Page 1
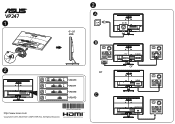
Q41G78S168093B or C AC IN DVI D-SUB or HDMI AUDIO IN All Rights Reserved. VP247 1 1 2 2 A -5 ~ 20 B 2 HDMI DVI VGA DVI VGA DVI VGA VGA VP247H VP247T VP247N VP247D http://www.asus.com Copyright © 2015 ASUSTeK COMPUTER INC.
Q41G78S168093B or C AC IN DVI D-SUB or HDMI AUDIO IN All Rights Reserved. VP247 1 1 2 2 A -5 ~ 20 B 2 HDMI DVI VGA DVI VGA DVI VGA VGA VP247H VP247T VP247N VP247D http://www.asus.com Copyright © 2015 ASUSTeK COMPUTER INC.


