
User Guide
Page 7
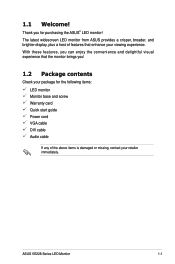
... a host of the above items is damaged or missing, contact your viewing experience. ASUS VE228 Series LED Monitor 1-1 With these features, you ! 1.2 Package contents Check your package for purchasing the ASUS® LED monitor! Thank you for the following items: LED monitor Monitor base and screw Warranty card Quick start guide Power cord VGA cable...
... a host of the above items is damaged or missing, contact your viewing experience. ASUS VE228 Series LED Monitor 1-1 With these features, you ! 1.2 Package contents Check your package for purchasing the ASUS® LED monitor! Thank you for the following items: LED monitor Monitor base and screw Warranty card Quick start guide Power cord VGA cable...
User Guide
Page 9
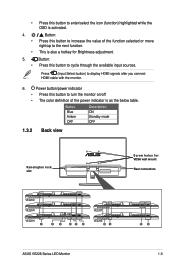
... this button to increase the value of the power indicator is also a hotkey for VESA wall mount Rear connectors VE228D VE228N VE228H 1 23 45 6 VE228T VE228S 31 56 ASUS VE228 Series LED Monitor 1-3 Power button/power indicator • Press this button to display HDMI signals after you connect HDMI cable with the monitor...
... this button to increase the value of the power indicator is also a hotkey for VESA wall mount Rear connectors VE228D VE228N VE228H 1 23 45 6 VE228T VE228S 31 56 ASUS VE228 Series LED Monitor 1-3 Power button/power indicator • Press this button to display HDMI signals after you connect HDMI cable with the monitor...
User Guide
Page 11
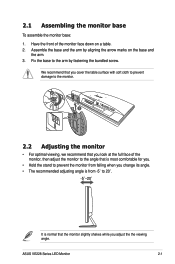
... • For optimal viewing, we recommend that you look at the full face of the monitor face down on the base and the arm. 3. ASUS VE228 Series LED Monitor 2-1 Have the front of the monitor, then adjust the monitor to the angle that is most comfortable for you. • Hold the stand...
... • For optimal viewing, we recommend that you look at the full face of the monitor face down on the base and the arm. 3. ASUS VE228 Series LED Monitor 2-1 Have the front of the monitor, then adjust the monitor to the angle that is most comfortable for you. • Hold the stand...
User Guide
Page 12
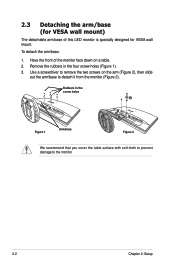
... recommend that you cover the table surface with soft cloth to prevent damage to detach it from the monitor (Figure 2). Have the front of this LED monitor is specially designed for VESA wall mount) The detachable arm/base of the monitor face down on the arm (Figure 2), then slide out the...
... recommend that you cover the table surface with soft cloth to prevent damage to detach it from the monitor (Figure 2). Have the front of this LED monitor is specially designed for VESA wall mount) The detachable arm/base of the monitor face down on the arm (Figure 2), then slide out the...
User Guide
Page 13
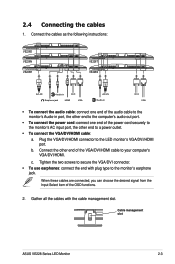
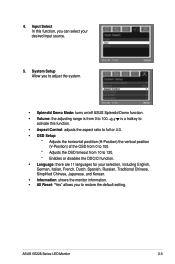
Connect the cables as the following instructions: VE228D VE228N VE228H VE228T VE228S Audio-in Earphone jack HDMI VGA Audio-in VGA • To connect the audio cable: connect one end of the audio cable to ... Select item of the OSD functions. 2. c. Tighten the two screws to your computer's VGA/DVI/HDMI. 2.4 Connecting the cables 1. Cable management slot ASUS VE228 Series LED Monitor 2-3 Gather all the cables with plug type to the LED monitor's VGA/DVI/HDMI port. b. Plug the VGA/DVI/HDMI connector to the monitor's earphone jack.
Connect the cables as the following instructions: VE228D VE228N VE228H VE228T VE228S Audio-in Earphone jack HDMI VGA Audio-in VGA • To connect the audio cable: connect one end of the audio cable to ... Select item of the OSD functions. 2. c. Tighten the two screws to your computer's VGA/DVI/HDMI. 2.4 Connecting the cables 1. Cable management slot ASUS VE228 Series LED Monitor 2-3 Gather all the cables with plug type to the LED monitor's VGA/DVI/HDMI port. b. Plug the VGA/DVI/HDMI connector to the monitor's earphone jack.

User Guide
Page 15
... MENU button to reconfigure 1. Highlight and activate the desired sub-menu function by pressing the MENU button. Repeat step 2 and step 3.1.2 OSD Function Introduction 1. ASUS VE228 Series LED Monitor 3-1 Press (or function. ), and to navigate through the sub-menu functions. To exit the OSD menu, press the 3 to adjust any other modes...
... MENU button to reconfigure 1. Highlight and activate the desired sub-menu function by pressing the MENU button. Repeat step 2 and step 3.1.2 OSD Function Introduction 1. ASUS VE228 Series LED Monitor 3-1 Press (or function. ), and to navigate through the sub-menu functions. To exit the OSD menu, press the 3 to adjust any other modes...
User Guide
Page 17
...8226; Information: shows the monitor information. • All Reset: "Yes" allows you to adjust the system. • Splendid Demo Mode: turns on/off ASUS Splendid Demo function. • Volume: the adjusting range is a hotkey to • Aspect Control: adjusts the aspect ratio to full or 4:3. • OSD...)/the vertical position (V-Position) of the OSD from 0 to 100. * Adjusts the OSD timeout from 0 to restore the default setting. ASUS VE228 Series LED Monitor 3-3 is from 10 to 120. * Enables or disables the DDC/CI function. • Language: there are 11 languages for your...
...8226; Information: shows the monitor information. • All Reset: "Yes" allows you to adjust the system. • Splendid Demo Mode: turns on/off ASUS Splendid Demo function. • Volume: the adjusting range is a hotkey to • Aspect Control: adjusts the aspect ratio to full or 4:3. • OSD...)/the vertical position (V-Position) of the OSD from 0 to 100. * Adjusts the OSD timeout from 0 to restore the default setting. ASUS VE228 Series LED Monitor 3-3 is from 10 to 120. * Enables or disables the DDC/CI function. • Language: there are 11 languages for your...
User Guide
Page 18
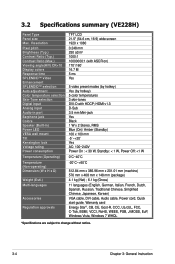
...100 x 100 mm -5˚~+20˚ Yes AC: 100~240V Power On : < 30 W, Standby: < 1 W, Power Off: 3.2 Specifications summary (VE228H) Panel Type Panel size Max. Resolution Pixel pitch Brightness (Typ.) Contrast Ratio (Typ.) Contrast Ratio (Max.) Viewing angle(H/V) CR>10 Display colors Response time ...Auto adjustment Color temperature selection Skin-Tone selection Digital input Analog input Audio-in port Earphone jack Colors Speaker (Built-in) Power LED VESA wall mount Tilt Kensington lock Voltage rating Power consumption Temperature (Operating) Temperature (Non-operating) Dimension (W x H x ...
...100 x 100 mm -5˚~+20˚ Yes AC: 100~240V Power On : < 30 W, Standby: < 1 W, Power Off: 3.2 Specifications summary (VE228H) Panel Type Panel size Max. Resolution Pixel pitch Brightness (Typ.) Contrast Ratio (Typ.) Contrast Ratio (Max.) Viewing angle(H/V) CR>10 Display colors Response time ...Auto adjustment Color temperature selection Skin-Tone selection Digital input Analog input Audio-in port Earphone jack Colors Speaker (Built-in) Power LED VESA wall mount Tilt Kensington lock Voltage rating Power consumption Temperature (Operating) Temperature (Non-operating) Dimension (W x H x ...
User Guide
Page 19
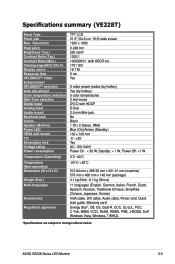
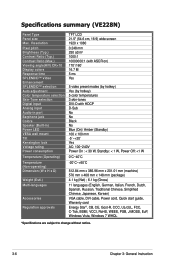
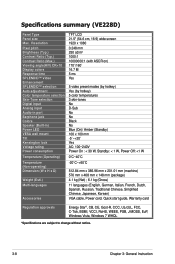
... SPLENDID™ selection Auto adjustment Color temperature selection Skin-Tone selection Digital input Analog input Audio-in port Earphone jack Colors Speaker (Built-in) Power LED VESA wall mount Tilt Kensington lock Voltage rating Power consumption Temperature (Operating) Temperature (Non-operating) Dimension (W x H x D) Weight (Esti.) Multi-languages Accessories Regulation approvals TFT LCD...
... SPLENDID™ selection Auto adjustment Color temperature selection Skin-Tone selection Digital input Analog input Audio-in port Earphone jack Colors Speaker (Built-in) Power LED VESA wall mount Tilt Kensington lock Voltage rating Power consumption Temperature (Operating) Temperature (Non-operating) Dimension (W x H x D) Weight (Esti.) Multi-languages Accessories Regulation approvals TFT LCD...
User Guide
Page 20
... SPLENDID™ selection Auto adjustment Color temperature selection Skin-Tone selection Digital input Analog input Audio-in port Earphone jack Colors Speaker (Built-in) Power LED VESA wall mount Tilt Kensington lock Voltage rating Power consumption Temperature (Operating) Temperature (Non-operating) Dimension (W x H x D) Weight (Esti.) Multi-languages Accessories Regulation approvals TFT LCD...
... SPLENDID™ selection Auto adjustment Color temperature selection Skin-Tone selection Digital input Analog input Audio-in port Earphone jack Colors Speaker (Built-in) Power LED VESA wall mount Tilt Kensington lock Voltage rating Power consumption Temperature (Operating) Temperature (Non-operating) Dimension (W x H x D) Weight (Esti.) Multi-languages Accessories Regulation approvals TFT LCD...

User Guide
Page 21
... SPLENDID™ selection Auto adjustment Color temperature selection Skin-Tone selection Digital input Analog input Audio-in port Earphone jack Colors Speaker (Built-in) Power LED VESA wall mount Tilt Kensington lock Voltage rating Power consumption Temperature (Operating) Temperature (Non-operating) Dimension (W x H x D) Weight (Esti.) Multi-languages Accessories Regulation approvals TFT LCD...
... SPLENDID™ selection Auto adjustment Color temperature selection Skin-Tone selection Digital input Analog input Audio-in port Earphone jack Colors Speaker (Built-in) Power LED VESA wall mount Tilt Kensington lock Voltage rating Power consumption Temperature (Operating) Temperature (Non-operating) Dimension (W x H x D) Weight (Esti.) Multi-languages Accessories Regulation approvals TFT LCD...
User Guide
Page 22
... SPLENDID™ selection Auto adjustment Color temperature selection Skin-Tone selection Digital input Analog input Audio-in port Earphone jack Colors Speaker (Built-in) Power LED VESA wall mount Tilt Kensington lock Voltage rating Power consumption Temperature (Operating) Temperature (Non-operating) Dimension (W x H x D) Weight (Esti.) Multi-languages Accessories TFT LCD 21.5" (54...
... SPLENDID™ selection Auto adjustment Color temperature selection Skin-Tone selection Digital input Analog input Audio-in port Earphone jack Colors Speaker (Built-in) Power LED VESA wall mount Tilt Kensington lock Voltage rating Power consumption Temperature (Operating) Temperature (Non-operating) Dimension (W x H x D) Weight (Esti.) Multi-languages Accessories TFT LCD 21.5" (54...
User Guide
Page 23
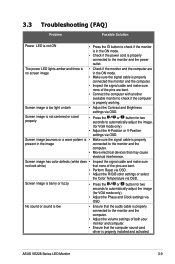
... sure not look white) that none of the pins are in the image connected to check if the computer is properly working. ASUS VE228 Series LED Monitor 3-9 The power LED lights amber and there is no screen image • Check if the monitor and the computer are bent. • Perform Reset... automatically adjust the image. (for VGA mode only). • Adjust the Phase and Clock settings via OSD. 3.3 Troubleshooting (FAQ) Problem Possible Solution Power LED is not ON • Press the button to check if the monitor is in the ON mode. • Check if the power cord is properly...
... sure not look white) that none of the pins are in the image connected to check if the computer is properly working. ASUS VE228 Series LED Monitor 3-9 The power LED lights amber and there is no screen image • Check if the monitor and the computer are bent. • Perform Reset... automatically adjust the image. (for VGA mode only). • Adjust the Phase and Clock settings via OSD. 3.3 Troubleshooting (FAQ) Problem Possible Solution Power LED is not ON • Press the button to check if the monitor is in the ON mode. • Check if the power cord is properly...


