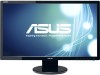
Asus VE248Q Support Question
Asus VE248Q Support Question
Find answers below for this question about Asus VE248Q.Need a Asus VE248Q manual? We have 1 online manual for this item!
Question posted by dbrow4043 on April 21st, 2012
Manul For Ve248 Series Led Monitor
The person who posted this question about this Asus product did not include a detailed explanation. Please use the "Request More Information" button to the right if more details would help you to answer this question.
Current Answers
Related Asus VE248Q Manual Pages
User Manual - Page 2
... information iv Care & Cleaning v 1.1 Welcome 1-1 1.2 Package contents 1-1 1.3 Monitor introduction 1-2
1.3.1 Front view 1-2 1.3.2 Back view 1-3 2.1 Assembling the monitor base 2-1 2.2 Adjusting the monitor 2-1 2.3 Detaching the arm/base (for VESA wall mount 2-2 2.4 Connecting the cables 2-3 2.5 Turning on the monitor 2-4 3.1 OSD (On-Screen Display) menu 3-1 3.1.1 How to reconfigure...
User Manual - Page 3
This equipment has been tested and found to comply with the limits for connection of the monitor to the graphics card is required to Part 15 of shielded cables for a Class B digital device, pursuant to assure compliance with manufacturer's instructions, may cause ...
User Manual - Page 4

... radiator or heat source unless proper ventilation is broken, do not try to open the monitor cabinet. If you are not sure of the type of the crossed out wheeled bin indicates... objects or spill liquid of the cabinet are not damaged. If you encounter technical problems with the monitor, contact a qualified service technician or your retailer. • Before using the product, make sure all...
User Manual - Page 5
... may flicker during the initial use due to the nature of the fluorescent light. Clean the monitor surface with the monitor. Do not repair the screen by the stand or the cord.
• Cleaning. NOTE:...completing a task. Follow the correct lifting techniques when positioning the monitor. Use a cleaner intended for hours.
• When the screen becomes black or flashes, or cannot work...
User Manual - Page 7
... or missing, contact your viewing experience. ASUS VE247/VE248/VE249 Series LED Monitor
1-1
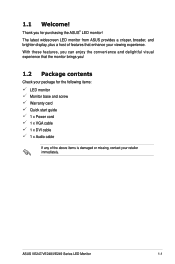
Thank you !
1.2 Package contents
Check your package for purchasing the ASUS® LED monitor! With these features, you can enjoy the convenience and delightful visual experience that the monitor brings you for the following items: LED monitor Monitor base and screw Warranty card Quick start...
User Manual - Page 8

... menu. • Press this button to decrease the value of the function selected or move left/down to the previous function. 1.3 Monitor introduction
1.3.1 Front view
VE247H/ VE248H/ VE249H
VE247T/ VE247S/ VE248T/ VE248S
S/A Volume/Down Menu Brightness/Up Input Select Power Key
S Volume/Down Menu Brightness/Up
A
Power Key
1
2
3
4
51
6
1. •
• •...
User Manual - Page 9
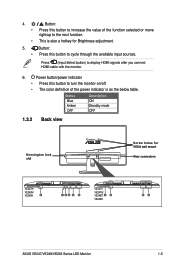
... definition of the function selected or move right/up to display HDMI signals after you connect HDMI cable with the monitor.
6.
Status Blue Amber OFF
Description ON Standby mode OFF
1.3.2 Back view
Kensington lock slot
Screw holes for Brightness...
Rear connectors
VE247H/
VE248H/
VE249H
2
134 5 6
VE247T/
VE247S/ VE248T/ 1 2
VE248S
56
ASUS VE247/VE248/VE249 Series LED Monitor
1-3
User Manual - Page 11

... the viewing angle. Assemble the base and the arm by fastening the bundled screw. ASUS VE247/VE248/VE249 Series LED Monitor
2-1
We recommend that you cover the table surface with soft cloth to prevent damage to the monitor.
2
1
2.2 Adjusting the monitor
• For optimal viewing, we recommend that you look at the full face of the...
User Manual - Page 12
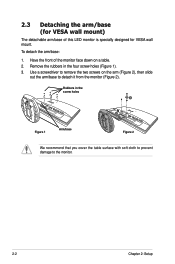
... to remove the two screws on a table. 2. Have the front of this LED monitor is specially designed for VESA wall mount. Remove the rubbers in the screw holes
...
Figure 1
Arm/base
Figure 2
We recommend that you cover the table surface with soft cloth to prevent damage to the monitor.
2-2
Chapter 2: Setup
Rubbers in the four screw holes (Figure 1). 3. To detach the arm/base:
1. 2.3 ...
User Manual - Page 13
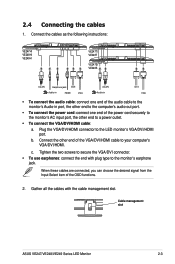
...To use earphones: connect the end with the cable management slot.
Gather all the cables with plug type to the LED monitor's VGA/DVI/HDMI port. 2.4 Connecting the cables
1. Connect the other end to your computer's VGA/DVI/HDMI... To connect the VGA/DVI/HDMI cable: a. b.
Cable management slot
ASUS VE247/VE248/VE249 Series LED Monitor
2-3 c.
Plug the VGA/DVI/HDMI connector to the...
User Manual - Page 14
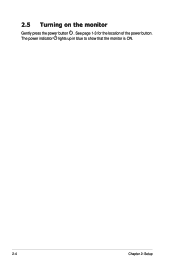
See page 1-3 for the location of the power button. The power indicator lights up in blue to show that the monitor is ON.
2-4
Chapter 2: Setup 2.5 Turning on the monitor
Gently press the power button .
User Manual - Page 15

... Enhancement.
• Game Mode: best choice for game playing with SPLENDID™ Video Enhancement.
• Night View Mode: best choice for your preference. ASUS VE247/VE248/VE249 Series LED Monitor
3-1 To exit the OSD menu, press the 3 to reconfigure
1.
User Manual - Page 17

... from 0 to 100.
* Adjusts the OSD timeout from 0 to 100. ASUS VE247/VE248/VE249 Series LED Monitor
3-3
System Setup Allow you to 120.
* Enables or disables the DDC/CI function.... Spanish, Russian, Traditional Chinese,
Simplified Chinese, Japanese, and Korean.
• Information: shows the monitor information. • All Reset: "Yes" allows you to adjust the system.
• Splendid...
User Manual - Page 18

... SPLENDID™ selection Auto adjustment Color temperature selection Skin-Tone selection Digital input Analog input Audio-in port Earphone jack Colors Speaker (Built-in) Power LED VESA wall mount Tilt Kensington lock Voltage rating Power consumption
Temperature (Operating)
Temperature (Non-operating) Dimension (W x H x D)
Weight (Esti.) Multi-languages
Accessories
Regulation approvals
TFT LCD...
User Manual - Page 19
... SPLENDID™ selection Auto adjustment Color temperature selection Skin-Tone selection Digital input Analog input Audio-in port Earphone jack Colors Speaker (Built-in) Power LED VESA wall mount Tilt Kensington lock Voltage rating Power consumption
Temperature (Operating)
Temperature (Nonoperating) Dimension (W x H x D)
Weight (Esti.) Multi-languages
Accessories
Regulation approvals
TFT LCD 24...
User Manual - Page 20

... SPLENDID™ selection Auto adjustment Color temperature selection Skin-Tone selection Digital input Analog input Audio-in port Earphone jack Colors Speaker (Built-in) Power LED VESA wall mount Tilt Kensington lock Voltage rating Power consumption
Temperature (Operating)
Temperature (Non-operating) Dimension (W x H x D)
Weight (Esti.) Multi-languages
Accessories
Regulation approvals
TFT LCD...
User Manual - Page 21

... Color temperature selection Skin-Tone selection Analog input Audio-in port Earphone jack Colors Speaker (Built-in) Power LED VESA wall mount Tilt Kensington lock Voltage rating Power consumption
Temperature (Operating)
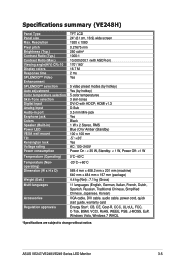
Temperature (Non-operating) Dimension (W ...730; Yes AC: 100~240V Power On : < 35 W, Standby: < 1 W, Power Off: Specifications summary (VE248S)
Panel Type Panel size Max.
User Manual - Page 23

... SPLENDID™ selection Auto adjustment Color temperature selection Skin-Tone selection Digital input Analog input Audio-in port Earphone jack Colors Speaker (Built-in) Power LED VESA wall mount Tilt Kensington lock Voltage rating Power consumption
Temperature (Operating)
Temperature (Non-operating) Dimension (W x H x D)
Weight (Esti.) Multi-languages
Accessories
Regulation approvals
TFT LCD...
User Manual - Page 25

Screen image is properly connected to automatically adjust the image
(for VGA mode only)
• Adjust the H-Position or V-Position
settings via OSD.
ASUS VE247/VE248/VE249 Series LED Monitor
3-11
Screen image bounces or a wave pattern is • Make sure the signal cable is properly
present in the ON mode.
• Check if the...
User Manual - Page 26
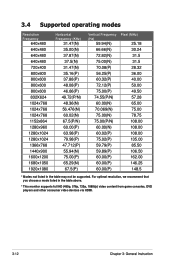
... 108.00 108.00 108.00 135.00 85.50 106.50 162.00 146.25 148.5
* Modes not listed in the table above.
* This monitor supports full HD (480p, 576p, 720p, 1080i/p) video content from game consoles, DVD players and other consumer video devices via HDMI.
3-12
Chapter 3: General Instruction...
Similar Questions

Ac Adapter Compatability
Hi!i just wanted to ask if i can use this type of adapter for my ASUS VX239input = 100-240V ~ 1.5A 5...
Hi!i just wanted to ask if i can use this type of adapter for my ASUS VX239input = 100-240V ~ 1.5A 5...
(Posted by m16rougester 8 years ago)

How Do You Get The Asus Vx248h To Go?
I have bought a new Asus VX248H Led monitor is VGAno signal. The logo comes up Ok and HDMI no signal...
I have bought a new Asus VX248H Led monitor is VGAno signal. The logo comes up Ok and HDMI no signal...
(Posted by igie57 9 years ago)

The Speakers On My Ve248 Monitor Are Not Working
Can you assist please
Can you assist please
(Posted by mkelleh5 9 years ago)

Asus Ve228h 21.5-inch Full-hd Led Monitor With Integrated Speakers, How To
adjust volume
adjust volume
(Posted by bonlo 10 years ago)

How To Remove The Monitor Stand?
i was able to remove the base however the stand is still attached to the monitor. i cannot unscrew i...
i was able to remove the base however the stand is still attached to the monitor. i cannot unscrew i...
(Posted by lesliejerry 11 years ago)