Asus VH197T Support Question
Asus VH197T Support Question
Find answers below for this question about Asus VH197T.Need a Asus VH197T manual? We have 1 online manual for this item!
Question posted by lesliejerry on November 19th, 2012
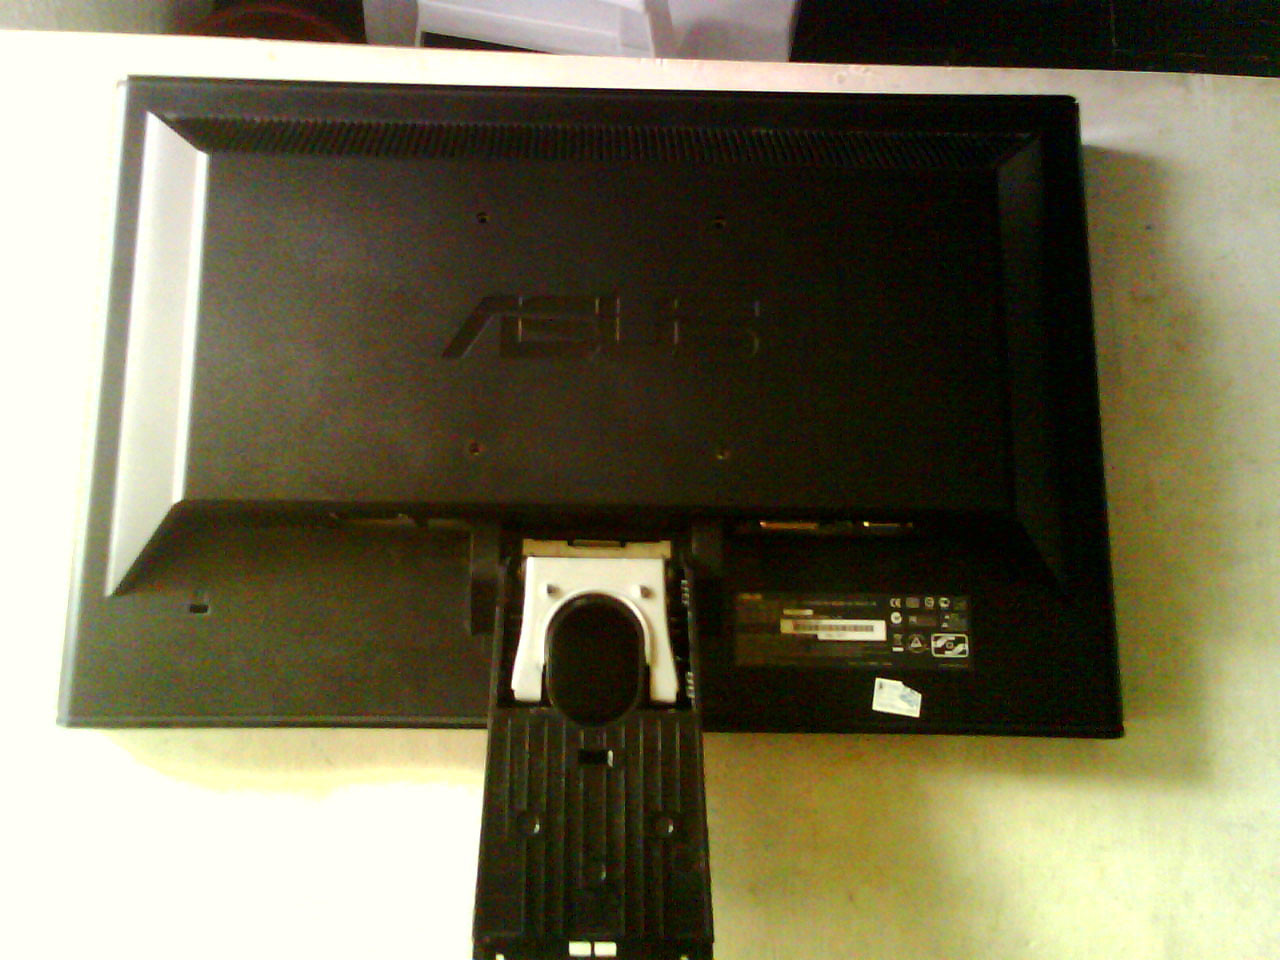
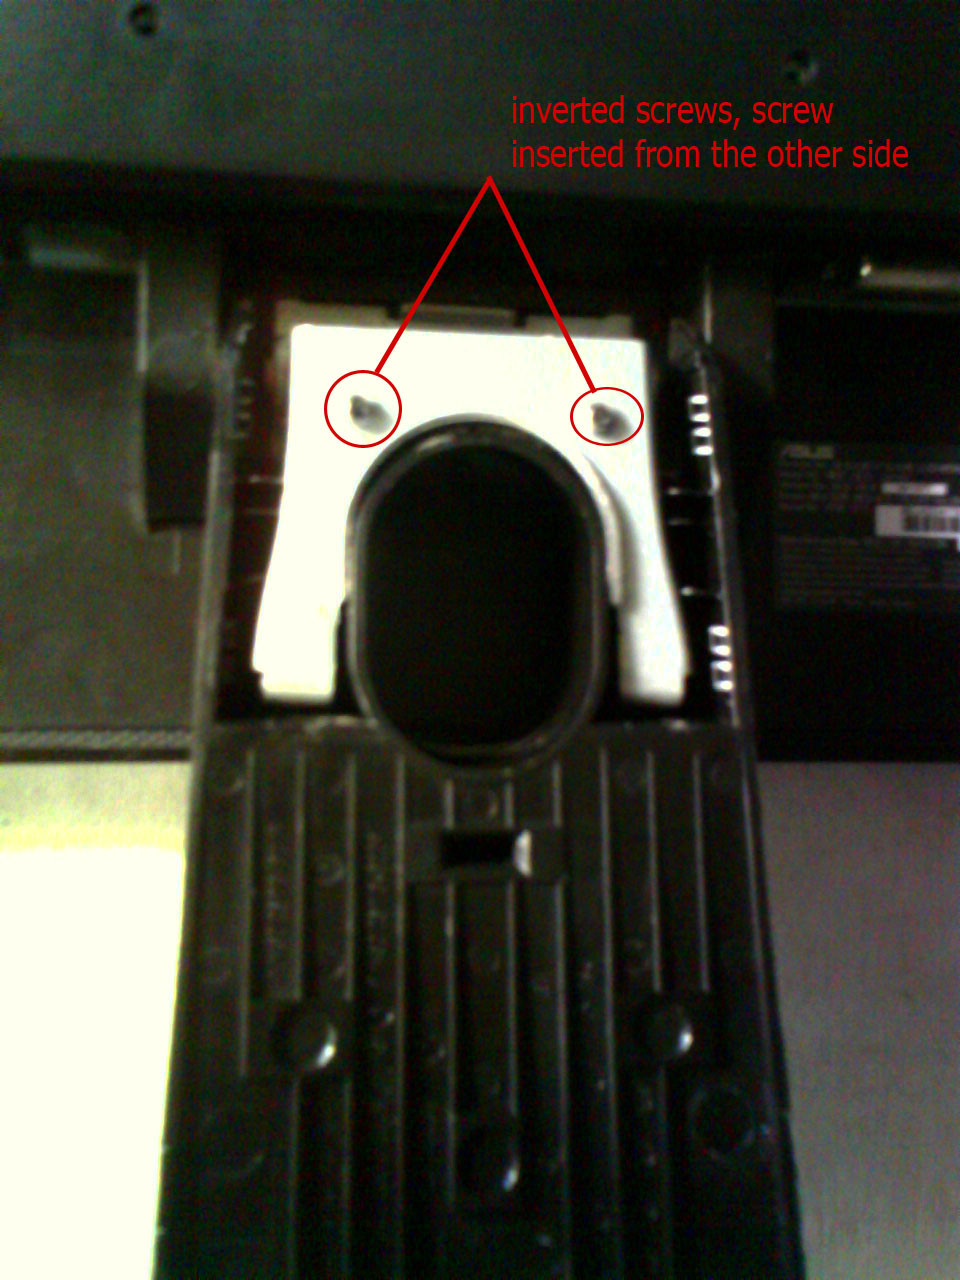
How To Remove The Monitor Stand?
i was able to remove the base however the stand is still attached to the monitor. i cannot unscrew it because it is screwed invertedly, now what am i supposed to do. How am i going to wall mount the LED Monitor if the stand is still attached to it.. need help.
Supporting Images
You can click the images below to enlarge
Current Answers
Answer #1: Posted by cljeffrey on November 21st, 2012 5:23 PM
cljeffrey

Member since:
July 17th, 2012 Points: 1,054,453

Member since:
July 17th, 2012 Points: 1,054,453
Looks like the only way to remove the stand is to completely open the LED monitor.
If you have any questions or comments you can email me at [email protected] which I reside in the U.S
ASUS strives to meet and exceeds our customer expectations within our warranty policy.
Regards,
Jeffrey
ASUS Customer Loyalty
ASUS strives to meet and exceeds our customer expectations within our warranty policy.
Regards,
Jeffrey
ASUS Customer Loyalty
Related Asus VH197T Manual Pages
User Guide - Page 2

... contents 1-1 1.3 Assembling the monitor 1-2 1.4 Monitor introduction 1-3
1.4.1 Front of the LED monitor 1-3 1.4.2 Rear of the LED monitor 1-5 2.1 Detaching the arm/stand (for identification or explanation and to the owners' benefit, without the express written permission of their respective companies, and are used only for VESA wall mount 2-1 2.2 Adjusting the monitor 2-2 3.1 OSD (On...
User Guide - Page 4

...all the documentation that came with the package.
• To prevent fire or shock hazard, never expose the monitor to rain or moisture.
• Never try to fix it may result in fire or electric shock.
...stable surface.
• Unplug the unit during a lightning storm or if it will protect the monitor from the type of power source indicated on the back or top of the cabinet are provided for...
User Guide - Page 5

...are normal with a lint-free, non-abrasive cloth. Do not repair the screen by the stand or the cord.
• Cleaning.
NOTE: Tips and additional information to the nature of ... Stubborn stains may be removed with a cloth dampened with the LCD.
Conventions used in completing a task. When lifting or carrying the monitor, grasp the edges of the monitor. IMPORTANT: Information that the...
User Guide - Page 7

... a crisper, broader, and brighter display, plus a host of the above items is damaged or missing, contact your viewing experience. ASUS LED Monitor VW197 Series
1-1
Thank you for the following items: LED monitor Monitor stand and base
User manual CD Quick start guide
Warranty card Power cord VGA cable Audio cable (VW197T/S)
If any of features that the...
User Guide - Page 8

Insert the stand to the monitor.
1
2
3
1-2
Chapter 1: Product Introduction
Have the front of the monitor face down on a table. 2. Adjust the monitor to the angle that the base has been
connected successfully. 4. We recommend that you cover the table surface with the monitor. A click indicates that is most comfortable. Connect the base with soft cloth to prevent damage...
User Guide - Page 9

..., and phase by long pressing this button to increase the value of the function selected or move to the next function.
ASUS LED Monitor VW197 Series
1-3 Exit the OSD menu or go back to the previous menu as the OSD menu is activated.
4. •
•
Button:
Press this button for 2-4 seconds (for VGA...
User Guide - Page 10

... Press this button to enter the OSD menu.
• Press this hot key to turn the monitor on/off.
6.
Power Indicator • The color definition of the function selected or move to decrease... is as the OSD menu is activated.
1-4
Chapter 1: Product Introduction
Exit the OSD menu or go back to its optimized position, clock, and phase by long pressing this button for 2-4 seconds (for...
User Guide - Page 11

... mode OFF
1.4.2 Rear of the LED monitor
Screw Holes for Brightness adjustment.
5. 4. •
•
Button:
Press this button to the next function.
This is as the below table. Power Button: • Press this button to increase the value of the power indicator is also a hot key for VESA Wall Mount
12
1 AC-IN port 2 Audio...
User Guide - Page 12

To detach the arm/stand: 1. 2.1 Detaching the arm/stand (for VESA wall mount. Detach the stand from the monitor.
• We recommend that you cover the table surface with soft cloth to prevent damage to the monitor.
• The VESA wall mount kit ( 100 x 100 mm) is specially designed for VESA wall mount)
The detachable stand of the VW197 Series LED monitor is purchased separately...
User Guide - Page 13
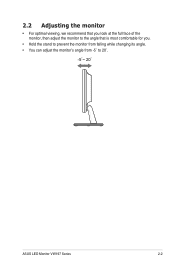
2.2 Adjusting the monitor
• For optimal viewing, we recommend that you look at the full face of the monitor, then adjust the monitor to the angle that is most comfortable for you.
• Hold the stand to prevent the monitor from falling while changing its angle. • You can adjust the monitor's angle from -5˚ to 20˚.
-5 ~ 20
ASUS LED Monitor VW197 Series
2-2
User Guide - Page 15

..., Skin Tone, Sharpness, ASCR are not user-configurable.
• In the sRGB, the Brightness, Contrast, Saturation, Color Temp, Skin Tone and ASCR are userconfigurable;
ASUS LED Monitor VW197 Series
3-2 the adjusting range is from 0 ~ 100. In the User Mode, colors of R (Red), G (Green), and B (Blue) are not user-configurable...
User Guide - Page 17
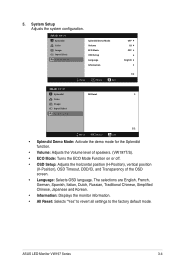
..., French, German, Spanish, Italian, Dutch, Russian, Traditional Chinese, Simplified Chinese, Japanese and Korean.
• Information: Displays the monitor information.
• All Reset: Selects "Yes" to revert all settings to the factory default mode. ASUS LED Monitor VW197 Series
3-4 VW197 Splendid Color Image Input Select System Setup
Splendid Demo Mode Volume ECO Mode OSD...
User Guide - Page 18

...+Tf) D-Sub
DVI(VW197T/N only) 1W x 2 (VW197T/S only)
-5° ~ +20° Yes (100mm x 100mm)
445x370x185mm 507x322x150mm
3.1 kg 4.9 kg AC 100~240V(Built-in ) Tilt VESA Wall Mounting Phys. 3.2 Specifications
Model
Panel Size Max.
User Guide - Page 19

...; Inspect the signal cable and make sure that may cause electrical
interference.
ASUS LED Monitor VW197 Series
3-6
The power LED lights amber and • Check if the monitor and the computer are bent.
• Connect the computer with another available
monitor to
automatically adjust the image (for two seconds to check if the computer is...
Similar Questions

Did Anyone Remove The Stand From This Monitor?
did anyone remove the stand from this monitor ? not just the circular base , but the neck aswell tha...
did anyone remove the stand from this monitor ? not just the circular base , but the neck aswell tha...
(Posted by shajeel91 3 years ago)


How To Mount Monitor To Wall
how would i mount the asus lcd monitor vh242 widescreen to wall? also how do i connect a logiteck 5....
how would i mount the asus lcd monitor vh242 widescreen to wall? also how do i connect a logiteck 5....
(Posted by cwabron59 10 years ago)
Screen Compatibilty With M5a78l-mlx Asus Motherboard.
Hi. Im usingM5A78L-MLX asus motherboard with VH197T monitor. On starting the PC the monitor says : t...
Hi. Im usingM5A78L-MLX asus motherboard with VH197T monitor. On starting the PC the monitor says : t...
(Posted by nishchaysukhija 11 years ago)

Stand
Hi, Can the complete stand be removed for wall mounting or just the base. Regards Ruth
Hi, Can the complete stand be removed for wall mounting or just the base. Regards Ruth
(Posted by ruthgosden12 11 years ago)