
Asus VE228T Support Question
Asus VE228T Support Question
Find answers below for this question about Asus VE228T.Need a Asus VE228T manual? We have 1 online manual for this item!
Question posted by ruthgosden12 on August 9th, 2012
Stand
Hi, Can the complete stand be removed for wall mounting or just the base. Regards Ruth
Current Answers
Answer #1: Posted by cljeffrey on August 10th, 2012 5:47 PM
cljeffrey

Member since:
July 17th, 2012 Points: 1,054,453

Member since:
July 17th, 2012 Points: 1,054,453
Hello my name is Jeffrey and I work for ASUS Customer Loyalty Team in the US.
Yes the stand should be easily removed. Can you please send me a photo of the back of the stand so I can tell you how to remove it.
You can email me at [email protected]
ASUS strives to meet and exceeds our customer expectations within our warranty policy.
Regards,
Jeffrey ASUS Customer Loyalty
Related Asus VE228T Manual Pages
User Guide - Page 2
... information iv Care & Cleaning v 1.1 Welcome 1-1 1.2 Package contents 1-1 1.3 Monitor introduction 1-2
1.3.1 Front view 1-2 1.3.2 Back view 1-3 2.1 Assembling the monitor base 2-1 2.2 Adjusting the monitor 2-1 2.3 Detaching the arm/base (for VESA wall mount 2-2 2.4 Connecting the cables 2-3 2.5 Turning on the monitor 2-4 3.1 OSD (On-Screen Display) menu 3-1 3.1.1 How to reconfigure...
User Guide - Page 3
... radio communications. This class B digital apparatus complies with Canadian ICES-003. This equipment generates, uses and can be determined by one or more of the monitor to the graphics card is required to radio or television reception, which the
receiver is encouraged to try to correct the interference by turning the...
User Guide - Page 4
... strips and extention cords. This will not be used for disposal of the cabinet are provided for ventilation. Safety information
• Before setting up the monitor, carefully read all cables are correctly connected and the
power cables are not damaged. Contact a qualified
service technician or your retailer. • Before using the...
User Guide - Page 5
... the screen depending on the screen, as it may be removed with a cloth dampened with a lint-free, non-abrasive cloth. v NOTE: Tips and additional information to complete a task. Do not repair the screen by the stand or the cord.
• Cleaning. Turn your monitor off the Power Switch and turn off the Power Switch...
User Guide - Page 7
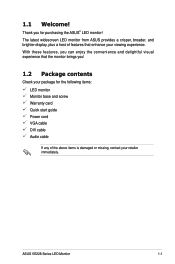
... delightful visual experience that enhance your retailer immediately.
ASUS VE228 Series LED Monitor
1-1
The latest widescreen LED monitor from ASUS provides a crisper, broader, and brighter display, plus a host of features that the monitor brings you for the following items: LED monitor Monitor base and screw Warranty card Quick start guide Power cord VGA cable DVI cable...
User Guide - Page 8
...)
This is active. (
, )
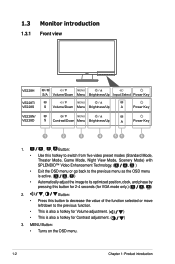
Automatically adjust the image to its optimized position, clock, and phase by
pressing this button for 2-4 seconds (for Contrast adjustment. (
)
3. 1.3 Monitor introduction
1.3.1 Front view
VE228H
VE228T/ VE228S
S/A Volume/Down Menu Brightness/Up Input Select Power Key
S Volume/Down Menu Brightness/Up
A
Power Key
VE228N/ VE228D
S Contrast/Down Menu Brightness...
User Guide - Page 9
...;
•
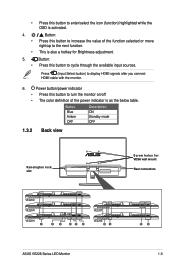
Button: Press this button to increase the value of the power indicator is also a hotkey for VESA wall mount
Rear connectors
VE228D
VE228N
VE228H 1
23
45 6
VE228T
VE228S 31
56
ASUS VE228 Series LED Monitor
1-3 Power button/power indicator
• Press this button to display HDMI signals after you connect HDMI cable with...
User Guide - Page 10
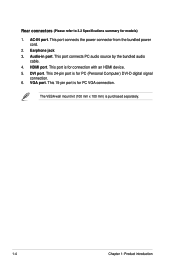
... (Personal Computer) DVI-D digital signal
connection. 6. This 15-pin port is purchased separately.
1-4
Chapter 1: Product introduction DVI port. AC-IN port. HDMI port. The VESA wall mount kit (100 mm x 100 mm) is for models)
1. Rear connectors (Please refer to 3.2 Specifications summary for PC VGA connection.
User Guide - Page 11
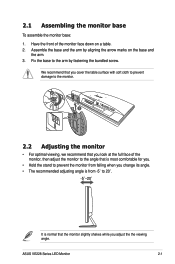
... angle that is most comfortable for you.
• Hold the stand to prevent the monitor from falling when you change its angle. • The recommended adjusting angle is normal that you adjust the the viewing angle. Release Lock
2.1 Assembling the monitor base
To assemble the monitor base: 1. We recommend that you cover the table surface with...
User Guide - Page 12
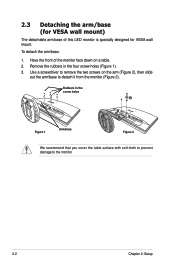
... to detach it from the monitor (Figure 2). Use a screwdriver to remove the two screws on a table. 2. To detach the arm/base:
1.
Rubbers in the four screw holes (Figure 1). 3. Have the front of this LED monitor is specially designed for VESA wall mount. 2.3 Detaching the arm/base (for VESA wall mount)
The detachable arm/base of the monitor face down on the...
User Guide - Page 13
...Monitor
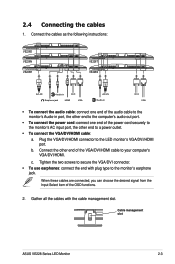
2-3 Connect the cables as the following instructions:
VE228D VE228N VE228H
VE228T VE228S
Audio-in
Earphone jack
HDMI
VGA
Audio-in
VGA
• To connect the audio cable: connect one end of the audio cable to the monitor...end with the cable management slot. b. Tighten the two screws to the monitor's AC input port, the other end of the OSD functions.
2. 2.4 Connecting the cables
...
User Guide - Page 14
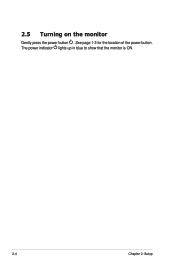
See page 1-3 for the location of the power button. 2.5 Turning on the monitor
Gently press the power button . The power indicator lights up in blue to show that the monitor is ON.
2-4
Chapter 2: Setup
User Guide - Page 15

... the 3 to navigate through the sub-menu functions. Repeat step 2 and step
3.1.2 OSD Function Introduction
1. Press the MENU button to reconfigure
1.
ASUS VE228 Series LED Monitor
3-1 Press
(or
), and
to adjust any other modes, the sRGB function is not user-configurable. Highlight and activate the
desired sub-menu function by pressing...
User Guide - Page 17
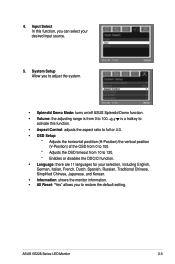
... function, you can select your selection, including English, German, Italian, French, Dutch, Spanish, Russian, Traditional Chinese,
Simplified Chinese, Japanese, and Korean.
• Information: shows the monitor information. • All Reset: "Yes" allows you to adjust the system.
• Splendid Demo Mode: turns on/off ASUS Splendid Demo function.
• Volume: the...
User Guide - Page 18
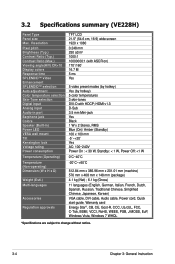
...; selection Auto adjustment Color temperature selection Skin-Tone selection Digital input Analog input Audio-in port Earphone jack Colors Speaker (Built-in) Power LED VESA wall mount Tilt Kensington lock Voltage rating Power consumption
Temperature (Operating)
Temperature (Non-operating) Dimension (W x H x D)
Weight (Esti.) Multi-languages
Accessories
Regulation approvals
TFT LCD 21.5" (54.6 cm...
User Guide - Page 19
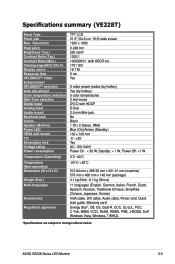
...selection Skin-Tone selection Digital input Analog input Audio-in port Earphone jack Colors Speaker (Built-in) Power LED VESA wall mount Tilt Kensington lock Voltage rating Power consumption
Temperature (Operating)
Temperature (Non-operating) Dimension (W x H x D)
...730; Yes AC: 100~240V Power On : < 30 W, Standby: < 1 W, Power Off: Specifications summary (VE228T)
Panel Type Panel size Max.
User Guide - Page 20
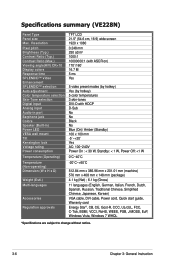
...; selection Auto adjustment Color temperature selection Skin-Tone selection Digital input Analog input Audio-in port Earphone jack Colors Speaker (Built-in) Power LED VESA wall mount Tilt Kensington lock Voltage rating Power consumption
Temperature (Operating)
Temperature (Non-operating) Dimension (W x H x D)
Weight (Esti.) Multi-languages
Accessories
Regulation approvals
TFT LCD 21.5" (54.6 cm...
User Guide - Page 21

...; selection Auto adjustment Color temperature selection Skin-Tone selection Digital input Analog input Audio-in port Earphone jack Colors Speaker (Built-in) Power LED VESA wall mount Tilt Kensington lock Voltage rating Power consumption
Temperature (Operating)
Temperature (Non-operating) Dimension (W x H x D)
Weight (Esti.) Multi-languages
Accessories
Regulation approvals
TFT LCD 21.5" (54.6 cm...
User Guide - Page 23
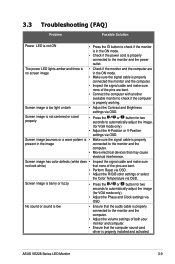
...via OSD. Screen image is blurry or fuzzy
• Press the
or button for two
seconds to the monitor and the
computer.
• Move electrical devices that the computer sound card driver is properly installed and ...Problem
Possible Solution
Power LED is not ON
• Press the button to check if the monitor is in the ON mode.
• Check if the power cord is properly connected to ...
User Guide - Page 24
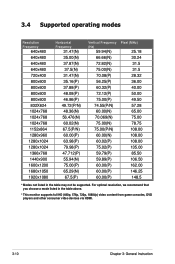
... 108.00 108.00 108.00 135.00 85.50 106.50 162.00 146.25 148.5
* Modes not listed in the table above.
* This monitor supports full HD (480p, 576p, 720p, 1080i/p) video content from game consoles, DVD players and other consumer video devices via HDMI.
3-10
Chapter 3: General Instruction...
Similar Questions

Did Anyone Remove The Stand From This Monitor?
did anyone remove the stand from this monitor ? not just the circular base , but the neck aswell tha...
did anyone remove the stand from this monitor ? not just the circular base , but the neck aswell tha...
(Posted by shajeel91 3 years ago)


How To Mount Monitor To Wall
how would i mount the asus lcd monitor vh242 widescreen to wall? also how do i connect a logiteck 5....
how would i mount the asus lcd monitor vh242 widescreen to wall? also how do i connect a logiteck 5....
(Posted by cwabron59 10 years ago)

How To Remove The Monitor Stand?
i was able to remove the base however the stand is still attached to the monitor. i cannot unscrew i...
i was able to remove the base however the stand is still attached to the monitor. i cannot unscrew i...
(Posted by lesliejerry 11 years ago)
Table Stand Removal
How to remove the table stand from ASUS vw228T monitor?
How to remove the table stand from ASUS vw228T monitor?
(Posted by ronnie91059 11 years ago)