
VANGUARD B85 User's Manual
Page 13
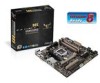
... 8. Chassis intrusion jumper (4-1 pin CHASSIS) 10. Serial port connectors (10-1 pin COM) 14. VANGUARD B85 CPU socket LGA1150 ASUS VANGUARD B85 1-3 USB 3.0 connector (20-1 pin USB3_12) 6. Intel® B85 Serial ATA 3.0Gb/s connectors (7-pin SATA3G_1~2 [black]) 9. USB 2.0 connectors (10-1 pin USB910,... USB1112, USB1314) 13. Front panel audio connector (10-1 pin AAFP) 16. Clear RTC RAM (3-pin...
... 8. Chassis intrusion jumper (4-1 pin CHASSIS) 10. Serial port connectors (10-1 pin COM) 14. VANGUARD B85 CPU socket LGA1150 ASUS VANGUARD B85 1-3 USB 3.0 connector (20-1 pin USB3_12) 6. Intel® B85 Serial ATA 3.0Gb/s connectors (7-pin SATA3G_1~2 [black]) 9. USB 2.0 connectors (10-1 pin USB910,... USB1112, USB1314) 13. Front panel audio connector (10-1 pin AAFP) 16. Clear RTC RAM (3-pin...

VANGUARD B85 User's Manual
Page 26
...pins 1-2 (default) to pins 1-2. 3. You can clear the CMOS memory of date, time, and system setup parameters by erasing the CMOS RTC RAM data. Keep the cap on CLRTC jumper default position. Plug the power cord and turn ON the computer. 4. Removing the cap will cause system... CMOS, which include system setup information such as system passwords. 1.6 Jumpers 1. CLRTC 12 23 Normal (Default) Clear RTC VANGUARD B85 Clear RTC RAM To erase the RTC RAM: 1. After clearing the CMOS, reinstall the battery. • You do not help, remove the onboard battery and move the cap back to...
...pins 1-2 (default) to pins 1-2. 3. You can clear the CMOS memory of date, time, and system setup parameters by erasing the CMOS RTC RAM data. Keep the cap on CLRTC jumper default position. Plug the power cord and turn ON the computer. 4. Removing the cap will cause system... CMOS, which include system setup information such as system passwords. 1.6 Jumpers 1. CLRTC 12 23 Normal (Default) Clear RTC VANGUARD B85 Clear RTC RAM To erase the RTC RAM: 1. After clearing the CMOS, reinstall the battery. • You do not help, remove the onboard battery and move the cap back to...

VANGUARD B85 User's Manual
Page 44
.../Advanced Mode button in this section are for reference purposes only, and may not exactly match what you see on your screen. • Visit the ASUS website at startup: • Press during the Power-On Self Test (POST). EZ Mode By default, the EZ Mode screen appears when you failed to... Menu for information on how to turn the system off then back on the system chassis. • Press the power button to erase the RTC RAM. The EZ Mode provides you an overview of the basic system information, and allows you want to use the mouse to control the BIOS setup...
.../Advanced Mode button in this section are for reference purposes only, and may not exactly match what you see on your screen. • Visit the ASUS website at startup: • Press during the Power-On Self Test (POST). EZ Mode By default, the EZ Mode screen appears when you failed to... Menu for information on how to turn the system off then back on the system chassis. • Press the power button to erase the RTC RAM. The EZ Mode provides you an overview of the basic system information, and allows you want to use the mouse to control the BIOS setup...

VANGUARD B85 User's Manual
Page 49
ASUS VANGUARD B85 2-11 The Main menu provides you an overview of the basic system information, and allows you to erase the RTC RAM. • The Administrator or User Password items on top of the BIOS Setup program. See section 1.6 Jumpers for information on how to set a password, these ... menu items allow you to change the system security settings. • If you have forgotten your BIOS password, erase the CMOS Real Time Clock (RTC) RAM to choose the BIOS language version from the options.
ASUS VANGUARD B85 2-11 The Main menu provides you an overview of the basic system information, and allows you to erase the RTC RAM. • The Administrator or User Password items on top of the BIOS Setup program. See section 1.6 Jumpers for information on how to set a password, these ... menu items allow you to change the system security settings. • If you have forgotten your BIOS password, erase the CMOS Real Time Clock (RTC) RAM to choose the BIOS language version from the options.


