
VANGUARD B85 User's Manual
Page 3
Contents Safety information iv About this guide iv Package contents vi VANGUARD B85 specifications summary vi Chapter 1 Product introduction 1.1 Before you proceed 1-1 1.2 Motherboard overview 1-1 1.3 Central Processing Unit (CPU 1-3 1.4 System memory 1-7 1.5 Expansion slots 1-14 1.6 Jumpers 1-16 1.7 Connectors 1-17 1.8 Onboard LED 1-26 1.9 Software support 1-27 Chapter 2 BIOS information...11 2.5 Ai Tweaker menu 2-13 2.6 Advanced menu 2-25 2.7 Monitor menu 2-34 2.8 Boot menu 2-37 2.9 Tools menu 2-43 2.10 Exit menu 2-44 Appendices Notices...A-1 ASUS contact information A-3 iii
Contents Safety information iv About this guide iv Package contents vi VANGUARD B85 specifications summary vi Chapter 1 Product introduction 1.1 Before you proceed 1-1 1.2 Motherboard overview 1-1 1.3 Central Processing Unit (CPU 1-3 1.4 System memory 1-7 1.5 Expansion slots 1-14 1.6 Jumpers 1-16 1.7 Connectors 1-17 1.8 Onboard LED 1-26 1.9 Software support 1-27 Chapter 2 BIOS information...11 2.5 Ai Tweaker menu 2-13 2.6 Advanced menu 2-25 2.7 Monitor menu 2-34 2.8 Boot menu 2-37 2.9 Tools menu 2-43 2.10 Exit menu 2-44 Appendices Notices...A-1 ASUS contact information A-3 iii

VANGUARD B85 User's Manual
Page 4
...This user guide contains the information you detect any area where it may be exposed to moisture. • Place the product on the motherboard. • Chapter 2: BIOS information This chapter discusses changing system settings through the BIOS Setup menus. If you are not sure about the... voltage of the electrical outlet you add a device. • Before connecting or removing signal cables from the motherboard, ensure that came with the product, contact a qualified service technician or your retailer. iv If possible, disconnect all power cables are using an...
...This user guide contains the information you detect any area where it may be exposed to moisture. • Place the product on the motherboard. • Chapter 2: BIOS information This chapter discusses changing system settings through the BIOS Setup menus. If you are not sure about the... voltage of the electrical outlet you add a device. • Before connecting or removing signal cables from the motherboard, ensure that came with the product, contact a qualified service technician or your retailer. iv If possible, disconnect all power cables are using an...

VANGUARD B85 User's Manual
Page 6
... for the following items. User Manual ASUS VANGUARD B85 motherboard Technical documentations, certification and warranty card Support DVD 2 x Serial ATA 6.0 Gb/s cables 1 x 2-in-1 ASUS Q-Connector kit 1 x ASUS Q-Shield • If any of the above items is damaged or missing, contact your retailer...x16 slot 1 x PCI Express 2.0 x16 slot [black] (max. VANGUARD B85 specifications summary CPU Chipset Memory Expansion Slots LGA1150 socket for CPU support list. at 1600MHz frequency for better stability. ** Refer to www.asus.com for 4th Generation Intel® CoreTM i7/i5/i3, Pentium&#...
... for the following items. User Manual ASUS VANGUARD B85 motherboard Technical documentations, certification and warranty card Support DVD 2 x Serial ATA 6.0 Gb/s cables 1 x 2-in-1 ASUS Q-Connector kit 1 x ASUS Q-Shield • If any of the above items is damaged or missing, contact your retailer...x16 slot 1 x PCI Express 2.0 x16 slot [black] (max. VANGUARD B85 specifications summary CPU Chipset Memory Expansion Slots LGA1150 socket for CPU support list. at 1600MHz frequency for better stability. ** Refer to www.asus.com for 4th Generation Intel® CoreTM i7/i5/i3, Pentium&#...

VANGUARD B85 User's Manual
Page 11
... any component. • Before handling components, use a grounded wrist strap or touch a safely grounded object or a metal object, such as indicated in the correct orientation. ASUS VANGUARD B85 1-1 Unplug the power cord before installing or removing the motherboard. The edge with the component. • Before you install or remove any component, ensure that the...
... any component. • Before handling components, use a grounded wrist strap or touch a safely grounded object or a metal object, such as indicated in the correct orientation. ASUS VANGUARD B85 1-1 Unplug the power cord before installing or removing the motherboard. The edge with the component. • Before you install or remove any component, ensure that the...

VANGUARD B85 User's Manual
Page 12
Place this side towards the rear of the chassis 1.2.3 Motherboard layout 1 2 3 4 3 24.4cm(9.6in) KBMS_USB34 DP_HDMI EATX12V DIGI+ VRM CPU_FAN CHA_FAN3 CHA_FAN2 3 DRAM_LED CPU_LED DDR3 DIMM_A1 (64bit, 240-pin module) DDR3 ... EATXPWR 1 TPU 24.4cm(9.6in) USB3_12 AUDIO Intel I217 V VGA_LED BATTERY PCIEX16_1 5 6 BOOT_DEVICE_LED 6 SATA6G_12 ASM 1083 PCIEX1_1 Super I/O PCI1 Intel® B85 7 SATA6G_3 SB_PWR SATA6G_4 16Mb SATA3G_56 ALC PCIEX16_2 BIOS 887 SPIDF_OUT CHA_FAN4 TPM COM USB910 USB1112 USB1314 CHA_FAN1 PANEL 8 AAFP CLRTC CHASSIS 18 16 15 3 14...
Place this side towards the rear of the chassis 1.2.3 Motherboard layout 1 2 3 4 3 24.4cm(9.6in) KBMS_USB34 DP_HDMI EATX12V DIGI+ VRM CPU_FAN CHA_FAN3 CHA_FAN2 3 DRAM_LED CPU_LED DDR3 DIMM_A1 (64bit, 240-pin module) DDR3 ... EATXPWR 1 TPU 24.4cm(9.6in) USB3_12 AUDIO Intel I217 V VGA_LED BATTERY PCIEX16_1 5 6 BOOT_DEVICE_LED 6 SATA6G_12 ASM 1083 PCIEX1_1 Super I/O PCI1 Intel® B85 7 SATA6G_3 SB_PWR SATA6G_4 16Mb SATA3G_56 ALC PCIEX16_2 BIOS 887 SPIDF_OUT CHA_FAN4 TPM COM USB910 USB1112 USB1314 CHA_FAN1 PANEL 8 AAFP CLRTC CHASSIS 18 16 15 3 14...

VANGUARD B85 User's Manual
Page 13
... 1-21 1-7 1-24 1-26 1-22 1-23 1-22 1-16 1-25 1-26 1-24 1-20 1-20 1-19 1.3 Central Processing Unit (CPU) This motherboard comes with a surface mount LGA1150 socket designed for the Intel® 4th generation Core™ i7 / Core™ i5 / Core™ i3, Pentium...power connectors (24-pin EATXPWR, 8-pin ATX12V) 2. Intel® B85 Serial ATA 3.0Gb/s connectors (7-pin SATA3G_1~2 [black]) 9. Serial port connectors (10-1 pin COM) 14. Intel® LGA1150 CPU socket 3. VANGUARD B85 CPU socket LGA1150 ASUS VANGUARD B85 1-3 Chassis intrusion jumper (4-1 pin CHASSIS) 10. TPM connector (20-1...
... 1-21 1-7 1-24 1-26 1-22 1-23 1-22 1-16 1-25 1-26 1-24 1-20 1-20 1-19 1.3 Central Processing Unit (CPU) This motherboard comes with a surface mount LGA1150 socket designed for the Intel® 4th generation Core™ i7 / Core™ i5 / Core™ i3, Pentium...power connectors (24-pin EATXPWR, 8-pin ATX12V) 2. Intel® B85 Serial ATA 3.0Gb/s connectors (7-pin SATA3G_1~2 [black]) 9. Serial port connectors (10-1 pin COM) 14. Intel® LGA1150 CPU socket 3. VANGUARD B85 CPU socket LGA1150 ASUS VANGUARD B85 1-3 Chassis intrusion jumper (4-1 pin CHASSIS) 10. TPM connector (20-1...

VANGUARD B85 User's Manual
Page 14
... shipment/ transit-related. • Keep the cap after installing the motherboard. ASUS will process Return Merchandise Authorization (RMA) requests only if the motherboard comes with the cap on the socket and the socket contacts are not bent. ASUS will shoulder the cost of the motherboard, ensure that the PnP cap is missing, or if you... retailer immediately if the PnP cap is on the LGA1150 socket. • The product warranty does not cover damage to the PnP cap/socket contacts/motherboard components.
... shipment/ transit-related. • Keep the cap after installing the motherboard. ASUS will process Return Merchandise Authorization (RMA) requests only if the motherboard comes with the cap on the socket and the socket contacts are not bent. ASUS will shoulder the cost of the motherboard, ensure that the PnP cap is missing, or if you... retailer immediately if the PnP cap is on the LGA1150 socket. • The product warranty does not cover damage to the PnP cap/socket contacts/motherboard components.

VANGUARD B85 User's Manual
Page 17
...the total size of the DDR3 DIMM sockets: DIMM_A1 DIMM_A2 DIMM_B1 DIMM_B2 Channel Channel A Channel B Sockets DIMM_A1 & DIMM_A2 DIMM_B1 & DIMM_B2 VANGUARD B85 240-pin DDR3 DIMM sockets 1.4.2 Memory configurations You may install 2GB, 4GB, and 8GB unbuffered non-ECC DDR3 DIMMs into the DIMM...Any excess memory from the same vendor. ASUS VANGUARD B85 1-7 A DDR3 module has the same physical dimensions as a DDR2 DIMM but is then mapped for single-channel operation. • Due to prevent installation on the motherboard. • This motherboard does not support DIMMs made up of the...
...the total size of the DDR3 DIMM sockets: DIMM_A1 DIMM_A2 DIMM_B1 DIMM_B2 Channel Channel A Channel B Sockets DIMM_A1 & DIMM_A2 DIMM_B1 & DIMM_B2 VANGUARD B85 240-pin DDR3 DIMM sockets 1.4.2 Memory configurations You may install 2GB, 4GB, and 8GB unbuffered non-ECC DDR3 DIMMs into the DIMM...Any excess memory from the same vendor. ASUS VANGUARD B85 1-7 A DDR3 module has the same physical dimensions as a DDR2 DIMM but is then mapped for single-channel operation. • Due to prevent installation on the motherboard. • This motherboard does not support DIMMs made up of the...

VANGUARD B85 User's Manual
Page 18
..., use a more efficient memory cooling system to support a full memory load (4 DIMMs) or overclocking condition. • Visit the ASUS website at: www.asus.com for overclocking may operate at a lower frequency than the vendor-marked value. Size SS/ DS Chip Chip Brand No. Size ... TXD38G2666HC11CBK(XMP) 16GB ( 2x 8GB ) DS - - 11-13-13-35 1.65 • • DDR3 2400 MHz capability Vendors Part No. VANGUARD B85 Motherboard Qualified Vendors Lists (QVL) DDR3 2666 MHz capability Vendors Part No. Size SS/ DS Chip Brand Chip No. Timing DIMM socket support Voltage (Optional) ...
..., use a more efficient memory cooling system to support a full memory load (4 DIMMs) or overclocking condition. • Visit the ASUS website at: www.asus.com for overclocking may operate at a lower frequency than the vendor-marked value. Size SS/ DS Chip Chip Brand No. Size ... TXD38G2666HC11CBK(XMP) 16GB ( 2x 8GB ) DS - - 11-13-13-35 1.65 • • DDR3 2400 MHz capability Vendors Part No. VANGUARD B85 Motherboard Qualified Vendors Lists (QVL) DDR3 2666 MHz capability Vendors Part No. Size SS/ DS Chip Brand Chip No. Timing DIMM socket support Voltage (Optional) ...

VANGUARD B85 User's Manual
Page 23
... pressing the 2 retaining clips. Press the retaining clips outward to both the motherboard and the components. 1. 1.4.3 Installing a DIMM Unplug the power supply before adding or removing DIMMs or other system components. Support the DIMM lightly with extra force. 2. DIMM notch ASUS VANGUARD B85 1-13 Firmly insert the DIMM into a socket in only one direction...
... pressing the 2 retaining clips. Press the retaining clips outward to both the motherboard and the components. 1. 1.4.3 Installing a DIMM Unplug the power supply before adding or removing DIMMs or other system components. Support the DIMM lightly with extra force. 2. DIMM notch ASUS VANGUARD B85 1-13 Firmly insert the DIMM into a socket in only one direction...

VANGUARD B85 User's Manual
Page 24
1.5 Expansion slots Unplug the power cord before adding or removing expansion cards. PCIEX16_1 PCIEX1_1 PCI1 PCIEX16_2 Slot No. 1 2 3 4 Slot Description PCIe 3.0/2.0 x16_1 slot PCIe 2.0 x1_1 slot PCI x1 slot PCIe 2.0 x16_1 slot 1-14 Chapter 1: Product introduction Failure to do so may cause you physical injury and damage motherboard components.
1.5 Expansion slots Unplug the power cord before adding or removing expansion cards. PCIEX16_1 PCIEX1_1 PCI1 PCIEX16_2 Slot No. 1 2 3 4 Slot Description PCIe 3.0/2.0 x16_1 slot PCIe 2.0 x1_1 slot PCI x1 slot PCIe 2.0 x16_1 slot 1-14 Chapter 1: Product introduction Failure to do so may cause you physical injury and damage motherboard components.

VANGUARD B85 User's Manual
Page 25
shared - - - - - shared - - - - - G H - - - - - - - - - shared - shared - - - - - - - - - - - shared - - - - shared - - - - - shared - - - - - - - - - shared - - - - - - ASUS VANGUARD B85 1-15 shared - - - - - shared - - - - - - - - shared - - - - - IRQ assignments for this motherboard SATA Controller 0 SATA Controller 1 SMBUS Controller Thermal Controller USB2.0 Controller 0 USB2.0 Controller 1 PCIe x16_1 PCIe x16_2 PCIe x1_1 PCI1 Intel LAN A B C D E F - - -
shared - - - - - shared - - - - - G H - - - - - - - - - shared - shared - - - - - - - - - - - shared - - - - shared - - - - - shared - - - - - - - - - shared - - - - - - ASUS VANGUARD B85 1-15 shared - - - - - shared - - - - - - - - shared - - - - - IRQ assignments for this motherboard SATA Controller 0 SATA Controller 1 SMBUS Controller Thermal Controller USB2.0 Controller 0 USB2.0 Controller 1 PCIe x16_1 PCIe x16_2 PCIe x1_1 PCI1 Intel LAN A B C D E F - - -

VANGUARD B85 User's Manual
Page 30
...chassis-mounted front panel audio I/O module that you connect a high-definition front panel audio module to this connector to avail of the motherboard's high-definition audio capability. • If you want to connect a high-definition front panel audio module to this connector, set ...MICPWR Line out_R NC Line out_L PORT1 L PORT1 R PORT2 R SENSE_SEND PORT2 L HD-audio-compliant Legacy AC'97 pin definition compliant definition VANGUARD B85 Front panel audio connector • We recommend that supports either HD Audio or legacy AC`97 audio standard. A TPM system also helps ...
...chassis-mounted front panel audio I/O module that you connect a high-definition front panel audio module to this connector to avail of the motherboard's high-definition audio capability. • If you want to connect a high-definition front panel audio module to this connector, set ...MICPWR Line out_R NC Line out_L PORT1 L PORT1 R PORT2 R SENSE_SEND PORT2 L HD-audio-compliant Legacy AC'97 pin definition compliant definition VANGUARD B85 Front panel audio connector • We recommend that supports either HD Audio or legacy AC`97 audio standard. A TPM system also helps ...

VANGUARD B85 User's Manual
Page 31
... (4-pin CPU_FAN, 4-pin CHA_FAN1~4) Connect the fan cables to the fan connectors. These are not jumpers! 5. Insufficient air flow inside the system may damage the motherboard components. ASUS VANGUARD B85 1-21 GND CPU FAN PWR CPU FAN IN CPU FAN PWM A CPU_FAN B CHA_FAN3 C CHA_FAN2 GND CHA FAN PWR CHA FAN IN +5V GND CHA...
... (4-pin CPU_FAN, 4-pin CHA_FAN1~4) Connect the fan cables to the fan connectors. These are not jumpers! 5. Insufficient air flow inside the system may damage the motherboard components. ASUS VANGUARD B85 1-21 GND CPU FAN PWR CPU FAN IN CPU FAN PWM A CPU_FAN B CHA_FAN3 C CHA_FAN2 GND CHA FAN PWR CHA FAN IN +5V GND CHA...

VANGUARD B85 User's Manual
Page 36
Connect the USB module cable to any motherboard component. The USB 2.0 module is ON, in sleep mode, or in any of these connectors, then install the module to 480Mbps connection speed. SB_PWR ON OFF Standby Power Powered Off VANGUARD B85 Onboard LED 1-26 Chapter 1: Product introduction The...+ GND NC USB+5V USB_P13USB_P13+ GND NC USB+5V USB_P10USB_P10+ GND USB+5V USB_P12USB_P12+ GND USB+5V USB_P14USB_P14+ GND VANGUARD B85 PIN 1 PIN 1 PIN 1 VANGUARD B85 USB2.0 connectors Never connect a 1394 cable to indicate that you should shut down the system and unplug the power cable ...
Connect the USB module cable to any motherboard component. The USB 2.0 module is ON, in sleep mode, or in any of these connectors, then install the module to 480Mbps connection speed. SB_PWR ON OFF Standby Power Powered Off VANGUARD B85 Onboard LED 1-26 Chapter 1: Product introduction The...+ GND NC USB+5V USB_P13USB_P13+ GND NC USB+5V USB_P10USB_P10+ GND USB+5V USB_P12USB_P12+ GND USB+5V USB_P14USB_P14+ GND VANGUARD B85 PIN 1 PIN 1 PIN 1 VANGUARD B85 USB2.0 connectors Never connect a 1394 cable to indicate that you should shut down the system and unplug the power cable ...
VANGUARD B85 User's Manual
Page 37
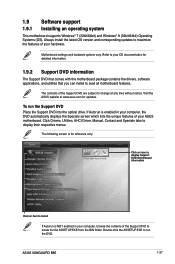
.... The contents of the Support DVD are subject to change at www.asus.com for updates. To run the DVD. Click an icon to display Support DVD/motherboard information Click an item to install If Autorun is NOT enabled in your...folder. The following screen is enabled in your hardware. ASUS VANGUARD B85 1-27 Click Drivers, Utilities, AHCI Driver, Manual, Contact and Specials tabs to your ASUS motherboard. Motherboard settings and hardware options vary. 1.9 Software support 1.9.1 Installing an operating system This motherboard supports Windows® 7 (32bit/64bit) and Windows&#...
.... The contents of the Support DVD are subject to change at www.asus.com for updates. To run the DVD. Click an icon to display Support DVD/motherboard information Click an item to install If Autorun is NOT enabled in your...folder. The following screen is enabled in your hardware. ASUS VANGUARD B85 1-27 Click Drivers, Utilities, AHCI Driver, Manual, Contact and Specials tabs to your ASUS motherboard. Motherboard settings and hardware options vary. 1.9 Software support 1.9.1 Installing an operating system This motherboard supports Windows® 7 (32bit/64bit) and Windows&#...

VANGUARD B85 User's Manual
Page 39
Copy the original motherboard BIOS using the ASUS Update utility. 2.1.1 EZ Update EZ Update is a utility that allows you can also manually update the saved BIOS and select a boot logo when the system goes into POST. ASUS VANGUARD B85 2-1 With this section may vary by models. Click to check for the latest BIOS from the Internet...
Copy the original motherboard BIOS using the ASUS Update utility. 2.1.1 EZ Update EZ Update is a utility that allows you can also manually update the saved BIOS and select a boot logo when the system goes into POST. ASUS VANGUARD B85 2-1 With this section may vary by models. Click to check for the latest BIOS from the Internet...

VANGUARD B85 User's Manual
Page 41
... USB flash drive that allows you to restore the BIOS file when it fails or gets corrupted during the updating process. ASUS VANGUARD B85 2-3 Prepare the motherboard support DVD and a USB flash drive formatted using this utility, rename the BIOS file in the removable device into B85VA.... BIOS file in the support DVD may not be the latest version. 2.1.3 ASUS CrashFree BIOS 3 utility The ASUS CrashFree BIOS 3 is not supported under DOS environment. You can restore a corrupted BIOS file using the motherboard support DVD or a USB flash drive that contains the updated BIOS file. ...
... USB flash drive that allows you to restore the BIOS file when it fails or gets corrupted during the updating process. ASUS VANGUARD B85 2-3 Prepare the motherboard support DVD and a USB flash drive formatted using this utility, rename the BIOS file in the removable device into B85VA.... BIOS file in the support DVD may not be the latest version. 2.1.3 ASUS CrashFree BIOS 3 utility The ASUS CrashFree BIOS 3 is not supported under DOS environment. You can restore a corrupted BIOS file using the motherboard support DVD or a USB flash drive that contains the updated BIOS file. ...

VANGUARD B85 User's Manual
Page 44
...system fails to boot after changing any BIOS setting, try to clear the CMOS and reset the motherboard to the default value. Do this motherboard. • Ensure that a USB mouse is connected to your motherboard if you do not press , POST continues with its parameters. You can cause damage to your... screen. • Visit the ASUS website at startup: • Press during the Power-On Self Test (POST). We recommend you failed to enter BIOS ...
...system fails to boot after changing any BIOS setting, try to clear the CMOS and reset the motherboard to the default value. Do this motherboard. • Ensure that a USB mouse is connected to your motherboard if you do not press , POST continues with its parameters. You can cause damage to your... screen. • Visit the ASUS website at startup: • Press during the Power-On Self Test (POST). We recommend you failed to enter BIOS ...

VANGUARD B85 User's Manual
Page 45
The default screen for the detailed configurations. Displays the CPU/motherboard temperature, CPU voltage output, and CPU/chassis fan speed Selects the display language of the BIOS setup program Exits the BIOS setup program without saving ... priority Power saving mode Displays the Advanced mode menus Selects the boot device priority Loads optimized default Displays the system properties of the Advanced Mode. ASUS VANGUARD B85 2-7 Advanced Mode The Advanced Mode provides advanced options for experienced end-users to the Setup Mode item in section 2.8 Boot menu for details. Refer to...
The default screen for the detailed configurations. Displays the CPU/motherboard temperature, CPU voltage output, and CPU/chassis fan speed Selects the display language of the BIOS setup program Exits the BIOS setup program without saving ... priority Power saving mode Displays the Advanced mode menus Selects the boot device priority Loads optimized default Displays the system properties of the Advanced Mode. ASUS VANGUARD B85 2-7 Advanced Mode The Advanced Mode provides advanced options for experienced end-users to the Setup Mode item in section 2.8 Boot menu for details. Refer to...


