
User Guide
Page 2
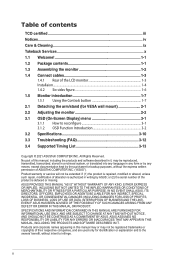
.... ("ASUS"). Table of contents TCO certified iii Notices...iv Care & Cleaning ix Takeback Services x 1.1 Welcome 1-1 1.2 Package contents 1-1 1.3 Assembling the monitor 1-2 1.4 Connect cables 1-3 1.4.1 Rear of the product is authorized in writing by the purchaser for backup purposes, without the express written permission of their respective companies, and are used only for VESA wall mount 2-1 2.2 Adjusting the monitor 2-2 3.1 OSD (On-Screen Display) menu 3-1 3.1.1 How to infringe. No part of this manual...
.... ("ASUS"). Table of contents TCO certified iii Notices...iv Care & Cleaning ix Takeback Services x 1.1 Welcome 1-1 1.2 Package contents 1-1 1.3 Assembling the monitor 1-2 1.4 Connect cables 1-3 1.4.1 Rear of the product is authorized in writing by the purchaser for backup purposes, without the express written permission of their respective companies, and are used only for VESA wall mount 2-1 2.2 Adjusting the monitor 2-2 3.1 OSD (On-Screen Display) menu 3-1 3.1.1 How to infringe. No part of this manual...
User Guide
Page 4
... to correct the interference by turning the equipment off and on a circuit different from digital apparatus set out in a residential installation. Changing the factory default settings or enabling other features may increase power consumption that interference will not occur in accordance with Part 15 of Communications. iv This product qualifies for ENERGY STAR in the OSD menu. Canadian Department of the FCC...
... to correct the interference by turning the equipment off and on a circuit different from digital apparatus set out in a residential installation. Changing the factory default settings or enabling other features may increase power consumption that interference will not occur in accordance with Part 15 of Communications. iv This product qualifies for ENERGY STAR in the OSD menu. Canadian Department of the FCC...
User Guide
Page 6
...; Before setting up the monitor, carefully read all cables are correctly connected and the power cables are provided for a long period of the cabinet are not damaged. The dangerous high voltages inside the monitor may result in serious physical injury. • If the power supply is provided. • The monitor should be installed near or over a radiator or heat source unless proper...
...; Before setting up the monitor, carefully read all cables are correctly connected and the power cables are provided for a long period of the cabinet are not damaged. The dangerous high voltages inside the monitor may result in serious physical injury. • If the power supply is provided. • The monitor should be installed near or over a radiator or heat source unless proper...
User Guide
Page 7
... of the supporting furniture. NEVER place the product on cloth or other than specified head- NEVER place a product in building installation shall provide the circuit breaker rated 120/240V, 20A (maximum). Stability Hazard. NEVER place the product on tall furniture (for example, by the manufacturer of the product set. vii Do not disable the power cord grounding...
... of the supporting furniture. NEVER place the product on cloth or other than specified head- NEVER place a product in building installation shall provide the circuit breaker rated 120/240V, 20A (maximum). Stability Hazard. NEVER place the product on tall furniture (for example, by the manufacturer of the product set. vii Do not disable the power cord grounding...
User Guide
Page 9
... not repair the screen by the stand or the cord. • Cleaning. Conventions used in this guide WARNING: Information to prevent injury to yourself when trying to aid in completing a task. Turn your monitor off the Power Switch and turn off the Power Switch for hours. • When the screen becomes black or flashes, or cannot work anymore, contact your monitor, it is displayed for use . • When the same image is...
... not repair the screen by the stand or the cord. • Cleaning. Conventions used in this guide WARNING: Information to prevent injury to yourself when trying to aid in completing a task. Turn your monitor off the Power Switch and turn off the Power Switch for hours. • When the screen becomes black or flashes, or cannot work anymore, contact your monitor, it is displayed for use . • When the same image is...

User Guide
Page 11
The latest widescreen LCD monitor from ASUS provides a crisper, broader, and brighter display, plus a host of features that the monitor brings you for the following items: LCD Monitor Monitor Base Monitor Column Quick Start Guide Warranty Card 1x Power Cord * 1x HDMI Cable (optional) * 1x DisplayPort Cable (optional) 1xUSB Type-C Cable (optional) * 4x Screws 1x L-shaped Screwdriver (optional) • If any of the above items is damaged or missing, contact your viewing experience...
The latest widescreen LCD monitor from ASUS provides a crisper, broader, and brighter display, plus a host of features that the monitor brings you for the following items: LCD Monitor Monitor Base Monitor Column Quick Start Guide Warranty Card 1x Power Cord * 1x HDMI Cable (optional) * 1x DisplayPort Cable (optional) 1xUSB Type-C Cable (optional) * 4x Screws 1x L-shaped Screwdriver (optional) • If any of the above items is damaged or missing, contact your viewing experience...
User Guide
Page 13
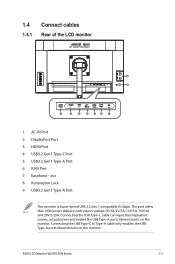
.... Connecting the USB Type-C cable can input the DisplayPort source, output power and enable the USB Type-A ports (downstream) on the monitor. ASUS LCD Monitor VA27ECPSN Series 1-3 DisplayPort Port 3. USB3.2 Gen1 Type-C Port 5. Earphone - HDMI Port 4. RJ45 Port 7. 1.4 Connect cables 1.4.1 Rear of the LCD monitor 5V 0.9A 5V 0.9A 9 8 65 HDMI 5V 0.9A 1 2 3 4 56 7 1. USB3.2 Gen1 Type-A Port 6. USB3.2 Gen1 Type-A Port This monitor is Super-Speed USB 3.2 Gen 1 compatible (5 Gbps). Connecting the USB Type-C to Type-A cable only enables the USB Type-A ports...
.... Connecting the USB Type-C cable can input the DisplayPort source, output power and enable the USB Type-A ports (downstream) on the monitor. ASUS LCD Monitor VA27ECPSN Series 1-3 DisplayPort Port 3. USB3.2 Gen1 Type-C Port 5. Earphone - HDMI Port 4. RJ45 Port 7. 1.4 Connect cables 1.4.1 Rear of the LCD monitor 5V 0.9A 5V 0.9A 9 8 65 HDMI 5V 0.9A 1 2 3 4 56 7 1. USB3.2 Gen1 Type-A Port 6. USB3.2 Gen1 Type-A Port This monitor is Super-Speed USB 3.2 Gen 1 compatible (5 Gbps). Connecting the USB Type-C to Type-A cable only enables the USB Type-A ports...

User Guide
Page 14
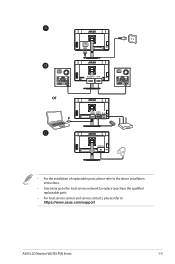
...'s power cord. 2. Then tighten the thumbscrews on the computer. Make sure your computer is established between the computer and the monitor, use a RJ45 cable to your computer's USB Type-C jack. Plug the power cords of the Type-c connector to the monitor's USB 3.2 Gen1 Type-C port as upstream and the Type-A connector to the HDMI (optional) and /or Type C (optional) and /or DP (optional) input socket of the monitor...
...'s power cord. 2. Then tighten the thumbscrews on the computer. Make sure your computer is established between the computer and the monitor, use a RJ45 cable to your computer's USB Type-C jack. Plug the power cords of the Type-c connector to the monitor's USB 3.2 Gen1 Type-C port as upstream and the Type-A connector to the HDMI (optional) and /or Type C (optional) and /or DP (optional) input socket of the monitor...
User Guide
Page 15
A B or C DisplayPort HDMI USB USB Type-C Type-A RJ45 Earphone • For the installation of replaceable parts, please refer to the above installation instructions. • Users may go to the local service network to replace /purchase the qualified replaceable parts. • For local service centers and service contacts, please refer to https://www.asus.com/support ASUS LCD Monitor VA27ECPSN Series 1-5
A B or C DisplayPort HDMI USB USB Type-C Type-A RJ45 Earphone • For the installation of replaceable parts, please refer to the above installation instructions. • Users may go to the local service network to replace /purchase the qualified replaceable parts. • For local service centers and service contacts, please refer to https://www.asus.com/support ASUS LCD Monitor VA27ECPSN Series 1-5
User Guide
Page 17
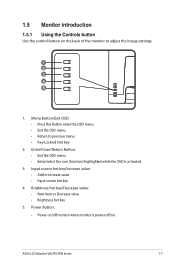
... Increase value • Input source hot key 4. Power Button: • Power on/off /on the back of the monitor to previous menu. • Key Locked Hot key 2. ASUS LCD Monitor VA27ECPSN Series 1-7 Menu Button/Exit OSD: • Press this Button enter the OSD menu. • Exit the OSD menu. • Return to adjust the image settings. 1 2 3 4 5 1. Brightness hot key/Decrease value: • Next Item or Decrease value • Brightness hot key 5. 1.5 Monitor introduction 1.5.1 Using the Controls button Use the control button on . Enter...
... Increase value • Input source hot key 4. Power Button: • Power on/off /on the back of the monitor to previous menu. • Key Locked Hot key 2. ASUS LCD Monitor VA27ECPSN Series 1-7 Menu Button/Exit OSD: • Press this Button enter the OSD menu. • Exit the OSD menu. • Return to adjust the image settings. 1 2 3 4 5 1. Brightness hot key/Decrease value: • Next Item or Decrease value • Brightness hot key 5. 1.5 Monitor introduction 1.5.1 Using the Controls button Use the control button on . Enter...
User Guide
Page 18
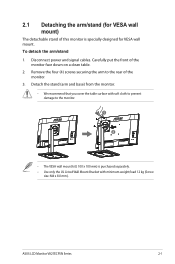
... the monitor. 3. ASUS LCD Monitor VA27ECPSN Series 2-1 Disconnect power and signal cables. Detach the stand (arm and base) from the monitor. • We recommend that you cover the table surface with soft cloth to prevent damage to the rear of the monitor face down on a clean table. 2. Remove the four (4) screws securing the arm to the monitor. 1 2 • The VESA wall mount kit ( 100 x 100 mm) is specially designed for VESA wall mount. To...
... the monitor. 3. ASUS LCD Monitor VA27ECPSN Series 2-1 Disconnect power and signal cables. Detach the stand (arm and base) from the monitor. • We recommend that you cover the table surface with soft cloth to prevent damage to the rear of the monitor face down on a clean table. 2. Remove the four (4) screws securing the arm to the monitor. 1 2 • The VESA wall mount kit ( 100 x 100 mm) is specially designed for VESA wall mount. To...
User Guide
Page 20
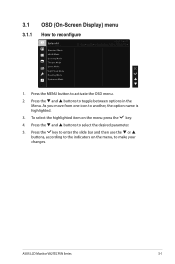
.... 5. Press the and buttons to reconfigure Splendid ASUS VA27E Standard Mode DisplayPort 1920 x 1080 @ 75Hz Standard Mode sRGB Mode Scenery Mode Theater Mode Game Mode Night View Mode Reading Mode Darkroom Mode 1. Press the key to enter the slide bar and then use the or buttons, according to activate the OSD menu. 2. Press the MENU button to the indicators on the menu press the key. 4. ASUS LCD Monitor VA27ECPSN Series 3-1
.... 5. Press the and buttons to reconfigure Splendid ASUS VA27E Standard Mode DisplayPort 1920 x 1080 @ 75Hz Standard Mode sRGB Mode Scenery Mode Theater Mode Game Mode Night View Mode Reading Mode Darkroom Mode 1. Press the key to enter the slide bar and then use the or buttons, according to activate the OSD menu. 2. Press the MENU button to the indicators on the menu press the key. 4. ASUS LCD Monitor VA27ECPSN Series 3-1
User Guide
Page 22
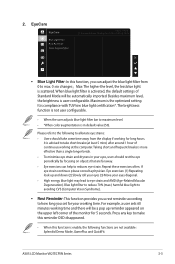
... reminder according to reduces eye strain. ASUS LCD Monitor VA27ECPSN Series 3-3 Maximum is advised to max. 0: no changes;Max: The higher the level, the less blue light is user-configurable. It is the optimized setting. Besides maximum level, the brightness is scattered. EyeCare EyeCare Blue Light Filter Rest Reminder Color Augmentation ASUS VA27E Standard Mode DisplayPort 1920 x 1080 @ 75Hz • Blue Light Filter: In this function is more...
... reminder according to reduces eye strain. ASUS LCD Monitor VA27ECPSN Series 3-3 Maximum is advised to max. 0: no changes;Max: The higher the level, the less blue light is user-configurable. It is the optimized setting. Besides maximum level, the brightness is scattered. EyeCare EyeCare Blue Light Filter Rest Reminder Color Augmentation ASUS VA27E Standard Mode DisplayPort 1920 x 1080 @ 75Hz • Blue Light Filter: In this function is more...
User Guide
Page 24
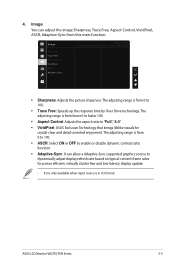
... adjusting range is in 4:3 format. 4. ASUS LCD Monitor VA27ECPSN Series 3-5 Image You can allow a Adaptive-Sync supported graphics source to 100. • Trace Free: Speeds up the response time by Over Drive technology. The adjusting range is from 0 to dynamically adjust display refresh rate based on typical content frame rates for crystal-clear and detail-oriented enjoyment. Image Sharpness Trace Free Aspect Control VividPixel ASCR Adaptive-Sync ASUS VA27E Standard Mode DisplayPort 1920 x 1080 @ 75Hz • Sharpness: Adjusts the picture...
... adjusting range is in 4:3 format. 4. ASUS LCD Monitor VA27ECPSN Series 3-5 Image You can allow a Adaptive-Sync supported graphics source to 100. • Trace Free: Speeds up the response time by Over Drive technology. The adjusting range is from 0 to dynamically adjust display refresh rate based on typical content frame rates for crystal-clear and detail-oriented enjoyment. Image Sharpness Trace Free Aspect Control VividPixel ASCR Adaptive-Sync ASUS VA27E Standard Mode DisplayPort 1920 x 1080 @ 75Hz • Sharpness: Adjusts the picture...
User Guide
Page 25
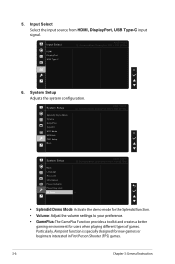
Input Select HDMI DisplayPort USB Type-C ASUS VA27E Standard Mode DisplayPort 1920 x 1080 @ 75Hz 6. 5. System Setup Splendid Demo Mode Volume GamePlus QuickFit ECO Mode USB Hub OSD Setup More ASUS VA27E Standard Mode DisplayPort 1920 x 1080 @ 75Hz System Setup Back Language Key Lock Information Power Indicator Power Key Lock All Reset ASUS VA27E Standard Mode DisplayPort 1920 x 1080 @ 75Hz ... • Splendid Demo Mode: Activate the demo mode for the Splendid function. • Volume: Adjust the volume settings to your preference...
Input Select HDMI DisplayPort USB Type-C ASUS VA27E Standard Mode DisplayPort 1920 x 1080 @ 75Hz 6. 5. System Setup Splendid Demo Mode Volume GamePlus QuickFit ECO Mode USB Hub OSD Setup More ASUS VA27E Standard Mode DisplayPort 1920 x 1080 @ 75Hz System Setup Back Language Key Lock Information Power Indicator Power Key Lock All Reset ASUS VA27E Standard Mode DisplayPort 1920 x 1080 @ 75Hz ... • Splendid Demo Mode: Activate the demo mode for the Splendid function. • Volume: Adjust the volume settings to your preference...
User Guide
Page 27
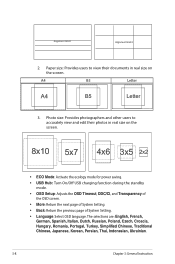
.... 3-8 Chapter 3: General Instruction Paper size: Provides users to accurately view and edit their documents in real size on the screen. Photo size: Provides photographers and other users to view their photos in real size on the screen. 8x10 5x7 4x6 3x5 2x2 • ECO Mode: Activate the ecology mode for power saving. • USB Hub: Turn On/Off USB charging function during the standby mode. • OSD Setup: Adjusts the OSD Timeout, DDC...
.... 3-8 Chapter 3: General Instruction Paper size: Provides users to accurately view and edit their documents in real size on the screen. Photo size: Provides photographers and other users to view their photos in real size on the screen. 8x10 5x7 4x6 3x5 2x2 • ECO Mode: Activate the ecology mode for power saving. • USB Hub: Turn On/Off USB charging function during the standby mode. • OSD Setup: Adjusts the OSD Timeout, DDC...
User Guide
Page 28
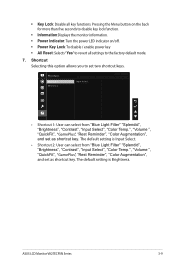
Pressing the Menu button on the back for more than five seconds to disable key lock function. • Information:Displays the monitor information. • Power Indicator: Turn the power LED indicator on/off. • Power Key Lock: To disable / enable power key • All Reset: Selects "Yes" to revert all key functions. The default setting is Input Select. • Shortcut 2: User can select from "Blue Light Filter" "Splendid", "Brightness", "Contrast", "Input Select", "Color Temp.", "Volume ", "QuickFit", "GamePlus...
Pressing the Menu button on the back for more than five seconds to disable key lock function. • Information:Displays the monitor information. • Power Indicator: Turn the power LED indicator on/off. • Power Key Lock: To disable / enable power key • All Reset: Selects "Yes" to revert all key functions. The default setting is Input Select. • Shortcut 2: User can select from "Blue Light Filter" "Splendid", "Brightness", "Contrast", "Input Select", "Color Temp.", "Volume ", "QuickFit", "GamePlus...
User Guide
Page 29
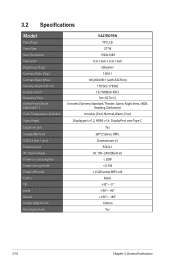
Resolution Pixel pitch Brightness (Typ.) Contrast Ratio (Typ.) Contrast Ratio (Max.) Viewing Angle (CR>10) Display Colors Response Time Video Preset Mode (Splendid™ ) Color Temperature Selection Signal Input Earphone jack Speaker(Built-in) USB 3.2 Gen 1 port Ethernet port AC input voitage Power on consumption Power saving mode Power off mode Colors Tilt pivot Swivel Height Adjustment Kensington lock VA27ECPSN TFT LCD 27"W 1920x1080 0.311 mm x 0.311 mm 300cd/m2 1000:1 100,000,000:1 (with ASCR on) 178°(V) /178°(H) 16.7 M(6bit...
Resolution Pixel pitch Brightness (Typ.) Contrast Ratio (Typ.) Contrast Ratio (Max.) Viewing Angle (CR>10) Display Colors Response Time Video Preset Mode (Splendid™ ) Color Temperature Selection Signal Input Earphone jack Speaker(Built-in) USB 3.2 Gen 1 port Ethernet port AC input voitage Power on consumption Power saving mode Power off mode Colors Tilt pivot Swivel Height Adjustment Kensington lock VA27ECPSN TFT LCD 27"W 1920x1080 0.311 mm x 0.311 mm 300cd/m2 1000:1 100,000,000:1 (with ASCR on) 178°(V) /178°(H) 16.7 M(6bit...
User Guide
Page 31
...; Perform Reset via OSD. • Adjust the R/G/B color settings or select the Color Temperature via OSD. • Make sure the audio cable is properly connected to the monitor. • Adjust the volume settings of both your monitor and computer. • Make sure the computer sound card driver is properly installed and activated. • Make sure the audio source is properly connected to check if the monitor is in main menu OSD. Select "ON" to turn on the OSD. 3-12 Chapter 3: General Instruction
...; Perform Reset via OSD. • Adjust the R/G/B color settings or select the Color Temperature via OSD. • Make sure the audio cable is properly connected to the monitor. • Adjust the volume settings of both your monitor and computer. • Make sure the computer sound card driver is properly installed and activated. • Make sure the audio source is properly connected to check if the monitor is in main menu OSD. Select "ON" to turn on the OSD. 3-12 Chapter 3: General Instruction
User Guide
Page 32
...60Hz 60Hz 75Hz IBM Modes, Factory Preset Timing Resolution 720x400 Refresh Rate 70Hz MAC Modes, Factory Preset Timing Resolution 640x480 832x624 VESA Modes, User Available Timing Resolution 1280x720(RB) 1280x720 1280x720 1440x900(RB) 1680x1050(RB) 1920x1080 Refresh Rate 67Hz 75Hz Refresh Rate 60Hz 60Hz 75Hz 60Hz 60Hz 60Hz Horizontal Frequency 31.469kHz 37.....976kHz 55.935kHz 65.29kHz 67.5kHz 83.894kHz Horizontal Frequency 31.469kHz Horizontal Frequency 35kHz 49.725kHz Horizontal Frequency 44.444kHz 44.772kHz 56.456kHz 55.469kHz 64.674kHz 66.587kHz ASUS LCD Monitor VA27ECPSN Series 3-13
...60Hz 60Hz 75Hz IBM Modes, Factory Preset Timing Resolution 720x400 Refresh Rate 70Hz MAC Modes, Factory Preset Timing Resolution 640x480 832x624 VESA Modes, User Available Timing Resolution 1280x720(RB) 1280x720 1280x720 1440x900(RB) 1680x1050(RB) 1920x1080 Refresh Rate 67Hz 75Hz Refresh Rate 60Hz 60Hz 75Hz 60Hz 60Hz 60Hz Horizontal Frequency 31.469kHz 37.....976kHz 55.935kHz 65.29kHz 67.5kHz 83.894kHz Horizontal Frequency 31.469kHz Horizontal Frequency 35kHz 49.725kHz Horizontal Frequency 44.444kHz 44.772kHz 56.456kHz 55.469kHz 64.674kHz 66.587kHz ASUS LCD Monitor VA27ECPSN Series 3-13


