Asus VS197T Support and Manuals
Get Help and Manuals for this Asus item
Popular Asus VS197T Manual Pages
User Guide - Page 2
... monitor 1-5 2.1 Detaching the arm/stand (for identification or explanation and to the owners' benefit, without intent to reconfigure 3-1 3.1.2 OSD Function Introduction 3-1 3.2 Specifications 3-5 3.3 Troubleshooting (FAQ 3-6 3.4 Supported Timing List 3-7
Copyright © 2011 ASUSTeK COMPUTER INC. No part of this manual may or may be extended if: (1) the product is repaired, modified...
User Guide - Page 3

... Communications Commission Statement This device complies with manufacturer's instructions, may cause undesired operation. If this product meets... from that interference will not occur in a residential installation. As an Energy Star® Partner, our company... radio noise emissions from digital apparatus set out in accordance with Part 15 of Communications Statement This digital apparatus...
User Guide - Page 4

... complies with the monitor, contact a qualified service technician or your dealer immediately.
• Slots and openings on the back or top of the cabinet are not damaged. Place the monitor on the label. This will not be operated only from damage due to open the monitor cabinet. If you encounter technical problems with your dealer...
User Guide - Page 7
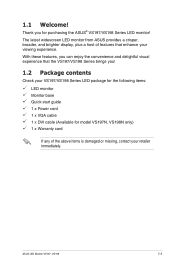
... for the following items:
LED monitor Monitor base Quick start guide 1 x Power cord 1 x VGA cable 1 x DVI cable (Available for purchasing the ASUS® VS197/VS198 Series LED monitor! The latest widescreen LED monitor from ASUS provides a crisper, broader, and brighter display, plus a host of features that the VS197/VS198 Series brings you for model VS197N, VS198N only) 1 x Warranty card...
User Guide - Page 9
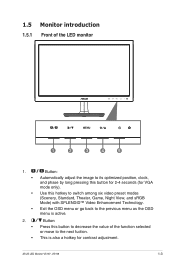
Exit the OSD menu or go back to the next fuction.
ASUS LED Monitor VS197, VS198
1-3 Use this button to decrease the value of the LED monitor
1
2
3
4
5
1. •
•
• 2.
• &#...and phase by long pressing this button for 2-4 seconds (for contrast adjustment.
1.5 Monitor introduction
1.5.1 Front of the function selected or move to the previous menu as the OSD menu...
User Guide - Page 11
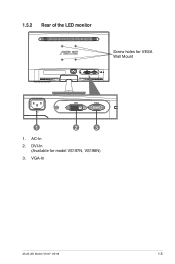
1.5.2 Rear of the LED monitor
Screw holes for model VS197N, VS198N)
3. AC-In
2. DVI-In (Available for VESA Wall Mount
1
2
3
1. VGA-In
ASUS LED Monitor VS197, VS198
1-5
User Guide - Page 12
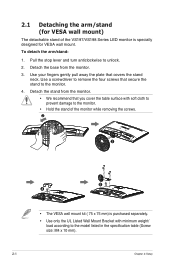
... cloth to prevent damage to the monitor.
• Hold the stand of the VS197/VS198 Series LED monitor is purchased separately.
• Use only the UL Listed Wall Mount Bracket with minimum weight/ load according to the model listed in the specification table (Screw size: M4 x 10 mm).
2-1
Chapter 2: Setup Use a screwdriver to remove the four...
User Guide - Page 13
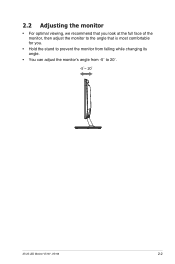
2.2 Adjusting the monitor
• For optimal viewing, we recommend that you look at the full face of the monitor, then adjust the monitor to the angle that is most comfortable for you.
• Hold the stand to prevent the monitor from falling while changing its angle.
• You can adjust the monitor's angle from -5˚ to 20˚.
-5 ~ 20
ASUS LED Monitor VS197, VS198
2-2
User Guide - Page 14
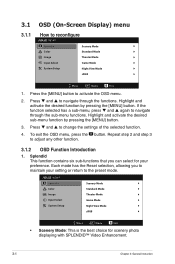
...and again to reconfigure
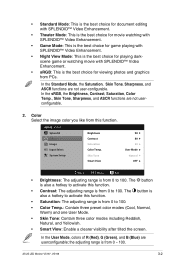
VS197
Splendid
Scenery Mode
Color
Standard Mode
Image
Theater Mode
Input Select
Game Mode
System Setup
Night View Mode
sRGB
Move
Menu
Exit
1. Repeat step 2 and step 3 to change the settings of the selected function.
4. ...select for scenery photo displaying with SPLENDID™ Video Enhancement.
3-1
Chapter 3: General Instruction
User Guide - Page 15
VS197 Splendid Color Image Input Select System Setup
Brightness Contrast Saturation Color Temp.
Color Select the image color you like...hotkey to activate this function.
• Saturation: The adjusting range is also a hotkey to activate this function. ASUS LED Monitor VS197, VS198
3-2
The button is from 0 to 100. the adjusting range is the best choice for playing darkscene ...
User Guide - Page 16
...ASUS Smart Contrast Ratio.
The adjusting range is from 0 to 100. (Only available for VGA input.)
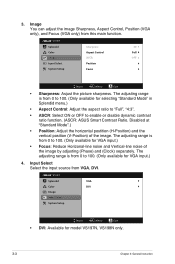
4. VS197
Splendid
Sharpness
40
Color
Aspect Control
Full
Image
ASCR
OFF
Input Select
Position
System Setup... range is from 0 to 100. (Only available for model VS197N, VS198N only.
3-3
Chapter 3: General Instruction Image You can adjust the image Sharpness, Aspect Control, Position ...
User Guide - Page 17
...), vertical position (V-Position), OSD Timeout, DDD/CI, and Transparency of Input Port, Resolution, H-freq., V-freq, and Model Name.
• All Reset: Set to "Yes" to revert all settings to the factory default status. ASUS LED Monitor VS197, VS198
3-4 Its brightness is ON.
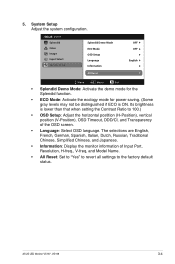
System Setup Adjust the system configuration. The selections are English, French, German, Spanish, Italian, Dutch...
User Guide - Page 18
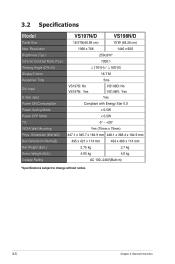
3.2 Specifications
Model
VS197N/D
VS198N/D
Panel Size
18.5"W(46.99 cm)
19"W (48.26 cm)
Max. Resolution
1366 x 768
1440 x 900
Brightness (Typ.)
250cd/m2
Intrisinc Contrast Ratio (Typ.)
1000:1
Viewing Angle (CR=10)
≧170°(H) / ≧160°(V)
Display Colors
16.7 M
Response Time
5ms
DVI input
VS197D: No VS197N: Yes
VS198D: No VS198N: Yes
D-Sub...
User Guide - Page 19
...ASUS LED Monitor VS197, VS198
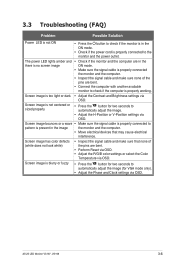
3-6 Screen image is not centered or sized properly
• Press the button for VGA mode only).
• Adjust the Phase and Clock settings...monitor to automatically adjust the image.
• Adjust the H-Position or V-Position settings via OSD. 3.3 Troubleshooting (FAQ)
Problem...connected to the monitor and the power outlet.
Screen image is blurry or fuzzy
&#...
User Guide - Page 20
...
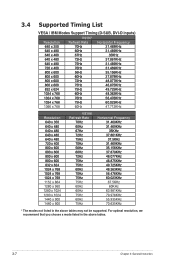
VESA / IBM Modes Support Timing (D-SUB, DVI-D inputs)
VS197
Resolution Refresh Rate
Horizontal Frequency
640 x 350
70Hz
31.469KHz
640 x 480
60Hz
31.469KHz
640 x 480
67Hz... 55.935KHz 70.635KHz
* The modes not listed in the above tables may not be supported. For optimal resolution, we recommend that you choose a mode listed in the above tables.
3-7
Chapter 3: General Instruction
Asus VS197T Reviews
We have not received any reviews for Asus yet.