User Manual
Page 1
Notebook PC Hardware User's Manual E3354 / Aug 2007
Notebook PC Hardware User's Manual E3354 / Aug 2007
User Manual
Page 2
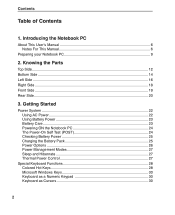
Getting Started Power System ...22 Using AC Power 22 Using Battery Power 23 Battery Care...23 Powering ON the Notebook PC 24 The Power-On Self Test (POST 24 Checking Battery Power 25 Charging the Battery Pack 25 Power Options ...26 Power Management Modes 27 ... of Contents 1. Knowing the Parts Top Side...12 Bottom Side ...14 Left Side ...16 Right Side ...18 Front Side ...19 Rear Side...20 3. Introducing the Notebook PC About This User's Manual 6 Notes For This Manual 6 Preparing your...
Getting Started Power System ...22 Using AC Power 22 Using Battery Power 23 Battery Care...23 Powering ON the Notebook PC 24 The Power-On Self Test (POST 24 Checking Battery Power 25 Charging the Battery Pack 25 Power Options ...26 Power Management Modes 27 ... of Contents 1. Knowing the Parts Top Side...12 Bottom Side ...14 Left Side ...16 Right Side ...18 Front Side ...19 Rear Side...20 3. Introducing the Notebook PC About This User's Manual 6 Notes For This Manual 6 Preparing your...
User Manual
Page 3
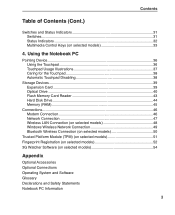
... Indicators 32 Multimedia Control Keys (on selected models 54 Appendix Optional Accessories Optional Connections Operating System and Software Glossary Declarations and Safety Statements Notebook PC Information 3 Using the Notebook PC Pointing Device...36 Using the Touchpad 36 Touchpad Usage Illustrations 37 Caring for the Touchpad 38 Automatic Touchpad Disabling 38 Storage Devices...
... Indicators 32 Multimedia Control Keys (on selected models 54 Appendix Optional Accessories Optional Connections Operating System and Software Glossary Declarations and Safety Statements Notebook PC Information 3 Using the Notebook PC Pointing Device...36 Using the Touchpad 36 Touchpad Usage Illustrations 37 Caring for the Touchpad 38 Automatic Touchpad Disabling 38 Storage Devices...
User Manual
Page 5
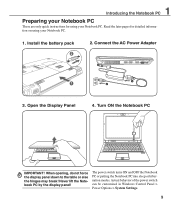
1. Introducing the Notebook PC About This User's Manual Notes For This Manual Safety Precautions Preparing your Notebook PC NOTE: Photos and icons in this manual are used for artistic purposes only and do not show what is actually used in the product itself. 5
1. Introducing the Notebook PC About This User's Manual Notes For This Manual Safety Precautions Preparing your Notebook PC NOTE: Photos and icons in this manual are used for artistic purposes only and do not show what is actually used in the product itself. 5
User Manual
Page 6
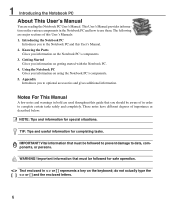
...you to complete certain tasks safely and completely. Knowing the Parts Gives you should be followed for safe operation. < > Text enclosed in order to the Notebook PC and this User's Manuals: 1. do not actually type the [ ] < > or [ ] and the enclosed letters. 6 Notes For This ...Manual A few notes and warnings in bold are reading the Notebook PC User's Manual. These notes have different degrees of in < > or [ ] represents a key on the keyboard; Important information that must be aware of ...
...you to complete certain tasks safely and completely. Knowing the Parts Gives you should be followed for safe operation. < > Text enclosed in order to the Notebook PC and this User's Manuals: 1. do not actually type the [ ] < > or [ ] and the enclosed letters. 6 Notes For This ...Manual A few notes and warnings in bold are reading the Notebook PC User's Manual. These notes have different degrees of in < > or [ ] represents a key on the keyboard; Important information that must be aware of ...
User Manual
Page 7
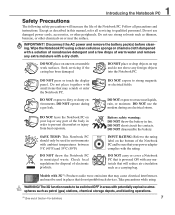
...as petrol (gas) stations, chemical storage depots, and blasting operations. (1) (See end of warm water and remove any foreign objects into the Notebook PC. Do not use strong solvents such as a carrying bag. DO NOT expose to strong magnetic or electrical fields. Battery safety warning:... do not prohibit such devices. IMPORTANT! DO NOT use near the surface. Check local regulations for definition) 7 Wipe the Notebook PC using . Do not place together with potentially explosive atmospheres such as described in places that your lap or any part of the...
...as petrol (gas) stations, chemical storage depots, and blasting operations. (1) (See end of warm water and remove any foreign objects into the Notebook PC. Do not use strong solvents such as a carrying bag. DO NOT expose to strong magnetic or electrical fields. Battery safety warning:... do not prohibit such devices. IMPORTANT! DO NOT use near the surface. Check local regulations for definition) 7 Wipe the Notebook PC using . Do not place together with potentially explosive atmospheres such as described in places that your lap or any part of the...
User Manual
Page 8
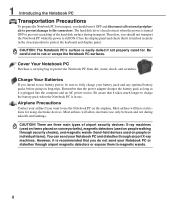
...through airport X-ray machines. Most airlines will allow electronic use battery power, be sure to magnetic wands. 8 Be careful not to protect the Notebook PC from dirt, water, shock, and scratches. Charge Your Batteries If you want to use only between and not during transport. Airplane Precautions.... Therefore, you should turn it is recommended that it is easily dulled if not properly cared for using electronic devices. CAUTION: The Notebook PC's surface is plugged into the computer and an AC power source. There are three main types of the hard disk surface during ...
...through airport X-ray machines. Most airlines will allow electronic use battery power, be sure to magnetic wands. 8 Be careful not to protect the Notebook PC from dirt, water, shock, and scratches. Charge Your Batteries If you want to use only between and not during transport. Airplane Precautions.... Therefore, you should turn it is recommended that it is easily dulled if not properly cared for using electronic devices. CAUTION: The Notebook PC's surface is plugged into the computer and an AC power source. There are three main types of the hard disk surface during ...
User Manual
Page 9
... table or else the hinges may break! The power switch turns ON and OFF the Notebook PC or putting the Notebook PC into sleep or hibernation modes. Open the Display Panel 4. Turn ON the Notebook PC 1.3 MEGA PIXELS IMPORTANT! Install the battery pack 2 2. Actual behavior of the ...power switch can be customized in Windows Control Panel > Power Options > System Settings. 9 Never lift the Notebook PC by the display panel! Read the later ...
... table or else the hinges may break! The power switch turns ON and OFF the Notebook PC or putting the Notebook PC into sleep or hibernation modes. Open the Display Panel 4. Turn ON the Notebook PC 1.3 MEGA PIXELS IMPORTANT! Install the battery pack 2 2. Actual behavior of the ...power switch can be customized in Windows Control Panel > Power Options > System Settings. 9 Never lift the Notebook PC by the display panel! Read the later ...

User Manual
Page 10
1 Introducing the Notebook PC 10
1 Introducing the Notebook PC 10
User Manual
Page 11
2. Knowing the Parts Basic sides of the Notebook PC NOTE: Photos and icons in this manual are used for artistic purposes only and do not show what is actually used in the product itself. 11
2. Knowing the Parts Basic sides of the Notebook PC NOTE: Photos and icons in this manual are used for artistic purposes only and do not show what is actually used in the product itself. 11

User Manual
Page 12
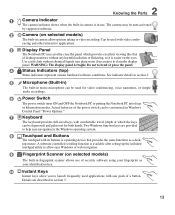
2 Knowing the Parts Top Side Refer to the diagram below to identify the components on this side of the Notebook PC. NOTE: The keyboard will be different for each territory. 12 3 4 10 5 6 7 8 9 12
2 Knowing the Parts Top Side Refer to the diagram below to identify the components on this side of the Notebook PC. NOTE: The keyboard will be different for each territory. 12 3 4 10 5 6 7 8 9 12
User Manual
Page 13
..., voice narrations, or simple audio recordings. 6 Power Switch The power switch turns ON and OFF the Notebook PC or putting the Notebook PC into sleep or hibernation modes. encing and other interactive applications. 3 Display Panel The Notebook PC uses an ultra-clear flat which provides excellent viewing like that provides the same...
..., voice narrations, or simple audio recordings. 6 Power Switch The power switch turns ON and OFF the Notebook PC or putting the Notebook PC into sleep or hibernation modes. encing and other interactive applications. 3 Display Panel The Notebook PC uses an ultra-clear flat which provides excellent viewing like that provides the same...
User Manual
Page 14
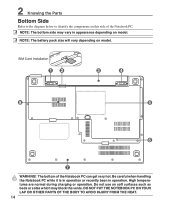
.... NOTE: The battery pack size will vary depending on soft surfaces such as beds or sofas which may vary in operation. DO NOT PUT THE NOTEBOOK PC ON YOUR LAP OR OTHER PARTS OF THE BODY TO AVOID INJURY FROM THE HEAT. 14 NOTE: The bottom side may block the vents...3 4 8 5 6 7 WARNING! 2 Knowing the Parts Bottom Side Refer to the diagram below to identify the components on this side of the Notebook PC can get very hot. Be careful when handling the Notebook PC while it is in operation or recently been in appearance depending on model. High temperatures are normal during charging...
.... NOTE: The battery pack size will vary depending on soft surfaces such as beds or sofas which may vary in operation. DO NOT PUT THE NOTEBOOK PC ON YOUR LAP OR OTHER PARTS OF THE BODY TO AVOID INJURY FROM THE HEAT. 14 NOTE: The bottom side may block the vents...3 4 8 5 6 7 WARNING! 2 Knowing the Parts Bottom Side Refer to the diagram below to identify the components on this side of the Notebook PC can get very hot. Be careful when handling the Notebook PC while it is in operation or recently been in appearance depending on model. High temperatures are normal during charging...
User Manual
Page 15
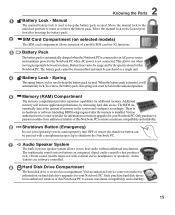
... as a single unit. 4 Battery Lock - Visit an authorized service center or retailer for information on memory upgrades for this Notebook PC to ensure maximum compatibility and reliability. 15 Manual The manual battery lock is inserted, it will increase application performance by the... specifications for your Notebook PC. When the battery pack is used to keep the battery pack secured. Visit an authorized service center or retailer ...
... as a single unit. 4 Battery Lock - Visit an authorized service center or retailer for information on memory upgrades for this Notebook PC to ensure maximum compatibility and reliability. 15 Manual The manual battery lock is inserted, it will increase application performance by the... specifications for your Notebook PC. When the battery pack is used to keep the battery pack secured. Visit an authorized service center or retailer ...
User Manual
Page 16
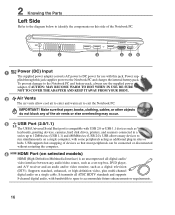
... USE. plied through this jack. IMPORTANT! 2 Knowing the Parts Left Side Refer to the diagram below to identify the components on this side of the Notebook PC. 1 2 3 4 56 1 Power (DC) Input The supplied power adapter converts AC power to DC power for use the supplied power adapter. BE SURE ...COVER THE ADAPTER AND KEEP IT AWAY FROM YOUR BODY. 2 Air Vents The air vents allow cool air to enter and warm air to the Notebook PC and charges the internal battery pack. USB allows many devices to run simultaneously on a single cable. It transmits all -digital audio/ video ...
... USE. plied through this jack. IMPORTANT! 2 Knowing the Parts Left Side Refer to the diagram below to identify the components on this side of the Notebook PC. 1 2 3 4 56 1 Power (DC) Input The supplied power adapter converts AC power to DC power for use the supplied power adapter. BE SURE ...COVER THE ADAPTER AND KEEP IT AWAY FROM YOUR BODY. 2 Air Vents The air vents allow cool air to enter and warm air to the Notebook PC and charges the internal battery pack. USB allows many devices to run simultaneously on a single cable. It transmits all -digital audio/ video ...
User Manual
Page 18
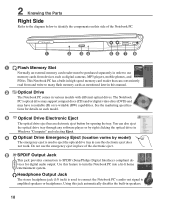
..." and selecting Eject. 4 Optical Drive Emergency Eject (location varies by right clicking the optical drive in various models with different optical drives. The Notebook PC's optical drive may support compact discs (CD) and/or digital video discs (DVD) and may have recordable (R) or re-writable (RW)... capabilities. Combo 5 SPDIF Output Jack This jack provides connection to eject the optical drive tray in place of the Notebook PC. 1 2 34 56 7 8 1 Flash Memory Slot Normally an external memory card reader must be purchased separately in order to amplifi...
..." and selecting Eject. 4 Optical Drive Emergency Eject (location varies by right clicking the optical drive in various models with different optical drives. The Notebook PC's optical drive may support compact discs (CD) and/or digital video discs (DVD) and may have recordable (R) or re-writable (RW)... capabilities. Combo 5 SPDIF Output Jack This jack provides connection to eject the optical drive tray in place of the Notebook PC. 1 2 34 56 7 8 1 Flash Memory Slot Normally an external memory card reader must be purchased separately in order to amplifi...
User Manual
Page 19
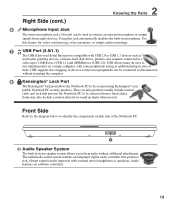
... Jack The mono microphone jack (1/8 inch) can be connected or disconnected without additional attachments. USB supports hot-swapping of the Notebook PC. 1 Audio Speaker System The built-in microphone. These security products usually include a metal cable and lock that most ...recordings. 7 USB Port (2.0/1.1) 2.0 The USB (Universal Serial Bus) port is compatible with external stereo headphones or speakers). patible Notebook PC security products. Use this jack automatically disables the built-in stereo speaker system allows you to hear audio without restarting the ...
... Jack The mono microphone jack (1/8 inch) can be connected or disconnected without additional attachments. USB supports hot-swapping of the Notebook PC. 1 Audio Speaker System The built-in microphone. These security products usually include a metal cable and lock that most ...recordings. 7 USB Port (2.0/1.1) 2.0 The USB (Universal Serial Bus) port is compatible with external stereo headphones or speakers). patible Notebook PC security products. Use this jack automatically disables the built-in stereo speaker system allows you to hear audio without restarting the ...

User Manual
Page 20
... 4 Display (Monitor) Output The 15-pin D-sub monitor port supports a standard VGA-compatible device such as a monitor or projector to allow viewing on this Notebook PC. The built-in digital phone systems. Do not connect the modem port to a digital phone system or else damage will occur to the... RJ-45 LAN port with two pins is smaller than the RJ-11 modem port and supports a standard Ethernet cable for this side of the Notebook PC. 12 3 4 1 Modem Port The RJ-11 modem port with eight pins is not connected. IMPORTANT! This allows use without additional adapters. 3 Battery ...
... 4 Display (Monitor) Output The 15-pin D-sub monitor port supports a standard VGA-compatible device such as a monitor or projector to allow viewing on this Notebook PC. The built-in digital phone systems. Do not connect the modem port to a digital phone system or else damage will occur to the... RJ-45 LAN port with two pins is smaller than the RJ-11 modem port and supports a standard Ethernet cable for this side of the Notebook PC. 12 3 4 1 Modem Port The RJ-11 modem port with eight pins is not connected. IMPORTANT! This allows use without additional adapters. 3 Battery ...

User Manual
Page 21
Getting Started Using AC Power Using Battery Power Powering ON the Notebook PC Checking Battery Power Powering Options Power Management Modes Special Keyboard Functions Switches and Status Indicators NOTE: Photos and icons in this manual are used for artistic purposes only and do not show what is actually used in the product itself. 21 3.
Getting Started Using AC Power Using Battery Power Powering ON the Notebook PC Checking Battery Power Powering Options Power Management Modes Special Keyboard Functions Switches and Status Indicators NOTE: Photos and icons in this manual are used for artistic purposes only and do not show what is actually used in the product itself. 21 3.

User Manual
Page 22
... to a different standard. If there is within accepted ranges. BE SURE NOT TO COVER THE ADAPTER AND KEEP IT AWAY FROM YOUR BODY. 22 Your Notebook PC comes with a faulty AC-DC adapter. TIP: You can buy travel kits for almost every country. Connecting the AC-DC adapter to the AC... outlet first allows you may require that includes power and modem adapters for the Notebook PC that an adapter be used to connect the provided US-standard AC power cord to any 100V-120V as well as voltages. IMPORTANT! Seek...
... to a different standard. If there is within accepted ranges. BE SURE NOT TO COVER THE ADAPTER AND KEEP IT AWAY FROM YOUR BODY. 22 Your Notebook PC comes with a faulty AC-DC adapter. TIP: You can buy travel kits for almost every country. Connecting the AC-DC adapter to the AC... outlet first allows you may require that includes power and modem adapters for the Notebook PC that an adapter be used to connect the provided US-standard AC power cord to any 100V-120V as well as voltages. IMPORTANT! Seek...


