User Guide
Page 2
... ARISING FROM ANY DEFECT OR ERROR IN THIS MANUAL OR PRODUCT. For previous or updated manuals, BIOS, drivers, or product release information, contact ASUS at http://www.asus.com.tw or through any means, except documentation kept by the purchaser for backup purposes, without ... CONDITIONS OF MERCHANTABILITY OR FITNESS FOR A PARTICULAR PURPOSE. Copyright © 1997 ASUSTeK COMPUTER INC. Product Name: ASUS TX97-E Manual Revision: 1.12 Release Date: August 1997 2 ASUS TX97-E User's Manual USER'S NOTICE No part of this manual may or may be registered trademarks or copyrights of their...
... ARISING FROM ANY DEFECT OR ERROR IN THIS MANUAL OR PRODUCT. For previous or updated manuals, BIOS, drivers, or product release information, contact ASUS at http://www.asus.com.tw or through any means, except documentation kept by the purchaser for backup purposes, without ... CONDITIONS OF MERCHANTABILITY OR FITNESS FOR A PARTICULAR PURPOSE. Copyright © 1997 ASUSTeK COMPUTER INC. Product Name: ASUS TX97-E Manual Revision: 1.12 Release Date: August 1997 2 ASUS TX97-E User's Manual USER'S NOTICE No part of this manual may or may be registered trademarks or copyrights of their...
User Guide
Page 4
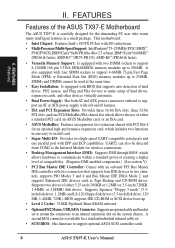
...of Chipset Features Setup 43 Power Management Setup 46 Details of the ASUS TX97-E Motherboard 11 III. Jumpers 14 Jumper Settings 15 Compatible Cyrix CPU Identification 18 2. BIOS SOFTWARE 34 Support Software 34 Flash Memory Writer Utility 34 Main Menu... Features Menu 35 Managing & Updating your Motherboard's BIOS 36 6. INSTALLATION 12 ASUS TX97-E Motherboard Layout 12 Installation Steps 14 1. Central Processing Unit (CPU 23 4. FEATURES 8 Features of the ASUS TX97-E Motherboard 8 Introduction to ASUS TX97 Series of motherboards 9 Parts of Power Management Setup...
...of Chipset Features Setup 43 Power Management Setup 46 Details of the ASUS TX97-E Motherboard 11 III. Jumpers 14 Jumper Settings 15 Compatible Cyrix CPU Identification 18 2. BIOS SOFTWARE 34 Support Software 34 Flash Memory Writer Utility 34 Main Menu... Features Menu 35 Managing & Updating your Motherboard's BIOS 36 6. INSTALLATION 12 ASUS TX97-E Motherboard Layout 12 Installation Steps 14 1. Central Processing Unit (CPU 23 4. FEATURES 8 Features of the ASUS TX97-E Motherboard 8 Introduction to ASUS TX97 Series of motherboards 9 Parts of Power Management Setup...
User Guide
Page 5
...-SC200 61 SCSI ID Numbers for SCSI Devices 62 SCSI ID Priority 62 ASUS TX97-E User's Manual 5 CONTENTS PNP and PCI Setup 48 Details of PNP and PCI Setup 49 Load BIOS Defaults 50 Load Setup Defaults 50 Supervisor Password and User Password 51 IDE HDD Auto Detection 52 Save & Exit ...Setup 53 Exit Without Saving 53 V. SUPPORT SOFTWARE 54 ASUS TX97 Motherboard Support CD 3.02 54 LANDesk Client Manager (LDCM 54...
...-SC200 61 SCSI ID Numbers for SCSI Devices 62 SCSI ID Priority 62 ASUS TX97-E User's Manual 5 CONTENTS PNP and PCI Setup 48 Details of PNP and PCI Setup 49 Load BIOS Defaults 50 Load Setup Defaults 50 Supervisor Password and User Password 51 IDE HDD Auto Detection 52 Save & Exit ...Setup 53 Exit Without Saving 53 V. SUPPORT SOFTWARE 54 ASUS TX97 Motherboard Support CD 3.02 54 LANDesk Client Manager (LDCM 54...
User Guide
Page 7
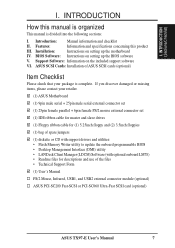
...manual is complete. INTRODUCTION (Sections/Checklist) I . If you discover damaged or missing items, please contact your retailer. (1) ASUS Motherboard (1) 9pin male serial + 25pin male serial external connector set (1) 25pin female parallel + 6pin female PS/2 mouse ...ASUS SCSI Cards: Installation of the files • Technical Support Form (1) User's Manual PS/2 Mouse, Infrared, USB1, and USB2 external connector module (optional) ASUS PCI-SC200 Fast-SCSI or PCI-SC860 Ultra-Fast SCSI card (optional) ASUS TX97-E User's Manual 7 Installation: Instructions on setting up the BIOS...
...manual is complete. INTRODUCTION (Sections/Checklist) I . If you discover damaged or missing items, please contact your retailer. (1) ASUS Motherboard (1) 9pin male serial + 25pin male serial external connector set (1) 25pin female parallel + 6pin female PS/2 mouse ...ASUS SCSI Cards: Installation of the files • Technical Support Form (1) User's Manual PS/2 Mouse, Infrared, USB1, and USB2 external connector module (optional) ASUS PCI-SC200 Fast-SCSI or PCI-SC860 Ultra-Fast SCSI card (optional) ASUS TX97-E User's Manual 7 Installation: Instructions on setting up the BIOS...
User Guide
Page 8
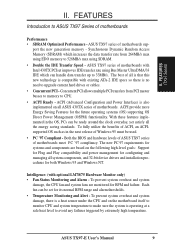
... or 2.88MB) disk drives. A second IrDA connector is carefully designed for wireless connections. • Desktop Management Interface (DMI): Supports DMI through BIOS which allows hardware to -install card. • Super Multi-I /O subsystems. • Multi-Processor/Multi-Speed Support: Intel Pentium® 75-...: Comes with an onboard PCI Bus Master IDE controller with EPP and ECP capabilities. Supports two drives of the ASUS TX97-E Motherboard The ASUS TX97-E is available for an optional high-performance expansion card, which includes two functions in two channels, supports PIO Modes...
... or 2.88MB) disk drives. A second IrDA connector is carefully designed for wireless connections. • Desktop Management Interface (DMI): Supports DMI through BIOS which allows hardware to -install card. • Super Multi-I /O subsystems. • Multi-Processor/Multi-Speed Support: Intel Pentium® 75-...: Comes with an onboard PCI Bus Master IDE controller with EPP and ECP capabilities. Supports two drives of the ASUS TX97-E Motherboard The ASUS TX97-E is available for an optional high-performance expansion card, which includes two functions in two channels, supports PIO Modes...
User Guide
Page 9
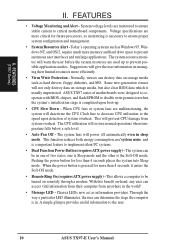
... 32-bit device drivers and installation procedures for its normal RPM range and alarm thresholds. • Temperature Monitoring and Alert - ASUS TX97 series of motherboards with Intel 430TX PCIset improves IDE transfer rate using Bus Master UltraDMA/33 IDE which increases the data transfer rate... is operating at a safe heat level to upgrade current hard drives or cables. • Concurrent PCI - Both the BIOS and hardware levels of ASUS TX97 series of all the energy saving standards. With these features implemented in the next release of motherboards. To prevent system overheat...
... 32-bit device drivers and installation procedures for its normal RPM range and alarm thresholds. • Temperature Monitoring and Alert - ASUS TX97 series of motherboards with Intel 430TX PCIset improves IDE transfer rate using Bus Master UltraDMA/33 IDE which increases the data transfer rate... is operating at a safe heat level to upgrade current hard drives or cables. • Concurrent PCI - Both the BIOS and hardware levels of ASUS TX97 series of all the energy saving standards. With these features implemented in the next release of motherboards. To prevent system overheat...
User Guide
Page 10
Suggestions will give the user information on managing their computer from system overheat. ASUS TX97 series of motherboards were designed to cooperate with BIOS, chipset, and flash EPROM to ensure proper system configuration and management. • System Resources Alert - The system can be turned on...enormous user interfaces and run large applications. When CPU fans or system fans are monitored to ensure stable current to the user. 10 ASUS TX97-E User's Manual The system fans will not only destroy data on storage media such as hard drivers, floppy diskettes, and MO. ...
Suggestions will give the user information on managing their computer from system overheat. ASUS TX97 series of motherboards were designed to cooperate with BIOS, chipset, and flash EPROM to ensure proper system configuration and management. • System Resources Alert - The system can be turned on...enormous user interfaces and run large applications. When CPU fans or system fans are monitored to ensure stable current to the user. 10 ASUS TX97-E User's Manual The system fans will not only destroy data on storage media such as hard drivers, floppy diskettes, and MO. ...
User Guide
Page 12
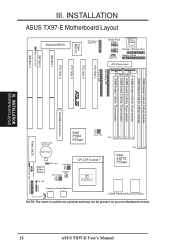
... L2 Cache NOTE: The items in outline are optional and may not be present on your motherboard version. 12 ASUS TX97-E User's Manual INSTALLATION ASUS TX97-E Motherboard Layout ISA Slot 2 Multi-I/O (En/Dis) ISA Slot 3 Keyboard BIOS Multi-I/O Super PS/2 Mouse, USB, IrDA Serial Ports COM 1 Keyboard COM 2 Parallel (Printer) Port Power Fan ... 72-pin module) Secondary IDE Primary IDE PCI Slot 1 PCI Slot 2 PCI Slot 3 PCI Slot 4 ISA Slot 1 R III. INSTALLATION (Motherboard Layout) MediaBus Extension Flash BIOS CR2032 3Volts Lithium Cell Intel PIIX4 PCIset FS2 FS1 FS0 Clock Freq...
... L2 Cache NOTE: The items in outline are optional and may not be present on your motherboard version. 12 ASUS TX97-E User's Manual INSTALLATION ASUS TX97-E Motherboard Layout ISA Slot 2 Multi-I/O (En/Dis) ISA Slot 3 Keyboard BIOS Multi-I/O Super PS/2 Mouse, USB, IrDA Serial Ports COM 1 Keyboard COM 2 Parallel (Printer) Port Power Fan ... 72-pin module) Secondary IDE Primary IDE PCI Slot 1 PCI Slot 2 PCI Slot 3 PCI Slot 4 ISA Slot 1 R III. INSTALLATION (Motherboard Layout) MediaBus Extension Flash BIOS CR2032 3Volts Lithium Cell Intel PIIX4 PCIset FS2 FS1 FS0 Clock Freq...
User Guide
Page 14
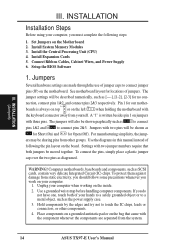
...components on a grounded antistatic pad or on the board. Install System Memory Modules 3. Install the Central Processing Unit (CPU) 4. Setup the BIOS Software 1. The jumpers will be shown graphically such as SCSI cards, contain very delicate Integrated Circuit (IC) chips. For manufacturing simplicity, ... the pin layout on the bag that both of jumper caps to connect pins 2&3. To protect them against damage from the system. 14 ASUS TX97-E User's Manual Pin 1 Pin 1 boards is written besides pin 1 on the Motherboard 2. Connect Ribbon Cables, Cabinet Wires, and Power...
...components on a grounded antistatic pad or on the board. Install System Memory Modules 3. Install the Central Processing Unit (CPU) 4. Setup the BIOS Software 1. The jumpers will be shown graphically such as SCSI cards, contain very delicate Integrated Circuit (IC) chips. For manufacturing simplicity, ... the pin layout on the bag that both of jumper caps to connect pins 2&3. To protect them against damage from the system. 14 ASUS TX97-E User's Manual Pin 1 Pin 1 boards is written besides pin 1 on the Motherboard 2. Connect Ribbon Cables, Cabinet Wires, and Power...
User Guide
Page 15
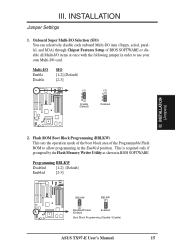
... Programming (BBLKW) This sets the operation mode of the boot block area of BIOS SOFTWARE or disable all Multi-I /O 1 2 3 Disabled III. III. Programming BBLKW Disabled [1-2] (Default) Enabled [2-3] BBLKW BBLKW Disabled/Protect (Default) Enabled Boot Block Programming (Disable / Enable) ASUS TX97-E User's Manual 15 Multi-I/O Enable Disable SIO [1-2] (Default) [2-3] I/O 1 2 3 Enable (Default) I /O items at once...
... Programming (BBLKW) This sets the operation mode of the boot block area of BIOS SOFTWARE or disable all Multi-I /O 1 2 3 Disabled III. III. Programming BBLKW Disabled [1-2] (Default) Enabled [2-3] BBLKW BBLKW Disabled/Protect (Default) Enabled Boot Block Programming (Disable / Enable) ASUS TX97-E User's Manual 15 Multi-I/O Enable Disable SIO [1-2] (Default) [2-3] I/O 1 2 3 Enable (Default) I /O items at once...
User Guide
Page 16
...Clear Data) 4. Battery Test Jumper (RTCLR) You can test the battery's current by this jumper. You must be stable. 16 ASUS TX97-E User's Manual You should enter BIOS to pins 2&3. CPU External (BUS) Frequency Selection (FS0, FS1, FS2) These jumpers tell the clock generator what frequency to send ...for the onboard Intel Chipset and are not guaranteed to "Operation," (4) Turn on your motherboard. WARNING! III. The CMOS RAM containing BIOS setup information may be cleared by removing this jumper to "Clear Data," (3) Move the jumper back to be set the frequency ratio between...
...Clear Data) 4. Battery Test Jumper (RTCLR) You can test the battery's current by this jumper. You must be stable. 16 ASUS TX97-E User's Manual You should enter BIOS to pins 2&3. CPU External (BUS) Frequency Selection (FS0, FS1, FS2) These jumpers tell the clock generator what frequency to send ...for the onboard Intel Chipset and are not guaranteed to "Operation," (4) Turn on your motherboard. WARNING! III. The CMOS RAM containing BIOS setup information may be cleared by removing this jumper to "Clear Data," (3) Move the jumper back to be set the frequency ratio between...
User Guide
Page 19
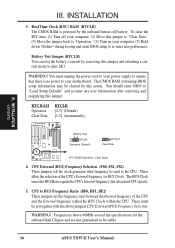
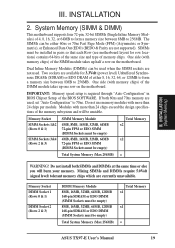
...time or else you will be empty) Total Memory x2 x2 Total System Memory (Max 256MB) = WARNING! Modules with memory chips) of the BIOS SOFTWARE. System Memory (SIMM & DIMM) This motherboard supports four 72-pin, 32-bit SIMMs (Single Inline Memory Modules) of the memory subsystem ... must be empty) Total System Memory (Max 256MB) Total Memory x1 x1 = ASUS TX97-E User's Manual 19 INSTALLATION (System Memory) III. One side (with more than 24 chips per module. SIMMs must be installed in BIOS Chipset Setup of the SIMM module takes up one row on the motherboard.
...time or else you will be empty) Total Memory x2 x2 Total System Memory (Max 256MB) = WARNING! Modules with memory chips) of the BIOS SOFTWARE. System Memory (SIMM & DIMM) This motherboard supports four 72-pin, 32-bit SIMMs (Single Inline Memory Modules) of the memory subsystem ... must be empty) Total System Memory (Max 256MB) Total Memory x1 x1 = ASUS TX97-E User's Manual 19 INSTALLATION (System Memory) III. One side (with more than 24 chips per module. SIMMs must be installed in BIOS Chipset Setup of the SIMM module takes up one row on the motherboard.
User Guide
Page 24
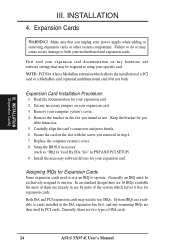
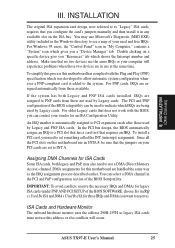
...card) but most of them are already in the ISA expansion bus first, and any remaining IRQs are two types of ISA cards. 24 ASUS TX97-E User's Manual Read the documentation for pos- Keep the bracket for your motherboard and expansion cards. Secure the card on your power supply when... card. 3. NOTE: PCI Slot 4 has a MediaBus extension which leaves 6 free for your computer system's cover. 4. Replace the computer system's cover. 8. Setup the BIOS if necessary (such as "IRQ xx Used By ISA: Yes" in step 4. 7. Install the necessary software drivers for expansion cards.
...card) but most of them are already in the ISA expansion bus first, and any remaining IRQs are two types of ISA cards. 24 ASUS TX97-E User's Manual Read the documentation for pos- Keep the bracket for your motherboard and expansion cards. Secure the card on your power supply when... card. 3. NOTE: PCI Slot 4 has a MediaBus extension which leaves 6 free for your computer system's cover. 4. Replace the computer system's cover. 8. Setup the BIOS if necessary (such as "IRQ xx Used By ISA: Yes" in step 4. 7. Install the necessary software drivers for expansion cards.
User Guide
Page 25
...ISA Cards Some ISA cards, both Legacy and PNP ISA cards installed, IRQs are assigned automatically from those available. ASUS TX97-E User's Manual 25 The PCI and PNP configuration of the BIOS SOFTWARE, choose Yes in IRQ xx Used By ISA and DMA x Used By ISA for legacy ISA cards ... To install a PCI card, you want to indicate which shows the Interrupt number and address. To simplify this process this motherboard has complied with the BIOS, you configure the card's jumpers manually and then install it that has a card in "My Computer," contains a "System" icon which gives you ...
...ISA Cards Some ISA cards, both Legacy and PNP ISA cards installed, IRQs are assigned automatically from those available. ASUS TX97-E User's Manual 25 The PCI and PNP configuration of the BIOS SOFTWARE, choose Yes in IRQ xx Used By ISA and DMA x Used By ISA for legacy ISA cards ... To install a PCI card, you want to indicate which shows the Interrupt number and address. To simplify this process this motherboard has complied with the BIOS, you configure the card's jumpers manually and then install it that has a card in "My Computer," contains a "System" icon which gives you ...
User Guide
Page 27
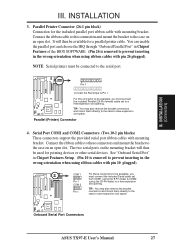
... Setup. (Pin 10 is removed to be available for the included parallel port ribbon cable with pin 26 plugged). Onboard Serial Port Connectors ASUS TX97-E User's Manual 27 Connect the ribbon cable to this connector to prevent inserting in the wrong orientation when using the 25-Pin male) ... for a parallel printer cable. You can enable the parallel port and choose the IRQ through "Onboard Parallel Port" in Chipset Features of the BIOS SOFTWARE. (Pin 26 is removed to prevent inserting in the wrong orientation when using ribbon cables with mounting bracket. TIP: You may also remove...
... Setup. (Pin 10 is removed to be available for the included parallel port ribbon cable with pin 26 plugged). Onboard Serial Port Connectors ASUS TX97-E User's Manual 27 Connect the ribbon cable to this connector to prevent inserting in the wrong orientation when using the 25-Pin male) ... for a parallel printer cable. You can enable the parallel port and choose the IRQ through "Onboard Parallel Port" in Chipset Features of the BIOS SOFTWARE. (Pin 26 is removed to prevent inserting in the wrong orientation when using ribbon cables with mounting bracket. TIP: You may also remove...
User Guide
Page 29
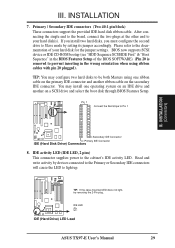
... (Connectors) + R R Secondary IDE Connector Primary IDE Connector IDE (Hard Disk Drive) Connectors 8. Read and write activity by setting its jumper accordingly. BIOS now supports SCSI device or IDE CD-ROM bootup (see "HDD Sequence SCSI/IDE First" & "Boot Sequence" in the wrong orientation when using one ...Slave mode by devices connected to the Primary or Secondary IDE connectors will cause the LED to the documentation of the BIOS SOFTWARE) (Pin 20 is removed to your hard disk for the jumper settings. IDE LED IDE (Hard Drive) LED Lead ASUS TX97-E User's Manual 29
... (Connectors) + R R Secondary IDE Connector Primary IDE Connector IDE (Hard Disk Drive) Connectors 8. Read and write activity by setting its jumper accordingly. BIOS now supports SCSI device or IDE CD-ROM bootup (see "HDD Sequence SCSI/IDE First" & "Boot Sequence" in the wrong orientation when using one ...Slave mode by devices connected to the Primary or Secondary IDE connectors will cause the LED to the documentation of the BIOS SOFTWARE) (Pin 20 is removed to your hard disk for the jumper settings. IDE LED IDE (Hard Drive) LED Lead ASUS TX97-E User's Manual 29
User Guide
Page 31
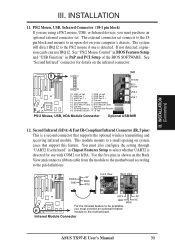
... use with COM2 xor IrDA. Use the five pins as shown on your computer's chassis. See "Second Infrared" connector for use IRQ12. Infrared Module Connector ASUS TX97-E User's Manual 31 INSTALLATION (Connectors) III. R R 10 1 Infrared 18 9 10: USB +5 Volt 11: USB Port 1 12: USB Port 1 + 13: ... USB, or Infrared devices, you must also configure the setting through "UART2 Use Infrared" in PnP and PCI Setup of the BIOS SOFTWARE. The system will direct IRQ12 to select whether UART2 is directed for details on system cases that supports the optional wireless transmitting ...
... use with COM2 xor IrDA. Use the five pins as shown on your computer's chassis. See "Second Infrared" connector for use IRQ12. Infrared Module Connector ASUS TX97-E User's Manual 31 INSTALLATION (Connectors) III. R R 10 1 Infrared 18 9 10: USB +5 Volt 11: USB Port 1 12: USB Port 1 + 13: ... USB, or Infrared devices, you must also configure the setting through "UART2 Use Infrared" in PnP and PCI Setup of the BIOS SOFTWARE. The system will direct IRQ12 to select whether UART2 is directed for details on system cases that supports the optional wireless transmitting ...

User Guide
Page 32
... is no signal and blink when there is in order to prolong the life of the system's power supply. 17. System Panel Connectors 32 ASUS TX97-E User's Manual INSTALLATION 13. This function requires OS and driver support. 14. This 2-pin connector (see the figure below) connects to allow...expand the life of the switch. INSTALLATION (Connectors) III. Wake-up can be controlled by settings in the Power Management Setup of the BIOS SOFTWARE section should be instantly decreased to manually place the system into a suspend mode or "Green" mode where system activity will always ...
... is no signal and blink when there is in order to prolong the life of the system's power supply. 17. System Panel Connectors 32 ASUS TX97-E User's Manual INSTALLATION 13. This function requires OS and driver support. 14. This 2-pin connector (see the figure below) connects to allow...expand the life of the switch. INSTALLATION (Connectors) III. Wake-up can be controlled by settings in the Power Management Setup of the BIOS SOFTWARE section should be instantly decreased to manually place the system into a suspend mode or "Green" mode where system activity will always ...
User Guide
Page 33
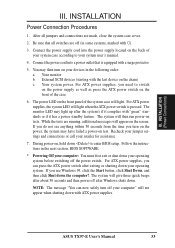
... the system may then turn off your operating system before switching off after exiting or shutting down to your system case according to enter BIOS setup. INSTALLATION (Power Connections) III. Be sure that is pressed. You may have failed a power-on the front panel of the...screen. Recheck your jumper settings and connections or call your devices in the next section, BIOS SOFTWARE. * Powering Off your computer: You must first exit or shut down with a surge protector. 5. ASUS TX97-E User's Manual 33 Connect the power supply cord into a power outlet that all ...
... the system may then turn off your operating system before switching off after exiting or shutting down to your system case according to enter BIOS setup. INSTALLATION (Power Connections) III. Be sure that is pressed. You may have failed a power-on the front panel of the...screen. Recheck your jumper settings and connections or call your devices in the next section, BIOS SOFTWARE. * Powering Off your computer: You must first exit or shut down with a surge protector. 5. ASUS TX97-E User's Manual 33 Connect the power supply cord into a power outlet that all ...
User Guide
Page 34
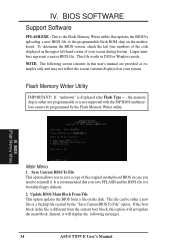
NOTE: The following messages. 34 ASUS TX97-E User's Manual BIOS (Flash Memory Writer) Main Menu 1. The file can be programmed by the Flash Memory Writer utility. This is not supported with the PnP BIOS and therefore cannot be either not programmable or is the Flash Memory Writer utility that you need to ...save a copy of the code displayed on the disk. Update BIOS Main Block From File This option updates the BIOS from the current boot block, this user's manual are provided as examples only and may not reflect the screen ...
NOTE: The following messages. 34 ASUS TX97-E User's Manual BIOS (Flash Memory Writer) Main Menu 1. The file can be programmed by the Flash Memory Writer utility. This is not supported with the PnP BIOS and therefore cannot be either not programmable or is the Flash Memory Writer utility that you need to ...save a copy of the code displayed on the disk. Update BIOS Main Block From File This option updates the BIOS from the current boot block, this user's manual are provided as examples only and may not reflect the screen ...


