User Guide
Page 1
R TX97-E Pentium® Motherboard USER'S MANUAL
R TX97-E Pentium® Motherboard USER'S MANUAL
User Guide
Page 2
... THE IMPLIED WARRANTIES OR CONDITIONS OF MERCHANTABILITY OR FITNESS FOR A PARTICULAR PURPOSE. Product Name: ASUS TX97-E Manual Revision: 1.12 Release Date: August 1997 2 ASUS TX97-E User's Manual The product name and revision number are released for each board design represented by the purchaser for... ANY TIME WITHOUT NOTICE, AND SHOULD NOT BE CONSTRUED AS A COMMITMENT BY ASUS. Copyright © 1997 ASUSTeK COMPUTER INC. Manual updates are represented by the third digit in this manual, including the products and softwares described in it, may not be reproduced, transmitted...
... THE IMPLIED WARRANTIES OR CONDITIONS OF MERCHANTABILITY OR FITNESS FOR A PARTICULAR PURPOSE. Product Name: ASUS TX97-E Manual Revision: 1.12 Release Date: August 1997 2 ASUS TX97-E User's Manual The product name and revision number are released for each board design represented by the purchaser for... ANY TIME WITHOUT NOTICE, AND SHOULD NOT BE CONSTRUED AS A COMMITMENT BY ASUS. Copyright © 1997 ASUSTeK COMPUTER INC. Manual updates are represented by the third digit in this manual, including the products and softwares described in it, may not be reproduced, transmitted...
User Guide
Page 3
...tw Technical Support Fax: +886-2-895-9254 BBS: +886-2-896-4667 Email: tsd@asus.com.tw WWW: www.asus.com.tw Gopher: gopher.asus.com.tw FTP: ftp.asus.com.tw/pub/ASUS ASUS COMPUTER INTERNATIONAL Marketing Info Address: 721 Charcot Avenue, San Jose, CA 95131, USA...asus.com.tw WWW: www.asus.com ASUS COMPUTER GmbH Marketing Info Address: Harkort Str. 25, 40880 Ratingen, BRD, Germany Telephone: 49-2102-445011 Fax: 49-2102-442066 Email: info-ger@asus.com.tw Technical Support BBS: 49-2102-448690 Email: tsd-ger@asus.com.tw Hotline: 49-2102-499712 ASUS TX97-E User's Manual...
...tw Technical Support Fax: +886-2-895-9254 BBS: +886-2-896-4667 Email: tsd@asus.com.tw WWW: www.asus.com.tw Gopher: gopher.asus.com.tw FTP: ftp.asus.com.tw/pub/ASUS ASUS COMPUTER INTERNATIONAL Marketing Info Address: 721 Charcot Avenue, San Jose, CA 95131, USA...asus.com.tw WWW: www.asus.com ASUS COMPUTER GmbH Marketing Info Address: Harkort Str. 25, 40880 Ratingen, BRD, Germany Telephone: 49-2102-445011 Fax: 49-2102-442066 Email: info-ger@asus.com.tw Technical Support BBS: 49-2102-448690 Email: tsd-ger@asus.com.tw Hotline: 49-2102-499712 ASUS TX97-E User's Manual...
User Guide
Page 4
... of BIOS Features Setup 41 Chipset Features Setup 43 Details of Chipset Features Setup 43 Power Management Setup 46 Details of the ASUS TX97-E Motherboard 11 III. INTRODUCTION 7 How this manual is organized 7 Item Checklist 7 II. System Memory (SIMM & DIMM 19 SIMM Memory Installation 20 DIMM Memory Installation 21 3. BIOS SOFTWARE 34 Support...
... of BIOS Features Setup 41 Chipset Features Setup 43 Details of Chipset Features Setup 43 Power Management Setup 46 Details of the ASUS TX97-E Motherboard 11 III. INTRODUCTION 7 How this manual is organized 7 Item Checklist 7 II. System Memory (SIMM & DIMM 19 SIMM Memory Installation 20 DIMM Memory Installation 21 3. BIOS SOFTWARE 34 Support...
User Guide
Page 5
...-SC200 60 Terminator Requirements for SCSI Devices 60 Terminator Settings for the ASUS PCI-SC860 61 Terminator Settings for the ASUS PCI-SC200 61 SCSI ID Numbers for SCSI Devices 62 SCSI ID Priority 62 ASUS TX97-E User's Manual 5 SUPPORT SOFTWARE 54 ASUS TX97 Motherboard Support CD 3.02 54 LANDesk Client Manager (LDCM 54 Desktop Management Interface...
...-SC200 60 Terminator Requirements for SCSI Devices 60 Terminator Settings for the ASUS PCI-SC860 61 Terminator Settings for the ASUS PCI-SC200 61 SCSI ID Numbers for SCSI Devices 62 SCSI ID Priority 62 ASUS TX97-E User's Manual 5 SUPPORT SOFTWARE 54 ASUS TX97 Motherboard Support CD 3.02 54 LANDesk Client Manager (LDCM 54 Desktop Management Interface...
User Guide
Page 6
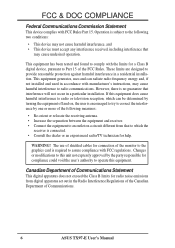
... B limits for connection of the monitor to the graphics card is encouraged to try to correct the interference by one or more of Communications. 6 ASUS TX97-E User's Manual If this equipment does cause harmful interference to radio or television reception, which the receiver is subject to operate this unit not expressly approved by...
... B limits for connection of the monitor to the graphics card is encouraged to try to correct the interference by one or more of Communications. 6 ASUS TX97-E User's Manual If this equipment does cause harmful interference to radio or television reception, which the receiver is subject to operate this unit not expressly approved by...
User Guide
Page 7
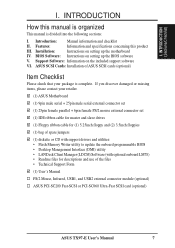
... use of the files • Technical Support Form (1) User's Manual PS/2 Mouse, Infrared, USB1, and USB2 external connector module (optional) ASUS PCI-SC200 Fast-SCSI or PCI-SC860 Ultra-Fast SCSI card (optional) ASUS TX97-E User's Manual 7 Support Software: Information on setting up the motherboard IV. Introduction: Manual information and checklist II. I . Installation: Instructions on setting...
... use of the files • Technical Support Form (1) User's Manual PS/2 Mouse, Infrared, USB1, and USB2 external connector module (optional) ASUS PCI-SC200 Fast-SCSI or PCI-SC860 Ultra-Fast SCSI card (optional) ASUS TX97-E User's Manual 7 Support Software: Information on setting up the motherboard IV. Introduction: Manual information and checklist II. I . Installation: Instructions on setting...
User Guide
Page 8
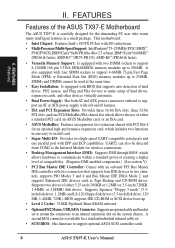
...ASUS SCSI controller cards. 8 ASUS TX97-E User's Manual A second IrDA connector is carefully designed for wireless connections. • Desktop Management Interface (DMI): Supports DMI through BIOS which allows the use of either a standard PCI card, an ASUS MediaBus card, or an ISA card. • ASUS...8226; Easy Installation: Is equipped with BIOS that supports four IDE devices in a small package. FEATURES Features of the ASUS TX97-E Motherboard The ASUS TX97-E is available for an optional high-performance expansion card, which includes two functions in one easy-to-install card. ...
...ASUS SCSI controller cards. 8 ASUS TX97-E User's Manual A second IrDA connector is carefully designed for wireless connections. • Desktop Management Interface (DMI): Supports DMI through BIOS which allows the use of either a standard PCI card, an ASUS MediaBus card, or an ISA card. • ASUS...8226; Easy Installation: Is equipped with BIOS that supports four IDE devices in a small package. FEATURES Features of the ASUS TX97-E Motherboard The ASUS TX97-E is available for an optional high-performance expansion card, which includes two functions in one easy-to-install card. ...
User Guide
Page 9
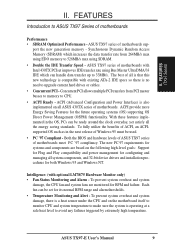
...implemented in the next release of all the energy saving standards. Both the BIOS and hardware levels of ASUS TX97 series of motherboards Performance • SDRAM Optimized Performance - ASUS TX97 series of motherboards with optional LM78/75 Hardware Monitor only) • Fan Status Monitoring and Alarm -...; ACPI Ready - Intelligence: (with Intel 430TX PCIset improves IDE transfer rate using SDRAM. • Double the IDE Transfer Speed - ASUS TX97-E User's Manual 9 To fully utilize the benefits of ACPI, an ACPIsupported OS such as in the OS, PCs can be ready around the clock ...
...implemented in the next release of all the energy saving standards. Both the BIOS and hardware levels of ASUS TX97 series of motherboards Performance • SDRAM Optimized Performance - ASUS TX97 series of motherboards with optional LM78/75 Hardware Monitor only) • Fan Status Monitoring and Alarm -...; ACPI Ready - Intelligence: (with Intel 430TX PCIset improves IDE transfer rate using SDRAM. • Double the IDE Transfer Speed - ASUS TX97-E User's Manual 9 To fully utilize the benefits of ACPI, an ACPIsupported OS such as in the OS, PCs can be ready around the clock ...
User Guide
Page 10
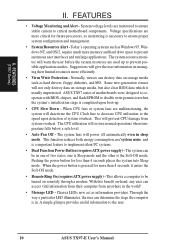
... to disable write permission when the system's initialization stage is a important feature to prevent possible application crashes. ASUS TX97 series of system overheat. FEATURES (TX97 Series) II. The CPU utilization will deactivate the CPU Clock line to decrease CPU utilization to the speed ...• Auto Fan Off - When CPU fans or system fans are monitored to ensure stable current to the user. 10 ASUS TX97-E User's Manual This function reduces both energy consumption and system noise, and is completed upon detection of motherboards were designed to cooperate with BIOS,...
... to disable write permission when the system's initialization stage is a important feature to prevent possible application crashes. ASUS TX97 series of system overheat. FEATURES (TX97 Series) II. The CPU utilization will deactivate the CPU Clock line to decrease CPU utilization to the speed ...• Auto Fan Off - When CPU fans or system fans are monitored to ensure stable current to the user. 10 ASUS TX97-E User's Manual This function reduces both energy consumption and system noise, and is completed upon detection of motherboards were designed to cooperate with BIOS,...
User Guide
Page 11
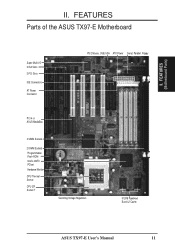
FEATURES Parts of the ASUS TX97-E Motherboard Super Multi-I/O 3 ISA Slots 3 PCI Slots IDE Connectors AT Power Connector PS/2 Mouse, USB, IrDA ATX Power Serial, Parallel, Floppy PCI 4 or ASUS MediaBus 4 SIMM Sockets 2 DIMM Sockets Programmable Flash ROM Intel's 430TX PCIset Hardware Monitor CPU Thermal Sensor CPU ZIF Socket 7 Switching Voltage Regulators 512KB Pipelined Burst L2 Cache ASUS TX97-E User's Manual 11 FEATURES (Motherboard Parts) II. II.
FEATURES Parts of the ASUS TX97-E Motherboard Super Multi-I/O 3 ISA Slots 3 PCI Slots IDE Connectors AT Power Connector PS/2 Mouse, USB, IrDA ATX Power Serial, Parallel, Floppy PCI 4 or ASUS MediaBus 4 SIMM Sockets 2 DIMM Sockets Programmable Flash ROM Intel's 430TX PCIset Hardware Monitor CPU Thermal Sensor CPU ZIF Socket 7 Switching Voltage Regulators 512KB Pipelined Burst L2 Cache ASUS TX97-E User's Manual 11 FEATURES (Motherboard Parts) II. II.
User Guide
Page 12
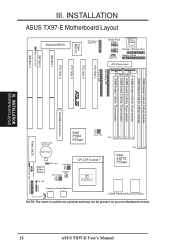
...Burst L2 Cache NOTE: The items in outline are optional and may not be present on your motherboard version. 12 ASUS TX97-E User's Manual INSTALLATION (Motherboard Layout) MediaBus Extension Flash BIOS CR2032 3Volts Lithium Cell Intel PIIX4 PCIset FS2 FS1 FS0 Clock Freq ...BIOS Power LM78 Hardware Monitor IDE LED RTC Clear Freq. III. INSTALLATION ASUS TX97-E Motherboard Layout ISA Slot 2 Multi-I/O (En/Dis) ISA Slot 3 Keyboard BIOS...
...Burst L2 Cache NOTE: The items in outline are optional and may not be present on your motherboard version. 12 ASUS TX97-E User's Manual INSTALLATION (Motherboard Layout) MediaBus Extension Flash BIOS CR2032 3Volts Lithium Cell Intel PIIX4 PCIset FS2 FS1 FS0 Clock Freq ...BIOS Power LM78 Hardware Monitor IDE LED RTC Clear Freq. III. INSTALLATION ASUS TX97-E Motherboard Layout ISA Slot 2 Multi-I/O (En/Dis) ISA Slot 3 Keyboard BIOS...
User Guide
Page 13
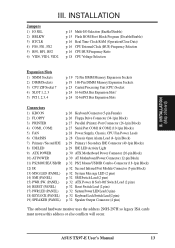
... uses the address 290H-297H so legacy ISA cards must not use this address or else conflicts will occur. INSTALLATION (Map of Board) III. III. ASUS TX97-E User's Manual 13
... uses the address 290H-297H so legacy ISA cards must not use this address or else conflicts will occur. INSTALLATION (Map of Board) III. III. ASUS TX97-E User's Manual 13
User Guide
Page 14
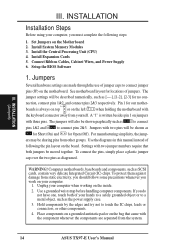
... be shown as to connect pins 1&2 and to touch the IC chips, leads or connectors, or other groups. Use the diagrams in this manual instead of following steps: 1. Unplug your computer, you must complete the following the pin layout on the inside. 2. Install System Memory Modules ... of jumper caps to a metal object, such as diagramed. INSTALLATION (Jumpers) III. To protect them against damage from the system. 14 ASUS TX97-E User's Manual WARNING! Set Jumpers on your hands to a safely grounded object or to connect jumper pins (JP) on the bag that came with two...
... be shown as to connect pins 1&2 and to touch the IC chips, leads or connectors, or other groups. Use the diagrams in this manual instead of following steps: 1. Unplug your computer, you must complete the following the pin layout on the inside. 2. Install System Memory Modules ... of jumper caps to a metal object, such as diagramed. INSTALLATION (Jumpers) III. To protect them against damage from the system. 14 ASUS TX97-E User's Manual WARNING! Set Jumpers on your hands to a safely grounded object or to connect jumper pins (JP) on the bag that came with two...
User Guide
Page 15
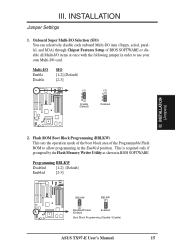
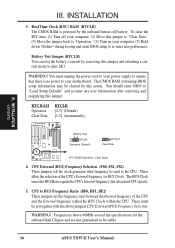
... allow programming in BIOS SOFTWARE. INSTALLATION Jumper Settings 1. Programming BBLKW Disabled [1-2] (Default) Enabled [2-3] BBLKW BBLKW Disabled/Protect (Default) Enabled Boot Block Programming (Disable / Enable) ASUS TX97-E User's Manual 15 Onboard Super Multi-I/O Selection (SIO) You can selectively disable each onboard Multi-I/O item (floppy, serial, parallel, and IrDA) through Chipset Features Setup of the...
... allow programming in BIOS SOFTWARE. INSTALLATION Jumper Settings 1. Programming BBLKW Disabled [1-2] (Default) Enabled [2-3] BBLKW BBLKW Disabled/Protect (Default) Enabled Boot Block Programming (Disable / Enable) ASUS TX97-E User's Manual 15 Onboard Super Multi-I/O Selection (SIO) You can selectively disable each onboard Multi-I/O item (floppy, serial, parallel, and IrDA) through Chipset Features Setup of the...
User Guide
Page 16
... generator what frequency to send to be cleared by the onboard button cell battery. The CMOS RAM containing BIOS setup information may be stable. 16 ASUS TX97-E User's Manual These must unplug the power cord to your power supply to ensure that there is powered by this jumper to "Clear Data," (3) Move the...
... generator what frequency to send to be cleared by the onboard button cell battery. The CMOS RAM containing BIOS setup information may be stable. 16 ASUS TX97-E User's Manual These must unplug the power cord to your power supply to ensure that there is powered by this jumper to "Clear Data," (3) Move the...
User Guide
Page 17
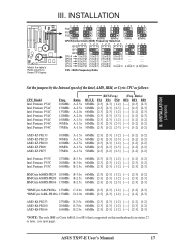
...) that is supported on this motherboard is revision 2.7 or later. (see next page). FS2 FS1 FS0 66MHz [2-3] [2-3] [1-2] 60MHz [2-3] [2-3] [2-3] 66MHz [2-3] [2-3] [1-2] 60MHz [2-3] [2-3] [2-3] 66MHz [2-3] [2-3] [1-2] 60MHz [2-3] [2-3] [2-3] 50MHz [2-3] [1-2] [2-3] (Freq. III. ASUS TX97-E User's Manual 17
...) that is supported on this motherboard is revision 2.7 or later. (see next page). FS2 FS1 FS0 66MHz [2-3] [2-3] [1-2] 60MHz [2-3] [2-3] [2-3] 66MHz [2-3] [2-3] [1-2] 60MHz [2-3] [2-3] [2-3] 66MHz [2-3] [2-3] [1-2] 60MHz [2-3] [2-3] [2-3] 50MHz [2-3] [1-2] [2-3] (Freq. III. ASUS TX97-E User's Manual 17
User Guide
Page 18
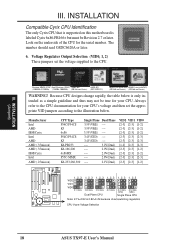
... later. INSTALLATION Compatible Cyrix CPU Identification The only Cyrix CPU that is supported on the underside of autoswitching regulators CPU Vcore Voltage Selection 18 ASUS TX97-E User's Manual Always refer to the CPU documentation for your CPU's voltage and then set the voltage supplied to the illustration below is labeled Cyrix 6x86-PR166...
... later. INSTALLATION Compatible Cyrix CPU Identification The only Cyrix CPU that is supported on the underside of autoswitching regulators CPU Vcore Voltage Selection 18 ASUS TX97-E User's Manual Always refer to the CPU documentation for your CPU's voltage and then set the voltage supplied to the illustration below is labeled Cyrix 6x86-PR166...
User Guide
Page 19
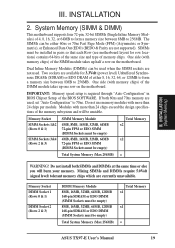
... used . Do not install both 60ns and 70ns memory are not supported). SIMMs must be empty) Total System Memory (Max 256MB) Total Memory x1 x1 = ASUS TX97-E User's Manual 19 The SIMMs can be either 8, 16, 32, 64, or 128MB to form a memory size between 8MB to 70ns. Dual Inline Memory Modules (DIMMs...
... used . Do not install both 60ns and 70ns memory are not supported). SIMMs must be empty) Total System Memory (Max 256MB) Total Memory x1 x1 = ASUS TX97-E User's Manual 19 The SIMMs can be either 8, 16, 32, 64, or 128MB to form a memory size between 8MB to 70ns. Dual Inline Memory Modules (DIMMs...
User Guide
Page 20
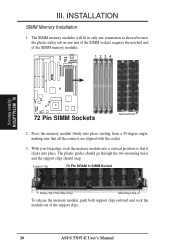
... one orientation as shown because the plastic safety tab on one end of the SIMM sockets requires the notched end of the support clips. 20 ASUS TX97-E User's Manual The plastic guides should go through the two mounting holes and the support clips should snap. With your fingertips, rock the memory module into...
... one orientation as shown because the plastic safety tab on one end of the SIMM sockets requires the notched end of the support clips. 20 ASUS TX97-E User's Manual The plastic guides should go through the two mounting holes and the support clips should snap. With your fingertips, rock the memory module into...


