TUWE-M User Manual
Page 2
... AT ANY TIME WITHOUT NOTICE, AND SHOULD NOT BE CONSTRUED AS A COMMITMENT BY ASUS. For previous or updated manuals, BIOS, drivers, or product release information, contact ASUS at http://www.asus.com.tw or through any of the product is defaced or missing. IN NO ... ASUSTeK COMPUTER INC. The product name and revision number are registered trademarks of Microsoft Corporation. Product Name: ASUS TUWE-M Manual Revision: 1.01 E919 Release Date: December 2001 2 ASUS TUWE-M User's Manual Products and corporate names appearing in any form or by any means, except documentation kept ...
... AT ANY TIME WITHOUT NOTICE, AND SHOULD NOT BE CONSTRUED AS A COMMITMENT BY ASUS. For previous or updated manuals, BIOS, drivers, or product release information, contact ASUS at http://www.asus.com.tw or through any of the product is defaced or missing. IN NO ... ASUSTeK COMPUTER INC. The product name and revision number are registered trademarks of Microsoft Corporation. Product Name: ASUS TUWE-M Manual Revision: 1.01 E919 Release Date: December 2001 2 ASUS TUWE-M User's Manual Products and corporate names appearing in any form or by any means, except documentation kept ...
TUWE-M User Manual
Page 4
... the Computer System 41 4.1.2 Updating BIOS Procedures 42 4.2 BIOS Setup Program 45 4.2.1 BIOS Menu Bar 46 4.2.2 Legend Bar 46 4.3 Main Menu 48 4.3.1 Primary & Secondary Master/Slave 49 4.3.2 Keyboard Features 52 4.4 Advanced Menu 54 4.4.1 Chip Configuration 56 4.4.2 I/O Device Configuration 58 4.4.3 PCI Configuration 60 4.5 Power Menu 62 4 ASUS TUWE-M User's Manual FEATURES 8 2.1 The ASUS TUWE-M 8 2.2 TUWE-M Motherboard Components 12 3. HARDWARE...
... the Computer System 41 4.1.2 Updating BIOS Procedures 42 4.2 BIOS Setup Program 45 4.2.1 BIOS Menu Bar 46 4.2.2 Legend Bar 46 4.3 Main Menu 48 4.3.1 Primary & Secondary Master/Slave 49 4.3.2 Keyboard Features 52 4.4 Advanced Menu 54 4.4.1 Chip Configuration 56 4.4.2 I/O Device Configuration 58 4.4.3 PCI Configuration 60 4.5 Power Menu 62 4 ASUS TUWE-M User's Manual FEATURES 8 2.1 The ASUS TUWE-M 8 2.2 TUWE-M Motherboard Components 12 3. HARDWARE...
TUWE-M User Manual
Page 7
... 1.2 Item Checklist Check that your retailer. 1. Intructions on setting up the BIOS Intructions on setting up the included software Reference material for (1) 5.25" and (2) 3.5" floppy disk drives (1) COM 2 Bracket (1) Bag of spare jumpers (1) Support drivers and utilities (1) This Motherboard User's Manual (1) ASUS 2-port USB connector set with bracket ASUS TUWE-M User's Manual 7 HARDWARE SETUP 4.
... 1.2 Item Checklist Check that your retailer. 1. Intructions on setting up the BIOS Intructions on setting up the included software Reference material for (1) 5.25" and (2) 3.5" floppy disk drives (1) COM 2 Bracket (1) Bag of spare jumpers (1) Support drivers and utilities (1) This Motherboard User's Manual (1) ASUS 2-port USB connector set with bracket ASUS TUWE-M User's Manual 7 HARDWARE SETUP 4.
TUWE-M User Manual
Page 8
...high-level command processing. • Smart BIOS: 2Mb firmware provides Vcore and CPU/SDRAM frequency adjustments, boot block write protection, and HD/SCSI/MO/ ZIP/CD/Floppy boot. 8 ASUS TUWE-M User's Manual FEATURES 2.1 The ASUS TUWE-M The ASUS TUWE-M motherboard is integrated through the Intel I/O... Controller Hub 2 (ICH2), which allows burst mode data ASUS IrDA-compliant infrared module transfer rates of up to 512MB ...
...high-level command processing. • Smart BIOS: 2Mb firmware provides Vcore and CPU/SDRAM frequency adjustments, boot block write protection, and HD/SCSI/MO/ ZIP/CD/Floppy boot. 8 ASUS TUWE-M User's Manual FEATURES 2.1 The ASUS TUWE-M The ASUS TUWE-M motherboard is integrated through the Intel I/O... Controller Hub 2 (ICH2), which allows burst mode data ASUS IrDA-compliant infrared module transfer rates of up to 512MB ...
TUWE-M User Manual
Page 10
... new PC 99 requirements for systems and components are based on remotely through the onboard hardware ASUS ASIC and the bundled ASUS PC Probe. 10 ASUS TUWE-M User's Manual All fans are color-coded. • Remote Ring On (requires modem):... This allows a computer to test and manage system status information, such as Windows 98/2000/Millenium must be ready around the clock, yet satisfy all the energy saving standards. FEATURES 2.1.3 Special Features • Easy Installation: Incorporates BIOS...
... new PC 99 requirements for systems and components are based on remotely through the onboard hardware ASUS ASIC and the bundled ASUS PC Probe. 10 ASUS TUWE-M User's Manual All fans are color-coded. • Remote Ring On (requires modem):... This allows a computer to test and manage system status information, such as Windows 98/2000/Millenium must be ready around the clock, yet satisfy all the energy saving standards. FEATURES 2.1.3 Special Features • Easy Installation: Incorporates BIOS...
TUWE-M User Manual
Page 11
... EEPROM), offering enhanced ACPI for system bootup. • Chassis Intrusion Detection: Supports chassis-intrusion monitoring through BIOS setup to allow the computer to be enabled or disabled through the ASUS ASIC. A chassis intrusion event is kept in memory on battery power for more efficiently. • Suspend and Go: Suspend-to-RAM (STR... button is standby power to damage the motherboard, peripherals, and/or components. • System Resources Alert: Today's operating systems such as not to the motherboard. ASUS TUWE-M User's Manual 11
... EEPROM), offering enhanced ACPI for system bootup. • Chassis Intrusion Detection: Supports chassis-intrusion monitoring through BIOS setup to allow the computer to be enabled or disabled through the ASUS ASIC. A chassis intrusion event is kept in memory on battery power for more efficiently. • Suspend and Go: Suspend-to-RAM (STR... button is standby power to damage the motherboard, peripherals, and/or components. • System Resources Alert: Today's operating systems such as not to the motherboard. ASUS TUWE-M User's Manual 11
TUWE-M User Manual
Page 21
... Memory (Max 512 MB) Total Memory x1 x1 = NOTE: Make sure the total installed memory does not exceeds 512MB. H/W SETUP Memory Installation ASUS TUWE-M User's Manual 21 This motherboard uses only Dual Inline Memory Modules (DIMMs). Memory speed setup is recommended through SDRAM Configuration in 32, 64, ...memory. Sockets are available for best performance vs. stability. • BIOS shows SDRAM memory on the motherboard. Install memory in 16, 32, 64,128MB; HARDWARE SETUP 3.5 System Memory (DIMM) NOTE: No hardware or BIOS setup is the memory of the DIMM takes up one row on ...
... Memory (Max 512 MB) Total Memory x1 x1 = NOTE: Make sure the total installed memory does not exceeds 512MB. H/W SETUP Memory Installation ASUS TUWE-M User's Manual 21 This motherboard uses only Dual Inline Memory Modules (DIMMs). Memory speed setup is recommended through SDRAM Configuration in 32, 64, ...memory. Sockets are available for best performance vs. stability. • BIOS shows SDRAM memory on the motherboard. Install memory in 16, 32, 64,128MB; HARDWARE SETUP 3.5 System Memory (DIMM) NOTE: No hardware or BIOS setup is the memory of the DIMM takes up one row on ...
TUWE-M User Manual
Page 25
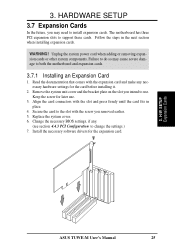
...cover. 6. 3. Remove the system unit cover and the bracket plate on the slot you intend to support these cards. H/W SETUP Expansion Cards ASUS TUWE-M User's Manual 25 The motherboard has three PCI expansion slots to use . 3. Unplug the system power cord when adding or removing expansion cards ...and press firmly until the card fits in the next section when installing expansion cards. Keep the screw for later use . Change the necessary BIOS settings, if any necessary hardware settings for the expansion card. 3. WARNING! Secure the card to change the settings.) 7. HARDWARE SETUP 3.7 ...
...cover. 6. 3. Remove the system unit cover and the bracket plate on the slot you intend to support these cards. H/W SETUP Expansion Cards ASUS TUWE-M User's Manual 25 The motherboard has three PCI expansion slots to use . 3. Unplug the system power cord when adding or removing expansion cards ...and press firmly until the card fits in the next section when installing expansion cards. Keep the screw for later use . Change the necessary BIOS settings, if any necessary hardware settings for the expansion card. 3. WARNING! Secure the card to change the settings.) 7. HARDWARE SETUP 3.7 ...
TUWE-M User Manual
Page 32
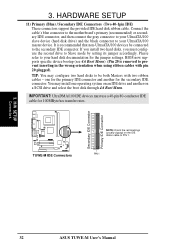
...100 master device. Please refer to prevent inserting in the wrong orientation when using ribbon cables with two ribbon cables - H/W SETUP Connectors 32 ASUS TUWE-M User's Manual HARDWARE SETUP 11) Primary (Blue) / Secondary IDE Connectors (Two 40-1pin IDE) These connectors support the provided IDE hard ...disk ribbon cable. BIOS now supports specific device bootup (see 4.6 Boot Menu). (Pin 20 is recommended that non-UltraATA/100 devices be both Masters with pin 20...
...100 master device. Please refer to prevent inserting in the wrong orientation when using ribbon cables with two ribbon cables - H/W SETUP Connectors 32 ASUS TUWE-M User's Manual HARDWARE SETUP 11) Primary (Blue) / Secondary IDE Connectors (Two 40-1pin IDE) These connectors support the provided IDE hard ...disk ribbon cable. BIOS now supports specific device bootup (see 4.6 Boot Menu). (Pin 20 is recommended that non-UltraATA/100 devices be both Masters with pin 20...
TUWE-M User Manual
Page 39
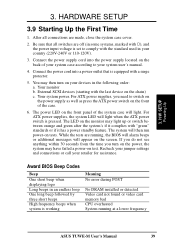
... No error during POST No DRAM installed or detected Video card not found or video card memory bad CPU overheated System running , the BIOS will alarm beeps or additional messages will then run power-on the front panel of the case. 6. Your system power. Recheck your... has a power standby feature. Award BIOS Beep Codes Beep One short beep when displaying logo Long beeps in your retailer for assistance. 3. H/W SETUP Powering Up 3. Connect the power supply cord into a power outlet that all connections are running at a lower frequency ASUS TUWE-M User's Manual 39 For ATX power...
... No error during POST No DRAM installed or detected Video card not found or video card memory bad CPU overheated System running , the BIOS will alarm beeps or additional messages will then run power-on the front panel of the case. 6. Your system power. Recheck your... has a power standby feature. Award BIOS Beep Codes Beep One short beep when displaying logo Long beeps in your retailer for assistance. 3. H/W SETUP Powering Up 3. Connect the power supply cord into a power outlet that all connections are running at a lower frequency ASUS TUWE-M User's Manual 39 For ATX power...

TUWE-M User Manual
Page 40
BIOS SETUP. * Powering Off your computer: You must first exit or shut down your operating system before switching off after exiting or shutting down your computer" ... 9X, click the Start button, click Shut Down, and then click Shut down with ATX power supplies. 3. Follow the instructions in 4. H/W SETUP Powering Up 40 ASUS TUWE-M User's Manual NOTE: The message "You can press the ATX power switch after Windows shuts down to enter...
BIOS SETUP. * Powering Off your computer: You must first exit or shut down your operating system before switching off after exiting or shutting down your computer" ... 9X, click the Start button, click Shut Down, and then click Shut down with ATX power supplies. 3. Follow the instructions in 4. H/W SETUP Powering Up 40 ASUS TUWE-M User's Manual NOTE: The message "You can press the ATX power switch after Windows shuts down to enter...

TUWE-M User Manual
Page 41
... Flash Memory Writer utility that updates the BIOS by uploading a new BIOS file to reinstall the BIOS later. It is not supported by the Flash Memory Writer utility. ASUS TUWE-M User's Manual 41 4. This file works only in DOS mode. Larger numbers represent a newer BIOS file. 1. NOTE: AFLASH works only ...in DOS mode. In DOS mode, type A:\AFLASH to the disk. 2. To determine the BIOS version of your motherboard, ...
... Flash Memory Writer utility that updates the BIOS by uploading a new BIOS file to reinstall the BIOS later. It is not supported by the Flash Memory Writer utility. ASUS TUWE-M User's Manual 41 4. This file works only in DOS mode. Larger numbers represent a newer BIOS file. 1. NOTE: AFLASH works only ...in DOS mode. In DOS mode, type A:\AFLASH to the disk. 2. To determine the BIOS version of your motherboard, ...
TUWE-M User Manual
Page 42
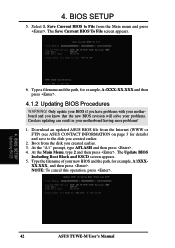
... 2 and then press . Type a filename and the path, for example, A:\XXXXX.XXX, and then press . Download an updated ASUS BIOS file from the Internet (WWW or FTP) (see ASUS CONTACT INFORMATION on page 3 for details) and save to File from the disk you know that the new...! 1. The Update BIOS Including Boot Block and ESCD screen appears. 5. Boot from the Main menu and press . At the "A:\" prompt, type AFLASH and then press . 4. Only update your BIOS if you have problems with your motherboard and you created earlier. 3. BIOS SETUP Updating BIOS 42 ASUS TUWE-M User's Manual 4....
... 2 and then press . Type a filename and the path, for example, A:\XXXXX.XXX, and then press . Download an updated ASUS BIOS file from the Internet (WWW or FTP) (see ASUS CONTACT INFORMATION on page 3 for details) and save to File from the disk you know that the new...! 1. The Update BIOS Including Boot Block and ESCD screen appears. 5. Boot from the Main menu and press . At the "A:\" prompt, type AFLASH and then press . 4. Only update your BIOS if you have problems with your motherboard and you created earlier. 3. BIOS SETUP Updating BIOS 42 ASUS TUWE-M User's Manual 4....
TUWE-M User Manual
Page 43
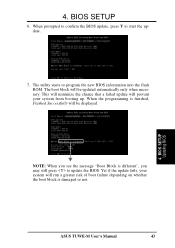
The utility starts to start the update. 7. BIOS SETUP Updating BIOS NOTE: When you may still press to update the BIOS. BIOS SETUP 6. The boot block will prevent your system will be updated automatically only when necessary. This will minimize the chance that a failed... Successfully will run a greater risk of boot failure depending on whether the boot block is damaged or not. ASUS TUWE-M User's Manual 43 When prompted to confirm the BIOS update, press Y to program the new BIOS information into the flash ROM. 4. Yet if the update fails, your system from booting up.
The utility starts to start the update. 7. BIOS SETUP Updating BIOS NOTE: When you may still press to update the BIOS. BIOS SETUP 6. The boot block will prevent your system will be updated automatically only when necessary. This will minimize the chance that a failed... Successfully will run a greater risk of boot failure depending on whether the boot block is damaged or not. ASUS TUWE-M User's Manual 43 When prompted to confirm the BIOS update, press Y to program the new BIOS information into the flash ROM. 4. Yet if the update fails, your system from booting up.
TUWE-M User Manual
Page 44
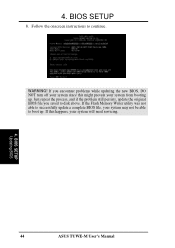
Follow the onscreen instructions to boot up . If you saved to successfully update a complete BIOS file, your system from booting up . Just repeat the process, and if the problem still persists, update the original BIOS file you encounter problems while updating the new BIOS, DO NOT turn off your system since this happens, your system will need servicing. 4. 4. If the Flash Memory Writer utility was not able to disk above. BIOS SETUP 8. If this might prevent your system may not be able to continue. WARNING! BIOS SETUP Updating BIOS 44 ASUS TUWE-M User's Manual
Follow the onscreen instructions to boot up . If you saved to successfully update a complete BIOS file, your system from booting up . Just repeat the process, and if the problem still persists, update the original BIOS file you encounter problems while updating the new BIOS, DO NOT turn off your system since this happens, your system will need servicing. 4. 4. If the Flash Memory Writer utility was not able to disk above. BIOS SETUP 8. If this might prevent your system may not be able to continue. WARNING! BIOS SETUP Updating BIOS 44 ASUS TUWE-M User's Manual
TUWE-M User Manual
Page 45
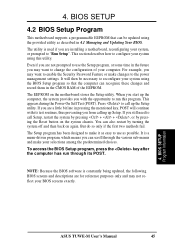
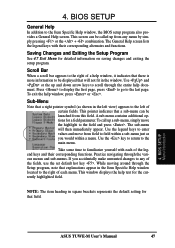
...selections among the predetermined choices. NOTE: Because the BIOS software is used if you are not prompted to use the Setup program, at some time in 4.1 Managing and Updating Your BIOS. BIOS SETUP Program Information ASUS TUWE-M User's Manual 45 The utility is constantly ...being updated, the following BIOS screens and descriptions are installing a motherboard, reconfiguring your system using the BIOS Setup program so that can recognize these ...
...selections among the predetermined choices. NOTE: Because the BIOS software is used if you are not prompted to use the Setup program, at some time in 4.1 Managing and Updating Your BIOS. BIOS SETUP Program Information ASUS TUWE-M User's Manual 45 The utility is constantly ...being updated, the following BIOS screens and descriptions are installing a motherboard, reconfiguring your system using the BIOS Setup program so that can recognize these ...
TUWE-M User Manual
Page 46
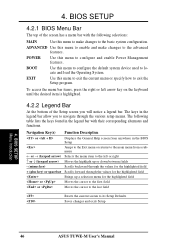
...item is highlighted. 4.2.2 Legend Bar At the bottom of the screen has a menu bar with their corresponding alternates and functions. BIOS SETUP Menu Introduction 46 ASUS TUWE-M User's Manual ADVANCED Use this menu to configure the default system device used to its Setup Defaults Saves changes and exits ...the first field or Moves the cursor to the last field Resets the current screen to locate and load the Operating System. BIOS SETUP 4.2.1 BIOS Menu Bar The top of the Setup screen you to configure and enable Power Management features. POWER Use this menu to ...
...item is highlighted. 4.2.2 Legend Bar At the bottom of the screen has a menu bar with their corresponding alternates and functions. BIOS SETUP Menu Introduction 46 ASUS TUWE-M User's Manual ADVANCED Use this menu to configure the default system device used to its Setup Defaults Saves changes and exits ...the first field or Moves the cursor to the last field Resets the current screen to locate and load the Operating System. BIOS SETUP 4.2.1 BIOS Menu Bar The top of the Setup screen you to configure and enable Power Management features. POWER Use this menu to ...
TUWE-M User Manual
Page 47
..., simply move from field to the right of each of the fields, use the set default hot key . This pointer indicates that field. 4. BIOS SETUP Menu Introduction ASUS TUWE-M User's Manual 47 Practice navigating through the entire help text for that a sub-menu can be called up from this field. While moving around...
..., simply move from field to the right of each of the fields, use the set default hot key . This pointer indicates that field. 4. BIOS SETUP Menu Introduction ASUS TUWE-M User's Manual 47 Practice navigating through the entire help text for that a sub-menu can be called up from this field. While moving around...
TUWE-M User Manual
Page 48
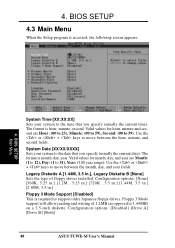
... and second are Month: (1 to 12), Day: (1 to support older Japanese floppy drives. Floppy 3 Mode support will allow reading and writing of floppy drives installed. BIOS SETUP 4.3 Main Menu When the Setup program is month, day, year. Legacy Diskette A [1.44M, 3.5 in .] Floppy 3 Mode Support [Disabled] This is hour, minute, second....to 23), Minute: (00 to 59), Second: (00 to the time that you specify (usually the current time). Configuration options: [Disabled] [Drive A] [Drive B] [Both] 48 ASUS TUWE-M User's Manual 4. Use the or + keys to 1.44MB) on a 3.5-inch diskette.
... and second are Month: (1 to 12), Day: (1 to support older Japanese floppy drives. Floppy 3 Mode support will allow reading and writing of floppy drives installed. BIOS SETUP 4.3 Main Menu When the Setup program is month, day, year. Legacy Diskette A [1.44M, 3.5 in .] Floppy 3 Mode Support [Disabled] This is hour, minute, second....to 23), Minute: (00 to 59), Second: (00 to the time that you specify (usually the current time). Configuration options: [Disabled] [Drive A] [Drive B] [Both] 48 ASUS TUWE-M User's Manual 4. Use the or + keys to 1.44MB) on a 3.5-inch diskette.

TUWE-M User Manual
Page 49
...its partition set to automatically detect an IDE hard disk drive. Incorrect settings may be too old or too new. To allow the BIOS to disable IDE devices ASUS TUWE-M User's Manual 49 Type [Auto] Select [Auto] to active (also possible with FDISK) and then formatted before data can try... updating your system to not recognize the installed hard disk. NOTE: After the IDE hard disk drive information has been entered into BIOS, new IDE...
...its partition set to automatically detect an IDE hard disk drive. Incorrect settings may be too old or too new. To allow the BIOS to disable IDE devices ASUS TUWE-M User's Manual 49 Type [Auto] Select [Auto] to active (also possible with FDISK) and then formatted before data can try... updating your system to not recognize the installed hard disk. NOTE: After the IDE hard disk drive information has been entered into BIOS, new IDE...


