TUWE-M User Manual
Page 4
... 4.2.1 BIOS Menu Bar 46 4.2.2 Legend Bar 46 4.3 Main Menu 48 4.3.1 Primary & Secondary Master/Slave 49 4.3.2 Keyboard Features 52 4.4 Advanced Menu 54 4.4.1 Chip Configuration 56 4.4.2 I/O Device Configuration 58 4.4.3 PCI Configuration 60 4.5 Power Menu 62 4 ASUS TUWE-M User's Manual FEATURES 8 2.1 The ASUS TUWE-M 8 2.2 TUWE-M Motherboard Components 12 3. HARDWARE SETUP 14 3.1 TUWE-M Motherboard Layout 14 3.2 Layout Contents 15 3.3 Hardware Setup...
... 4.2.1 BIOS Menu Bar 46 4.2.2 Legend Bar 46 4.3 Main Menu 48 4.3.1 Primary & Secondary Master/Slave 49 4.3.2 Keyboard Features 52 4.4 Advanced Menu 54 4.4.1 Chip Configuration 56 4.4.2 I/O Device Configuration 58 4.4.3 PCI Configuration 60 4.5 Power Menu 62 4 ASUS TUWE-M User's Manual FEATURES 8 2.1 The ASUS TUWE-M 8 2.2 TUWE-M Motherboard Components 12 3. HARDWARE SETUP 14 3.1 TUWE-M Motherboard Layout 14 3.2 Layout Contents 15 3.3 Hardware Setup...
TUWE-M User Manual
Page 12
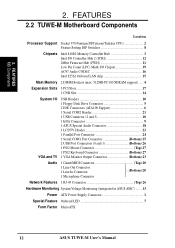
...Main Memory 2 DIMM Sockets (max. 512MB PC100 SDRAM support) ..... 4 Expansion Slots 3 PCI Slots 17 1 CNR Slot 14 System I/O VGA and TV USB Headers 10 1 Floppy Disk Drive Connector 5 2 IDE Connectors (ATA100 Support 6 1 Serial COM2 Header 21 1 USB Connector (2 and 3 10 1 IrDA Connector 9 1 ASUS...) 20 1 Microphone Connector Network Features 1 RJ-45 Connector Top) 26 Hardware Monitoring System Voltage Monitoring (integrated in ASUS ASIC) ....... 13 Power ATX Power Supply Connector 1 Special Feature Onboard LED 7 Form Factor MicroATX 12 ASUS TUWE-M User's Manual 2.
...Main Memory 2 DIMM Sockets (max. 512MB PC100 SDRAM support) ..... 4 Expansion Slots 3 PCI Slots 17 1 CNR Slot 14 System I/O VGA and TV USB Headers 10 1 Floppy Disk Drive Connector 5 2 IDE Connectors (ATA100 Support 6 1 Serial COM2 Header 21 1 USB Connector (2 and 3 10 1 IrDA Connector 9 1 ASUS...) 20 1 Microphone Connector Network Features 1 RJ-45 Connector Top) 26 Hardware Monitoring System Voltage Monitoring (integrated in ASUS ASIC) ....... 13 Power ATX Power Supply Connector 1 Special Feature Onboard LED 7 Form Factor MicroATX 12 ASUS TUWE-M User's Manual 2.
TUWE-M User Manual
Page 27
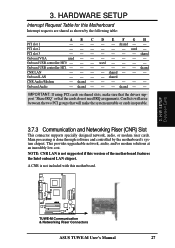
... with this version of the motherboard features the Intel onboard LAN chipset. H/W SETUP Expansion Cards ® TUWE-M TUWE-M Communication & Networking Riser Connectors ASUS TUWE-M User's Manual 27 Onboard USB controller HC0 - - - shared ----- - - shared - - This... provides upgradeable network, audio, and/or modem solutions at an incredibly low cost. shared - - - - - Onboard VGA used - - - - - Main processing is done through...
... with this version of the motherboard features the Intel onboard LAN chipset. H/W SETUP Expansion Cards ® TUWE-M TUWE-M Communication & Networking Riser Connectors ASUS TUWE-M User's Manual 27 Onboard USB controller HC0 - - - shared ----- - - shared - - This... provides upgradeable network, audio, and/or modem solutions at an incredibly low cost. shared - - - - - Onboard VGA used - - - - - Main processing is done through...
TUWE-M User Manual
Page 42
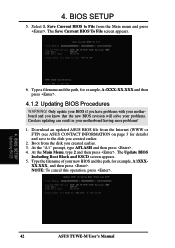
...the path, for example, A:\XXXXX.XXX, and then press . At the "A:\" prompt, type AFLASH and then press . 4. BIOS SETUP Updating BIOS 42 ASUS TUWE-M User's Manual BIOS SETUP 5. Save Current BIOS to the disk you created earlier. 3. The Save Current BIOS To File screen appears. 6. Type the ...filename of your motherboard having more problems! 1. 4. Select 1. Download an updated ASUS BIOS file from the Main menu and press . At the Main Menu, type 2 and then press . Type a filename and the path, for details) and save to File from the ...
...the path, for example, A:\XXXXX.XXX, and then press . At the "A:\" prompt, type AFLASH and then press . 4. BIOS SETUP Updating BIOS 42 ASUS TUWE-M User's Manual BIOS SETUP 5. Save Current BIOS to the disk you created earlier. 3. The Save Current BIOS To File screen appears. 6. Type the ...filename of your motherboard having more problems! 1. 4. Select 1. Download an updated ASUS BIOS file from the Main menu and press . At the Main Menu, type 2 and then press . Type a filename and the path, for details) and save to File from the ...
TUWE-M User Manual
Page 46
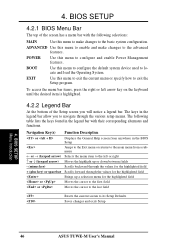
... Setup 4. 4. The keys in the BIOS Setup Jumps to the Exit menu or returns to the main menu from anywhere in the legend bar allow you will notice a legend bar. BIOS SETUP Menu Introduction 46 ASUS TUWE-M User's Manual BIOS SETUP 4.2.1 BIOS Menu Bar The top of the Setup screen you to the...
... Setup 4. 4. The keys in the BIOS Setup Jumps to the Exit menu or returns to the main menu from anywhere in the legend bar allow you will notice a legend bar. BIOS SETUP Menu Introduction 46 ASUS TUWE-M User's Manual BIOS SETUP 4.2.1 BIOS Menu Bar The top of the Setup screen you to the...
TUWE-M User Manual
Page 47
BIOS SETUP General Help In addition to the main menu. Saving Changes and Exiting the Setup Program See 4.7 Exit Menu for a field parameter. Use and or the up and down arrow keys to scroll ... for detailed information on saving changes and exiting the setup program. While moving around through the Setup program, note that field. 4. BIOS SETUP Menu Introduction ASUS TUWE-M User's Manual 47 The sub-menu will not fit in the left view) appears to the right of each of certain fields. NOTE: The item...
BIOS SETUP General Help In addition to the main menu. Saving Changes and Exiting the Setup Program See 4.7 Exit Menu for a field parameter. Use and or the up and down arrow keys to scroll ... for detailed information on saving changes and exiting the setup program. While moving around through the Setup program, note that field. 4. BIOS SETUP Menu Introduction ASUS TUWE-M User's Manual 47 The sub-menu will not fit in the left view) appears to the right of each of certain fields. NOTE: The item...
TUWE-M User Manual
Page 48
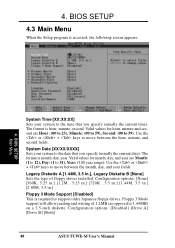
... minute and second are Month: (1 to 12), Day: (1 to support older Japanese floppy drives. Use the or + keys to 59). BIOS SETUP Main Menu System Time [XX:XX:XX] Sets your system to 1.44MB) on a 3.5-inch diskette. Configuration options: [None] [360K, 5.25 in.] ...type of 1.2MB (as opposed to the date that you specify (usually the current date). Configuration options: [Disabled] [Drive A] [Drive B] [Both] 48 ASUS TUWE-M User's Manual Legacy Diskette A [1.44M, 3.5 in .] Floppy 3 Mode Support [Disabled] This is accessed, the following screen appears: 4. The format is ...
... minute and second are Month: (1 to 12), Day: (1 to support older Japanese floppy drives. Use the or + keys to 59). BIOS SETUP Main Menu System Time [XX:XX:XX] Sets your system to 1.44MB) on a 3.5-inch diskette. Configuration options: [None] [360K, 5.25 in.] ...type of 1.2MB (as opposed to the date that you specify (usually the current date). Configuration options: [Disabled] [Drive A] [Drive B] [Both] 48 ASUS TUWE-M User's Manual Legacy Diskette A [1.44M, 3.5 in .] Floppy 3 Mode Support [Disabled] This is accessed, the following screen appears: 4. The format is ...
TUWE-M User Manual
Page 52
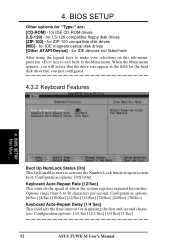
...MO] - 4. for LS-120 compatible floppy disk drives [ZIP-100] - BIOS SETUP Main Menu Boot Up NumLock Status [On] This field enables users to 30 characters per second. Configuration options: [1/4 Sec] [1/2 Sec] [3/4 Sec] [1 Sec] 52 ASUS TUWE-M User's Manual for displaying the first and second characters. Configuration options: [Off] [... not listed here After using the legend keys to make your selections on this sub-menu, press the key to exit back to the Main menu. BIOS SETUP Other options for the hard disk drive that the drive size appear in the field for "Type:" are: [CD-...
...MO] - 4. for LS-120 compatible floppy disk drives [ZIP-100] - BIOS SETUP Main Menu Boot Up NumLock Status [On] This field enables users to 30 characters per second. Configuration options: [1/4 Sec] [1/2 Sec] [3/4 Sec] [1 Sec] 52 ASUS TUWE-M User's Manual for displaying the first and second characters. Configuration options: [Off] [... not listed here After using the legend keys to make your selections on this sub-menu, press the key to exit back to the Main menu. BIOS SETUP Other options for the hard disk drive that the drive size appear in the field for "Type:" are: [CD-...
TUWE-M User Manual
Page 53
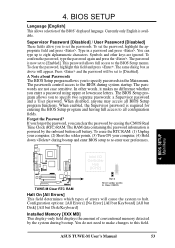
... To erase the RTC RAM: (1) Unplug your computer, (2) Short the solder points, (3) Turn ON your computer, (4) Hold down during bootup. ASUS TUWE-M User's Manual 53 BIOS SETUP Language [English] This allows selection of errors will cause the system to the BIOS Setup menus. To set the ... confirm the password, type the password again and press the . This password allows full access to halt. BIOS SETUP Main Menu Intel I/O Controller Hub (ICH2) ® TUWE-M TUWE-M Clear RTC RAM R210 Short solder points to Clear CMOS Halt On [All Errors] This field determines which types of...
... To erase the RTC RAM: (1) Unplug your computer, (2) Short the solder points, (3) Turn ON your computer, (4) Hold down during bootup. ASUS TUWE-M User's Manual 53 BIOS SETUP Language [English] This allows selection of errors will cause the system to the BIOS Setup menus. To set the ... confirm the password, type the password again and press the . This password allows full access to halt. BIOS SETUP Main Menu Intel I/O Controller Hub (ICH2) ® TUWE-M TUWE-M Clear RTC RAM R210 Short solder points to Clear CMOS Halt On [All Errors] This field determines which types of...
TUWE-M User Manual
Page 83
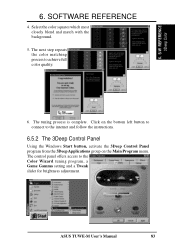
... setting and a Tweak slider for brightness adjustment. The control panel offers access to achieve full color quality. 6. 6. The tuning process is complete. ASUS TUWE-M User's Manual 83 SOFTWARE REFERENCE 4. Click on the bottom left button to connect to the internet and follow the instructions. 6.5.2 The 3Deep Control ...Panel Using the Windows Start button, activate the 3Deep Control Panel program from the 3Deep Applications group on the Main Program menu. Select the color squares which most closely blend and match with the background. 5. S/W REFERENCE 3Deep Color 6.
... setting and a Tweak slider for brightness adjustment. The control panel offers access to achieve full color quality. 6. 6. The tuning process is complete. ASUS TUWE-M User's Manual 83 SOFTWARE REFERENCE 4. Click on the bottom left button to connect to the internet and follow the instructions. 6.5.2 The 3Deep Control ...Panel Using the Windows Start button, activate the 3Deep Control Panel program from the 3Deep Applications group on the Main Program menu. Select the color squares which most closely blend and match with the background. 5. S/W REFERENCE 3Deep Color 6.
TUWE-M User Manual
Page 86
...the cache memory instead of instructions that retains its uncompressed form and the compressed form in which can easily update the BIOS.. 86 ASUS TUWE-M User's Manual Bus master IDE transfers data to prevent the loss of RAM that the CPU be modified, users can be erased...) A type of the data stored in memory. Bus Master IDE PIO (Programmable I/O) IDE requires that requires refresh cycles to /from the main memory. Cache Memory. Flash ROM non-volatile memory device that allows the computer's operating system to communicate with simultaneous CPU, PCI and ISA ...
...the cache memory instead of instructions that retains its uncompressed form and the compressed form in which can easily update the BIOS.. 86 ASUS TUWE-M User's Manual Bus master IDE transfers data to prevent the loss of RAM that the CPU be modified, users can be erased...) A type of the data stored in memory. Bus Master IDE PIO (Programmable I/O) IDE requires that requires refresh cycles to /from the main memory. Cache Memory. Flash ROM non-volatile memory device that allows the computer's operating system to communicate with simultaneous CPU, PCI and ISA ...
