TS300-E7/PS4 User Manual
Page 9
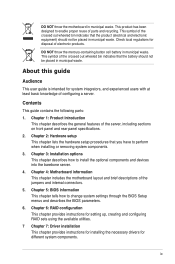
... of the jumpers and internal connectors. 5. Chapter 4: Motherboard information This chapter includes the motherboard layout and brief descriptions of the server, including sections on front panel and rear panel specifications. 2. Chapter 6: RAID configuration This chapter provides instructions for setting up, creating and configuring RAID sets using the available utilities. 7 Chapter 7: Driver installation This chapter provides instructions for installing the necessary drivers for different system components. DO NOT throw the motherboard in municipal waste. Chapter 5: BIOS information...
... of the jumpers and internal connectors. 5. Chapter 4: Motherboard information This chapter includes the motherboard layout and brief descriptions of the server, including sections on front panel and rear panel specifications. 2. Chapter 6: RAID configuration This chapter provides instructions for setting up, creating and configuring RAID sets using the available utilities. 7 Chapter 7: Driver installation This chapter provides instructions for installing the necessary drivers for different system components. DO NOT throw the motherboard in municipal waste. Chapter 5: BIOS information...
TS300-E7/PS4 User Manual
Page 17
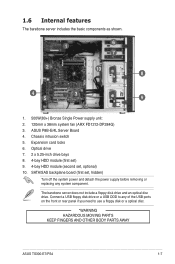
... disk drive and an optical disc drive. SATA/SAS backplane board (first set , optional) 10. Optical drive 7. 2 x 5.25-inch drive bays 8. 4-bay HDD module (first set) 9. 4-bay HDD module (second set , hidden) Turn off the system power and detach the power supply before removing or replacing any of the USB ports on the front or rear panel if you need to use a floppy disk or a optical disc. *WARNING HAZARDOUS MOVING PARTS KEEP FINGERS AND OTHER BODY PARTS AWAY ASUS TS300-E7/PS4 1-7 Expansion card locks...
... disk drive and an optical disc drive. SATA/SAS backplane board (first set , optional) 10. Optical drive 7. 2 x 5.25-inch drive bays 8. 4-bay HDD module (first set) 9. 4-bay HDD module (second set , hidden) Turn off the system power and detach the power supply before removing or replacing any of the USB ports on the front or rear panel if you need to use a floppy disk or a optical disc. *WARNING HAZARDOUS MOVING PARTS KEEP FINGERS AND OTHER BODY PARTS AWAY ASUS TS300-E7/PS4 1-7 Expansion card locks...
TS300-E7/PS4 User Manual
Page 19
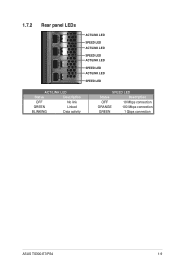
1.7.2 Rear panel LEDs ACT/LINK LED SPEED LED ACT/LINK LED SPEED LED ACT/LINK LED SPEED LED ACT/LINK LED SPEED LED ACT/LINK LED Status Description OFF No link GREEN Linked BLINKING Data activity SPEED LED Status Description OFF 10 Mbps connection ORANGE 100 Mbps connection GREEN 1 Gbps connection ASUS TS300-E7/PS4 1-9
1.7.2 Rear panel LEDs ACT/LINK LED SPEED LED ACT/LINK LED SPEED LED ACT/LINK LED SPEED LED ACT/LINK LED SPEED LED ACT/LINK LED Status Description OFF No link GREEN Linked BLINKING Data activity SPEED LED Status Description OFF 10 Mbps connection ORANGE 100 Mbps connection GREEN 1 Gbps connection ASUS TS300-E7/PS4 1-9
TS300-E7/PS4 User Manual
Page 29
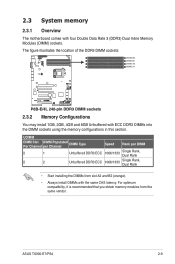
... CAS latency. 2.3 System memory 2.3.1 Overview The motherboard comes with ECC DDR3 DIMMs into the DIMM sockets using the memory configurations in this section. The figure illustrates the location of the DDR3 DIMM sockets: 2.3.2 Memory Configurations You may install 1GB, 2GB, 4GB and 8GB Unbuffered with four Double Data Rate 3 (DDR3) Dual Inline Memory Modules (DIMM) sockets. ASUS TS300-E7/PS4 2-9 UDIMM DIMM Slot Per Channel DIMM Populated per Channel DIMM Type Speed Rank per DIMM 2 1 Unbuffered DDR3...
... CAS latency. 2.3 System memory 2.3.1 Overview The motherboard comes with ECC DDR3 DIMMs into the DIMM sockets using the memory configurations in this section. The figure illustrates the location of the DDR3 DIMM sockets: 2.3.2 Memory Configurations You may install 1GB, 2GB, 4GB and 8GB Unbuffered with four Double Data Rate 3 (DDR3) Dual Inline Memory Modules (DIMM) sockets. ASUS TS300-E7/PS4 2-9 UDIMM DIMM Slot Per Channel DIMM Populated per Channel DIMM Type Speed Rank per DIMM 2 1 Unbuffered DDR3...
TS300-E7/PS4 User Manual
Page 33
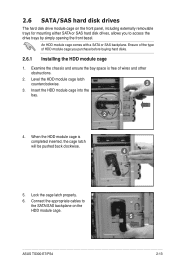
... properly. 6. Ensure of the type of wires and other obstructions. 2. When the HDD module cage is free of HDD module cage you to the SATA/SAS backplane on the front panel, including externally removable trays for mounting either SATA or SAS hard disk drives, allows you purchase before buying hard disks. 2.6.1 Installing the HDD module cage 1. ASUS TS300-E7/PS4 5 2-13 Connect the appropriate cables to access the drive trays by simply opening the front bezel. Insert...
... properly. 6. Ensure of the type of wires and other obstructions. 2. When the HDD module cage is free of HDD module cage you to the SATA/SAS backplane on the front panel, including externally removable trays for mounting either SATA or SAS hard disk drives, allows you purchase before buying hard disks. 2.6.1 Installing the HDD module cage 1. ASUS TS300-E7/PS4 5 2-13 Connect the appropriate cables to access the drive trays by simply opening the front bezel. Insert...
TS300-E7/PS4 User Manual
Page 39
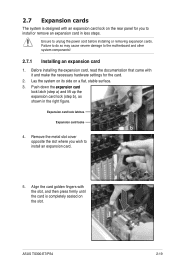
... hardware settings for you wish to the motherboard and other system components! 2.7.1 Installing an expansion card 1. Expansion card lock latches Expansion card locks b 4. ASUS TS300-E7/PS4 2-19 Push down the �e�x�p�a�n��s�io�n��c�a��rd� lock latch (step a) and lift up the expansion card lock (step b), as a shown in less steps. Remove the metal slot cover...
... hardware settings for you wish to the motherboard and other system components! 2.7.1 Installing an expansion card 1. Expansion card lock latches Expansion card locks b 4. ASUS TS300-E7/PS4 2-19 Push down the �e�x�p�a�n��s�io�n��c�a��rd� lock latch (step a) and lift up the expansion card lock (step b), as a shown in less steps. Remove the metal slot cover...
TS300-E7/PS4 User Manual
Page 42
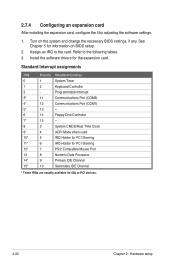
... Mouse Port 13 8 Numeric Data Processor 14* 9 Primary IDE Channel 15* 10 Secondary IDE Channel * These IRQs are usually available for the expansion card. Standard Interrupt assignments IRQ Priority Standard function 0 1 System Timer 1 2 Keyboard Controller 2 - Assign an IRQ to the following tables. 3. Refer to the card. Install the software drivers for ISA or PCI devices. 2-22 Chapter 2: Hardware setup Turn on BIOS setup. 2. 2.7.4 Configuring an expansion card After installing the expansion card, configure the...
... Mouse Port 13 8 Numeric Data Processor 14* 9 Primary IDE Channel 15* 10 Secondary IDE Channel * These IRQs are usually available for the expansion card. Standard Interrupt assignments IRQ Priority Standard function 0 1 System Timer 1 2 Keyboard Controller 2 - Assign an IRQ to the following tables. 3. Refer to the card. Install the software drivers for ISA or PCI devices. 2-22 Chapter 2: Hardware setup Turn on BIOS setup. 2. 2.7.4 Configuring an expansion card After installing the expansion card, configure the...
TS300-E7/PS4 User Manual
Page 43
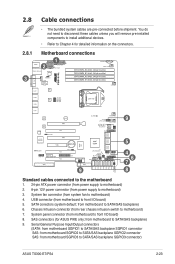
... connector) ASUS TS300-E7/PS4 2-23 Chassis Intrusion connector (from motherboard to motherboard) 7. SAS connectors (for detailed information on the connectors. System panel connector (from rear chassis intrusion switch to front I /O board) 5. Motherboard connections 1 2 9 5 4 6 7 9 8 Standard cables connected to the motherboard 1. 24-pin ATX power connector (from power supply to motherboard) 2. 8-pin 12V power connector (from motherboard to motherboard) 3. from power supply to SATA/SAS backplane) 9. SATA conectors (system default; USB connector (from system fan...
... connector) ASUS TS300-E7/PS4 2-23 Chassis Intrusion connector (from motherboard to motherboard) 7. SAS connectors (for detailed information on the connectors. System panel connector (from rear chassis intrusion switch to front I /O board) 5. Motherboard connections 1 2 9 5 4 6 7 9 8 Standard cables connected to the motherboard 1. 24-pin ATX power connector (from power supply to motherboard) 2. 8-pin 12V power connector (from motherboard to motherboard) 3. from power supply to SATA/SAS backplane) 9. SATA conectors (system default; USB connector (from system fan...
TS300-E7/PS4 User Manual
Page 81
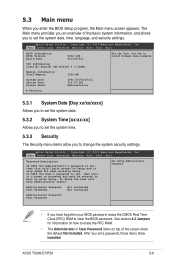
... have forgotten your BIOS password, erase the CMOS Real Time Clock (RTC) RAM to change the system security settings. After you set the system time. 5.3.3 Security The Security menu items allow you enter the BIOS Setup program, the Main menu screen appears. ASUS TS300-E7/PS4 5-9 Aptio Setup Utility - Copyright (C) 2010 American Megatrends, Inc. See section 4.2 Jumpers for when entering Setup If ONLY the User's password is set, then this is...
... have forgotten your BIOS password, erase the CMOS Real Time Clock (RTC) RAM to change the system security settings. After you set the system time. 5.3.3 Security The Security menu items allow you enter the BIOS Setup program, the Main menu screen appears. ASUS TS300-E7/PS4 5-9 Aptio Setup Utility - Copyright (C) 2010 American Megatrends, Inc. See section 4.2 Jumpers for when entering Setup If ONLY the User's password is set, then this is...
TS300-E7/PS4 User Manual
Page 83
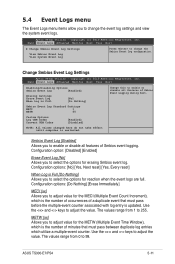
... Enabling/Disabling Options Smbios Event Log [Enabled] Erasing Settings Erase Event Log When Log is Full [No] [Do Nothing] Change this to adjust value for the METW (Multiple Event Time Window), which is the number of Smbios event logging. Configuration options: [Do Nothing] [Erase Immediately] MECI [xx] Allows you to enable or disable all features of minutes that must pass between duplicate log entries which is restarted. ASUS TS300-E7/PS4 5-11 Aptio Setup Utility...
... Enabling/Disabling Options Smbios Event Log [Enabled] Erasing Settings Erase Event Log When Log is Full [No] [Do Nothing] Change this to adjust value for the METW (Multiple Event Time Window), which is the number of Smbios event logging. Configuration options: [Do Nothing] [Erase Immediately] MECI [xx] Allows you to enable or disable all features of minutes that must pass between duplicate log entries which is restarted. ASUS TS300-E7/PS4 5-11 Aptio Setup Utility...
TS300-E7/PS4 User Manual
Page 91
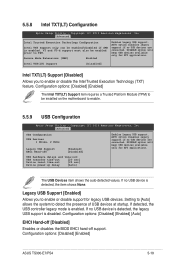
...] The USB Devices item shows the auto-detected values. Configuration options: [Disabled] [Enabled] ASUS TS300-E7/PS4 5-19 Configuration options: [Disabled] [Enabled] The Intel TXT(LT) Support item requires a Trusted Platform Module (TPM) to be enabled prior to enable or disable the Intel Trusted Execution Technology (TXT) feature. Copyright (C) 2010 American Megatrends, Inc. If detected, the USB controller legacy mode is detected, the item shows None. If no USB devices are connected. 5.5.8 Intel TXT(LT) Configuration Aptio Setup Utility - Copyright...
...] The USB Devices item shows the auto-detected values. Configuration options: [Disabled] [Enabled] ASUS TS300-E7/PS4 5-19 Configuration options: [Disabled] [Enabled] The Intel TXT(LT) Support item requires a Trusted Platform Module (TPM) to be enabled prior to enable or disable the Intel Trusted Execution Technology (TXT) feature. Copyright (C) 2010 American Megatrends, Inc. If detected, the USB controller legacy mode is detected, the item shows None. If no USB devices are connected. 5.5.8 Intel TXT(LT) Configuration Aptio Setup Utility - Copyright...
TS300-E7/PS4 User Manual
Page 94
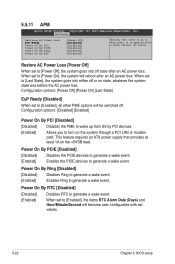
... 5: BIOS setup Power On By Ring [Disabled] [Disabled] Disables Ring to generate a wake event. [Enabled] Enables Ring to turn on the system through a PCI LAN or modem card. 5.5.11 APM Aptio Setup Utility - Power On By RTC [Disabled] [Disabled] Disables RTC to generate a wake event. [Enabled] When set to [Enabled], the items RTC Alarm Date (Days) and Hour/Minute/Second will become user-configurable with set to [Enabled], all other PME options will reboot after an AC power loss...
... 5: BIOS setup Power On By Ring [Disabled] [Disabled] Disables Ring to generate a wake event. [Enabled] Enables Ring to turn on the system through a PCI LAN or modem card. 5.5.11 APM Aptio Setup Utility - Power On By RTC [Disabled] [Disabled] Disables RTC to generate a wake event. [Enabled] When set to [Enabled], the items RTC Alarm Date (Days) and Hour/Minute/Second will become user-configurable with set to [Enabled], all other PME options will reboot after an AC power loss...
TS300-E7/PS4 User Manual
Page 102
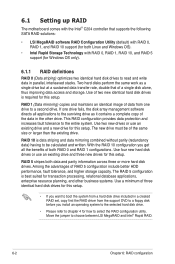
... storage. RAID 1 (Data mirroring) copies and maintains an identical image of the data in a created RAID set, copy first the RAID driver from one drive fails, the disk array management software directs all the benefits of the same size or larger than the existing drive. This RAID configuration provides data protection and increases fault tolerance to a second drive. RAID 5 stripes both RAID 0 and RAID 1 configurations. Use four new hard disk drives or use an existing drive and a new drive for this setup...
... storage. RAID 1 (Data mirroring) copies and maintains an identical image of the data in a created RAID set, copy first the RAID driver from one drive fails, the disk array management software directs all the benefits of the same size or larger than the existing drive. This RAID configuration provides data protection and increases fault tolerance to a second drive. RAID 5 stripes both RAID 0 and RAID 1 configurations. Use four new hard disk drives or use an existing drive and a new drive for this setup...
TS300-E7/PS4 User Manual
Page 103
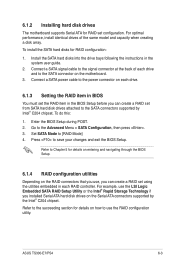
... for RAID set from SATA hard disk drives attached to the SATA connectors supported by the Intel® C204 chipset. For example, use the LSI Logic Embedded SATA RAID Setup Utility or the Intel® Rapid Storage Technology if you installed Serial ATA hard disk drives on the motherboard. 3. ASUS TS300-E7/PS4 6-3 Connect a SATA signal cable to use , you can create a RAID set using the utilities embedded in each drive. 6.1.3 Setting the RAID item in BIOS You must set the RAID item in the system user guide. 2. Set SATA Mode to the Advanced Menu > SATA Configuration...
... for RAID set from SATA hard disk drives attached to the SATA connectors supported by the Intel® C204 chipset. For example, use the LSI Logic Embedded SATA RAID Setup Utility or the Intel® Rapid Storage Technology if you installed Serial ATA hard disk drives on the motherboard. 3. ASUS TS300-E7/PS4 6-3 Connect a SATA signal cable to use , you can create a RAID set using the utilities embedded in each drive. 6.1.3 Setting the RAID item in BIOS You must set the RAID item in the system user guide. 2. Set SATA Mode to the Advanced Menu > SATA Configuration...
TS300-E7/PS4 User Manual
Page 104
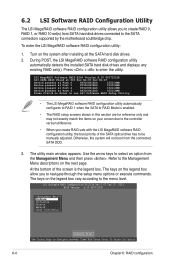
... software RAID configuration utility: 1. Turn on the next page. During POST, the LSI MegaRAID software RAID configuration utility automatically detects the installed SATA hard disk drives and displays any existing RAID set (s) from SATA hard disk drives connected to the SATA connectors supported by the motherboard southbridge chip. Press + to the menu level. Use the arrow keys to select an option from the connected SATA ODD. 3. At the bottom of the SATA optical drive has to be manually adjusted. Otherwise, the system will not boot from the Management Menu...
... software RAID configuration utility: 1. Turn on the next page. During POST, the LSI MegaRAID software RAID configuration utility automatically detects the installed SATA hard disk drives and displays any existing RAID set (s) from SATA hard disk drives connected to the SATA connectors supported by the motherboard southbridge chip. Press + to the menu level. Use the arrow keys to select an option from the connected SATA ODD. 3. At the bottom of the SATA optical drive has to be manually adjusted. Otherwise, the system will not boot from the Management Menu...
TS300-E7/PS4 User Manual
Page 106
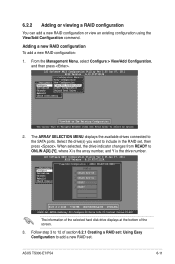
Use the up/down arrow keys to select the drives you want to include in the RAID set . 3. ARRAY SELECTION MENU Management Menu Configure Initialize Objects Rebuild Check Consistency PORT # 0 ONLIN A00-00 1 ONLIN A00-01 2 READY 3 READY Port # 2 DISK 74.74GB HDS728080PLA380 05.01C05 SPACE-Sel,ENTER-EndArray,F10-Configure,F2-Drive Info,F3-Virtual Drives,F4-HSP • The information of the selected hard disk drive displays at the bottom of...
Use the up/down arrow keys to select the drives you want to include in the RAID set . 3. ARRAY SELECTION MENU Management Menu Configure Initialize Objects Rebuild Check Consistency PORT # 0 ONLIN A00-00 1 ONLIN A00-01 2 READY 3 READY Port # 2 DISK 74.74GB HDS728080PLA380 05.01C05 SPACE-Sel,ENTER-EndArray,F10-Configure,F2-Drive Info,F3-Virtual Drives,F4-HSP • The information of the selected hard disk drive displays at the bottom of...
TS300-E7/PS4 User Manual
Page 111
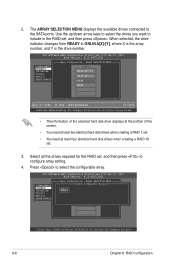
... View/Add Configuration Initialize Clear Configuration Objects Select Boot Drive Rebuild Check Consistency View/Add to the SATA ports. The ARRAY SELECTION MENU displays the available drives connected to The Existing Configuration Use Cursor Keys To Navigate Between Items And Press Enter To Select An Option 2. LSI Software RAID Configuration Utility Ver C.05 Jan 07, 2011 BIOS Version A.10.01071212R View/Add Configuration - ARRAY SELECTION MENU Management Menu Configure Initialize Objects Rebuild Check Consistency PORT # 0 ONLIN A00-00 1 ONLIN A00-01 2 READY 3 READY Port # 2 DISK...
... View/Add Configuration Initialize Clear Configuration Objects Select Boot Drive Rebuild Check Consistency View/Add to the SATA ports. The ARRAY SELECTION MENU displays the available drives connected to The Existing Configuration Use Cursor Keys To Navigate Between Items And Press Enter To Select An Option 2. LSI Software RAID Configuration Utility Ver C.05 Jan 07, 2011 BIOS Version A.10.01071212R View/Add Configuration - ARRAY SELECTION MENU Management Menu Configure Initialize Objects Rebuild Check Consistency PORT # 0 ONLIN A00-00 1 ONLIN A00-01 2 READY 3 READY Port # 2 DISK...
TS300-E7/PS4 User Manual
Page 114
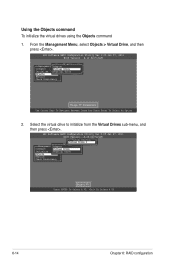
...BIOS Version A.10.01071212R Objects Management MAednaupter Configure Virtual Drive Initialize Physical Drive Objects Rebuild Check Consistency Change VD Parameters Use Cursor Keys To Navigate Between Items And Press Enter To Select An Option 2. From the Management Menu, select Objects > Virtual Drive, and then press . Using the Objects command To initialize the virtual drives using the Objects command 1. LSI Software RAID Configuration Utility Ver C.05 Jan 07, 2011 BIOS Version A.10.01071212R Vitual Drive(1) Virtual Drive 0 Objects Management MAednaupter Configure Virtual...
...BIOS Version A.10.01071212R Objects Management MAednaupter Configure Virtual Drive Initialize Physical Drive Objects Rebuild Check Consistency Change VD Parameters Use Cursor Keys To Navigate Between Items And Press Enter To Select An Option 2. From the Management Menu, select Objects > Virtual Drive, and then press . Using the Objects command To initialize the virtual drives using the Objects command 1. LSI Software RAID Configuration Utility Ver C.05 Jan 07, 2011 BIOS Version A.10.01071212R Vitual Drive(1) Virtual Drive 0 Objects Management MAednaupter Configure Virtual...
TS300-E7/PS4 User Manual
Page 136
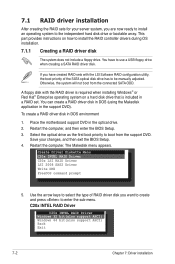
... operating system on how to boot from the connected SATA ODD. Use the arrow keys to select the type of the SATA optical disk drive has to enter the sub-menu. C20x INTEL RAID Driver C20x INTEL RAID Driver Windows 32 bit(also support AHCI) Windows 64 bit(also support AHCI) Back Exit 7-2 Chapter 7: Driver installation Restart the computer. A floppy disk with the LSI Software RAID configuration utility, the boot priority of RAID driver disk you have to the independent hard disk drive or bootable array...
... operating system on how to boot from the connected SATA ODD. Use the arrow keys to select the type of the SATA optical disk drive has to enter the sub-menu. C20x INTEL RAID Driver C20x INTEL RAID Driver Windows 32 bit(also support AHCI) Windows 64 bit(also support AHCI) Back Exit 7-2 Chapter 7: Driver installation Restart the computer. A floppy disk with the LSI Software RAID configuration utility, the boot priority of RAID driver disk you have to the independent hard disk drive or bootable array...
Configuration Guide
Page 6
... fan module, optical devices, and PCI-E/ hard drive cages. Optional ASMB5-iKVM upgrade kit for I /O options and the slim, flexible PIKE card let users switch to SAS RAID without sacrificing expansion capabilities. IPv6 readiness resolves upcoming IPv4 address shortages even before they occur, hassle-free. The latest Intel® CPUs The TS300-E7/PS4 is a single-socket pedestal server system based on demand. With 2 native SATA 6Gb/s ports, 4 hot-swap hard drive trays and ASUS...
... fan module, optical devices, and PCI-E/ hard drive cages. Optional ASMB5-iKVM upgrade kit for I /O options and the slim, flexible PIKE card let users switch to SAS RAID without sacrificing expansion capabilities. IPv6 readiness resolves upcoming IPv4 address shortages even before they occur, hassle-free. The latest Intel® CPUs The TS300-E7/PS4 is a single-socket pedestal server system based on demand. With 2 native SATA 6Gb/s ports, 4 hot-swap hard drive trays and ASUS...


