
User Manual
Page 2
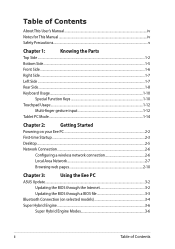
......1-10 Special Function Keys 1-10 Touchpad Usage...1-12 Multi-finger gesture input 1-12 Tablet PC Mode...1-14 Chapter 2: Getting Started Powering on your Eee PC...2-2 First-time Startup...2-3 Desktop...2-5 Network Connection...2-6 Configuring a wireless network connection 2-6 Local Area Network 2-7 Browsing web pages 2-10 Chapter 3: Using the Eee PC ASUS Update...3-2 Updating the BIOS through the Internet 3-2 Updating the BIOS through a BIOS file 3-3 Bluetooth Connection (on selected models 3-4 Super Hybrid Engine...3-6 Super Hybrid Engine Modes 3-6 ii Table of...
......1-10 Special Function Keys 1-10 Touchpad Usage...1-12 Multi-finger gesture input 1-12 Tablet PC Mode...1-14 Chapter 2: Getting Started Powering on your Eee PC...2-2 First-time Startup...2-3 Desktop...2-5 Network Connection...2-6 Configuring a wireless network connection 2-6 Local Area Network 2-7 Browsing web pages 2-10 Chapter 3: Using the Eee PC ASUS Update...3-2 Updating the BIOS through the Internet 3-2 Updating the BIOS through a BIOS file 3-3 Bluetooth Connection (on selected models 3-4 Super Hybrid Engine...3-6 Super Hybrid Engine Modes 3-6 ii Table of...

User Manual
Page 3
......3-9 Eee Xperience...3-9 Eee Tools...3-9 Boingo (on selected models 3-10 Touch Gate Mode 3-10 Touch Gate Mode...3-11 Using Touch Gate Mode 3-11 Changing Function Shortcuts 3-12 Switching back to Windows Mode 3-13 Microsoft® Office Trial...3-14 Chapter 4: Support DVD & System Recovery Support DVD information 4-2 Running the support DVD 4-2 Drivers menu...4-3 Utilities menu...4-3 Contact...4-3 Other information 4-3 System Recovery...4-4 Using Recovery Partition (F9 Recovery 4-4 Using the Support DVD 4-4 Boot Booster...4-6 Appendix Declarations and Safety Statements...
......3-9 Eee Xperience...3-9 Eee Tools...3-9 Boingo (on selected models 3-10 Touch Gate Mode 3-10 Touch Gate Mode...3-11 Using Touch Gate Mode 3-11 Changing Function Shortcuts 3-12 Switching back to Windows Mode 3-13 Microsoft® Office Trial...3-14 Chapter 4: Support DVD & System Recovery Support DVD information 4-2 Running the support DVD 4-2 Drivers menu...4-3 Utilities menu...4-3 Contact...4-3 Other information 4-3 System Recovery...4-4 Using Recovery Partition (F9 Recovery 4-4 Using the Support DVD 4-4 Boot Booster...4-6 Appendix Declarations and Safety Statements...
User Manual
Page 4
... importance as being correct. TIP: Tips for safe operation. About This User's Manual You are reading the Eee PC User's Manual.This User's Manual provides information regarding the various components in this manual. Knowing the Parts Provides information on getting started with the Eee PC. 3. Using the Eee PC Provides information on support DVD contents and system recovery. 5. Important information that must be followed for...
... importance as being correct. TIP: Tips for safe operation. About This User's Manual You are reading the Eee PC User's Manual.This User's Manual provides information regarding the various components in this manual. Knowing the Parts Provides information on getting started with the Eee PC. 3. Using the Eee PC Provides information on support DVD contents and system recovery. 5. Important information that must be followed for...
User Manual
Page 11
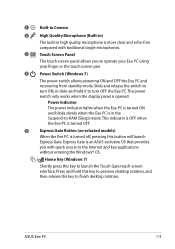
... desktop rotation. The power switch only works when the display panel is turned off, pressing this key to launch the Touch Gate touch screen interface. Express Gate is more clear and echo-free compared with traditional single microphones. 3 Touch Screen Panel The touch screen panel allows you with quick access to the Internet and key applications without entering the Windows® OS. / Home Key (Windows 7) Shortly press this button will launch Express Gate. Slide and release the switch to -RAM (Sleep) mode.
... desktop rotation. The power switch only works when the display panel is turned off, pressing this key to launch the Touch Gate touch screen interface. Express Gate is more clear and echo-free compared with traditional single microphones. 3 Touch Screen Panel The touch screen panel allows you with quick access to the Internet and key applications without entering the Windows® OS. / Home Key (Windows 7) Shortly press this button will launch Express Gate. Slide and release the switch to -RAM (Sleep) mode.
User Manual
Page 12
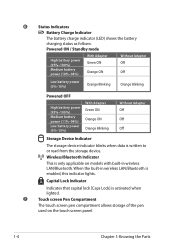
... ON Without Adapter Off Off Low battery power (0%-10%) Orange Blinking Orange Blinking Powered OFF High battery power (95%-100%) Medium battery power (11%-94%) Low battery power (0%-10%) With Adapter Green ON Orange ON Orange Blinking Without Adapter Off Off Off Storage Device Indicator The storage device indicator blinks when data is enabled, this indicator lights. Wireless/Bluetooth Indicator This is activated when lighted. 7 Touch screen Pen Compartment The touch screen pen compartment allows storage of the pen used on models with built-in wireless LAN/Bluetooth is...
... ON Without Adapter Off Off Low battery power (0%-10%) Orange Blinking Orange Blinking Powered OFF High battery power (95%-100%) Medium battery power (11%-94%) Low battery power (0%-10%) With Adapter Green ON Orange ON Orange Blinking Without Adapter Off Off Off Storage Device Indicator The storage device indicator blinks when data is enabled, this indicator lights. Wireless/Bluetooth Indicator This is activated when lighted. 7 Touch screen Pen Compartment The touch screen pen compartment allows storage of the pen used on models with built-in wireless LAN/Bluetooth is...
User Manual
Page 15
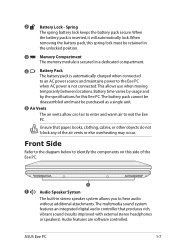
... without additional attachments. 2 Battery Lock - Battery time varies by usage and by the specifications for this spring lock must be retained in the unlocked position. 3 Memory Compartment The memory module is secured in stereo speaker system allows you to the Eee PC when AC power is not connected. ASUS Eee PC 1-7 Ensure that produces rich, vibrant sound (results improved with external stereo headphones or speakers).
... without additional attachments. 2 Battery Lock - Battery time varies by usage and by the specifications for this spring lock must be retained in the unlocked position. 3 Memory Compartment The memory module is secured in stereo speaker system allows you to the Eee PC when AC power is not connected. ASUS Eee PC 1-7 Ensure that produces rich, vibrant sound (results improved with external stereo headphones or speakers).

User Manual
Page 16
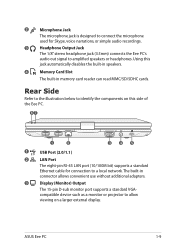
... Eee PC. 1 1 USB Port (2.0) The USB (Universal Serial Bus) port is compatible with USB 2.0 or USB 1.1 devices such as keyboards, pointing devices, cameras, and storage devices, connected in a series up to 12Mbits/sec (USB 1.1) and 480Mbits/sec (USB 2.0). Right Side Refer to the diagram below to identify the components on this side of the air vents or else overheating may occur. 1-8 Chapter 1: Knowing the Parts Also, the USB supports hot-swapping function.
... Eee PC. 1 1 USB Port (2.0) The USB (Universal Serial Bus) port is compatible with USB 2.0 or USB 1.1 devices such as keyboards, pointing devices, cameras, and storage devices, connected in a series up to 12Mbits/sec (USB 1.1) and 480Mbits/sec (USB 2.0). Right Side Refer to the diagram below to identify the components on this side of the air vents or else overheating may occur. 1-8 Chapter 1: Knowing the Parts Also, the USB supports hot-swapping function.
User Manual
Page 17
... bit) supports a standard Ethernet cable for Skype, voice narrations, or simple audio recordings. 3 Headphone Output Jack The 1/8" stereo headphone jack (3.5mm) connects the Eee PC's audio out signal to allow viewing on this jack automatically disables the built-in speakers. 4 Memory Card Slot The built-in connector allows convenient use without additional adapters. 3 Display (Monitor) Output The 15-pin D-sub monitor port supports a standard VGA- compatible device such as a monitor or...
... bit) supports a standard Ethernet cable for Skype, voice narrations, or simple audio recordings. 3 Headphone Output Jack The 1/8" stereo headphone jack (3.5mm) connects the Eee PC's audio out signal to allow viewing on this jack automatically disables the built-in speakers. 4 Memory Card Slot The built-in connector allows convenient use without additional adapters. 3 Display (Monitor) Output The 15-pin D-sub monitor port supports a standard VGA- compatible device such as a monitor or...
User Manual
Page 18
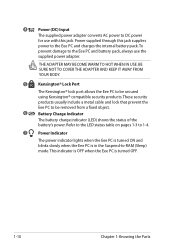
... power indicator lights when the Eee PC is turned ON and blinks slowly when the Eee PC is turned OFF. 1-10 Chapter 1: Knowing the Parts Power supplied through this jack. BE SURE NOT TO COVER THE ADAPTER AND KEEP IT AWAY FROM YOUR BODY. 5 Kensington® Lock Port The Kensington® lock port allows the Eee PC to be removed from a fixed object. 6 Battery Charge Indicator The battery charge...
... power indicator lights when the Eee PC is turned ON and blinks slowly when the Eee PC is turned OFF. 1-10 Chapter 1: Knowing the Parts Power supplied through this jack. BE SURE NOT TO COVER THE ADAPTER AND KEEP IT AWAY FROM YOUR BODY. 5 Kensington® Lock Port The Kensington® lock port allows the Eee PC to be removed from a fixed object. 6 Battery Charge Indicator The battery charge...
User Manual
Page 19
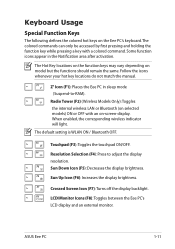
... key locations do not match the manual. LCD/Monitor Icons (F8): Toggles between the Eee PC's LCD display and an external monitor. Zz Icon (F1): Places the Eee PC in the Notification area after activation. The default setting is WLAN ON / Bluetooth OFF. Sun Up Icon (F6): Increases the display brightness. Radio Tower (F2) (Wireless Models Only):Toggles the internal wireless LAN or Bluetooth (on -screen-display. Touchpad (F3): Toggles the touchpad ON/OFF. ASUS...
... key locations do not match the manual. LCD/Monitor Icons (F8): Toggles between the Eee PC's LCD display and an external monitor. Zz Icon (F1): Places the Eee PC in the Notification area after activation. The default setting is WLAN ON / Bluetooth OFF. Sun Up Icon (F6): Increases the display brightness. Radio Tower (F2) (Wireless Models Only):Toggles the internal wireless LAN or Bluetooth (on -screen-display. Touchpad (F3): Toggles the touchpad ON/OFF. ASUS...

User Manual
Page 26
... by the display panel! • Only use power adapters supplied with this Eee PC or specifically approved by the manufacturer or retailer for using your battery pack and the Eee PC with this adapter is depleted to power the Eee PC. The output voltage of this model or else damage may occur to the Eee PC. Install the battery pack 2. Connect the AC power adapter 1 3 2 3 2 1 3. Turn ON...
... by the display panel! • Only use power adapters supplied with this Eee PC or specifically approved by the manufacturer or retailer for using your battery pack and the Eee PC with this adapter is depleted to power the Eee PC. The output voltage of this model or else damage may occur to the Eee PC. Install the battery pack 2. Connect the AC power adapter 1 3 2 3 2 1 3. Turn ON...
User Manual
Page 27
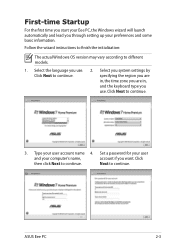
... you use . Follow the wizard instructions to finish the initialization: The actual Windows OS version may vary according to continue. ASUS Eee PC 2-3 Select you use . 2. Click then click Next to different models. 1. specifying the region you are in, the time zone you are in, and the keyboard type you system settings by Click Next to continue. Set a password for your user and your user account...
... you use . Follow the wizard instructions to finish the initialization: The actual Windows OS version may vary according to continue. ASUS Eee PC 2-3 Select you use . 2. Click then click Next to different models. 1. specifying the region you are in, the time zone you are in, and the keyboard type you system settings by Click Next to continue. Set a password for your user and your user account...
User Manual
Page 35
ASUS Update Bluetooth Connection (on selected models) Super Hybrid Engine Eee Docking Touch Tool Bar Boingo (on selected models) Touch Gate Mode Microsoft® Office Trial 3 Using the Eee PC
ASUS Update Bluetooth Connection (on selected models) Super Hybrid Engine Eee Docking Touch Tool Bar Boingo (on selected models) Touch Gate Mode Microsoft® Office Trial 3 Using the Eee PC
User Manual
Page 44
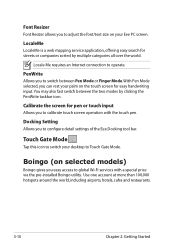
Calibrate the screen for pen or touch input Allows you to calibrate touch screen operation with a special price via the pre-installed Boingo utility. Boingo (on the touch screen for streets or companies sorted by clicking the PenWrite taskbar icon. PenWrite Allows you to configure detail settings of the Eee Docking tool bar. You may also fast switch between Pen Mode or Finger Mode. Docking Setting Allows you to switch between the two...
Calibrate the screen for pen or touch input Allows you to calibrate touch screen operation with a special price via the pre-installed Boingo utility. Boingo (on the touch screen for streets or companies sorted by clicking the PenWrite taskbar icon. PenWrite Allows you to configure detail settings of the Eee Docking tool bar. You may also fast switch between Pen Mode or Finger Mode. Docking Setting Allows you to switch between the two...

User Manual
Page 48
... is connected to finish the activation process before starting the free trial. Copy your product key and follow the onscreen instructions to the Internet and doubleclick Microsoft Office 60 Day Trial - If you want to select a desired application. 3-14 Chapter 3: Using the Eee PC Enter your product key and click the link. 5. Online on the desktop. 2. Do the following instructions to start and...
... is connected to finish the activation process before starting the free trial. Copy your product key and follow the onscreen instructions to the Internet and doubleclick Microsoft Office 60 Day Trial - If you want to select a desired application. 3-14 Chapter 3: Using the Eee PC Enter your product key and click the link. 5. Online on the desktop. 2. Do the following instructions to start and...
User Manual
Page 51
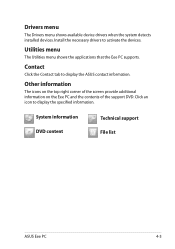
... Technical support File list ASUS Eee PC 4-3 Other information The icons on the top right corner of the screen provide additional information on the Eee PC and the contents of the support DVD. Contact Click the Contact tab to display the specified information. Utilities menu The Utilities menu shows the applications that the Eee PC supports. Install the necessary drivers to activate the devices. Drivers menu The Drivers menu shows available device drivers...
... Technical support File list ASUS Eee PC 4-3 Other information The icons on the top right corner of the screen provide additional information on the Eee PC and the contents of the support DVD. Contact Click the Contact tab to display the specified information. Utilities menu The Utilities menu shows the applications that the Eee PC supports. Install the necessary drivers to activate the devices. Drivers menu The Drivers menu shows available device drivers...
User Manual
Page 52
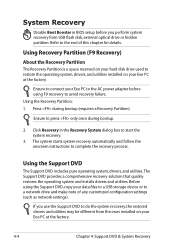
... BIOS setup before using the Support DVD, copy your Eee PC to the AC power adapter before you use the Support DVD to do the system recovery, the restored drivers and utilities may be different from USB flash disk, external optical drive or hidden partition. Using Recovery Partition (F9 Recovery) About the Recovery Partition The Recovery Partition is a space reserved on your hard disk drive used to restore the operating system, drivers, and utilities installed on your Eee PC at the factory. 4-4 Chapter 4: Support DVD & System Recovery Using...
... BIOS setup before using the Support DVD, copy your Eee PC to the AC power adapter before you use the Support DVD to do the system recovery, the restored drivers and utilities may be different from USB flash disk, external optical drive or hidden partition. Using Recovery Partition (F9 Recovery) About the Recovery Partition The Recovery Partition is a space reserved on your hard disk drive used to restore the operating system, drivers, and utilities installed on your Eee PC at the factory. 4-4 Chapter 4: Support DVD & System Recovery Using...
User Manual
Page 53
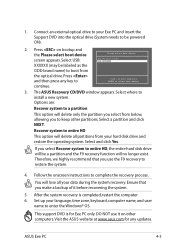
... key to ↑ and ↓ to move selection ENTER to enter the Windows® OS. Connect an external optical drive to your hard disk drive and restore the operating system. Select USB: XXXXXX (may be labeled as the Please select boot device: HDD:PM-ST9160310AS USB:XXXXXXXX ODD brand name) to be a partition and the F9 recovery function will delete all your language, time zone, keyboard, computer name, and user name to select boot device...
... key to ↑ and ↓ to move selection ENTER to enter the Windows® OS. Connect an external optical drive to your hard disk drive and restore the operating system. Select USB: XXXXXX (may be labeled as the Please select boot device: HDD:PM-ST9160310AS USB:XXXXXXXX ODD brand name) to be a partition and the F9 recovery function will delete all your language, time zone, keyboard, computer name, and user name to select boot device...
User Manual
Page 54
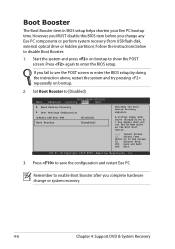
... POST screen or enter the BIOS setup by doing the instruction above, restart the system and try pressing repeatedly on bootup to enter the BIOS setup. Press to [Disabled] Main BIOS SETUP UTILITY Advanced Security Boot Exit Boot Device Priority Boot Settings Configuration OnBoard LAN Boot ROM [Disabled] Boot Booster [Disabled] Specifies the Boot Device Priority sequence. However, you MUST disable this BIOS item before you complete hardware change any Eee PC components or perform system recovery (from USB flash disk, external optical drive or...
... POST screen or enter the BIOS setup by doing the instruction above, restart the system and try pressing repeatedly on bootup to enter the BIOS setup. Press to [Disabled] Main BIOS SETUP UTILITY Advanced Security Boot Exit Boot Device Priority Boot Settings Configuration OnBoard LAN Boot ROM [Disabled] Boot Booster [Disabled] Specifies the Boot Device Priority sequence. However, you MUST disable this BIOS item before you complete hardware change any Eee PC components or perform system recovery (from USB flash disk, external optical drive or...

User Manual
Page 56
...Rules Part 15. These limits are cautioned that may not cause harmful interference, and • This device must accept any interference received, including interference that changes or modifications not expressly approved by the party responsible for help. Use only shielded cables to connect I/O devices ...• This device may cause undesired operation. It is essential that only the supplied power cord be determined by turning the equipment off and on, the user is encouraged to try to which can be used in a residential installation.This equipment generates, uses, and can ...
...Rules Part 15. These limits are cautioned that may not cause harmful interference, and • This device must accept any interference received, including interference that changes or modifications not expressly approved by the party responsible for help. Use only shielded cables to connect I/O devices ...• This device may cause undesired operation. It is essential that only the supplied power cord be determined by turning the equipment off and on, the user is encouraged to try to which can be used in a residential installation.This equipment generates, uses, and can ...


