
Motherboard DIY Troubleshooting Guide
Page 26
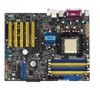
... port 3. Gigabit LAN port (RJ-45) 5. S/PDIF out jack 11. PS/2 mouse port 2. USB device wake-up (3-pin USBPWR12, USBPWR34 Rear Panel Connectors 1. Clear RTC RAM (3-pin CLRTC1) 2. USB 2.0 ports 3 and 4 8. Line In jack 5. USB 2.0 ports 1 and 2 9. 2.2.4 Layout Contents Slots 1. PS/2 keyboard port p. 2-17 p. 2-17 p. 2-18 p. 2-11 p. 2-19 p. 2-20 p. 2-20 p. 2-21...
... port 3. Gigabit LAN port (RJ-45) 5. S/PDIF out jack 11. PS/2 mouse port 2. USB device wake-up (3-pin USBPWR12, USBPWR34 Rear Panel Connectors 1. Clear RTC RAM (3-pin CLRTC1) 2. USB 2.0 ports 3 and 4 8. Line In jack 5. USB 2.0 ports 1 and 2 9. 2.2.4 Layout Contents Slots 1. PS/2 keyboard port p. 2-17 p. 2-17 p. 2-18 p. 2-11 p. 2-19 p. 2-20 p. 2-20 p. 2-21...
Motherboard DIY Troubleshooting Guide
Page 41
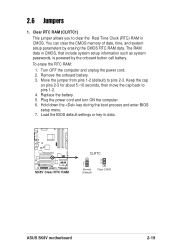
... setup menu. 7. Move the jumper from pins 1-2 (default) to pins 1-2. 4. Clear RTC RAM (CLRTC1) This jumper allows you to clear the Real Time Clock (RTC) RAM in data. ® SK8V SK8V Clear RTC RAM CLRTC 2 1 Normal (Default) 3 2 Clear CMOS ASUS SK8V motherboard 2-19 The RAM data in CMOS, that include system setup information such as system passwords, is...
... setup menu. 7. Move the jumper from pins 1-2 (default) to pins 1-2. 4. Clear RTC RAM (CLRTC1) This jumper allows you to clear the Real Time Clock (RTC) RAM in data. ® SK8V SK8V Clear RTC RAM CLRTC 2 1 Normal (Default) 3 2 Clear CMOS ASUS SK8V motherboard 2-19 The RAM data in CMOS, that include system setup information such as system passwords, is...

Motherboard DIY Troubleshooting Guide
Page 85
...] The following items appear only when the DRAM ECC Enable item is set to [Enabled]. ASUS SK8V motherboard 4-19 Configuration options: [Disabled] [Enabled] L2 Cache BG Scrub [Disabled] This item disables or sets the L2 data cache RAM to [Enabled]. Change Option F1 General Help F10 Save and Exit ESC Exit Master ECC...] [1.31ms] [2.62ms] [5.24ms] [10.49ms] [20.97ms] [42.00ms] [84.00ms] Data Cache BG Scrub [Disabled] This item disables or sets the L1 data cache RAM to maintain system integrity.
...] The following items appear only when the DRAM ECC Enable item is set to [Enabled]. ASUS SK8V motherboard 4-19 Configuration options: [Disabled] [Enabled] L2 Cache BG Scrub [Disabled] This item disables or sets the L2 data cache RAM to [Enabled]. Change Option F1 General Help F10 Save and Exit ESC Exit Master ECC...] [1.31ms] [2.62ms] [5.24ms] [10.49ms] [20.97ms] [42.00ms] [84.00ms] Data Cache BG Scrub [Disabled] This item disables or sets the L1 data cache RAM to maintain system integrity.

Motherboard DIY Troubleshooting Guide
Page 104
again to erase the RTC RAM. 4-38 Chapter 4: BIOS Setup After you have at least six characters. 3. Your password should have set or change the supervisor password. To clear the supervisor ... the configuration options. Select Screen Select Item +- To set your BIOS password, you can clear clear it by erasing the CMOS Real Time Clock (RTC) RAM. On the password box that appears, type a password composed of the screen shows the default Not Installed. The message "Password Uninstalled" appears. Change Option F1...
again to erase the RTC RAM. 4-38 Chapter 4: BIOS Setup After you have at least six characters. 3. Your password should have set or change the supervisor password. To clear the supervisor ... the configuration options. Select Screen Select Item +- To set your BIOS password, you can clear clear it by erasing the CMOS Real Time Clock (RTC) RAM. On the password box that appears, type a password composed of the screen shows the default Not Installed. The message "Password Uninstalled" appears. Change Option F1...

Motherboard DIY Troubleshooting Guide
Page 107
... one of the options from this menu or from the Exit menu to ensure the values you selected are finished making your changes before exiting. ASUS SK8V motherboard 4-41 F10 key can be used for a confirmation before exiting. When you select this option, a confirmation window appears. Select [Yes] to exit. ...Exit & Save Changes Once you are saved to the CMOS RAM. The CMOS RAM is sustained by an onboard backup battery and stays on even when the PC is turned off. Select Screen Select Item Enter Go to...
... one of the options from this menu or from the Exit menu to ensure the values you selected are finished making your changes before exiting. ASUS SK8V motherboard 4-41 F10 key can be used for a confirmation before exiting. When you select this option, a confirmation window appears. Select [Yes] to exit. ...Exit & Save Changes Once you are saved to the CMOS RAM. The CMOS RAM is sustained by an onboard backup battery and stays on even when the PC is turned off. Select Screen Select Item Enter Go to...

Motherboard DIY Troubleshooting Guide
Page 108
... load default values. Select [Yes] to discard any changes and load the previously saved values. Discard Changes This option allows you to the non-volatile RAM. 4-42 Chapter 4: BIOS Setup After selecting this option or if you made and restore the previously saved values. Select Exit Saving Changes or make other...
... load default values. Select [Yes] to discard any changes and load the previously saved values. Discard Changes This option allows you to the non-volatile RAM. 4-42 Chapter 4: BIOS Setup After selecting this option or if you made and restore the previously saved values. Select Exit Saving Changes or make other...

SK8V User Manual
Page 26
... p. 2-19 p. 2-20 p. 2-20 p. 2-22 p. 2-22 p. 2-23 p. 2-23 p. 2-24 p. 2-25 p. 2-25 p. 2-25 p. 2-25 p. 2-26 p. 2-26 p. 2-27 p. 2-28 p. 2-28 p. 2-28 p. 2-29 p. 2-29 2-4 Chapter 2: Hardware information Clear RTC RAM (3-pin CLRTC1) 2. 2.2.4 Layout Contents Slots 1. Floppy disk connector (34-1 pin FLOPPY) 4. Internal Audio CD connector (4-pin CD) 14. PCI slots 2. AGP slot 3. Internal Audio AUX...
... p. 2-19 p. 2-20 p. 2-20 p. 2-22 p. 2-22 p. 2-23 p. 2-23 p. 2-24 p. 2-25 p. 2-25 p. 2-25 p. 2-25 p. 2-26 p. 2-26 p. 2-27 p. 2-28 p. 2-28 p. 2-28 p. 2-29 p. 2-29 2-4 Chapter 2: Hardware information Clear RTC RAM (3-pin CLRTC1) 2. 2.2.4 Layout Contents Slots 1. Floppy disk connector (34-1 pin FLOPPY) 4. Internal Audio CD connector (4-pin CD) 14. PCI slots 2. AGP slot 3. Internal Audio AUX...

SK8V User Manual
Page 41
... onboard battery. 3. Move the jumper from pins 1-2 (default) to pins 1-2. 4. The RAM data in CMOS. Clear RTC RAM (CLRTC1) This jumper allows you to re-enter data. ® SK8V SK8V Clear RTC RAM CLRTC 2 1 Normal (Default) 3 2 Clear CMOS ASUS SK8V motherboard 2-19 To erase the RTC RAM: 1. Replace the battery. 5. Hold down the key during the boot process...
... onboard battery. 3. Move the jumper from pins 1-2 (default) to pins 1-2. 4. The RAM data in CMOS. Clear RTC RAM (CLRTC1) This jumper allows you to re-enter data. ® SK8V SK8V Clear RTC RAM CLRTC 2 1 Normal (Default) 3 2 Clear CMOS ASUS SK8V motherboard 2-19 To erase the RTC RAM: 1. Replace the battery. 5. Hold down the key during the boot process...

SK8V User Manual
Page 71
... CMOS RAM of your computer in this program. The default BIOS settings for this last option only if the first two failed. Select the Load Default Settings item under the Exit Menu. The BIOS setup screens shown in the future. Visit the ASUS website (www.asus.com) to enter the Setup utility. ASUS SK8V motherboard...
... CMOS RAM of your computer in this program. The default BIOS settings for this last option only if the first two failed. Select the Load Default Settings item under the Exit Menu. The BIOS setup screens shown in the future. Visit the ASUS website (www.asus.com) to enter the Setup utility. ASUS SK8V motherboard...

SK8V User Manual
Page 81
... correction. Configuration options: [Disabled] [Enabled] L2 Cache BG Scrub [Disabled] This item disables or sets the L2 data cache RAM to be corrected when idle. Configuration options: [Disabled] [Enabled] The following items appear only when the DRAM ECC Enable item ...] [10.49ms] [20.97ms] [42.00ms] [84.00ms] Data Cache BG Scrub [Disabled] This item disables or sets the L1 data cache RAM to [Enabled]. ASUS SK8V motherboard 4-19 ECC Configuration ECC Configuration Master ECC Enable [Disabled] Select Screen Select Item +- Configuration options: [Disabled] [40ns] [80ns] [160ns] [...
... correction. Configuration options: [Disabled] [Enabled] L2 Cache BG Scrub [Disabled] This item disables or sets the L2 data cache RAM to be corrected when idle. Configuration options: [Disabled] [Enabled] The following items appear only when the DRAM ECC Enable item ...] [10.49ms] [20.97ms] [42.00ms] [84.00ms] Data Cache BG Scrub [Disabled] This item disables or sets the L1 data cache RAM to [Enabled]. ASUS SK8V motherboard 4-19 ECC Configuration ECC Configuration Master ECC Enable [Disabled] Select Screen Select Item +- Configuration options: [Disabled] [40ns] [80ns] [160ns] [...

SK8V User Manual
Page 100
...set or change password. Your password should have set your BIOS password, you can clear clear it by erasing the CMOS Real Time Clock (RTC) RAM. If you forget your password. See section "2.7 Jumpers" for information on top of letters and/or numbers, then press Enter. On the password... supervisor password, follow the same steps as in setting a user password. 4.6.4 Security The Security menu items allow you to erase the RTC RAM. 4-38 Chapter 4: BIOS Setup The Supervisor Password item now shows Installed. Select the Change Supervisor Password item and press Enter. 2.
...set or change password. Your password should have set your BIOS password, you can clear clear it by erasing the CMOS Real Time Clock (RTC) RAM. If you forget your password. See section "2.7 Jumpers" for information on top of letters and/or numbers, then press Enter. On the password... supervisor password, follow the same steps as in setting a user password. 4.6.4 Security The Security menu items allow you to erase the RTC RAM. 4-38 Chapter 4: BIOS Setup The Supervisor Password item now shows Installed. Select the Change Supervisor Password item and press Enter. 2.

SK8V User Manual
Page 103
... changes while exiting. Exit & Discard Changes Select this option, a confirmation window appears. If you made to the CMOS RAM. Select Screen Select Item Enter Go to Sub-screen F1 General Help F10 Save and Exit ESC Exit Pressing does not ...] to fields other than system date, system time, and password, the BIOS asks for a confirmation before exiting. The CMOS RAM is sustained by an onboard backup battery and stays on even when the PC is turned off. 4.7 Exit menu The Exit ... and exit. F10 key can be used for this menu or from this operation. ASUS SK8V motherboard 4-41
... changes while exiting. Exit & Discard Changes Select this option, a confirmation window appears. If you made to the CMOS RAM. Select Screen Select Item Enter Go to Sub-screen F1 General Help F10 Save and Exit ESC Exit Pressing does not ...] to fields other than system date, system time, and password, the BIOS asks for a confirmation before exiting. The CMOS RAM is sustained by an onboard backup battery and stays on even when the PC is turned off. 4.7 Exit menu The Exit ... and exit. F10 key can be used for this menu or from this operation. ASUS SK8V motherboard 4-41

SK8V User Manual
Page 104
... option, a confirmation appears. Select [Yes] to load default values. Select Exit Saving Changes or make other changes before saving the values to the non-volatile RAM. 4-42 Chapter 4: BIOS Setup Discard Changes This option allows you to discard the selections you to load the default values for each of the parameters...
... option, a confirmation appears. Select [Yes] to load default values. Select Exit Saving Changes or make other changes before saving the values to the non-volatile RAM. 4-42 Chapter 4: BIOS Setup Discard Changes This option allows you to discard the selections you to load the default values for each of the parameters...


