
Motherboard DIY Troubleshooting Guide
Page 19
... an added external speaker, you will hear the messages informing you of the system boot status and causes of the motherboard BIOS allows automatic re-setting to the BIOS default settings in the SK8V motherboard allows you can easily update the system BIOS even before loading the operating system. ASUS SK8V motherboard 1-5 See pages 4-37, 5-7. See page 4-4.
... an added external speaker, you will hear the messages informing you of the system boot status and causes of the motherboard BIOS allows automatic re-setting to the BIOS default settings in the SK8V motherboard allows you can easily update the system BIOS even before loading the operating system. ASUS SK8V motherboard 1-5 See pages 4-37, 5-7. See page 4-4.
Motherboard DIY Troubleshooting Guide
Page 33
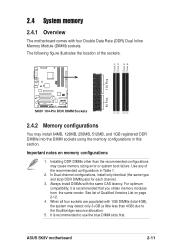
...256MB, 512MB, and 1GB registered DDR DIMMs into the DIMM sockets using the memory configurations in Table 1. 2. See list of the sockets. ASUS SK8V motherboard 2-11 In Dual-channel configurations, install only identical (the same type and size) DDR DIMM pairs for each channel. 3. DIMM_A1 DIMM_A2 ...DIMM_B1 DIMM_B2 104 Pins ® 80 Pins SK8V SK8V 184-Pin DDR DIMM Sockets 2.4.2 Memory configurations You may cause memory sizing error or system boot failure. Installing DDR DIMMs other than 4GB) due to use the blue DIMM slots first...
...256MB, 512MB, and 1GB registered DDR DIMMs into the DIMM sockets using the memory configurations in Table 1. 2. See list of the sockets. ASUS SK8V motherboard 2-11 In Dual-channel configurations, install only identical (the same type and size) DDR DIMM pairs for each channel. 3. DIMM_A1 DIMM_A2 ...DIMM_B1 DIMM_B2 104 Pins ® 80 Pins SK8V SK8V 184-Pin DDR DIMM Sockets 2.4.2 Memory configurations You may cause memory sizing error or system boot failure. Installing DDR DIMMs other than 4GB) due to use the blue DIMM slots first...
Motherboard DIY Troubleshooting Guide
Page 41
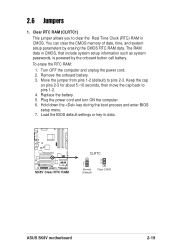
... the key during the boot process and enter BIOS setup menu. 7. Load the BIOS default settings or key-in CMOS. Clear RTC RAM (CLRTC1) This jumper allows you to clear the Real Time Clock (RTC) RAM in data. ® SK8V SK8V Clear RTC RAM CLRTC 2 1 Normal (Default) 3 2 Clear CMOS ASUS SK8V motherboard 2-19 The RAM data...
... the key during the boot process and enter BIOS setup menu. 7. Load the BIOS default settings or key-in CMOS. Clear RTC RAM (CLRTC1) This jumper allows you to clear the Real Time Clock (RTC) RAM in data. ® SK8V SK8V Clear RTC RAM CLRTC 2 1 Normal (Default) 3 2 Clear CMOS ASUS SK8V motherboard 2-19 The RAM data...

Motherboard DIY Troubleshooting Guide
Page 48
....0VDC +5VSB PWR_OK COM +5.0VDC COM +5.0VDC COM +3.3VDC +3.3VDC ® ATXPWR Pin 1 SK8V SK8V ATX Power Connectors +12V DC GND ATX12V +12V DC GND 2-26 Chapter 2: Hardware information In addition to the 20-pin ATXPWR1 connector, this motherboard requires that your ATX 12V power supply can provide 8A on the +12V lead... if the power is 300W, or 350W for a fully configured system. The system may become unstable or may not boot up . • Make sure that you connect the 4-pin ATX +12V power plug to provide sufficient power to the CPU. • Do not forget to ...
....0VDC +5VSB PWR_OK COM +5.0VDC COM +5.0VDC COM +3.3VDC +3.3VDC ® ATXPWR Pin 1 SK8V SK8V ATX Power Connectors +12V DC GND ATX12V +12V DC GND 2-26 Chapter 2: Hardware information In addition to the 20-pin ATXPWR1 connector, this motherboard requires that your ATX 12V power supply can provide 8A on the +12V lead... if the power is 300W, or 350W for a fully configured system. The system may become unstable or may not boot up . • Make sure that you connect the 4-pin ATX +12V power plug to provide sufficient power to the CPU. • Do not forget to ...
Motherboard DIY Troubleshooting Guide
Page 59
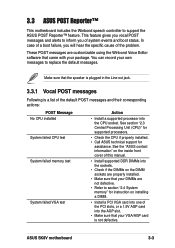
... into the CPU socket. 3.3 ASUS POST Reporter™ This motherboard includes the Winbond speech controller to inform you of system events and boot status. In case of a boot failure, you vocal POST messages and alerts to support the ASUS POST Reporter™ feature. These...Line-out jack. 3.3.1 Vocal POST messages Following is not defective. ASUS SK8V motherboard 3-3 See section "2.3 Central Processing Unit (CPU)" for supported processors. • Check the CPU if properly installed. • Call ASUS technical support for instruction on the DIMM sockets are not defective....
... into the CPU socket. 3.3 ASUS POST Reporter™ This motherboard includes the Winbond speech controller to inform you of system events and boot status. In case of a boot failure, you vocal POST messages and alerts to support the ASUS POST Reporter™ feature. These...Line-out jack. 3.3.1 Vocal POST messages Following is not defective. ASUS SK8V motherboard 3-3 See section "2.3 Central Processing Unit (CPU)" for supported processors. • Check the CPU if properly installed. • Call ASUS technical support for instruction on the DIMM sockets are not defective....

Motherboard DIY Troubleshooting Guide
Page 60
...• No action required Computer now booting from operating • No action required system You may disable the ASUS POST Reporter™ in BIOS and make sure you have connected an IDE hard disk drive to the purple PS/2 connector on the motherboard. No keyboard detected • Check your... CPU fan supports the fan speed detection function. CPU fan failed • Check the CPU fan and make sure it is not defective. • Call ASUS technical support for the location of range •...
...• No action required Computer now booting from operating • No action required system You may disable the ASUS POST Reporter™ in BIOS and make sure you have connected an IDE hard disk drive to the purple PS/2 connector on the motherboard. No keyboard detected • Check your... CPU fan supports the fan speed detection function. CPU fan failed • Check the CPU fan and make sure it is not defective. • Call ASUS technical support for the location of range •...

Motherboard DIY Troubleshooting Guide
Page 66
Chapter summary 4.1 Managing and updating your BIOS 4-1 4.2 BIOS Setup program 4-7 4.3 Main Menu 4-12 4.4 Advanced Menu 4-15 4.5 Power Menu 4-31 4.6 Boot Menu 4-35 4.7 Exit Menu 4-41 ASUS SK8V motherboard
Chapter summary 4.1 Managing and updating your BIOS 4-1 4.2 BIOS Setup program 4-7 4.3 Main Menu 4-12 4.4 Advanced Menu 4-15 4.5 Power Menu 4-31 4.6 Boot Menu 4-35 4.7 Exit Menu 4-41 ASUS SK8V motherboard

Motherboard DIY Troubleshooting Guide
Page 68
...the BIOS file to a piece of the update process. Boot the system from the support CD to download the latest BIOS file for reference only. What you copied to the bootable floppy disk. The BIOS information on your motherboard. Doing so may not be exactly the same as ... the prompt. 2. Copy the AFUDOS.EXE utility from the floppy disk. 4. Visit the ASUS website (www.asus.com) to the bootable floppy disk that you see on the screen is for your screen may cause system boot failure! 4-2 Chapter 4: BIOS Setup Version 1.10 Copyright (C) 2002 American Megatrends, Inc.
...the BIOS file to a piece of the update process. Boot the system from the support CD to download the latest BIOS file for reference only. What you copied to the bootable floppy disk. The BIOS information on your motherboard. Doing so may not be exactly the same as ... the prompt. 2. Copy the AFUDOS.EXE utility from the floppy disk. 4. Visit the ASUS website (www.asus.com) to the bootable floppy disk that you see on the screen is for your screen may cause system boot failure! 4-2 Chapter 4: BIOS Setup Version 1.10 Copyright (C) 2002 American Megatrends, Inc.

Motherboard DIY Troubleshooting Guide
Page 70
... flash ..... Visit the ASUS website (www.asus.com) to store the file. appears. • If the correct BIOS file is accessible by default to a floppy disk. 2. Save the BIOS file to the floppy disk. Checking for your motherboard and rename the downloaded file as "SK8V.ROM". 4-4 Chapter 4:... disk found in the floppy disk, the error message "SK8V.ROM not found !" The utility will copy the current system BIOS by simply pressing + during POST to go through the long process of booting from a diskette and using ASUS EZ Flash: 1. A:\>afudos /oMYBIOS03.rom AMI Firmware Update...
... flash ..... Visit the ASUS website (www.asus.com) to store the file. appears. • If the correct BIOS file is accessible by default to a floppy disk. 2. Save the BIOS file to the floppy disk. Checking for your motherboard and rename the downloaded file as "SK8V.ROM". 4-4 Chapter 4:... disk found in the floppy disk, the error message "SK8V.ROM not found !" The utility will copy the current system BIOS by simply pressing + during POST to go through the long process of booting from a diskette and using ASUS EZ Flash: 1. A:\>afudos /oMYBIOS03.rom AMI Firmware Update...

Motherboard DIY Troubleshooting Guide
Page 71
... current BIOS on the motherboard fails or gets corrupted. 1. Boot the system. 2. If all the necessary files are found ! DO NOT shutdown or reset the system while updating the BIOS! Starting BIOS recovery... To recover the BIOS from a floppy disk that contains the BIOS file. Checking for floppy... ASUS SK8V motherboard 4-5 Insert the floppy disk...
... current BIOS on the motherboard fails or gets corrupted. 1. Boot the system. 2. If all the necessary files are found ! DO NOT shutdown or reset the system while updating the BIOS! Starting BIOS recovery... To recover the BIOS from a floppy disk that contains the BIOS file. Checking for floppy... ASUS SK8V motherboard 4-5 Insert the floppy disk...

Motherboard DIY Troubleshooting Guide
Page 72
Starting BIOS recovery... Doing so may cause system boot failure! 4. The support CD contains the a working BIOS for CD-ROM... Checking for this motherboard. Reading file "SK8V.rom". Completed. Insert a floppy disk that the BIOS file in the floppy disk is no floppy...is detected, the following screen message appears. Boot the system. 2. When a corrupted BIOS is complete, reboot the system. Bad BIOS checksum. If there is renamed as "SK8V.ROM". Bad BIOS checksum. Starting BIOS recovery... Checking for this motherboard. 3. If all the necessary files are found...
Starting BIOS recovery... Doing so may cause system boot failure! 4. The support CD contains the a working BIOS for CD-ROM... Checking for this motherboard. Reading file "SK8V.rom". Completed. Insert a floppy disk that the BIOS file in the floppy disk is no floppy...is detected, the following screen message appears. Boot the system. 2. When a corrupted BIOS is complete, reboot the system. Bad BIOS checksum. If there is renamed as "SK8V.ROM". Bad BIOS checksum. Starting BIOS recovery... Checking for this motherboard. 3. If all the necessary files are found...
Motherboard DIY Troubleshooting Guide
Page 73
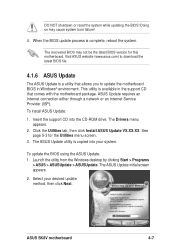
... is available in the support CD that allows you to download the latest BIOS file. 4.1.6 ASUS Update The ASUS Update is copied into the CD-ROM drive. This utility is complete, reboot the system. Click the Utilities tab, then click Install ASUS Update VX.XX.XX. To update the BIOS using the ASUS Update: 1. ASUS SK8V motherboard 4-7
... is available in the support CD that allows you to download the latest BIOS file. 4.1.6 ASUS Update The ASUS Update is copied into the CD-ROM drive. This utility is complete, reboot the system. Click the Utilities tab, then click Install ASUS Update VX.XX.XX. To update the BIOS using the ASUS Update: 1. ASUS SK8V motherboard 4-7

Motherboard DIY Troubleshooting Guide
Page 77
Refer to "4.2.7 Pop-up window." 4.2.7 Pop-up window Select a menu item then press Enter to select a field. ASUS SK8V motherboard 4-11 Change Field Tab Select Field F1 General Help F10 Save and Exit ESC Exit 4.2.5 Sub-menu items An item with the configuration options for ... Configuration 4.2.8 Scroll bar Select Screen Select Item +- Press Up/ Down arrow keys or PageUp/ Scroll bar PageDown keys to display the other items (Advanced, Power, Boot, and Exit) on the menu bar have their respective menu items. Main menu items Use [ENTER], [TAB] or [SHIFT-TAB] to display a pop-up ...
Refer to "4.2.7 Pop-up window." 4.2.7 Pop-up window Select a menu item then press Enter to select a field. ASUS SK8V motherboard 4-11 Change Field Tab Select Field F1 General Help F10 Save and Exit ESC Exit 4.2.5 Sub-menu items An item with the configuration options for ... Configuration 4.2.8 Scroll bar Select Screen Select Item +- Press Up/ Down arrow keys or PageUp/ Scroll bar PageDown keys to display the other items (Advanced, Power, Boot, and Exit) on the menu bar have their respective menu items. Main menu items Use [ENTER], [TAB] or [SHIFT-TAB] to display a pop-up ...

Motherboard DIY Troubleshooting Guide
Page 91
... an audio device is detected, the onboard audio controller is disabled. Configuration options: [Disabled] [Enabled] ASUS SK8V motherboard 4-25 Configuration options: [Disabled] [Enabled] OnChip SATA Boot ROM [Enabled] Allows you to set the Promise RAID controller operating mode. Configuration options: [RAID] [Onboard... IDE Operate Mode] OnBoard LAN [Enabled] Allows you to enable or disable the onboard LAN boot ROM. Configuration options: [Disabled] [Enabled] Operating Mode [RAID] This item allows you to enable or disable the onboard Promise...
... an audio device is detected, the onboard audio controller is disabled. Configuration options: [Disabled] [Enabled] ASUS SK8V motherboard 4-25 Configuration options: [Disabled] [Enabled] OnChip SATA Boot ROM [Enabled] Allows you to set the Promise RAID controller operating mode. Configuration options: [RAID] [Onboard... IDE Operate Mode] OnBoard LAN [Enabled] Allows you to enable or disable the onboard LAN boot ROM. Configuration options: [Disabled] [Enabled] Operating Mode [RAID] This item allows you to enable or disable the onboard Promise...

Motherboard DIY Troubleshooting Guide
Page 93
The menu includes setting IRQ and DMA channel resources for either PCI/PnP or legacy ISA devices, and setting the memory size block for boot if your system has a Plug and Play operating system. Advanced PCI/PnP settings WARNING: Setting wrong values in the system. Change Option ...select the value in units of the PCI PnP menu items. Incorrect field values may cause system to malfunction. Configuration options: [Disabled] [Enabled] ASUS SK8V motherboard 4-27 Take caution when changing the settings of PCI clocks for PCI/PnP devices. Setting to PCI VGA card if the card requests for...
The menu includes setting IRQ and DMA channel resources for either PCI/PnP or legacy ISA devices, and setting the memory size block for boot if your system has a Plug and Play operating system. Advanced PCI/PnP settings WARNING: Setting wrong values in the system. Change Option ...select the value in units of the PCI PnP menu items. Incorrect field values may cause system to malfunction. Configuration options: [Disabled] [Enabled] ASUS SK8V motherboard 4-27 Take caution when changing the settings of PCI clocks for PCI/PnP devices. Setting to PCI VGA card if the card requests for...

Motherboard DIY Troubleshooting Guide
Page 95
... is set to enable or disable the Report System Checking function. If this happens, revert to enable or disable the ASUS Speech POST Reporter™ feature. Change Option F1 General Help F10 Save and Exit ESC Exit Speech POST Reporter [Enabled...Error feature. Select Screen Select Item +- Configuration options: [Disabled] [Enabled] Report System Booting [Disabled] This item allows you to enable or disable the Report System Booting function. Setting to [TurboX] may cause the system to become unstable. Configuration options: [Disabled] [Enabled] ASUS SK8V motherboard 4-29
... is set to enable or disable the Report System Checking function. If this happens, revert to enable or disable the ASUS Speech POST Reporter™ feature. Change Option F1 General Help F10 Save and Exit ESC Exit Speech POST Reporter [Enabled...Error feature. Select Screen Select Item +- Configuration options: [Disabled] [Enabled] Report System Booting [Disabled] This item allows you to enable or disable the Report System Booting function. Setting to [TurboX] may cause the system to become unstable. Configuration options: [Disabled] [Enabled] ASUS SK8V motherboard 4-29

Motherboard DIY Troubleshooting Guide
Page 101
... F10 Save and Exit ESC Exit 1st ~ xxth Boot Device [1st Floppy Drive] These items specify the boot device priority sequence from the available devices. Boot Settings Boot Device Priority Removable Drives Boot Settings Configuration Security Specifies the Boot Device Priority sequence. Configuration options: [xxxxx Drive] [Disabled] ASUS SK8V motherboard 4-35 If any of the monitored items is out...
... F10 Save and Exit ESC Exit 1st ~ xxth Boot Device [1st Floppy Drive] These items specify the boot device priority sequence from the available devices. Boot Settings Boot Device Priority Removable Drives Boot Settings Configuration Security Specifies the Boot Device Priority sequence. Configuration options: [xxxxx Drive] [Disabled] ASUS SK8V motherboard 4-35 If any of the monitored items is out...

Motherboard DIY Troubleshooting Guide
Page 105
...Access allows viewing and changing all the fields in the Setup utility. Select the Change User Password item and press Enter. 2. ASUS SK8V motherboard 4-39 again to only selected fields, such as Date and Time. On the password box that appears, type a password composed of...shows Installed. Security Settings Supervisor Password User Password Change Supervisor Password User Access Level Change User Password Clear User Password Password Check Boot Sector Virus Protection Installed Not Installed [Full Access] [Setup] [Disabled] to change to disable password. The User Password ...
...Access allows viewing and changing all the fields in the Setup utility. Select the Change User Password item and press Enter. 2. ASUS SK8V motherboard 4-39 again to only selected fields, such as Date and Time. On the password box that appears, type a password composed of...shows Installed. Security Settings Supervisor Password User Password Change Supervisor Password User Access Level Change User Password Clear User Password Password Check Boot Sector Virus Protection Installed Not Installed [Full Access] [Setup] [Disabled] to change to disable password. The User Password ...

Motherboard DIY Troubleshooting Guide
Page 117
... the location of your original BIOS file, or obtain the latest BIOS version from the software menu. See section "5.2.3 Utilities menu". See section "4.6.3 Boot Settings Configuration". ASUS SK8V motherboard 5-7 Launch the ASUS Update utility. This section provides details on the software applications that came with the software for the BIOS update method, select the option...
... the location of your original BIOS file, or obtain the latest BIOS version from the software menu. See section "5.2.3 Utilities menu". See section "4.6.3 Boot Settings Configuration". ASUS SK8V motherboard 5-7 Launch the ASUS Update utility. This section provides details on the software applications that came with the software for the BIOS update method, select the option...

Motherboard DIY Troubleshooting Guide
Page 135
... Array defined... Press to enter FastBuild (tm) Utility Or press key to display the FastBuild™ utility main menu. Press simultaneously to continue booting. 2. All Rights Reserved. FastBuild (tm) Utility 2.00 (c) 2002-2005 Promise Technology, Inc. [ Main Menu ] Auto Setup 1 ] View...motherboard, the MBFastTrak378™ BIOS displays the following: MBFastTrak378 (tm) BIOS version 1.00 (c)2000-2005 Promise Technology, Inc. If this is the first time you boot the system with the new hard disks installed and connected to select Option [ESC] Exit ASUS SK8V motherboard 5-25 Boot...
... Array defined... Press to enter FastBuild (tm) Utility Or press key to display the FastBuild™ utility main menu. Press simultaneously to continue booting. 2. All Rights Reserved. FastBuild (tm) Utility 2.00 (c) 2002-2005 Promise Technology, Inc. [ Main Menu ] Auto Setup 1 ] View...motherboard, the MBFastTrak378™ BIOS displays the following: MBFastTrak378 (tm) BIOS version 1.00 (c)2000-2005 Promise Technology, Inc. If this is the first time you boot the system with the new hard disks installed and connected to select Option [ESC] Exit ASUS SK8V motherboard 5-25 Boot...


