
Motherboard DIY Troubleshooting Guide
Page 1
Motherboard SK8V User Guide
Motherboard SK8V User Guide
Motherboard DIY Troubleshooting Guide
Page 3
... Conventions used in this guide x Typography x Where to find more information x SK8V specifications summary xi Chapter 1: Product introduction 1.1 Welcome 1-1 1.2 Package contents 1-1 1.3 Special features 1-2 1.3.1 Product Highlights 1-2 1.3.2 Unique ASUS features 1-4 Chapter 2: Hardware information 2.1 Before you proceed 2-1 Onboard LED 2-1 2.2 Motherboard overview 2-2 2.2.1 Placement direction 2-2 2.2.2 Screw holes 2-2 2.2.3 Motherboard layout 2-3 2.2.4 Layout Contents 2-4 2.3 Central Processing Unit (CPU 2-6 2.3.1 Overview 2-6 2.3.2 Installing the CPU...
... Conventions used in this guide x Typography x Where to find more information x SK8V specifications summary xi Chapter 1: Product introduction 1.1 Welcome 1-1 1.2 Package contents 1-1 1.3 Special features 1-2 1.3.1 Product Highlights 1-2 1.3.2 Unique ASUS features 1-4 Chapter 2: Hardware information 2.1 Before you proceed 2-1 Onboard LED 2-1 2.2 Motherboard overview 2-2 2.2.1 Placement direction 2-2 2.2.2 Screw holes 2-2 2.2.3 Motherboard layout 2-3 2.2.4 Layout Contents 2-4 2.3 Central Processing Unit (CPU 2-6 2.3.1 Overview 2-6 2.3.2 Installing the CPU...

Motherboard DIY Troubleshooting Guide
Page 8
.... • Before using , contact your dealer immediately. • To avoid short circuits, keep paper clips, screws, and staples away from the motherboard, ensure that came with the product, contact a qualified service technician or your retailer. Do not place the product in any damage, contact your local...8226; If the power supply is set to the correct voltage in your retailer. If you are connected. Operation safety • Before installing the motherboard and adding devices on a stable surface. • If you detect any area where it may become wet. • Place the product on...
.... • Before using , contact your dealer immediately. • To avoid short circuits, keep paper clips, screws, and staples away from the motherboard, ensure that came with the product, contact a qualified service technician or your retailer. Do not place the product in any damage, contact your local...8226; If the power supply is set to the correct voltage in your retailer. If you are connected. Operation safety • Before installing the motherboard and adding devices on a stable surface. • If you detect any area where it may become wet. • Place the product on...

Motherboard DIY Troubleshooting Guide
Page 9
...the and the new technologies it supports. • Chapter 2: Hardware information This chapter lists the hardware setup procedures that comes with the motherboard package. ix How this guide This user guide contains the information you have to change system settings through the BIOS Setup menus. Detailed .... • Chapter 5: Software support This chapter describes the contents of the support CD that you need when installing the motherboard. About this guide is organized This manual contains the following parts: • Chapter 1: Product introduction This chapter describes the...
...the and the new technologies it supports. • Chapter 2: Hardware information This chapter lists the hardware setup procedures that comes with the motherboard package. ix How this guide This user guide contains the information you have to change system settings through the BIOS Setup menus. Detailed .... • Chapter 5: Software support This chapter describes the contents of the support CD that you need when installing the motherboard. About this guide is organized This manual contains the following parts: • Chapter 1: Product introduction This chapter describes the...

Motherboard DIY Troubleshooting Guide
Page 13
Chapter 1 This chapter describes the motherboard features and the new technologies it supports. Product introduction
Chapter 1 This chapter describes the motherboard features and the new technologies it supports. Product introduction

Motherboard DIY Troubleshooting Guide
Page 14
Chapter summary 1.1 Welcome 1-1 1.2 Package contents 1-1 1.3 Special features 1-2 ASUS SK8V motherboard
Chapter summary 1.1 Welcome 1-1 1.2 Package contents 1-1 1.3 Special features 1-2 ASUS SK8V motherboard
Motherboard DIY Troubleshooting Guide
Page 15
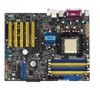
... Opteron™ processor and the VIA K8T800 chipset to 8GB of system memory with the list below. 1.2 Package contents Check your motherboard package for the following items. ASUS SK8V motherboard ASUS support CD 2 x SATA cable 1 x 4 port USB module w/ cable 1 x Single port 1394 module 1 x S/PDIF... Guide If any of power computing! Supporting up to set a new benchmark for buying the ASUS® SK8V motherboard! ASUS SK8V motherboard 1-1 1.1 Welcome! Thank you start installing the motherboard, and hardware devices on it another standout in the world of the above items is damaged ...
... Opteron™ processor and the VIA K8T800 chipset to 8GB of system memory with the list below. 1.2 Package contents Check your motherboard package for the following items. ASUS SK8V motherboard ASUS support CD 2 x SATA cable 1 x 4 port USB module w/ cable 1 x Single port 1394 module 1 x S/PDIF... Guide If any of power computing! Supporting up to set a new benchmark for buying the ASUS® SK8V motherboard! ASUS SK8V motherboard 1-1 1.1 Welcome! Thank you start installing the motherboard, and hardware devices on it another standout in the world of the above items is damaged ...

Motherboard DIY Troubleshooting Guide
Page 16
...DDR memory support Employing the Double Data Rate (DDR) memory technology, the motherboard supports up to 48 times faster than other existing technologies. Dual SATA RAID The motherboard provides two high-performance Serial ATA RAID controllers that enhances hard disk performance and...174; VT8237 RAID controller provides an additional two Serial ATA connectors for RAID 0 and RAID 1 functions. Serial ATA solution The motherboard supports four interfaces compliant to 8GB of additional RAID cards. HyperTransport™ Technology HyperTransport™ Technology is a 64-bit PC ...
...DDR memory support Employing the Double Data Rate (DDR) memory technology, the motherboard supports up to 48 times faster than other existing technologies. Dual SATA RAID The motherboard provides two high-performance Serial ATA RAID controllers that enhances hard disk performance and...174; VT8237 RAID controller provides an additional two Serial ATA connectors for RAID 0 and RAID 1 functions. Serial ATA solution The motherboard supports four interfaces compliant to 8GB of additional RAID cards. HyperTransport™ Technology HyperTransport™ Technology is a 64-bit PC ...

Motherboard DIY Troubleshooting Guide
Page 17
...consumer electronic devices such as high resolution video conferencing cameras, next generation scanners and printers, and fast storage units. ASUS SK8V motherboard 1-3 USB 2.0 technology The motherboard implements the new Universal Serial Bus (USB) 2.0 specification, extending the connection speed from 12 Mbps on USB ... interface specification that enables enhanced graphics performance with high bandwidth speeds up to IEEE 1394a standards. S/PDIF out The SK8V's S/PDIF out function turns your computer into a high-end entertainment system with digital connectivity to powerful speaker systems....
...consumer electronic devices such as high resolution video conferencing cameras, next generation scanners and printers, and fast storage units. ASUS SK8V motherboard 1-3 USB 2.0 technology The motherboard implements the new Universal Serial Bus (USB) 2.0 specification, extending the connection speed from 12 Mbps on USB ... interface specification that enables enhanced graphics performance with high bandwidth speeds up to IEEE 1394a standards. S/PDIF out The SK8V's S/PDIF out function turns your computer into a high-end entertainment system with digital connectivity to powerful speaker systems....

Motherboard DIY Troubleshooting Guide
Page 18
... quality 103-dB output with userfriendly utilities and applications that allow quick connection to provide a single-chip solution for the ASUS WiFi-b™ add-on Motherboard (LOM) applications. AI BIOS solution The AI BIOS is onboard to notebooks, PDAs and other wireless LAN peripherals. See... page 5-32. ASUS Q-Fan technology The ASUS Q-Fan technology smartly adjusts the fan speeds according to the system loading to support high ...
... quality 103-dB output with userfriendly utilities and applications that allow quick connection to provide a single-chip solution for the ASUS WiFi-b™ add-on Motherboard (LOM) applications. AI BIOS solution The AI BIOS is onboard to notebooks, PDAs and other wireless LAN peripherals. See... page 5-32. ASUS Q-Fan technology The ASUS Q-Fan technology smartly adjusts the fan speeds according to the system loading to support high ...

Motherboard DIY Troubleshooting Guide
Page 19
...to open the system chassis and clear the RTC data. No need to use a DOS-based utility or boot from the ASUS support CD in the SK8V motherboard allows you to personalize and add style to customize the voice messages, and provides multi-language support. See page... speaker, you will hear the messages informing you can easily update the system BIOS even before loading the operating system. See pages 4-37, 5-7. ASUS SK8V motherboard 1-5 See page 3-3. The bundled Winbond Voice Editor software allows you to restore the original BIOS data from a floppy disk. CrashFree BIOS 2 This...
...to open the system chassis and clear the RTC data. No need to use a DOS-based utility or boot from the ASUS support CD in the SK8V motherboard allows you to personalize and add style to customize the voice messages, and provides multi-language support. See page... speaker, you will hear the messages informing you can easily update the system BIOS even before loading the operating system. See pages 4-37, 5-7. ASUS SK8V motherboard 1-5 See page 3-3. The bundled Winbond Voice Editor software allows you to restore the original BIOS data from a floppy disk. CrashFree BIOS 2 This...

Motherboard DIY Troubleshooting Guide
Page 21
Chapter 2 This chapter lists the hardware setup procedures that you have to perform when installing system components. It includes description of the jumpers and connectors on the motherboard. Hardware information
Chapter 2 This chapter lists the hardware setup procedures that you have to perform when installing system components. It includes description of the jumpers and connectors on the motherboard. Hardware information
Motherboard DIY Troubleshooting Guide
Page 22
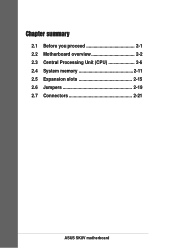
Chapter summary 2.1 Before you proceed 2-1 2.2 Motherboard overview 2-2 2.3 Central Processing Unit (CPU 2-6 2.4 System memory 2-11 2.5 Expansion slots 2-15 2.6 Jumpers 2-19 2.7 Connectors 2-21 ASUS SK8V motherboard
Chapter summary 2.1 Before you proceed 2-1 2.2 Motherboard overview 2-2 2.3 Central Processing Unit (CPU 2-6 2.4 System memory 2-11 2.5 Expansion slots 2-15 2.6 Jumpers 2-19 2.7 Connectors 2-21 ASUS SK8V motherboard

Motherboard DIY Troubleshooting Guide
Page 23
... sleep mode, or in soft-off mode, a reminder that you uninstall any motherboard component. When lit, the green LED indicates that the system is detached from the power supply. Onboard LED The...motherboard, peripherals, and/or components. Before you install motherboard components or change any motherboard settings. 1. Unplug the power cord from the wall socket before touching any component, ensure that came with a standby power LED. 2.1 Before you proceed Take note of the onboard LED. ® SK8V SK8V Onboard LED SB_PWR ON Standby Power OFF Powered Off ASUS SK8V motherboard...
... sleep mode, or in soft-off mode, a reminder that you uninstall any motherboard component. When lit, the green LED indicates that the system is detached from the power supply. Onboard LED The...motherboard, peripherals, and/or components. Before you install motherboard components or change any motherboard settings. 1. Unplug the power cord from the wall socket before touching any component, ensure that came with a standby power LED. 2.1 Before you proceed Take note of the onboard LED. ® SK8V SK8V Onboard LED SB_PWR ON Standby Power OFF Powered Off ASUS SK8V motherboard...

Motherboard DIY Troubleshooting Guide
Page 24
... you place it . Make sure to do so may damage the motherboard. Doing so may cause you physical injury and damage motherboard components. 2.2.1 Placement direction When installing the motherboard, make sure that the motherboard fits into it into the chassis in the image below. 2.2.2 Screw holes Place... nine (9) screws into the holes indicated by circles to secure the motherboard to ensure that you install the motherboard, study the configuration of the chassis as indicated in the correct orientation. The edge with external ports goes to...
... you place it . Make sure to do so may damage the motherboard. Doing so may cause you physical injury and damage motherboard components. 2.2.1 Placement direction When installing the motherboard, make sure that the motherboard fits into it into the chassis in the image below. 2.2.2 Screw holes Place... nine (9) screws into the holes indicated by circles to secure the motherboard to ensure that you install the motherboard, study the configuration of the chassis as indicated in the correct orientation. The edge with external ports goes to...

Motherboard DIY Troubleshooting Guide
Page 25
PRI_IDE 2.2.3 Motherboard layout PS/2KBMS T: Mouse B: Keyboard KBPWR SPDIF_O ATX Power Connector 24.5cm (9.6in) CPU_FAN Socket 940 ® DDR DIMM_A1 (64 bit,184-pin module) DDR ... SPDIF_OUT CD Audio Codec AUX FP_AUDIO FLOPPY PCI1 PCI2 PCI3 CLRTC CR2032 3V Lithium Cell CMOS Power VIA VT8237 SATA2 PRI_RAID SATA1 SATA_RAID1 SATA_RAID2 ASUS AS018 Deluxe RAID Promise PDC20378 PCI4 SK8V PCI5 USBPWR56 USBPWR78 USB78 USB56 WIFI COM2 Super 4Mbit I/O BIOS CHASSIS SB_PWR GAME PANEL SEC_IDE 30.5cm (12.0in) CHA_FAN ASUS SK8V motherboard 2-3
PRI_IDE 2.2.3 Motherboard layout PS/2KBMS T: Mouse B: Keyboard KBPWR SPDIF_O ATX Power Connector 24.5cm (9.6in) CPU_FAN Socket 940 ® DDR DIMM_A1 (64 bit,184-pin module) DDR ... SPDIF_OUT CD Audio Codec AUX FP_AUDIO FLOPPY PCI1 PCI2 PCI3 CLRTC CR2032 3V Lithium Cell CMOS Power VIA VT8237 SATA2 PRI_RAID SATA1 SATA_RAID1 SATA_RAID2 ASUS AS018 Deluxe RAID Promise PDC20378 PCI4 SK8V PCI5 USBPWR56 USBPWR78 USB78 USB56 WIFI COM2 Super 4Mbit I/O BIOS CHASSIS SB_PWR GAME PANEL SEC_IDE 30.5cm (12.0in) CHA_FAN ASUS SK8V motherboard 2-3

Motherboard DIY Troubleshooting Guide
Page 27
... Disk Activity LED (Red 2-pin IDE_LED) p. 2-22 p. 2-22 p. 2-23 p. 2-23 p. 2-24 p. 2-25 p. 2-25 p. 2-25 p. 2-25 p. 2-26 p. 2-26 p. 2-27 p. 2-28 p. 2-28 p. 2-28 p. 2-29 p. 2-29 p. 2-30 p. 2-30 ASUS SK8V motherboard 2-5 Internal Connectors 1. Power fan connector (3-pin PWR_FAN) 8. Chassis fan connector (3-pin CHA_FAN) 9. ATA 12V power connector (4-pin ATX12V) 12. CD connector (4-pin CD) 14. System...
... Disk Activity LED (Red 2-pin IDE_LED) p. 2-22 p. 2-22 p. 2-23 p. 2-23 p. 2-24 p. 2-25 p. 2-25 p. 2-25 p. 2-25 p. 2-26 p. 2-26 p. 2-27 p. 2-28 p. 2-28 p. 2-28 p. 2-29 p. 2-29 p. 2-30 p. 2-30 ASUS SK8V motherboard 2-5 Internal Connectors 1. Power fan connector (3-pin PWR_FAN) 8. Chassis fan connector (3-pin CHA_FAN) 9. ATA 12V power connector (4-pin ATX12V) 12. CD connector (4-pin CD) 14. System...

Motherboard DIY Troubleshooting Guide
Page 28
This mark should match a specific corner on the CPU. 2.3 Central Processing Unit (CPU) 2.3.1 Overview The motherboard comes with only 32-bit or 64-bit wide data paths. Gold triangle 2.3.2 Installing the CPU Follow these processors can run applications faster than processors ... gold triangle) on the socket to install a CPU. 1. Take note of these steps to ensure correct installation. Locate the 940-pin ZIF socket on the motherboard. 2-6 Chapter 2: Hardware information
This mark should match a specific corner on the CPU. 2.3 Central Processing Unit (CPU) 2.3.1 Overview The motherboard comes with only 32-bit or 64-bit wide data paths. Gold triangle 2.3.2 Installing the CPU Follow these processors can run applications faster than processors ... gold triangle) on the socket to install a CPU. 1. Take note of these steps to ensure correct installation. Locate the 940-pin ZIF socket on the motherboard. 2-6 Chapter 2: Hardware information

Motherboard DIY Troubleshooting Guide
Page 29
... a 90°-100° angle. DO NOT force the CPU into the socket until it up to prevent bending the pins and damaging the CPU! ASUS SK8V motherboard 2-7 Unlock the socket by pressing the lever sideways, then lift it fits in one correct orientation. 2. Small triangle Gold triangle The CPU fits only in...
... a 90°-100° angle. DO NOT force the CPU into the socket until it up to prevent bending the pins and damaging the CPU! ASUS SK8V motherboard 2-7 Unlock the socket by pressing the lever sideways, then lift it fits in one correct orientation. 2. Small triangle Gold triangle The CPU fits only in...

Motherboard DIY Troubleshooting Guide
Page 30
... assembly. Place the heatsink on the retention module base. 1. 5. Follow these steps to remove the retention module base when installing the CPU or installing other motherboard components. The retention module base is already installed on the side tab to indicate that it is in place, push down the socket lever to... Athlon™ 64 FX and AMD Opteron™ processors require a specially designed heatsink and fan assembly to secure the CPU. The lever clicks on the motherboard upon purchase. 2.
... assembly. Place the heatsink on the retention module base. 1. 5. Follow these steps to remove the retention module base when installing the CPU or installing other motherboard components. The retention module base is already installed on the side tab to indicate that it is in place, push down the socket lever to... Athlon™ 64 FX and AMD Opteron™ processors require a specially designed heatsink and fan assembly to secure the CPU. The lever clicks on the motherboard upon purchase. 2.


