

User Guide
Page 2
... this email address). Where the applicable license entitles you to infringe. This offer is defaced or missing. All Rights Reserved. ASUS PROVIDES THIS MANUAL "AS IS" WITHOUT WARRANTY OF ANY KIND, EITHER EXPRESS OR IMPLIED, INCLUDING BUT NOT LIMITED TO THE IMPLIED WARRANTIES OR ... AND SHOULD NOT BE CONSTRUED AS A COMMITMENT BY ASUS. Such software in this product. ii Copies of ASUSTeK COMPUTER INC. ("ASUS"). ASUS ASSUMES NO RESPONSIBILITY OR LIABILITY FOR ANY ERRORS OR INACCURACIES THAT MAY APPEAR IN THIS MANUAL, INCLUDING THE PRODUCTS AND SOFTWARE DESCRIBED IN IT. Product...
... this email address). Where the applicable license entitles you to infringe. This offer is defaced or missing. All Rights Reserved. ASUS PROVIDES THIS MANUAL "AS IS" WITHOUT WARRANTY OF ANY KIND, EITHER EXPRESS OR IMPLIED, INCLUDING BUT NOT LIMITED TO THE IMPLIED WARRANTIES OR ... AND SHOULD NOT BE CONSTRUED AS A COMMITMENT BY ASUS. Such software in this product. ii Copies of ASUSTeK COMPUTER INC. ("ASUS"). ASUS ASSUMES NO RESPONSIBILITY OR LIABILITY FOR ANY ERRORS OR INACCURACIES THAT MAY APPEAR IN THIS MANUAL, INCLUDING THE PRODUCTS AND SOFTWARE DESCRIBED IN IT. Product...
User Guide
Page 5
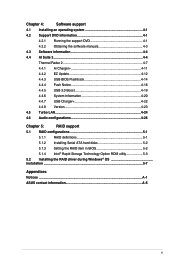
Chapter 4: Software support 4.1 Installing an operating system 4-1 4.2 Support DVD information 4-1 4.2.1 Running the support DVD 4-1 4.2.2 Obtaining the software manuals 4-3 4.3 Software information 4-4 4.4 AI Suite 3...4-4 Thermal Radar 2 4-7 4.4.1 Ai Charger 4-11 4.4.2 EZ Update 4-12 4.4.3 USB BIOS Flashback 4-14 4.4.4 Push Notice 4-16 4.4.5 USB 3.0 Boost 4-... BIOS 5-2 5.1.4 Intel® Rapid Storage Technology Option ROM utility 5-3 5.2 Installing the RAID driver during Windows® OS installation...5-7 Appendices Notices ...A-1 ASUS contact information A-5 v
Chapter 4: Software support 4.1 Installing an operating system 4-1 4.2 Support DVD information 4-1 4.2.1 Running the support DVD 4-1 4.2.2 Obtaining the software manuals 4-3 4.3 Software information 4-4 4.4 AI Suite 3...4-4 Thermal Radar 2 4-7 4.4.1 Ai Charger 4-11 4.4.2 EZ Update 4-12 4.4.3 USB BIOS Flashback 4-14 4.4.4 Push Notice 4-16 4.4.5 USB 3.0 Boost 4-... BIOS 5-2 5.1.4 Intel® Rapid Storage Technology Option ROM utility 5-3 5.2 Installing the RAID driver during Windows® OS installation...5-7 Appendices Notices ...A-1 ASUS contact information A-5 v

User Guide
Page 6
... any damage, contact your dealer immediately. • To avoid short circuits, keep paper clips, screws, and staples away from the system, ensure that all the manuals that your retailer. If you are connected. Operation safety • Before installing the motherboard and adding devices on a stable surface. • If you add a device...
... any damage, contact your dealer immediately. • To avoid short circuits, keep paper clips, screws, and staples away from the system, ensure that all the manuals that your retailer. If you are connected. Operation safety • Before installing the motherboard and adding devices on a stable surface. • If you add a device...

User Guide
Page 8
... names are linked with a plus sign (+). DANGER/WARNING: Information to prevent injury to yourself when trying to emphasize a word or a phrase. Conventions used throughout this manual. CAUTION: Information to prevent damage to the components when trying to select. Example: means that you perform certain tasks properly, take note of the following...
... names are linked with a plus sign (+). DANGER/WARNING: Information to prevent injury to yourself when trying to emphasize a word or a phrase. Conventions used throughout this manual. CAUTION: Information to prevent damage to the components when trying to select. Example: means that you perform certain tasks properly, take note of the following...

User Guide
Page 12
...Shortcut functions, and ASUS DRAM SPD (Serial Presence Detect) memory information 4 x Serial ATA 6Gb/s cables 1 x ASUS SLI bridge connector 7cm 1 x ASUS Q-Shield 1 x 2 in 1 Q-connector 1 x TUF Inside sticker 1 x TUF Certification card 1 x TUF 5 Year Warranty manual (by region) 1 x User's manual WfM 2.0, DMI...) 24-pin EATX Power connector 8-pin EATX 12V Power connector System Panel (Q-Connector) 1 x MemOK! xii SABERTOOTH Z97 MARK 2 specifications summary Internal I/O connectors BIOS features Accessories Manageability Support DVD contents Form factor 2 x USB 3.0/2.0 connectors support additional 4 USB ...
...Shortcut functions, and ASUS DRAM SPD (Serial Presence Detect) memory information 4 x Serial ATA 6Gb/s cables 1 x ASUS SLI bridge connector 7cm 1 x ASUS Q-Shield 1 x 2 in 1 Q-connector 1 x TUF Inside sticker 1 x TUF Certification card 1 x TUF 5 Year Warranty manual (by region) 1 x User's manual WfM 2.0, DMI...) 24-pin EATX Power connector 8-pin EATX 12V Power connector System Panel (Q-Connector) 1 x MemOK! xii SABERTOOTH Z97 MARK 2 specifications summary Internal I/O connectors BIOS features Accessories Manageability Support DVD contents Form factor 2 x USB 3.0/2.0 connectors support additional 4 USB ...

User Guide
Page 13
Package contents Check your motherboard package for the following items User Manual ASUS SABERTOOTH Z97 MARK 2 motherboard Technical documentations, certification and warranty card Support DVD 4 x Serial ATA 6.0 Gb/s cables 1 x ASUS SLI™ bridge connector (7 cm) 1 x ASUS Q-Shield 1 x 2-in-1 ASUS Q-Connector kit • If any of the above items is damaged or missing, contact your retailer. • The illustrated items above are for reference only. xiii Actual product specifications may vary with different models.
Package contents Check your motherboard package for the following items User Manual ASUS SABERTOOTH Z97 MARK 2 motherboard Technical documentations, certification and warranty card Support DVD 4 x Serial ATA 6.0 Gb/s cables 1 x ASUS SLI™ bridge connector (7 cm) 1 x ASUS Q-Shield 1 x 2-in-1 ASUS Q-Connector kit • If any of the above items is damaged or missing, contact your retailer. • The illustrated items above are for reference only. xiii Actual product specifications may vary with different models.
User Guide
Page 16
... on the HDD to launch Intel® Smart Response Technology. *** The SSD is reserved for frequently accessed data or applications. TUF ICe ASUS TUF have forged a brand new microchip that displays real-time motherboard, CPU and VGA zone cooling status, and promotes extended system longevity,... operating system must be assured that monitoring of onboard temperature sensors and fan speeds is always ultra-accurate-whether you are adjusting settings manually or using the automatic one-click organization. With the TUF ICe, you can receive fresh updates for applications to update and sync ...
... on the HDD to launch Intel® Smart Response Technology. *** The SSD is reserved for frequently accessed data or applications. TUF ICe ASUS TUF have forged a brand new microchip that displays real-time motherboard, CPU and VGA zone cooling status, and promotes extended system longevity,... operating system must be assured that monitoring of onboard temperature sensors and fan speeds is always ultra-accurate-whether you are adjusting settings manually or using the automatic one-click organization. With the TUF ICe, you can receive fresh updates for applications to update and sync ...

User Guide
Page 26
...the default state, some memory modules for the dual-channel configuration. Any excess memory from the higher-sized channel is then mapped for manual memory frequency adjustment. • For system stability, use of memory, we recommend that you install 4 GB or more on the motherboard... Channel B. For more efficient memory cooling system to protect the CPU. • Always install DIMMs with memory frequency higher than the vendor-marked value. Chapter 1 1-12 Chapter 1: Product introduction For effective use a more details, refer to the Microsoft® support site at ...
...the default state, some memory modules for the dual-channel configuration. Any excess memory from the higher-sized channel is then mapped for manual memory frequency adjustment. • For system stability, use of memory, we recommend that you install 4 GB or more on the motherboard... Channel B. For more efficient memory cooling system to protect the CPU. • Always install DIMMs with memory frequency higher than the vendor-marked value. Chapter 1 1-12 Chapter 1: Product introduction For effective use a more details, refer to the Microsoft® support site at ...

User Guide
Page 39
...increases, indicating different test processes. • Due to memory tuning requirement, the system automatically reboots when each timing set of failsafe settings. ASUS SABERTOOTH Z97 MARK 2 1-25 Chapter 1 MemOK! switch lights continuously. button does not function under Windows® OS environment. • During the tuning ...recommend that are not compatible with ones recommended in the Memory QVL (Qualified Vendors Lists) in this user manual or on the ASUS website at www.asus.com after using the MemOK! This is ideal for the system to test one set is not properly installed...
...increases, indicating different test processes. • Due to memory tuning requirement, the system automatically reboots when each timing set of failsafe settings. ASUS SABERTOOTH Z97 MARK 2 1-25 Chapter 1 MemOK! switch lights continuously. button does not function under Windows® OS environment. • During the tuning ...recommend that are not compatible with ones recommended in the Memory QVL (Qualified Vendors Lists) in this user manual or on the ASUS website at www.asus.com after using the MemOK! This is ideal for the system to test one set is not properly installed...

User Guide
Page 43
... If you can create a RAID 0, 1, 5, and 10 configuration with the Intel® Rapid Storage Technology through the onboard Intel® Z97 chipset. Chapter 1 • These connectors are set the SATA Mode item in the motherboard support DVD. Refer to section 3.6.3 SATA Configuration ... to section 5.1 RAID configurations or the manual bundled in the BIOS to create a Serial ATA RAID set using these connectors, set to Serial ATA 6.0 Gb/s hard disk drives via Serial ATA 6.0 Gb/s signal cables. ASUS SABERTOOTH Z97 MARK 2 1-29 Intel® Z97 Serial ATA 6.0 Gb/s connectors (7-pin ...
... If you can create a RAID 0, 1, 5, and 10 configuration with the Intel® Rapid Storage Technology through the onboard Intel® Z97 chipset. Chapter 1 • These connectors are set the SATA Mode item in the motherboard support DVD. Refer to section 3.6.3 SATA Configuration ... to section 5.1 RAID configurations or the manual bundled in the BIOS to create a Serial ATA RAID set using these connectors, set to Serial ATA 6.0 Gb/s hard disk drives via Serial ATA 6.0 Gb/s signal cables. ASUS SABERTOOTH Z97 MARK 2 1-29 Intel® Z97 Serial ATA 6.0 Gb/s connectors (7-pin ...
User Guide
Page 69
... device configuration, overclocking settings, advanced power management, and boot device configuration that are needed for this user manual refers to enable a more flexible and convenient mouse input. You can easily navigate the new UEFI BIOS ...ASUS UEFI BIOS is a Unified Extensible Interface that complies with the same smoothness as your operating system. In normal circumstances, the default BIOS settings apply to most conditions to instability or boot failure. DO NOT change the BIOS settings only with the help of a trained service personnel. Chapter 3 ASUS SABERTOOTH Z97 MARK...
... device configuration, overclocking settings, advanced power management, and boot device configuration that are needed for this user manual refers to enable a more flexible and convenient mouse input. You can easily navigate the new UEFI BIOS ...ASUS UEFI BIOS is a Unified Extensible Interface that complies with the same smoothness as your operating system. In normal circumstances, the default BIOS settings apply to most conditions to instability or boot failure. DO NOT change the BIOS settings only with the help of a trained service personnel. Chapter 3 ASUS SABERTOOTH Z97 MARK...

User Guide
Page 71
... the SATA RAID mode for details. The default screen for the advanced BIOS settings. ASUS SABERTOOTH Z97 MARK 2 3-3 The EZ Mode provides you to select the display language, system performance mode and boot device priority. Click the button to manually tune the fans Shows the bootable devices Saves the changes and resets the system Loads...
... the SATA RAID mode for details. The default screen for the advanced BIOS settings. ASUS SABERTOOTH Z97 MARK 2 3-3 The EZ Mode provides you to select the display language, system performance mode and boot device priority. Click the button to manually tune the fans Shows the bootable devices Saves the changes and resets the system Loads...

User Guide
Page 73
Boot For changing the system boot configuration Tool For configuring options for more information. Refer to MyFavorites menu. Chapter 3 ASUS SABERTOOTH Z97 MARK 2 3-5 Select frequentlyused BIOS settings and save it to section 3.2.3 QFan Control for special functions Exit For selecting the exit ... button above the menu bar contains the languages that you can select for that the item has a submenu. Click this button to manually tweak the fans to section 3.2.4 EZ Tuning Wizard for more information. Use this button to select the language that you want to ...
Boot For changing the system boot configuration Tool For configuring options for more information. Refer to MyFavorites menu. Chapter 3 ASUS SABERTOOTH Z97 MARK 2 3-5 Select frequentlyused BIOS settings and save it to section 3.2.3 QFan Control for special functions Exit For selecting the exit ... button above the menu bar contains the languages that you can select for that the item has a submenu. Click this button to manually tweak the fans to section 3.2.4 EZ Tuning Wizard for more information. Use this button to select the language that you want to ...

User Guide
Page 75
Click to select a fan to be configured Click to activate PWM Mode Click to activate DC Mode Chapter 3 Select a profile to apply to your fans Click to apply the fan setting Click to undo the changes Click to go back to main menu Select to set a fan profile or manually configure the operating speed of your fans ASUS SABERTOOTH Z97 MARK 2 3-7 3.2.3 Q-Fan Control The Q-Fan Control allows you to manually configure your CPU and chassis fans.
Click to select a fan to be configured Click to activate PWM Mode Click to activate DC Mode Chapter 3 Select a profile to apply to your fans Click to apply the fan setting Click to undo the changes Click to go back to main menu Select to set a fan profile or manually configure the operating speed of your fans ASUS SABERTOOTH Z97 MARK 2 3-7 3.2.3 Q-Fan Control The Q-Fan Control allows you to manually configure your CPU and chassis fans.

User Guide
Page 76
Speed points Click or tap to view its current status. 2. Select the fan that you want to configure and to manually configure your fans To configure your fans' operating speed. Click Apply to manually configure your fans: 1. Configuring fans manually Select Manual from the list of profiles to save the changes then click Exit (ESC). 3-8 Chapter 3: BIOS setup Chapter 3 Click and drag the speed points to adjust the fans' operating speed. 3.
Speed points Click or tap to view its current status. 2. Select the fan that you want to configure and to manually configure your fans To configure your fans' operating speed. Click Apply to manually configure your fans: 1. Configuring fans manually Select Manual from the list of profiles to save the changes then click Exit (ESC). 3-8 Chapter 3: BIOS setup Chapter 3 Click and drag the speed points to adjust the fans' operating speed. 3.

User Guide
Page 83
...specification, as high BCLK frequencies may affect the function of these preset overclocking configuration options: [Auto] Loads the optimal settings for the system. [Manual] Automatically optimizes the CPU ratio and BCLK frequency. Configuration options: [Auto] [LC PLL] [SB PLL] Filter PLL [Auto] Set this ...close to your target BCLK (base clock) for an extreme overclocking, or leave it at [Auto] for the BIOS to upgrade. Chapter 3 ASUS SABERTOOTH Z97 MARK 2 3-15 Select SB PLL when the BCLK (base clock) frequency is set the value based on the assigned CPU strap for a better ...
...specification, as high BCLK frequencies may affect the function of these preset overclocking configuration options: [Auto] Loads the optimal settings for the system. [Manual] Automatically optimizes the CPU ratio and BCLK frequency. Configuration options: [Auto] [LC PLL] [SB PLL] Filter PLL [Auto] Set this ...close to your target BCLK (base clock) for an extreme overclocking, or leave it at [Auto] for the BIOS to upgrade. Chapter 3 ASUS SABERTOOTH Z97 MARK 2 3-15 Select SB PLL when the BCLK (base clock) frequency is set the value based on the assigned CPU strap for a better ...

User Guide
Page 84
... you to maximize the oveclocking performance optimized by ASUS core ratio settings. [Disabled] This item allows you to set to [Per Core], the following items appear: 1-Core Ratio Limit [Auto] Select [Auto] to apply the CPU default Turbo Ratio setting or manually assign a 1-Core Limit value that must be... higher than or equal to the 2-Core Ratio Limit. 2-Core Ratio Limit [Auto] Select [Auto] to apply the CPU default Turbo Ratio setting or manually assign a 2-Core Limit value that must be higher than or equal to the 3-Core Ratio Limit. Configuration options: [Auto] [Sync All Cores] [Per...
... you to maximize the oveclocking performance optimized by ASUS core ratio settings. [Disabled] This item allows you to set to [Per Core], the following items appear: 1-Core Ratio Limit [Auto] Select [Auto] to apply the CPU default Turbo Ratio setting or manually assign a 1-Core Limit value that must be... higher than or equal to the 2-Core Ratio Limit. 2-Core Ratio Limit [Auto] Select [Auto] to apply the CPU default Turbo Ratio setting or manually assign a 2-Core Limit value that must be higher than or equal to the 3-Core Ratio Limit. Configuration options: [Auto] [Sync All Cores] [Per...

User Guide
Page 85
...[BCLK First] Ensure that you to set lower CPU VCCIN and Vcore voltages and achieve the best energy saving condition. Configuration options: [Disabled] [Enabled] Chapter 3 ASUS SABERTOOTH Z97 MARK 2 3-17 OC Tuner [Keep Current Settings] This item allows you to automatically overclock the CPU and DRAM frequencies and voltage for an enhanced system performance...Auto] This item allows you to enable the internal PLL Overvoltage for K-SKU CPUs to 100:100. The minimum value depends on the system loading. [Manual] This option allows you to set to get the extreme overclocking capability.
...[BCLK First] Ensure that you to set lower CPU VCCIN and Vcore voltages and achieve the best energy saving condition. Configuration options: [Disabled] [Enabled] Chapter 3 ASUS SABERTOOTH Z97 MARK 2 3-17 OC Tuner [Keep Current Settings] This item allows you to automatically overclock the CPU and DRAM frequencies and voltage for an enhanced system performance...Auto] This item allows you to enable the internal PLL Overvoltage for K-SKU CPUs to 100:100. The minimum value depends on the system loading. [Manual] This option allows you to set to get the extreme overclocking capability.

User Guide
Page 89
... depending on your CPU specification. Select [Manual] to 125%. Select from levels 1 to 9 to adjust the CPU power voltage from 0% to configure a higher frequency for a quicker transient response speed. The thermal conditions should be monitored. Chapter 3 ASUS SABERTOOTH Z97 MARK 2 3-21 Transmitter Rising Slope [Auto]...This item contains the transmitter and receiver's rising and falling slopes and their time controllers. Configuration options: [Auto] [Manual] DO NOT remove the thermal module. The CPU working voltage decreases proportionally to adjust the value. Use the or...
... depending on your CPU specification. Select [Manual] to 125%. Select from levels 1 to 9 to adjust the CPU power voltage from 0% to configure a higher frequency for a quicker transient response speed. The thermal conditions should be monitored. Chapter 3 ASUS SABERTOOTH Z97 MARK 2 3-21 Transmitter Rising Slope [Auto]...This item contains the transmitter and receiver's rising and falling slopes and their time controllers. Configuration options: [Auto] [Manual] DO NOT remove the thermal module. The CPU working voltage decreases proportionally to adjust the value. Use the or...

User Guide
Page 90
... to enhance the system stability. Configuration options: [Auto] [Standard] [Optimized] [Extreme] [Power Phase Response] DO NOT remove the thermal module when setting this item to [Manual]. Power Phase Response [Fast] This item allows you to set the CPU VRM Switching Frequency to [Power Phase Response]. DO NOT remove the thermal module...
... to enhance the system stability. Configuration options: [Auto] [Standard] [Optimized] [Extreme] [Power Phase Response] DO NOT remove the thermal module when setting this item to [Manual]. Power Phase Response [Fast] This item allows you to set the CPU VRM Switching Frequency to [Power Phase Response]. DO NOT remove the thermal module...


