User Guide
Page 12
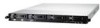
... See the figure below. 1.1 System package contents Check your system package for the following items. Model Name Chassis Motherboard Component Accessories Optional Items RS500A-E6/PS4 ASUS R10A 1U Rackmount Chassis ASUS KGNE-D16 Server Board 1 x 500W 80+ Single Power Supply 4 x Hot-swap 3.5" HDD trays (varies by territories) 1 x SAS/SATAII HDD Backplane (BP4LX-R10A) 1 x PCI Riser Card...
... See the figure below. 1.1 System package contents Check your system package for the following items. Model Name Chassis Motherboard Component Accessories Optional Items RS500A-E6/PS4 ASUS R10A 1U Rackmount Chassis ASUS KGNE-D16 Server Board 1 x 500W 80+ Single Power Supply 4 x Hot-swap 3.5" HDD trays (varies by territories) 1 x SAS/SATAII HDD Backplane (BP4LX-R10A) 1 x PCI Riser Card...
User Guide
Page 14
...Front x 2, Rear x 2) 1 x External Serial Port 1 x VGA port 1 x PS/2 keyboard port 1 x PS/2 mouse port 1 x Internal A Type USB port Windows® Server 2008 R2 Windows® Server 2008 Enterprise 32/64-bit Windows® Server 2003 R2 Enterprise 32/64-bit RedHat® Enterprise Linux AS5.0 32/64-bit SuSE® Linux Enterprise... Server 10 32/64-bit (Subject to change without any notice) Optional CA® eTrust™ 7.1 anti-virus software ASWM 2.0 Optional ASMB4-iKVM for KVM-over-IP support 615mm x 444mm x 43.6mm (1U) 15 Kg 500W 80+ Single Power Supply...
...Front x 2, Rear x 2) 1 x External Serial Port 1 x VGA port 1 x PS/2 keyboard port 1 x PS/2 mouse port 1 x Internal A Type USB port Windows® Server 2008 R2 Windows® Server 2008 Enterprise 32/64-bit Windows® Server 2003 R2 Enterprise 32/64-bit RedHat® Enterprise Linux AS5.0 32/64-bit SuSE® Linux Enterprise... Server 10 32/64-bit (Subject to change without any notice) Optional CA® eTrust™ 7.1 anti-virus software ASWM 2.0 Optional ASMB4-iKVM for KVM-over-IP support 615mm x 444mm x 43.6mm (1U) 15 Kg 500W 80+ Single Power Supply...
User Guide
Page 43
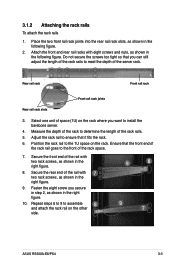
... the rear rail rack slots, as shown in the following figure. Position the rack rail to install the barebone server. 4. Fasten the eight screw you want to the 1U space on the other 8 side. 9 8 9 7 ASUS RS500A-E6/PS4 3-3 Select one unit of the rack space. 7. Secure the rear end of the rack rails. 5. Ensure that ...rack rails to determine the length of the rail with two rack screws, as shown in the right figure. 8. Secure the front end of the server rack. Do not secure the screws too tight so that it fits the rack. 6. Measure the depth of the rack to meet the depth of...
... the rear rail rack slots, as shown in the following figure. Position the rack rail to install the barebone server. 4. Fasten the eight screw you want to the 1U space on the other 8 side. 9 8 9 7 ASUS RS500A-E6/PS4 3-3 Select one unit of the rack space. 7. Secure the rear end of the rack rails. 5. Ensure that ...rack rails to determine the length of the rail with two rack screws, as shown in the right figure. 8. Secure the front end of the server rack. Do not secure the screws too tight so that it fits the rack. 6. Measure the depth of the rack to meet the depth of...
User Guide
Page 46
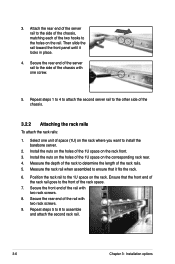
Repeat steps 1 to 4 to attach the second server rail to the 1U space on the rack front. 3. Install the nuts on the holes of the 1U space on the rack. Repeat steps 5 to 8 to the front ... the nuts on the holes of space (1U) on the corresponding rack rear. 4. Measure the depth of the rack to install the barebone server. 2. Secure the rear end of the server rail to the side of the two hooks...it fits the rack. 6. Ensure that it locks in place. 4. 3. Attach the rear end of the server rail to the holes on the rail. Measure the rack rail when assembled to ensure that the front end ...
Repeat steps 1 to 4 to attach the second server rail to the 1U space on the rack front. 3. Install the nuts on the holes of the 1U space on the rack. Repeat steps 5 to 8 to the front ... the nuts on the holes of space (1U) on the corresponding rack rear. 4. Measure the depth of the rack to install the barebone server. 2. Secure the rear end of the server rail to the side of the two hooks...it fits the rack. 6. Ensure that it locks in place. 4. 3. Attach the rear end of the server rail to the holes on the rail. Measure the rack rail when assembled to ensure that the front end ...

