
User Manual
Page 50
...system setup information such as system passwords. You can clear the CMOS memory of date, time, and system setup parameters by erasing the CMOS RTC RAM data. Keep the cap on CLRTC jumper default position. Remove the onboard battery. 3. Plug the power cord and turn ON the computer. 6.... Hold down the key during the boot process and enter BIOS setup to pins 2-3. Clear RTC RAM (CLRTC1) This jumper allows you to pins 1-2. 4. To erase the RTC RAM: 1. Move the jumper cap from pins 1-2 (default) to re-enter data. 4.2 Jumpers 1. Reinstall the battery. 5. ...
...system setup information such as system passwords. You can clear the CMOS memory of date, time, and system setup parameters by erasing the CMOS RTC RAM data. Keep the cap on CLRTC jumper default position. Remove the onboard battery. 3. Plug the power cord and turn ON the computer. 6.... Hold down the key during the boot process and enter BIOS setup to pins 2-3. Clear RTC RAM (CLRTC1) This jumper allows you to pins 1-2. 4. To erase the RTC RAM: 1. Move the jumper cap from pins 1-2 (default) to re-enter data. 4.2 Jumpers 1. Reinstall the battery. 5. ...

User Manual
Page 73
... your system using the provided utility described in the CMOS RAM. The Setup program is designed to configure your selections from the available options using this program. Select the L o a d S e t u p D e f a u l t s item under the Exit Menu. ASUS RS161-E2/PA2 5-11 5.2 BIOS setup program This motherboard supports a...a menu-driven program, it lets you can also restart by pressing the reset button on your screen. • Visit the ASUS website (www.asus.com) to download the latest BIOS file for most conditions to use as possible. Do this section are installing a motherboard, ...
... your system using the provided utility described in the CMOS RAM. The Setup program is designed to configure your selections from the available options using this program. Select the L o a d S e t u p D e f a u l t s item under the Exit Menu. ASUS RS161-E2/PA2 5-11 5.2 BIOS setup program This motherboard supports a...a menu-driven program, it lets you can also restart by pressing the reset button on your screen. • Visit the ASUS website (www.asus.com) to download the latest BIOS file for most conditions to use as possible. Do this section are installing a motherboard, ...
User Manual
Page 85
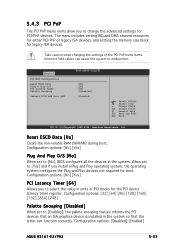
... for either PCI/PnP or legacy ISA devices, and setting the memory size block for the PCI device latency timer register. Configuration options: [Disabled] [Enabled] ASUS RS161-E2/PA2 5-23 Advanced PCI/PnP Configuration Reset ESCD Data Plug & Play O/S PCI Latency Timer Palette Snooping OnBoard PCIE LAN Boot ROM BIOS SETUP UTILITY [No... not required for boot. Take caution when changing the settings of PCI clocks for legacy ISA devices. Reset ESCD Data [No] Clears the non-volatile RAM (NVRAM) during boot.
... for either PCI/PnP or legacy ISA devices, and setting the memory size block for the PCI device latency timer register. Configuration options: [Disabled] [Enabled] ASUS RS161-E2/PA2 5-23 Advanced PCI/PnP Configuration Reset ESCD Data Plug & Play O/S PCI Latency Timer Palette Snooping OnBoard PCIE LAN Boot ROM BIOS SETUP UTILITY [No... not required for boot. Take caution when changing the settings of PCI clocks for legacy ISA devices. Reset ESCD Data [No] Clears the non-volatile RAM (NVRAM) during boot.
User Manual
Page 94
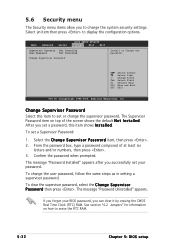
... +- After you forget your password. Confirm the password when prompted. The Supervisor Password item on how to set a password, this item to erase the RTC RAM. 5-32 Chapter 5: BIOS setup The message "Password Uninstalled" appears. See section "4.2 Jumpers" for information on top of at least six letters and/or numbers, then... Change Supervisor Password item, then press . 2. 5.6 Security menu The Security menu items allow you can clear it by erasing the CMOS Real Time Clock (RTC) RAM.
... +- After you forget your password. Confirm the password when prompted. The Supervisor Password item on how to set a password, this item to erase the RTC RAM. 5-32 Chapter 5: BIOS setup The message "Password Uninstalled" appears. See section "4.2 Jumpers" for information on top of at least six letters and/or numbers, then... Change Supervisor Password item, then press . 2. 5.6 Security menu The Security menu items allow you can clear it by erasing the CMOS Real Time Clock (RTC) RAM.

User Manual
Page 100
...8592; Select Screen ↑↓ Select Item +- Pressing does not immediately exit this option, a confirmation appears. An onboard backup battery sustains the CMOS RAM so it stays on even when the computer is turned off. When you made and restore the previously saved values. 5.8 Exit menu The Exit menu... attempt to exit the Setup program without saving your changes, the program prompts you with a message asking if you want to the CMOS RAM. F10 key can be used for the BIOS items, and save the changes that you selected are finished making your selections, choose this ...
...8592; Select Screen ↑↓ Select Item +- Pressing does not immediately exit this option, a confirmation appears. An onboard backup battery sustains the CMOS RAM so it stays on even when the computer is turned off. When you made and restore the previously saved values. 5.8 Exit menu The Exit menu... attempt to exit the Setup program without saving your changes, the program prompts you with a message asking if you want to the CMOS RAM. F10 key can be used for the BIOS items, and save the changes that you selected are finished making your selections, choose this ...

User Manual
Page 101
ASUS RS161-E2/PA2 5-39 Load Setup Defaults Allows you press , a confirmation window appears. Select S a v e C h a n g e s & E x i t or make other changes before saving the values to load default values. Select O k to the non-volatile RAM. When you select this option or if you to load the default values for each of the parameters on the Setup menus.
ASUS RS161-E2/PA2 5-39 Load Setup Defaults Allows you press , a confirmation window appears. Select S a v e C h a n g e s & E x i t or make other changes before saving the values to load default values. Select O k to the non-volatile RAM. When you select this option or if you to load the default values for each of the parameters on the Setup menus.


