
User Manual
Page 10
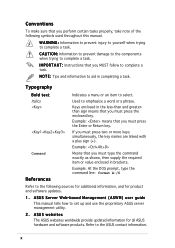
...and software products. Example: Means that you must type the command exactly as shown, then supply the required item or value enclosed in brackets. ASUS Server Web-based Management (ASWM) user guide This manual tells how to aid in the less-than and greaterthan sign...used throughout this manual. Example: At the DOS prompt, type the command line: format A:/S Refer to emphasize a word or a phrase. ASUS websites The ASUS websites worldwide provide updated information for product and software updates. 1 . Keys enclosed in completing a task. Conventions To make sure that you must...
...and software products. Example: Means that you must type the command exactly as shown, then supply the required item or value enclosed in brackets. ASUS Server Web-based Management (ASWM) user guide This manual tells how to aid in the less-than and greaterthan sign...used throughout this manual. Example: At the DOS prompt, type the command line: format A:/S Refer to emphasize a word or a phrase. ASUS websites The ASUS websites worldwide provide updated information for product and software updates. 1 . Keys enclosed in completing a task. Conventions To make sure that you must...

User Manual
Page 75
... is enclosed in brackets, and is not user-configurable. To change the value of options. Pop-up window with the configuration options for that item. 5.2.8 Scroll bar A scroll bar appears on the right side of the selected item. ASUS RS161-E2/PA2 5-13 You cannot select an item that do not fit on the...
... is enclosed in brackets, and is not user-configurable. To change the value of options. Pop-up window with the configuration options for that item. 5.2.8 Scroll bar A scroll bar appears on the right side of the selected item. ASUS RS161-E2/PA2 5-13 You cannot select an item that do not fit on the...

User Manual
Page 79
...F1 General Help F10 Save and Exit ESC Exit V00.00 (C)Copyright 1985-2004, American Megatrends, Inc. These values are specifically configuring a CD-ROM drive. Select [ARMD] (ATAPI Removable Media Device) if your device is...occurs multiple sectors at a time. There is either a ZIP, LS-120, or MO drive. The BIOS automatically detects the values opposite the dimmed items (Device, Vendor, Size, LBA Mode, Block Mode, PIO Mode, Async DMA, Ultra DMA, and ...Master/Slave The BIOS automatically detects the connected IDE devices. Configuration options: [Disabled] [Auto] ASUS RS161-E2/PA2 5-17
...F1 General Help F10 Save and Exit ESC Exit V00.00 (C)Copyright 1985-2004, American Megatrends, Inc. These values are specifically configuring a CD-ROM drive. Select [ARMD] (ATAPI Removable Media Device) if your device is...occurs multiple sectors at a time. There is either a ZIP, LS-120, or MO drive. The BIOS automatically detects the values opposite the dimmed items (Device, Vendor, Size, LBA Mode, Block Mode, PIO Mode, Async DMA, Ultra DMA, and ...Master/Slave The BIOS automatically detects the connected IDE devices. Configuration options: [Disabled] [Auto] ASUS RS161-E2/PA2 5-17

User Manual
Page 82
...Table Version [1.4] Sets the Multi-Processor System (MPS) table version. Main Advanced Server BIOS SETUP UTILITY Security Boot Exit WARNING: Setting wrong values in this menu show the CPU-related information that the BIOS automatically detects. Change Field Tab Select Field F1 General Help F10 Save and Exit...items in the sections below may cause system to malfunction. Take caution when changing the settings of the Advanced menu items. Incorrect field values can cause the system to malfunction. Change Field Tab Select Field F1 General Help F10 Save and Exit ESC Exit V00.00 (C)Copyright...
...Table Version [1.4] Sets the Multi-Processor System (MPS) table version. Main Advanced Server BIOS SETUP UTILITY Security Boot Exit WARNING: Setting wrong values in this menu show the CPU-related information that the BIOS automatically detects. Change Field Tab Select Field F1 General Help F10 Save and Exit...items in the sections below may cause system to malfunction. Take caution when changing the settings of the Advanced menu items. Incorrect field values can cause the system to malfunction. Change Field Tab Select Field F1 General Help F10 Save and Exit ESC Exit V00.00 (C)Copyright...
User Manual
Page 85
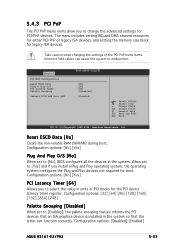
... the non-volatile RAM (NVRAM) during boot. Configuration options: [No] [Yes] PCI Latency Timer [64] Allows you to select the value in the system so that an ISA graphics device is installed in units of the PCI PnP menu items. Incorrect field values can function correctly. Configuration options: [Disabled] [Enabled] ASUS RS161-E2/PA2 5-23 5.4.3 PCI...
... the non-volatile RAM (NVRAM) during boot. Configuration options: [No] [Yes] PCI Latency Timer [64] Allows you to select the value in the system so that an ISA graphics device is installed in units of the PCI PnP menu items. Incorrect field values can function correctly. Configuration options: [Disabled] [Enabled] ASUS RS161-E2/PA2 5-23 5.4.3 PCI...

User Manual
Page 86
... shows N o n e. Setting to [Auto] allows the system to display the configuration options. If no USB device is enabled. The M o d u l e V e r s i o n and U S B D e v i c e s E n a b l e d items show the auto-detected values. Select an item then press to detect the presence of USB devices at startup. Configuration options: [Disabled] [Enabled] 5.4.4 USB Configuration The items in the onboard...
... shows N o n e. Setting to [Auto] allows the system to display the configuration options. If no USB device is enabled. The M o d u l e V e r s i o n and U S B D e v i c e s E n a b l e d items show the auto-detected values. Select an item then press to detect the presence of USB devices at startup. Configuration options: [Disabled] [Enabled] 5.4.4 USB Configuration The items in the onboard...

User Manual
Page 90
...is set to the motherboard, the field shows N/A. Smart Fan Control [Disabled] Allows you do not wish to enable or disable the ASUS Smart Fan feature that smartly adjusts the fan speeds for more efficient system operation. Configuration options: [Disabled] [Enabled] 5.4.8 Hardware Monitor ... the items RTC Alarm Date, RTC Alarm Hour, RTC Alarm Minute, and RTC Alarm Second appear with set values. CPU1/CPU2 Temperature [xxxºC/xxxºF] MB Temperature [xxxºC/xxxºF] The onboard hardware monitor automatically detects and displays the motherboard and CPU temperatures. Resume...
...is set to the motherboard, the field shows N/A. Smart Fan Control [Disabled] Allows you do not wish to enable or disable the ASUS Smart Fan feature that smartly adjusts the fan speeds for more efficient system operation. Configuration options: [Disabled] [Enabled] 5.4.8 Hardware Monitor ... the items RTC Alarm Date, RTC Alarm Hour, RTC Alarm Minute, and RTC Alarm Second appear with set values. CPU1/CPU2 Temperature [xxxºC/xxxºF] MB Temperature [xxxºC/xxxºF] The onboard hardware monitor automatically detects and displays the motherboard and CPU temperatures. Resume...

User Manual
Page 100
...select this option, a confirmation window appears. Select one of the options from this menu or from the Exit menu to ensure the values you selected are finished making your changes to the BIOS items. Main Advanced Server Save Changes and Exit Discard Changes and Exit Discard ...8593;↓ Select Item +- After selecting this option, a confirmation appears. When you made and restore the previously saved values. Save Changes & Exit Once you are saved to the CMOS RAM. If you attempt to exit the Setup program without saving your changes, the program prompts you with a message asking...
...select this option, a confirmation window appears. Select one of the options from this menu or from the Exit menu to ensure the values you selected are finished making your changes to the BIOS items. Main Advanced Server Save Changes and Exit Discard Changes and Exit Discard ...8593;↓ Select Item +- After selecting this option, a confirmation appears. When you made and restore the previously saved values. Save Changes & Exit Once you are saved to the CMOS RAM. If you attempt to exit the Setup program without saving your changes, the program prompts you with a message asking...

User Manual
Page 101
Select S a v e C h a n g e s & E x i t or make other changes before saving the values to load default values. When you select this option or if you to load the default values for each of the parameters on the Setup menus. Select O k to the non-volatile RAM. ASUS RS161-E2/PA2 5-39 Load Setup Defaults Allows you press , a confirmation window appears.
Select S a v e C h a n g e s & E x i t or make other changes before saving the values to load default values. When you select this option or if you to load the default values for each of the parameters on the Setup menus. Select O k to the non-volatile RAM. ASUS RS161-E2/PA2 5-39 Load Setup Defaults Allows you press , a confirmation window appears.

User Manual
Page 108
You must choose the stripe size value based on the projected drive usage. T I D M o d e, then press . Repeat the process until all desired hard disk drives are added. For low disk usage, select 8 KB/... to select the stripe block size appropriate to your drive usage, then press . 8K ↑ 16K 32K 64K 128K Optim ↓ The available stripe size values range from 8KB to 128KB. A pop-up or down arrow keys to select S t r i p i n g, then press . Mirroring Striping Stripe Mirroring Spanning 3. Press to move to the...
You must choose the stripe size value based on the projected drive usage. T I D M o d e, then press . Repeat the process until all desired hard disk drives are added. For low disk usage, select 8 KB/... to select the stripe block size appropriate to your drive usage, then press . 8K ↑ 16K 32K 64K 128K Optim ↓ The available stripe size values range from 8KB to 128KB. A pop-up or down arrow keys to select S t r i p i n g, then press . Mirroring Striping Stripe Mirroring Spanning 3. Press to move to the...