
User Manual
Page 4
... 4-4 4.3 Internal connectors 4-8 Chapter 5: BIOS setup 5.1 Managing and updating your BIOS 5-2 5.1.1 Creating a bootable floppy disk 5-2 5.1.2 AFUDOS utility 5-3 5.1.3 ASUS CrashFree BIOS 2 utility 5-6 5.1.4 ASUS Update utility 5-8 5.2 BIOS setup program 5-11 5.2.1 BIOS menu screen 5-12 5.2.2 Menu bar 5-12 5.2.3 Navigation keys 5-12 5.2.4 Menu items 5-13 5.2.5 Sub-menu items 5-13 5.2.6 Configuration fields 5-13 5.2.7 Pop-up window 5-13 5.2.8 Scroll bar...
... 4-4 4.3 Internal connectors 4-8 Chapter 5: BIOS setup 5.1 Managing and updating your BIOS 5-2 5.1.1 Creating a bootable floppy disk 5-2 5.1.2 AFUDOS utility 5-3 5.1.3 ASUS CrashFree BIOS 2 utility 5-6 5.1.4 ASUS Update utility 5-8 5.2 BIOS setup program 5-11 5.2.1 BIOS menu screen 5-12 5.2.2 Menu bar 5-12 5.2.3 Navigation keys 5-12 5.2.4 Menu items 5-13 5.2.5 Sub-menu items 5-13 5.2.6 Configuration fields 5-13 5.2.7 Pop-up window 5-13 5.2.8 Scroll bar...
User Manual
Page 10
... N O T E : Tips and information to the ASUS contact information. Example: At the DOS prompt, type the command line: format A:/S Refer to complete a task. x I M P O R T A N T : Instructions that you must press the Enter or Return key. Keys enclosed in the less-than and greaterthan sign means that ...perform certain tasks properly, take note of the following sources for additional information, and for all ASUS hardware and software products. Conventions To make sure that you must press two or more keys simultaneously, the key names are linked with a plus sign (+). W A R N I O N : ...
... N O T E : Tips and information to the ASUS contact information. Example: At the DOS prompt, type the command line: format A:/S Refer to complete a task. x I M P O R T A N T : Instructions that you must press the Enter or Return key. Keys enclosed in the less-than and greaterthan sign means that ...perform certain tasks properly, take note of the following sources for additional information, and for all ASUS hardware and software products. Conventions To make sure that you must press two or more keys simultaneously, the key names are linked with a plus sign (+). W A R N I O N : ...

User Manual
Page 50
...the power cord and turn ON the computer. 6. K8N-DRE ¤ CLRTC1 1 2 Normal (Default) 2 3 Clear CMOS K8N-DRE Clear RTC RAM 4-4 Chapter 4: Motherboard info Keep the cap on CLRTC jumper default position. Removing the cap will cause system boot failure! Move the jumper cap from... pins 1-2 (default) to clear the Real Time Clock (RTC) RAM in CMOS, which include system setup information such as system passwords. Hold down the key during the boot process and enter BIOS setup to pins 1-2. 4. Reinstall the battery. 5. Remove the onboard...
...the power cord and turn ON the computer. 6. K8N-DRE ¤ CLRTC1 1 2 Normal (Default) 2 3 Clear CMOS K8N-DRE Clear RTC RAM 4-4 Chapter 4: Motherboard info Keep the cap on CLRTC jumper default position. Removing the cap will cause system boot failure! Move the jumper cap from... pins 1-2 (default) to clear the Real Time Clock (RTC) RAM in CMOS, which include system setup information such as system passwords. Hold down the key during the boot process and enter BIOS setup to pins 1-2. 4. Reinstall the battery. 5. Remove the onboard...

User Manual
Page 51
... controller setting (3-pin LAN1_EN1) This jumper allows you to activate the Gigabit LAN feature. K8N-DRE ¤ LAN1_EN1 1 2 Enable (Default) 2 3 Disable K8N-DRE LAN1_EN1 setting ASUS RS161-E2 (PA2) 4-5 K8N-DRE ¤ KBPWR1 1 2 +5VSB 2 3 +5V (Default) K8N-DRE Keyboard power setting 3 . Set to pins 1-2 to enable or disable the keyboard wake-up the...
... controller setting (3-pin LAN1_EN1) This jumper allows you to activate the Gigabit LAN feature. K8N-DRE ¤ LAN1_EN1 1 2 Enable (Default) 2 3 Disable K8N-DRE LAN1_EN1 setting ASUS RS161-E2 (PA2) 4-5 K8N-DRE ¤ KBPWR1 1 2 +5VSB 2 3 +5V (Default) K8N-DRE Keyboard power setting 3 . Set to pins 1-2 to enable or disable the keyboard wake-up the...

User Manual
Page 53
Insert a floppy disk with the original or updated BIOS file. 4. When finished, shut down the key during the boot process and enter BIOS setup to pins 1-2. 8. K8N-DRE ¤ RECOVERY1 1 2 Normal (Default) 2 3 BIOS recovery K8N-DRE BIOS recovery setting ASUS RS161-E2 (PA2) 4-7 6. The system searches for the BIOS file in case the BIOS codes...
Insert a floppy disk with the original or updated BIOS file. 4. When finished, shut down the key during the boot process and enter BIOS setup to pins 1-2. 8. K8N-DRE ¤ RECOVERY1 1 2 Normal (Default) 2 3 BIOS recovery K8N-DRE BIOS recovery setting ASUS RS161-E2 (PA2) 4-7 6. The system searches for the BIOS file in case the BIOS codes...

User Manual
Page 73
... the Exit Menu. Being a menu-driven program, it as possible. This section explains how to configure your system using the navigation keys. • The default BIOS settings for this motherboard apply for reference purposes only, and may not exactly match what you wish to...asus.com) to "Run Setup." See section "5.7 Exit Menu." • The BIOS setup screens shown in the future. 5.2 BIOS setup program This motherboard supports a programmable firmware chip that the computer can recognize these changes and record them in the CMOS RAM...management settings. ASUS RS161-E2/PA2 5-11
... the Exit Menu. Being a menu-driven program, it as possible. This section explains how to configure your system using the navigation keys. • The default BIOS settings for this motherboard apply for reference purposes only, and may not exactly match what you wish to...asus.com) to "Run Setup." See section "5.7 Exit Menu." • The BIOS setup screens shown in the future. 5.2 BIOS setup program This motherboard supports a programmable firmware chip that the computer can recognize these changes and record them in the CMOS RAM...management settings. ASUS RS161-E2/PA2 5-11

User Manual
Page 74
... Select Field F1 General Help F10 Save and Exit ESC Exit V00.00 (C)Copyright 1985-2004, American Megatrends, Inc. Use the navigation keys to select items in .] [Not Detected] [Not Detected] [Not Detected] [Not Detected] [Not Detected] [Not Detected] [Not... Detected] [Not Detected] Use [ENTER], [TAB] or [SHIFT-TAB] to select a field. Sub-menu items Navigation keys 5.2.2 Menu bar The menu bar on top of the screen has the following main items: Main Advanced Server Security Boot Exit For ...Boot Exit [Mon, 06/27/2005] [08:52:30] [1.44 MB, 3.5 in the menu and change the settings.
... Select Field F1 General Help F10 Save and Exit ESC Exit V00.00 (C)Copyright 1985-2004, American Megatrends, Inc. Use the navigation keys to select items in .] [Not Detected] [Not Detected] [Not Detected] [Not Detected] [Not Detected] [Not Detected] [Not... Detected] [Not Detected] Use [ENTER], [TAB] or [SHIFT-TAB] to select a field. Sub-menu items Navigation keys 5.2.2 Menu bar The menu bar on top of the screen has the following main items: Main Advanced Server Security Boot Exit For ...Boot Exit [Mon, 06/27/2005] [08:52:30] [1.44 MB, 3.5 in the menu and change the settings.

User Manual
Page 75
... menu items. The other items on the screen. You cannot select an item that is highlighted when selected. Press the Up/Down arrow keys or / keys to display a list of the selected item. To change the value of a menu screen when there are items that do not fit... . 5.2.6 Configuration fields These fields show the values for that item. 5.2.8 Scroll bar A scroll bar appears on any menu screen means that menu. ASUS RS161-E2/PA2 5-13 Pop-up window with the configuration options for the menu items. If an item is a brief description of options. A configurable field is...
... menu items. The other items on the screen. You cannot select an item that is highlighted when selected. Press the Up/Down arrow keys or / keys to display a list of the selected item. To change the value of a menu screen when there are items that do not fit... . 5.2.6 Configuration fields These fields show the values for that item. 5.2.8 Scroll bar A scroll bar appears on any menu screen means that menu. ASUS RS161-E2/PA2 5-13 Pop-up window with the configuration options for the menu items. If an item is a brief description of options. A configurable field is...
User Manual
Page 89
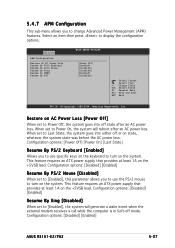
5.4.7 APM Configuration This sub-menu allows you to use specific keys on the keyboard to turn on AC Power Loss [Power Off] When set to change Advanced Power Management (APM) features. Advanced APM Configuration Restore On ... (C)Copyright 1985-2004, American Megatrends, Inc. This feature requires an ATX power supply that provides at least 1A on the system. Configuration options: [Disabled] [Enabled] ASUS RS161-E2/PA2 5-27 Restore on the system. Configuration options: [Disabled] [Enabled] Resume By PS/2 Mouse [Disabled] When set to Power On, the system will generate a wake...
5.4.7 APM Configuration This sub-menu allows you to use specific keys on the keyboard to turn on AC Power Loss [Power Off] When set to change Advanced Power Management (APM) features. Advanced APM Configuration Restore On ... (C)Copyright 1985-2004, American Megatrends, Inc. This feature requires an ATX power supply that provides at least 1A on the system. Configuration options: [Disabled] [Enabled] ASUS RS161-E2/PA2 5-27 Restore on the system. Configuration options: [Disabled] [Enabled] Resume By PS/2 Mouse [Disabled] When set to Power On, the system will generate a wake...

User Manual
Page 91
...] [11.932V] F1 General Help F10 Save and Exit ESC Exit V00.00 (C)Copyright 1985-2004, American Megatrends, Inc. ASUS RS161-E2/PA2 5-29 The C P U 1 T e m p e r a t u r e, C P U 2 T e m p e r a t u r e, and F r o n t 1 T e m p e r a t u r e items appear when you to scroll down arrow key to set the CPU and system threshold temperature before the Smart Fan Control is installed in CPU 2 socket. VCORE1...
...] [11.932V] F1 General Help F10 Save and Exit ESC Exit V00.00 (C)Copyright 1985-2004, American Megatrends, Inc. ASUS RS161-E2/PA2 5-29 The C P U 1 T e m p e r a t u r e, C P U 2 T e m p e r a t u r e, and F r o n t 1 T e m p e r a t u r e items appear when you to scroll down arrow key to set the CPU and system threshold temperature before the Smart Fan Control is installed in CPU 2 socket. VCORE1...

User Manual
Page 93
Configuration options: [ANSI] [VT100] [VT-UTF8] VT-UTF8 Combo Key Support [Disabled] Enables or disables the VT-UTF8 combo key support for console redirection. Configuration options: [Disabled] [Boot Loader] [Always] Terminal Type [ANSI] Allows you to select ...mode after the BIOS Power-On Self-Test (POST). Configuration options: [COM1] [COM2] Baudrate [57600] Sets the baudrate. Configuration options: [Disabled] [Enabled] ASUS RS161-E2/PA2 5-31 Configuration options: [115200] [57600] [38400] [19200] [9600] Flow Control [None] Allows you to Always. Serial port number [COM1] Selects...
Configuration options: [ANSI] [VT100] [VT-UTF8] VT-UTF8 Combo Key Support [Disabled] Enables or disables the VT-UTF8 combo key support for console redirection. Configuration options: [Disabled] [Boot Loader] [Always] Terminal Type [ANSI] Allows you to select ...mode after the BIOS Power-On Self-Test (POST). Configuration options: [COM1] [COM2] Baudrate [57600] Sets the baudrate. Configuration options: [Disabled] [Enabled] ASUS RS161-E2/PA2 5-31 Configuration options: [115200] [57600] [38400] [19200] [9600] Flow Control [None] Allows you to Always. Serial port number [COM1] Selects...

User Manual
Page 99
Configuration options: [Disabled] [Enabled] Interrupt 19 Capture [Disabled] When set to [Enabled], this function allows the option ROMs to be pressed when error occurs. Wait for 'F1' If Error [Enabled] When set to Enabled, the system waits for the F1 key to trap Interrupt 19. Configuration options: [Disabled] [Enabled] ASUS RS161-E2/PA2 5-37 Configuration options: [Disabled] [Enabled] Hit 'DEL' Message Display [Enabled] When set to Enabled, the system displays the message "Press DEL to run Setup" during POST.
Configuration options: [Disabled] [Enabled] Interrupt 19 Capture [Disabled] When set to [Enabled], this function allows the option ROMs to be pressed when error occurs. Wait for 'F1' If Error [Enabled] When set to Enabled, the system waits for the F1 key to trap Interrupt 19. Configuration options: [Disabled] [Enabled] ASUS RS161-E2/PA2 5-37 Configuration options: [Disabled] [Enabled] Hit 'DEL' Message Display [Enabled] When set to Enabled, the system displays the message "Press DEL to run Setup" during POST.

User Manual
Page 100
...Exit ESC Exit V00.00 (C)Copyright 1985-2004, American Megatrends, Inc. An onboard backup battery sustains the CMOS RAM so it stays on even when the computer is turned off. After selecting this menu or from the legend... exiting. Select one of the options from this option, a confirmation appears. If you are saved to the CMOS RAM. Pressing does not immediately exit this option, a confirmation window appears. Save Changes & Exit Once you made and ... load the previously saved values. 5-38 Chapter 5: BIOS setup F10 key can be used for a confirmation before exiting.
...Exit ESC Exit V00.00 (C)Copyright 1985-2004, American Megatrends, Inc. An onboard backup battery sustains the CMOS RAM so it stays on even when the computer is turned off. After selecting this menu or from the legend... exiting. Select one of the options from this option, a confirmation appears. If you are saved to the CMOS RAM. Pressing does not immediately exit this option, a confirmation window appears. Save Changes & Exit Once you made and ... load the previously saved values. 5-38 Chapter 5: BIOS setup F10 key can be used for a confirmation before exiting.

User Manual
Page 107
...to move through and select menu options. [F6] Back [F7] Finish [TAB] Navigate [↑↓] Select [ENTER] Popup The navigation keys vary depending on the menu level or option. Define a New Array - NVIDIA RAID Utility Oct 5 2004 - RAID Mode: Striping Striping ...F7] Finish [TAB] Navigate [↑↓] Select [ENTER] Popup At the bottom section of the screen are the navigation keys. 6.2.2 Entering the NVIDIA® RAID Utility To enter the NVIDIA® RAID Utility: 1. These keys allow you to display the utility main menu. ASUS RS161-E2/PA2 6-5 Restart the computer. 2.
...to move through and select menu options. [F6] Back [F7] Finish [TAB] Navigate [↑↓] Select [ENTER] Popup The navigation keys vary depending on the menu level or option. Define a New Array - NVIDIA RAID Utility Oct 5 2004 - RAID Mode: Striping Striping ...F7] Finish [TAB] Navigate [↑↓] Select [ENTER] Popup At the bottom section of the screen are the navigation keys. 6.2.2 Entering the NVIDIA® RAID Utility To enter the NVIDIA® RAID Utility: 1. These keys allow you to display the utility main menu. ASUS RS161-E2/PA2 6-5 Restart the computer. 2.

User Manual
Page 108
... Select [ENTER] Popup 6-6 Chapter 6: RAID configuration From the D e f i n e a N e w A r r a y menu, select R A I P . Use the up or down arrow keys to select the stripe block size appropriate to your drive usage, then press . 8K ↑ 16K 32K 64K 128K Optim ↓ The available stripe size... press . Use the up menu appears. 2. 6.2.3 Creating a RAID 0 set (Stripe) To create a RAID 0 set , then press the right arrow key to select. For typical disk usage, select 64 KB. For multimedia computer systems used mainly for performance disk usage. A pop-up or down arrow...
... Select [ENTER] Popup 6-6 Chapter 6: RAID configuration From the D e f i n e a N e w A r r a y menu, select R A I P . Use the up or down arrow keys to select the stripe block size appropriate to your drive usage, then press . 8K ↑ 16K 32K 64K 128K Optim ↓ The available stripe size... press . Use the up menu appears. 2. 6.2.3 Creating a RAID 0 set (Stripe) To create a RAID 0 set , then press the right arrow key to select. For typical disk usage, select 64 KB. For multimedia computer systems used mainly for performance disk usage. A pop-up or down arrow...

User Manual
Page 110
... data from the hard disk drives and continue creating the RAID set , then press the right arrow key to select. A pop-up menu appears. 2. Press to select M i r r o r i n g, then press . Use the up or down arrow keys to delete all desired hard disk drives are added. The utility displays the created RAID 1 set...
... data from the hard disk drives and continue creating the RAID set , then press the right arrow key to select. A pop-up menu appears. 2. Press to select M i r r o r i n g, then press . Use the up or down arrow keys to delete all desired hard disk drives are added. The utility displays the created RAID 1 set...

User Manual
Page 111
The RAID set after rebuilding. From the A r r a y L i s t, use the up or down arrow keys to select the RAID set you want to rebuild, then press . Boot No No Id Status 4 Healthy 3 Healthy Vendor NVIDIA NVIDIA Array Model... rebuild a RAID set you want to rebuild, then press . Use the up or down arrow keys to select a the RAID set : 1. Array List - NVIDIA RAID Utility Oct 5 2004 - A confirmation message appears. Rebuild array? [Enter] OK [Esc] Cancel ASUS RS161-E2/PA2 6-9 RAID Mode: Striping Striping Width: 1 Striping Block: 64K Adapt Channel M/S 2 1 1 0 ...
The RAID set after rebuilding. From the A r r a y L i s t, use the up or down arrow keys to select the RAID set you want to rebuild, then press . Boot No No Id Status 4 Healthy 3 Healthy Vendor NVIDIA NVIDIA Array Model... rebuild a RAID set you want to rebuild, then press . Use the up or down arrow keys to select a the RAID set : 1. Array List - NVIDIA RAID Utility Oct 5 2004 - A confirmation message appears. Rebuild array? [Enter] OK [Esc] Cancel ASUS RS161-E2/PA2 6-9 RAID Mode: Striping Striping Width: 1 Striping Block: 64K Adapt Channel M/S 2 1 1 0 ...

User Manual
Page 112
... lose all data on the drives if you want to delete, then press . Create a new RAID set . From the A r r a y L i s t, use the up or down arrow keys to cancel. The D e f i n e a N e w A r r a y menu appears when you press . NVAIrDrIaAy R1AI:D NUVtIiDlIiAtyMIRORcOtR 5 X2X0X0.4XXG - -ArArraryayLiDsetta-il - The RAID set you delete a disk array! 4. A confirmation message appears...
... lose all data on the drives if you want to delete, then press . Create a new RAID set . From the A r r a y L i s t, use the up or down arrow keys to cancel. The D e f i n e a N e w A r r a y menu appears when you press . NVAIrDrIaAy R1AI:D NUVtIiDlIiAtyMIRORcOtR 5 X2X0X0.4XXG - -ArArraryayLiDsetta-il - The RAID set you delete a disk array! 4. A confirmation message appears...

User Manual
Page 113
... You will lose all data when you want to clear, then press . From the A r r a y L i s t, use the up or down arrow keys to clear disk. Boot No No Id Status 4 Healthy 3 Healthy Vendor NVIDIA NVIDIA Array Model Name STRIPING XXX.XXG MIRRORING XXX.XXG [Ctrl-X]Exit [↑....XXGB XXX.XXGB [R] Rebuild [D] Delete [C] Clear Disk [ENTER] Return 3. Array Detail - The RAID set , then press . Clear disk data? [Y] Yes [N] Cancel ASUS RS161-E2/PA2 6-11 Press to clear the disk data, or press to cancel.Press to select a RAID set details appear. To clear the disk data: 1. Array...
... You will lose all data when you want to clear, then press . From the A r r a y L i s t, use the up or down arrow keys to clear disk. Boot No No Id Status 4 Healthy 3 Healthy Vendor NVIDIA NVIDIA Array Model Name STRIPING XXX.XXG MIRRORING XXX.XXG [Ctrl-X]Exit [↑....XXGB XXX.XXGB [R] Rebuild [D] Delete [C] Clear Disk [ENTER] Return 3. Array Detail - The RAID set , then press . Clear disk data? [Y] Yes [N] Cancel ASUS RS161-E2/PA2 6-11 Press to clear the disk data, or press to cancel.Press to select a RAID set details appear. To clear the disk data: 1. Array...

User Manual
Page 116
... in DOS (using the Makedisk application in the support CD) or in the optical drive. 2. Restart the computer, then enter the BIOS Setup. 3. Press any key to boot from CDROM... When you are now ready to install an operating system to boot from the Internet. Save your server system, you insert... Windows® 2000/XP operating system on how to the floppy disk drive. To create a RAID driver disk in a RAID set. When prompted, press any key to create the RAID driver disk from the system/motherboard support CD or from the support CD.
... in DOS (using the Makedisk application in the support CD) or in the optical drive. 2. Restart the computer, then enter the BIOS Setup. 3. Press any key to boot from CDROM... When you are now ready to install an operating system to boot from the Internet. Save your server system, you insert... Windows® 2000/XP operating system on how to the floppy disk drive. To create a RAID driver disk in a RAID set. When prompted, press any key to create the RAID driver disk from the system/motherboard support CD or from the support CD.
