
User Guide
Page 49
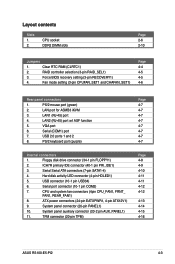
Force BIOS recovery setting (3-pin RECOVERY1) 4. LAN1 (RJ-45) port 4. ICH7R primary IDE connector (40-1 pin PRI_IDE1) 3. Fan mode setting (3-pin CPUFAN_SET1 and CHAFAN_SET1) Page 4-4 4-5 4-5 4-6 Rear panel connectors 1. Serial (COM1) port 7. USB connector (10-1 pin USB34) 6. Clear RTC RAM (CLRTC1) 2. PS/2 keyboard port ... pin FLOPPY1) 2. TPM connector (20-pin TPM) Page 4-7 4-7 4-7 4-7 4-7 4-7 4-7 4-7 Page 4-8 4-9 4-10 4-11 4-11 4-12 4-12 4-13 4-14 4-15 4-16 ASUS RS100-E5-PI2 4-3 RAID controller selection (3-pin RAID_SEL1) 3. Layout contents Slots 1. 2.
Force BIOS recovery setting (3-pin RECOVERY1) 4. LAN1 (RJ-45) port 4. ICH7R primary IDE connector (40-1 pin PRI_IDE1) 3. Fan mode setting (3-pin CPUFAN_SET1 and CHAFAN_SET1) Page 4-4 4-5 4-5 4-6 Rear panel connectors 1. Serial (COM1) port 7. USB connector (10-1 pin USB34) 6. Clear RTC RAM (CLRTC1) 2. PS/2 keyboard port ... pin FLOPPY1) 2. TPM connector (20-pin TPM) Page 4-7 4-7 4-7 4-7 4-7 4-7 4-7 4-7 Page 4-8 4-9 4-10 4-11 4-11 4-12 4-12 4-13 4-14 4-15 4-16 ASUS RS100-E5-PI2 4-3 RAID controller selection (3-pin RAID_SEL1) 3. Layout contents Slots 1. 2.
User Guide
Page 51
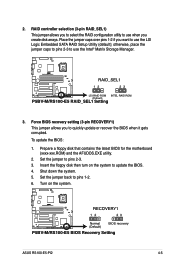
...Matrix Storage Manager. ® P5BV-M/RS100-E5 RAID_SEL1 12 23 LSI RAID ROM INTEL RAID ROM (Default) P5BV-M/RS100-E5 RAID_SEL1 Setting 3. Set the jumper to quickly update or recover the BIOS when it gets corrupted. 2. Force BIOS recovery setting (3-pin RECOVERY1) This ...jumper allows you want to pins 1-2. 6. Insert the floppy disk then turn on the system. ® P5BV-M/RS100-E5 RECOVERY1 12 23 Normal (Default) BIOS recovery P5BV-M/RS100-E5 BIOS Recovery Setting ASUS RS100-E5-PI2 4-5...
...Matrix Storage Manager. ® P5BV-M/RS100-E5 RAID_SEL1 12 23 LSI RAID ROM INTEL RAID ROM (Default) P5BV-M/RS100-E5 RAID_SEL1 Setting 3. Set the jumper to quickly update or recover the BIOS when it gets corrupted. 2. Force BIOS recovery setting (3-pin RECOVERY1) This ...jumper allows you want to pins 1-2. 6. Insert the floppy disk then turn on the system. ® P5BV-M/RS100-E5 RECOVERY1 12 23 Normal (Default) BIOS recovery P5BV-M/RS100-E5 BIOS Recovery Setting ASUS RS100-E5-PI2 4-5...
User Guide
Page 63
BIOS Setup ASUS RS100-E5-PI2 5-1 Chapter 5 This chapter tells how to change the system settings through the BIOS Setup menus. Detailed descriptions of the BIOS parameters are also provided.
BIOS Setup ASUS RS100-E5-PI2 5-1 Chapter 5 This chapter tells how to change the system settings through the BIOS Setup menus. Detailed descriptions of the BIOS parameters are also provided.

User Guide
Page 65
...not be same as backup when the BIOS fails or gets corrupted during the updating process. Version 1.19(ASUS V2.07(03.11.24BB)) Copyright (C) 2002 American Megatrends, Inc. All rights reserved. ok A:\> The utility returns to file...... Press . ASUS RS100-E5-PI2 5-3 This utility also allows you can ...use as shown. 1. Copy the AFUDOS utility (afudos.exe) from the motherboard support CD to the bootable floppy disk you to update the BIOS file in DOS mode, then at least 1024...
...not be same as backup when the BIOS fails or gets corrupted during the updating process. Version 1.19(ASUS V2.07(03.11.24BB)) Copyright (C) 2002 American Megatrends, Inc. All rights reserved. ok A:\> The utility returns to file...... Press . ASUS RS100-E5-PI2 5-3 This utility also allows you can ...use as shown. 1. Copy the AFUDOS utility (afudos.exe) from the motherboard support CD to the bootable floppy disk you to update the BIOS file in DOS mode, then at least 1024...
User Guide
Page 67
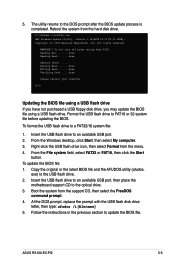
... select the FreeDOS command prompt. 4. Do not turn off power during flash BIOS Reading file ....... done Writing flash ...... Right-click the USB flash drive icon, then select Format from the menu. 4. ASUS RS100-E5-PI2 5-5 From the File system field, select FAT32 or FAT16, then click the... Start button. Follow the instructions in the previous section to the USB flash drive. 2. done Please restart your computer A:\> Updating the BIOS file using a USB flash ...
... select the FreeDOS command prompt. 4. Do not turn off power during flash BIOS Reading file ....... done Writing flash ...... Right-click the USB flash drive icon, then select Format from the menu. 4. ASUS RS100-E5-PI2 5-5 From the File system field, select FAT32 or FAT16, then click the... Start button. Follow the instructions in the previous section to the USB flash drive. 2. done Please restart your computer A:\> Updating the BIOS file using a USB flash ...
User Guide
Page 69
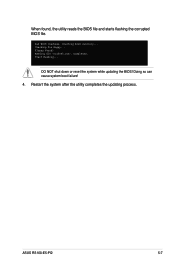
Bad BIOS checksum. Floppy found , the utility reads the BIOS file and starts flashing the corrupted BIOS file. Reading file "rs100e5.rom". Completed. Restart the system after the utility completes the updating process. Start flashing... Starting BIOS recovery... ASUS RS100-E5-PI2 5-7 DO NOT shut down or reset the system while updating the BIOS! Doing so can cause system boot failure! 4. Checking for floppy... When found !
Bad BIOS checksum. Floppy found , the utility reads the BIOS file and starts flashing the corrupted BIOS file. Reading file "rs100e5.rom". Completed. Restart the system after the utility completes the updating process. Start flashing... Starting BIOS recovery... ASUS RS100-E5-PI2 5-7 DO NOT shut down or reset the system while updating the BIOS! Doing so can cause system boot failure! 4. Checking for floppy... When found !
User Guide
Page 71
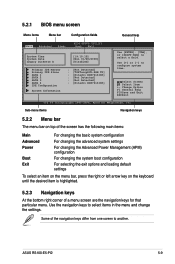
... of the navigation keys differ from one screen to select items in the menu and change the settings. ASUS RS100-E5-PI2 5-9 Use [+] or [-] to select a field. 5.2.1 BIOS menu screen Menu items Menu bar Configuration fields General help BIOS SETUP UTILITY Main Advanced Power Boot Exit System Time System Date Legacy Diskette A Primary IDE Master Primary...
... of the navigation keys differ from one screen to select items in the menu and change the settings. ASUS RS100-E5-PI2 5-9 Use [+] or [-] to select a field. 5.2.1 BIOS menu screen Menu items Menu bar Configuration fields General help BIOS SETUP UTILITY Main Advanced Power Boot Exit System Time System Date Legacy Diskette A Primary IDE Master Primary...
User Guide
Page 73
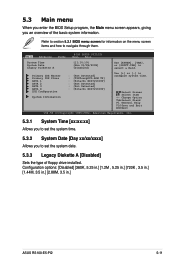
....] [720K , 3.5 in.] [1.44M, 3.5 in.] [2.88M, 3.5 in.] ASUS RS100-E5-PI2 5-11 Primary IDE Master Primary IDE Slave SATA 1 SATA 2 SATA 3 SATA 4 IDE Configuration System Information : [Not Detected] : [TSSTcorpDVD-ROM TS] : [Hitachi HDS721616P] : [Not Detected] : [Not Detected] : [Hitachi HDS721616P] Use [+] or [-] to navigate through them. Select Screen Select Item +- BIOS SETUP UTILITY Main Advanced Power Boot...
....] [720K , 3.5 in.] [1.44M, 3.5 in.] [2.88M, 3.5 in.] ASUS RS100-E5-PI2 5-11 Primary IDE Master Primary IDE Slave SATA 1 SATA 2 SATA 3 SATA 4 IDE Configuration System Information : [Not Detected] : [TSSTcorpDVD-ROM TS] : [Hitachi HDS721616P] : [Not Detected] : [Not Detected] : [Hitachi HDS721616P] Use [+] or [-] to navigate through them. Select Screen Select Item +- BIOS SETUP UTILITY Main Advanced Power Boot...

User Guide
Page 75
Select an item then press if you to configure the item. Configuration options: [Disabled] [Compatible] [Enhanced] Configure SATA as BIOS SETUP UTILITY [Enhanced] [IDE] Hard Disk Write Protect [Disabled] IDE Detect Time Out (Sec) [35] ATA(PI) 80Pin Cable Detection [... [Disabled] [Enabled] 5.3.5 IDE Configuration The items in this menu allow you to set the SATA configuration. Configuration options: [IDE] [RAID] [AHCI] ASUS RS100-E5-PI2 5-13 PIO Mode [Auto] Selects the PIO mode. Change Option F1 General Help F10 Save and Exit ESC Exit v02.58 (C)Copyright 1985-2007, American...
Select an item then press if you to configure the item. Configuration options: [Disabled] [Compatible] [Enhanced] Configure SATA as BIOS SETUP UTILITY [Enhanced] [IDE] Hard Disk Write Protect [Disabled] IDE Detect Time Out (Sec) [35] ATA(PI) 80Pin Cable Detection [... [Disabled] [Enabled] 5.3.5 IDE Configuration The items in this menu allow you to set the SATA configuration. Configuration options: [IDE] [RAID] [AHCI] ASUS RS100-E5-PI2 5-13 PIO Mode [Auto] Selects the PIO mode. Change Option F1 General Help F10 Save and Exit ESC Exit v02.58 (C)Copyright 1985-2007, American...
User Guide
Page 77
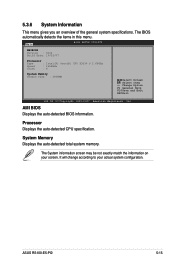
The BIOS automatically detects the items in this menu. System Memory Displays the auto-detected total system memory. Change Option F1 General Help F10 Save and Exit .... 5.3.6 System Information This menu gives you an overview of the general system specifications. AMI BIOS Displays the auto-detected BIOS information. The System information screen may be not exactly match the information on your actual system configuration. ASUS RS100-E5-PI2 5-15 Main BIOS SETUP UTILITY AMIBIOS Version : 0104 Build Date: 10/25/07 Processor Type : Intel...
The BIOS automatically detects the items in this menu. System Memory Displays the auto-detected total system memory. Change Option F1 General Help F10 Save and Exit .... 5.3.6 System Information This menu gives you an overview of the general system specifications. AMI BIOS Displays the auto-detected BIOS information. The System information screen may be not exactly match the information on your actual system configuration. ASUS RS100-E5-PI2 5-15 Main BIOS SETUP UTILITY AMIBIOS Version : 0104 Build Date: 10/25/07 Processor Type : Intel...
User Guide
Page 79
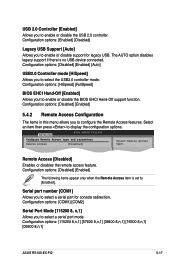
...mode [HiSpeed] Allows you to select a serial port mode. Configuration options: [115200 8,n,1] [57600 8,n,1] [38400 8,n,1] [19200 8,n,1] [09600 8,n,1] ASUS RS100-E5-PI2 5-17 Configuration options: [COM1] [COM2] Serial Port Mode [115200 8, n,1] Allows you to select the USB2.0 controller mode. Configuration options: [... following items appear only when the Remote Access item is no USB device connected. Configuration options: [HiSpeed] [FullSpeed] BIOS EHCI Hand-Off [Enabled] Allows yout to configure the Remote Access features. Configuration options: [Enabled] [Disabled] Legacy...
...mode [HiSpeed] Allows you to select a serial port mode. Configuration options: [115200 8,n,1] [57600 8,n,1] [38400 8,n,1] [19200 8,n,1] [09600 8,n,1] ASUS RS100-E5-PI2 5-17 Configuration options: [COM1] [COM2] Serial Port Mode [115200 8, n,1] Allows you to select the USB2.0 controller mode. Configuration options: [... following items appear only when the Remote Access item is no USB device connected. Configuration options: [HiSpeed] [FullSpeed] BIOS EHCI Hand-Off [Enabled] Allows yout to configure the Remote Access features. Configuration options: [Enabled] [Disabled] Legacy...
User Guide
Page 81
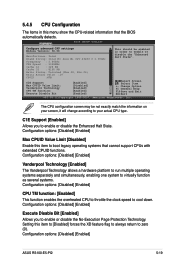
...] [Enabled] Execute Disable Bit [Enabled] Allows you to enable or disable the Enhanced Halt State. Configuration options: [Disabled] [Enabled] ASUS RS100-E5-PI2 5-19 Change Option F1 General Help F10 Save and Exit ESC Exit v02.58 (C)Copyright 1985-2007, American Megatrends, Inc. The CPU ... Configuration The items in order to enable or disable the "Enhanced Halt State". Setting this item to boot legacy operating systems that the BIOS automatically detects. Configuration options: [Disabled] [Enabled] Max CPUID Value Limit [Disabled] Enable this item to [Disabled] forces the XD...
...] [Enabled] Execute Disable Bit [Enabled] Allows you to enable or disable the Enhanced Halt State. Configuration options: [Disabled] [Enabled] ASUS RS100-E5-PI2 5-19 Change Option F1 General Help F10 Save and Exit ESC Exit v02.58 (C)Copyright 1985-2007, American Megatrends, Inc. The CPU ... Configuration The items in order to enable or disable the "Enhanced Halt State". Setting this item to boot legacy operating systems that the BIOS automatically detects. Configuration options: [Disabled] [Enabled] Max CPUID Value Limit [Disabled] Enable this item to [Disabled] forces the XD...

User Guide
Page 83
.../IRQ3] [Normal] PCIE LAN-5721A LAN5721A Boot ROM PCIE LAN-5721B LAN5721B Boot ROM [Enabled] [Disabled] [Enabled] [Disabled] Allows BIOS to display the sub-menu. Configuration options: [Normal] [IrDA] [ASK IR] ASUS RS100-E5-PI2 5-21 Serial Port1 Address [3F8/IRQ4] Allows you to select the Serial Port1 base address. Configuration options: [Disabled] [Enabled] SLP_S4...
.../IRQ3] [Normal] PCIE LAN-5721A LAN5721A Boot ROM PCIE LAN-5721B LAN5721B Boot ROM [Enabled] [Disabled] [Enabled] [Disabled] Allows BIOS to display the sub-menu. Configuration options: [Normal] [IrDA] [ASK IR] ASUS RS100-E5-PI2 5-21 Serial Port1 Address [3F8/IRQ4] Allows you to select the Serial Port1 base address. Configuration options: [Disabled] [Enabled] SLP_S4...

User Guide
Page 85
... the system so that an ISA graphics device is reserved for legacy ISA devices. Configuration options: [PCI Device] [Reserved] ASUS RS100-E5-PI2 5-23 Allocate IRQ to PCI VGA [Yes] When set to [Yes], BIOS assigns an IRQ to PCI VGA card if the card requests for use of PCI/PnP devices. Configuration options: [Disabled...] [Enabled] IRQ-xx assigned to [PCI Device] When set to [No], BIOS does not assign an IRQ to the PCI VGA card...
... the system so that an ISA graphics device is reserved for legacy ISA devices. Configuration options: [PCI Device] [Reserved] ASUS RS100-E5-PI2 5-23 Allocate IRQ to PCI VGA [Yes] When set to [Yes], BIOS assigns an IRQ to PCI VGA card if the card requests for use of PCI/PnP devices. Configuration options: [Disabled...] [Enabled] IRQ-xx assigned to [PCI Device] When set to [No], BIOS does not assign an IRQ to the PCI VGA card...

User Guide
Page 87
...Minute (Second) [30] To set to Last State, the system goes into off mode. Configuration options: [00] [01] [02] [03]...[59] ASUS RS100-E5-PI2 5-25 When set values. When set the alarm minute (second≠), highlight this item and press the or key to make the selection. Configuration options... Alarm [Disabled] [Disabled] [Disabled] to select whether or not to restart the system after AC power loss. 5.5.1 APM Configuration Power BIOS SETUP UTILITY APM Configuration Restore on AC Power Loss [Last State] When set the alarm hour, highlight this item and press the or key...
...Minute (Second) [30] To set to Last State, the system goes into off mode. Configuration options: [00] [01] [02] [03]...[59] ASUS RS100-E5-PI2 5-25 When set values. When set the alarm minute (second≠), highlight this item and press the or key to make the selection. Configuration options... Alarm [Disabled] [Disabled] [Disabled] to select whether or not to restart the system after AC power loss. 5.5.1 APM Configuration Power BIOS SETUP UTILITY APM Configuration Restore on AC Power Loss [Last State] When set the alarm hour, highlight this item and press the or key...

User Guide
Page 91
...Wait for 'F1' If Error [Enabled] When set display mode for the NumLock. Configuration options: [Disabled] [Enabled] ASUS RS100-E5-PI2 5-29 AddOn ROM Display Mode [Force BIOS] Allows you to select the power-on self tests (POST) while booting to decrease the time needed to skip certain tests... some power on state for optional ROM. Configuration options: [Disabled] [Enabled] Set this item allows the BIOS to use the ASUS MyLogo2™ feature. Configuration options: [Force BIOS] [Keep Current] Bootup Num-Lock [On] Allows you to set to Enabled, the system waits for ...
...Wait for 'F1' If Error [Enabled] When set display mode for the NumLock. Configuration options: [Disabled] [Enabled] ASUS RS100-E5-PI2 5-29 AddOn ROM Display Mode [Force BIOS] Allows you to select the power-on self tests (POST) while booting to decrease the time needed to skip certain tests... some power on state for optional ROM. Configuration options: [Disabled] [Enabled] Set this item allows the BIOS to use the ASUS MyLogo2™ feature. Configuration options: [Force BIOS] [Keep Current] Bootup Num-Lock [On] Allows you to set to Enabled, the system waits for ...

User Guide
Page 93
... Password Select this item shows Installed. Password Check [Setup] When set your password successfully. Configuration options: [Setup] [Always] ASUS RS100-E5-PI2 5-31 User Access Level [Full Access] This item allows you set to [Always], BIOS checks for user password when accessing the Setup utility. When set a password, this item to clear the user password...
... Password Select this item shows Installed. Password Check [Setup] When set your password successfully. Configuration options: [Setup] [Always] ASUS RS100-E5-PI2 5-31 User Access Level [Full Access] This item allows you set to [Always], BIOS checks for user password when accessing the Setup utility. When set a password, this item to clear the user password...

User Guide
Page 97
Install the SATA hard disks into the drive bays. 2. To do this: 1. ASUS RS100-E5-PI2 6-3 Select RAID from the Configure SATA As item options, then press . 5. Refer to Chapter 5 for details on the RAID_SEL1 jumper setting and the operating system, ...0 or RAID 1 set (s). For optimal performance, install identical drives of the same model and capacity when creating a disk array. Save your changes, then exit the BIOS Setup. Use the Intel® Matrix Storage Manager to create a RAID set. Refer to the succeeding sections for details on entering and navigating through the...
Install the SATA hard disks into the drive bays. 2. To do this: 1. ASUS RS100-E5-PI2 6-3 Select RAID from the Configure SATA As item options, then press . 5. Refer to Chapter 5 for details on the RAID_SEL1 jumper setting and the operating system, ...0 or RAID 1 set (s). For optimal performance, install identical drives of the same model and capacity when creating a disk array. Save your changes, then exit the BIOS Setup. Use the Intel® Matrix Storage Manager to create a RAID set. Refer to the succeeding sections for details on entering and navigating through the...
User Guide
Page 105
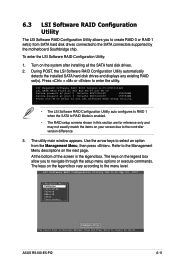
... screens shown in this section are for reference only and may not exactly match the items on the next page. LSI MegaRAID Software RAID BIOS Version A.05.090611342R LSI SATA RAID Found at PCI Bus No:00 Dev No:1F Device present at port 0 Hitachi HDS721616P 156554MB Device...Management Menu descriptions on your screen due to the controller version difference. 3. Press + or to Navigate Between Items And Press Enter To Select An Option ASUS RS100-E5-PI2 6-11 The utility main window appears. The keys on the legend box allow you to create RAID 0 or RAID 1 set (s). LSI Software RAID...
... screens shown in this section are for reference only and may not exactly match the items on the next page. LSI MegaRAID Software RAID BIOS Version A.05.090611342R LSI SATA RAID Found at PCI Bus No:00 Dev No:1F Device present at port 0 Hitachi HDS721616P 156554MB Device...Management Menu descriptions on your screen due to the controller version difference. 3. Press + or to Navigate Between Items And Press Enter To Select An Option ASUS RS100-E5-PI2 6-11 The utility main window appears. The keys on the legend box allow you to create RAID 0 or RAID 1 set (s). LSI Software RAID...
User Guide
Page 147
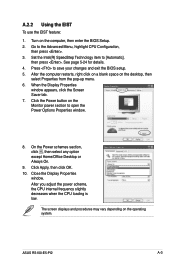
... EIST To use the EIST feature: 1. After the computer restarts, right click on a blank space on the computer, then enter the BIOS Setup. 2. Go to save your changes and exit the BIOS setup. 5. Set the Intel(R) SpeedStep Technology item to open the Power Options Properties window. 8. The screen displays and procedures may.... 10. Click the Power button on the operating system. See page 5-24 for details. 4. When the Display Properties window appears, click the Screen Saver tab. 7. ASUS RS100-E5-PI2 A-3 Close the Display Properties window.
... EIST To use the EIST feature: 1. After the computer restarts, right click on a blank space on the computer, then enter the BIOS Setup. 2. Go to save your changes and exit the BIOS setup. 5. Set the Intel(R) SpeedStep Technology item to open the Power Options Properties window. 8. The screen displays and procedures may.... 10. Click the Power button on the operating system. See page 5-24 for details. 4. When the Display Properties window appears, click the Screen Saver tab. 7. ASUS RS100-E5-PI2 A-3 Close the Display Properties window.


