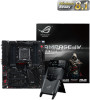
RAMPAGE IV BLACK EDITION User's Manual
Page 3
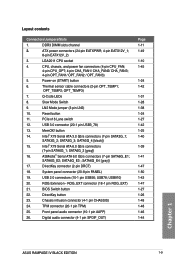
... information...vi About this guide...vii RAMPAGE IV BLACK EDITION specifications summary ix OC Panel specifications summary xiii Package contents...xiv Installation tools and components xv Chapter 1: Product Introduction 1.1 Special features 1-1 1.1.1 Product highlights 1-1 1.1.2 ROG Unique Gaming Features 1-2 1.1.3 ROG exclusive features 1-3 1.1.4 ASUS special features 1-5 1.1.5 ROG rich-bundled...2.1.6 SATA device connection 2-9 2.1.7 Front I/O Connector 2-10 2.1.8 Expansion Card installation 2-11 2.1.9 Wi-Fi antenna installation 2-12 2.2 BIOS update utility 2-13 iii
... information...vi About this guide...vii RAMPAGE IV BLACK EDITION specifications summary ix OC Panel specifications summary xiii Package contents...xiv Installation tools and components xv Chapter 1: Product Introduction 1.1 Special features 1-1 1.1.1 Product highlights 1-1 1.1.2 ROG Unique Gaming Features 1-2 1.1.3 ROG exclusive features 1-3 1.1.4 ASUS special features 1-5 1.1.5 ROG rich-bundled...2.1.6 SATA device connection 2-9 2.1.7 Front I/O Connector 2-10 2.1.8 Expansion Card installation 2-11 2.1.9 Wi-Fi antenna installation 2-12 2.2 BIOS update utility 2-13 iii
RAMPAGE IV BLACK EDITION User's Manual
Page 13
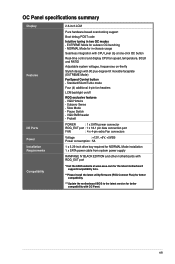
...1 x 5.25-inch drive bay required for NORMAL Mode installation 1 x SATA power cable from system power supply RAMPAGE IV BLACK EDITION and other motherboards with ROG_EXT port *Visit the ASUS website at one-click OC button Real-time control and display CPU fan speed, temperature, BCLK and RATIO Adjustable ... support/compatibility lists. **Please install the latest utility/firmware (ROG Connect Plus) for better compatibility. ***Update the motherboard BIOS to the latest version for better compatibility with 90 plus-degree-tilt movable faceplate (EXTREME Mode) FanSpeed Control button - EXTREME...
...1 x 5.25-inch drive bay required for NORMAL Mode installation 1 x SATA power cable from system power supply RAMPAGE IV BLACK EDITION and other motherboards with ROG_EXT port *Visit the ASUS website at one-click OC button Real-time control and display CPU fan speed, temperature, BCLK and RATIO Adjustable ... support/compatibility lists. **Please install the latest utility/firmware (ROG Connect Plus) for better compatibility. ***Update the motherboard BIOS to the latest version for better compatibility with 90 plus-degree-tilt movable faceplate (EXTREME Mode) FanSpeed Control button - EXTREME...
RAMPAGE IV BLACK EDITION User's Manual
Page 21
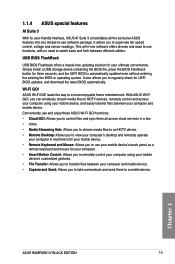
...'s desktop and remotely operate your computer in -one simple-to supervise fan speed control, voltage and sensor readings. Chapter 1 ASUS RAMPAGE IV BLACK EDITION 1-5 leads the way to regularly check for UEFI BIOS updates, and download the latest BIOS automatically. functions: • Cloud GO!: Allows you to control files and sync them all across cloud services in...
...'s desktop and remotely operate your computer in -one simple-to supervise fan speed control, voltage and sensor readings. Chapter 1 ASUS RAMPAGE IV BLACK EDITION 1-5 leads the way to regularly check for UEFI BIOS updates, and download the latest BIOS automatically. functions: • Cloud GO!: Allows you to control files and sync them all across cloud services in...
RAMPAGE IV BLACK EDITION User's Manual
Page 25
... 1-24 1-27 1-42 1-25 1-40 1-39 1-41 1-47 1-50 1-43 1-47 1-27 1-26 1-48 1-48 1-46 1-44 Chapter 1 ASUS RAMPAGE IV BLACK EDITION 1-9 Layout contents Connectors/Jumpers/Slots 1. CPU, chassis, and power fan connectors (4-pin CPU_FAN; 4-pin CPU_OPT; 4-pin CHA_FAN1/ CHA_FAN2/ CHA_FAN3; 4-pin...174; Serial ATA 6.0 Gb/s connectors (7-pin SATA6G_E1; OPT_TEMP3) 7. MemOK! SATA6G_E2; Reset button 11. DirectKey button 23. SATA3G_4 [black]) 15. Front panel audio connector (10-1 pin AAFP) 26. SATA3G_2; SATA6G_E3 ; Chassis intrusion connector (4-1 pin CHASSIS) 24. DDR3...
... 1-24 1-27 1-42 1-25 1-40 1-39 1-41 1-47 1-50 1-43 1-47 1-27 1-26 1-48 1-48 1-46 1-44 Chapter 1 ASUS RAMPAGE IV BLACK EDITION 1-9 Layout contents Connectors/Jumpers/Slots 1. CPU, chassis, and power fan connectors (4-pin CPU_FAN; 4-pin CPU_OPT; 4-pin CHA_FAN1/ CHA_FAN2/ CHA_FAN3; 4-pin...174; Serial ATA 6.0 Gb/s connectors (7-pin SATA6G_E1; OPT_TEMP3) 7. MemOK! SATA6G_E2; Reset button 11. DirectKey button 23. SATA3G_4 [black]) 15. Front panel audio connector (10-1 pin AAFP) 26. SATA3G_2; SATA6G_E3 ; Chassis intrusion connector (4-1 pin CHASSIS) 24. DDR3...
RAMPAGE IV BLACK EDITION User's Manual
Page 37
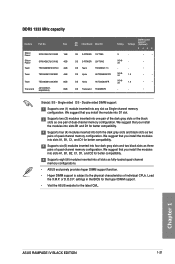
... modules inserted into any slot as two pairs of quad-channel memory configuration. settings in the BIOS for the hyper DIMM support. • Visit the ASUS website for better compatibility. SS S-POWER 10YT3E5 DS S-POWER 20YT3NG DS Team T3D2568LT-13 DS ... slots or the black slots as fully-loaded quad-channel memory configurations. • ASUS exclusively provides hyper DIMM support function. • Hyper DIMM support is subject to the physical characteristics of dual-channel memory configuration. Load the X.M.P. Chapter 1 ASUS RAMPAGE IV BLACK EDITION 1-21 Supports eight...
... modules inserted into any slot as two pairs of quad-channel memory configuration. settings in the BIOS for the hyper DIMM support. • Visit the ASUS website for better compatibility. SS S-POWER 10YT3E5 DS S-POWER 20YT3NG DS Team T3D2568LT-13 DS ... slots or the black slots as fully-loaded quad-channel memory configurations. • ASUS exclusively provides hyper DIMM support function. • Hyper DIMM support is subject to the physical characteristics of dual-channel memory configuration. Load the X.M.P. Chapter 1 ASUS RAMPAGE IV BLACK EDITION 1-21 Supports eight...

RAMPAGE IV BLACK EDITION User's Manual
Page 41
... the MemOK! If the installed DIMMs still fail to the latest BIOS version from the ASUS website at www.asus.com. • If you download and update to boot after using the MemOK! ASUS RAMPAGE IV BLACK EDITION 1-25 Chapter 1 button Installing DIMMs that helps check key components ...during the tuning process, the system continues memory tuning after turning on the ASUS website at www.asus.com after the whole tuning process, the ...
... the MemOK! If the installed DIMMs still fail to the latest BIOS version from the ASUS website at www.asus.com. • If you download and update to boot after using the MemOK! ASUS RAMPAGE IV BLACK EDITION 1-25 Chapter 1 button Installing DIMMs that helps check key components ...during the tuning process, the system continues memory tuning after turning on the ASUS website at www.asus.com after the whole tuning process, the ...
RAMPAGE IV BLACK EDITION User's Manual
Page 43
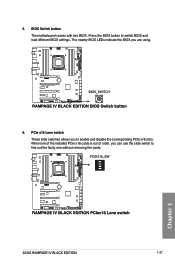
Press the BIOS button to find out the faulty one of the installed PCIe x16 cards is out of order, you can use the slide switch to switch BIOS and load different BIOS settings. When one without removing the cards. The nearby BIOS LEDs indicate the BIOS you to enable and disable the corresponding PCIe x16 slots. BIOS Switch button The motherboard comes with two BIOS. Chapter 1 ASUS RAMPAGE IV BLACK EDITION 1-27 PCIe x16 Lane switch These slide switches allows you are using. 6. 5.
Press the BIOS button to find out the faulty one of the installed PCIe x16 cards is out of order, you can use the slide switch to switch BIOS and load different BIOS settings. When one without removing the cards. The nearby BIOS LEDs indicate the BIOS you to enable and disable the corresponding PCIe x16 slots. BIOS Switch button The motherboard comes with two BIOS. Chapter 1 ASUS RAMPAGE IV BLACK EDITION 1-27 PCIe x16 Lane switch These slide switches allows you are using. 6. 5.
RAMPAGE IV BLACK EDITION User's Manual
Page 45
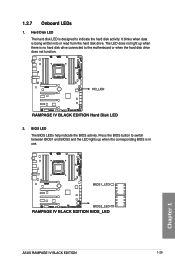
It blinks when data is designed to indicate the hard disk activity. The LED does not light up when the corresponding BIOS is no hard disk drive connected to switch between BIOS1 and BIOS2 and the LED lights up when there is in use. 1.2.7 Onboard LEDs 1. Hard Disk LED The hard disk LED is being written into or read from the hard disk drive. BIOS LED The BIOS LEDs help indicate the BIOS activity. Press the BIOS button to the motherboard or when the hard disk drive does not function. 2. Chapter 1 ASUS RAMPAGE IV BLACK EDITION 1-29
It blinks when data is designed to indicate the hard disk activity. The LED does not light up when the corresponding BIOS is no hard disk drive connected to switch between BIOS1 and BIOS2 and the LED lights up when there is in use. 1.2.7 Onboard LEDs 1. Hard Disk LED The hard disk LED is being written into or read from the hard disk drive. BIOS LED The BIOS LEDs help indicate the BIOS activity. Press the BIOS button to the motherboard or when the hard disk drive does not function. 2. Chapter 1 ASUS RAMPAGE IV BLACK EDITION 1-29
RAMPAGE IV BLACK EDITION User's Manual
Page 55
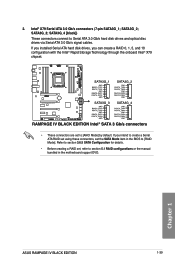
Chapter 1 ASUS RAMPAGE IV BLACK EDITION 1-39 Intel® X79 Serial ATA 3.0 Gb/s connectors (7-pin SATA3G_1; SATA3G_3; SATA3G_4 [black]) These connectors connect to section 5.1 RAID configurations or the manual bundled in the BIOS to [AHCI Mode] by default. Refer to section 3.6.5 SATA Configuration for details. • Before creating a RAID set, refer to Serial ATA 3.0 Gb/s hard disk drives...
Chapter 1 ASUS RAMPAGE IV BLACK EDITION 1-39 Intel® X79 Serial ATA 3.0 Gb/s connectors (7-pin SATA3G_1; SATA3G_3; SATA3G_4 [black]) These connectors connect to section 5.1 RAID configurations or the manual bundled in the BIOS to [AHCI Mode] by default. Refer to section 3.6.5 SATA Configuration for details. • Before creating a RAID set, refer to Serial ATA 3.0 Gb/s hard disk drives...

RAMPAGE IV BLACK EDITION User's Manual
Page 57
... • The USB 3.0 module is for the additional USB 3.0 ports, and complies with the temperature sensors for temperature monitoring. ASUS RAMPAGE IV BLACK EDITION 1-41 Chapter 1 We recommend you to install the related driver to these connectors. • Thermal sensor cables or thermistors are ...) This connector is purchased separately. • These connectors are purchased separately. • To monitor the temperature at the BIOS, go to BIOS>Monitor>Temperature Monitor. If the USB 3.0 front panel cable is available from your system chassis, with this USB 3.0 connector...
... • The USB 3.0 module is for the additional USB 3.0 ports, and complies with the temperature sensors for temperature monitoring. ASUS RAMPAGE IV BLACK EDITION 1-41 Chapter 1 We recommend you to install the related driver to these connectors. • Thermal sensor cables or thermistors are ...) This connector is purchased separately. • These connectors are purchased separately. • To monitor the temperature at the BIOS, go to BIOS>Monitor>Temperature Monitor. If the USB 3.0 front panel cable is available from your system chassis, with this USB 3.0 connector...
RAMPAGE IV BLACK EDITION User's Manual
Page 61
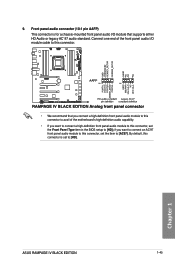
... panel audio module to this connector, set the Front Panel Type item in the BIOS setup to [HD]. By default, this connector is for a chassis-mounted front panel audio I /O module cable to this connector, set to [HD]; Chapter 1 ASUS RAMPAGE IV BLACK EDITION 1-45 Front panel audio connector (10-1 pin AAFP) This connector is set the...
... panel audio module to this connector, set the Front Panel Type item in the BIOS setup to [HD]. By default, this connector is for a chassis-mounted front panel audio I /O module cable to this connector, set to [HD]; Chapter 1 ASUS RAMPAGE IV BLACK EDITION 1-45 Front panel audio connector (10-1 pin AAFP) This connector is set the...
RAMPAGE IV BLACK EDITION User's Manual
Page 65
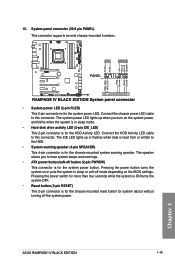
... power button/soft-off button (2-pin PWRSW) This connector is for the system power LED. ASUS RAMPAGE IV BLACK EDITION 1-49 Chapter 1 The IDE LED lights up when you to this connector. The speaker allows you turn on the BIOS settings. Pressing the power switch for more than four seconds while the system is ON turns...
... power button/soft-off button (2-pin PWRSW) This connector is for the system power LED. ASUS RAMPAGE IV BLACK EDITION 1-49 Chapter 1 The IDE LED lights up when you to this connector. The speaker allows you turn on the BIOS settings. Pressing the power switch for more than four seconds while the system is ON turns...
RAMPAGE IV BLACK EDITION User's Manual
Page 79
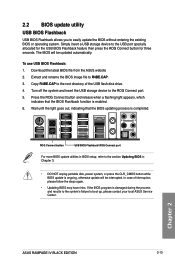
... system. Copy R4BE.CAP to the root directory of interruption, please follow the steps again. • Updating BIOS may have risks. Chapter 2 ASUS RAMPAGE IV BLACK EDITION 2-13 Press the ROG Connect button and release when a flashing light appears, which indicates that the BIOS updating process is ongoing, otherwise update will be interrupted. ROG Connect button USB...
... system. Copy R4BE.CAP to the root directory of interruption, please follow the steps again. • Updating BIOS may have risks. Chapter 2 ASUS RAMPAGE IV BLACK EDITION 2-13 Press the ROG Connect button and release when a flashing light appears, which indicates that the BIOS updating process is ongoing, otherwise update will be interrupted. ROG Connect button USB...
RAMPAGE IV BLACK EDITION User's Manual
Page 89
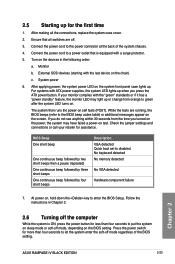
... seconds to put the system on sleep mode or soft-off . 3. After applying power, the system power LED on the BIOS setting. BIOS Beep One short beep One continuous beep followed by two short beeps then a pause (repeated) One continuous beep followed by three...the BIOS Setup. Follow the instructions in the following order: a. Check the jumper settings and connections or call your monitor complies with a surge protector. 5. Connect the power cord to a power outlet that all the connections, replace the system case cover. 2. System power 6. Chapter 2 ASUS RAMPAGE IV BLACK EDITION 2-23...
... seconds to put the system on sleep mode or soft-off . 3. After applying power, the system power LED on the BIOS setting. BIOS Beep One short beep One continuous beep followed by two short beeps then a pause (repeated) One continuous beep followed by three...the BIOS Setup. Follow the instructions in the following order: a. Check the jumper settings and connections or call your monitor complies with a surge protector. 5. Connect the power cord to a power outlet that all the connections, replace the system case cover. 2. System power 6. Chapter 2 ASUS RAMPAGE IV BLACK EDITION 2-23...

RAMPAGE IV BLACK EDITION User's Manual
Page 91
... ensure optimal performance. Chapter 3 ASUS RAMPAGE IV BLACK EDITION 3-1 DO NOT change the BIOS settings only with the same smoothness as your operating system. When downloading or updating the BIOS file, rename it as storage device configuration, overclocking settings, advanced power management, and boot device configuration that goes beyond the traditional keyboardonly BIOS controls to enable a more flexible...
... ensure optimal performance. Chapter 3 ASUS RAMPAGE IV BLACK EDITION 3-1 DO NOT change the BIOS settings only with the same smoothness as your operating system. When downloading or updating the BIOS file, rename it as storage device configuration, overclocking settings, advanced power management, and boot device configuration that goes beyond the traditional keyboardonly BIOS controls to enable a more flexible...
RAMPAGE IV BLACK EDITION User's Manual
Page 93
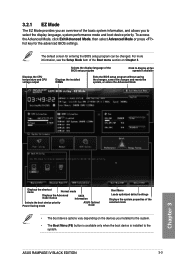
... the system properties of the selected mode • The boot device options vary depending on Chapter 3. The default screen for the advanced BIOS settings. ASUS RAMPAGE IV BLACK EDITION 3-3 To access the Advanced Mode, click Exit/Advanced Mode, then select Advanced Mode or press hot key for entering the... BIOS setup program can be changed. For more information, see the Setup Mode item of the Boot menu section on the devices you to ...
... the system properties of the selected mode • The boot device options vary depending on Chapter 3. The default screen for the advanced BIOS settings. ASUS RAMPAGE IV BLACK EDITION 3-3 To access the Advanced Mode, click Exit/Advanced Mode, then select Advanced Mode or press hot key for entering the... BIOS setup program can be changed. For more information, see the Setup Mode item of the Boot menu section on the devices you to ...

RAMPAGE IV BLACK EDITION User's Manual
Page 95
...BIOS. • The Quick Note function does not support the following keyboard functions: delete, cut, copy and paste. • You can change the value of options. You cannot select an item that you have their respective menu items. Back button This button appears when entering a submenu. Chapter 3 ASUS RAMPAGE IV BLACK EDITION... after your notes. For example, selecting Main shows the Main menu items. The other items on the menu bar have done in BIOS Setup. General help At the top right corner of the selected item. To change the settings. A configurable field is a brief ...
...BIOS. • The Quick Note function does not support the following keyboard functions: delete, cut, copy and paste. • You can change the value of options. You cannot select an item that you have their respective menu items. Back button This button appears when entering a submenu. Chapter 3 ASUS RAMPAGE IV BLACK EDITION... after your notes. For example, selecting Main shows the Main menu items. The other items on the menu bar have done in BIOS Setup. General help At the top right corner of the selected item. To change the settings. A configurable field is a brief ...
RAMPAGE IV BLACK EDITION User's Manual
Page 97
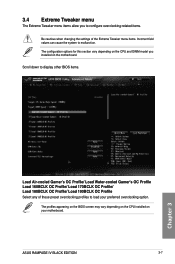
... OC Profile/ Load 190BCLK OC Profile Select any of the Extreme Tweaker menu items. Incorrect field values can cause the system to load your motherboard. ASUS RAMPAGE IV BLACK EDITION 3-7 The profiles appearing on the BIOS screen may vary depending on the CPU installed on the motherboard.
... OC Profile/ Load 190BCLK OC Profile Select any of the Extreme Tweaker menu items. Incorrect field values can cause the system to load your motherboard. ASUS RAMPAGE IV BLACK EDITION 3-7 The profiles appearing on the BIOS screen may vary depending on the CPU installed on the motherboard.
RAMPAGE IV BLACK EDITION User's Manual
Page 111
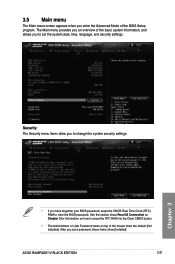
...on top of the screen show [Installed]. After you enter the Advanced Mode of the basic system information, and allows you have forgotten your BIOS password, erase the CMOS Real Time Clock (RTC) RAM to set a password, these items show the default [Not Installed]. 3.5 Main ... you set the system date, time, language, and security settings. The Main menu provides you an overview of the BIOS Setup program. Security The Security menu items allow you to change the system security settings. • If you to clear the BIOS password. ASUS RAMPAGE IV BLACK EDITION 3-21 Chapter 3
...on top of the screen show [Installed]. After you enter the Advanced Mode of the basic system information, and allows you have forgotten your BIOS password, erase the CMOS Real Time Clock (RTC) RAM to set a password, these items show the default [Not Installed]. 3.5 Main ... you set the system date, time, language, and security settings. The Main menu provides you an overview of the BIOS Setup program. Security The Security menu items allow you to change the system security settings. • If you to clear the BIOS password. ASUS RAMPAGE IV BLACK EDITION 3-21 Chapter 3
RAMPAGE IV BLACK EDITION User's Manual
Page 117
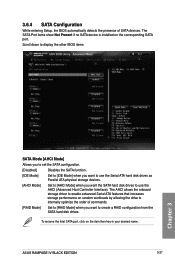
...drive to internally optimize the order of SATA devices. ASUS RAMPAGE IV BLACK EDITION 3-27 The SATA Port items show Not Present if no SATA device is installed on the item then key-in your desired name. Scroll down to display the other BIOS items. Chapter 3 SATA Mode [AHCI Mode] Allows...(Advanced Host Controller Interface). To rename the Intel SATA port, click on the corresponding SATA port. 3.6.4 SATA Configuration While entering Setup, the BIOS automatically detects the presence of commands. [RAID Mode] Set to [RAID Mode] when you want to use the Serial ATA hard disk drives...
...drive to internally optimize the order of SATA devices. ASUS RAMPAGE IV BLACK EDITION 3-27 The SATA Port items show Not Present if no SATA device is installed on the item then key-in your desired name. Scroll down to display the other BIOS items. Chapter 3 SATA Mode [AHCI Mode] Allows...(Advanced Host Controller Interface). To rename the Intel SATA port, click on the corresponding SATA port. 3.6.4 SATA Configuration While entering Setup, the BIOS automatically detects the presence of commands. [RAID Mode] Set to [RAID Mode] when you want to use the Serial ATA hard disk drives...


