
User Guide
Page 19
PS/2 mouse port (green). This port is for a PS/2 mouse. 2. ASUS Q87M-E 1-11 • If the steps above do not need to clear the RTC when the system hangs due to overclocking. Intel® ME jumper (3-pin ... panel connectors 2 3 4 56 13 12 11 10 9 8 7 1. This 15-pin port is for a DisplayPort-compatible devices. 3. Shut down and reboot the system, then the BIOS automatically resets parameter settings to enable or disable the Intel® ME function. For system failure due to a Local Area Network (LAN) through a network hub. DIS_ME 12...
PS/2 mouse port (green). This port is for a PS/2 mouse. 2. ASUS Q87M-E 1-11 • If the steps above do not need to clear the RTC when the system hangs due to overclocking. Intel® ME jumper (3-pin ... panel connectors 2 3 4 56 13 12 11 10 9 8 7 1. This 15-pin port is for a DisplayPort-compatible devices. 3. Shut down and reboot the system, then the BIOS automatically resets parameter settings to enable or disable the Intel® ME function. For system failure due to a Local Area Network (LAN) through a network hub. DIS_ME 12...
User Guide
Page 31
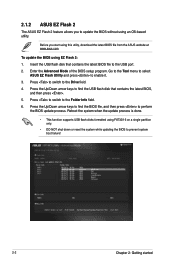
... the latest BIOS file from the ASUS website at www.asus.com. Before you to prevent system boot failure! 2-2 Chapter 2: Getting started Reboot the system when the update process is done. • This function supports USB flash disks formatted using FAT32/16 on a single partition only. • DO NOT shut down or reset the...
... the latest BIOS file from the ASUS website at www.asus.com. Before you to prevent system boot failure! 2-2 Chapter 2: Getting started Reboot the system when the update process is done. • This function supports USB flash disks formatted using FAT32/16 on a single partition only. • DO NOT shut down or reset the...
User Guide
Page 32
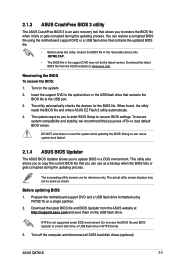
... on the system. 2. ASUS Q87M-E 2-3 Download the latest BIOS file from the ASUS website at www.asus.com. To ensure system compatibility and stability, we recommend that you can cause system boot failure! 2.1.4 ASUS BIOS Updater The ASUS BIOS Updater allows you to enter BIOS Setup to the USB port...hard disk drives (optional). DO NOT shut down or reset the system while updating the BIOS! 2.1.3 ASUS CrashFree BIOS 3 utility The ASUS CrashFree BIOS 3 is not supported under DOS environment. The succeeding utility screens are for the BIOS file. Do not save them on the USB flash...
... on the system. 2. ASUS Q87M-E 2-3 Download the latest BIOS file from the ASUS website at www.asus.com. To ensure system compatibility and stability, we recommend that you can cause system boot failure! 2.1.4 ASUS BIOS Updater The ASUS BIOS Updater allows you to enter BIOS Setup to the USB port...hard disk drives (optional). DO NOT shut down or reset the system while updating the BIOS! 2.1.3 ASUS CrashFree BIOS 3 utility The ASUS CrashFree BIOS 3 is not supported under DOS environment. The succeeding utility screens are for the BIOS file. Do not save them on the USB flash...
User Guide
Page 34
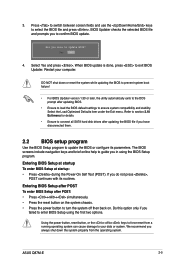
... back on. Entering BIOS Setup at startup To enter BIOS Setup at startup: • Press during the Power-On Self Test (POST). Using the power button, reset button, or the ++ keys to enter BIOS Setup using the BIOS Setup program. Restart your...BIOS Updater. Entering BIOS Setup after POST To enter BIOS Setup after updating the BIOS file if you do not press , POST continues with its parameters. BIOS Updater checks the selected BIOS file and prompts you in using the first two options. The BIOS screens include navigation keys and brief online help to your computer. ASUS Q87M...
... back on. Entering BIOS Setup at startup To enter BIOS Setup at startup: • Press during the Power-On Self Test (POST). Using the power button, reset button, or the ++ keys to enter BIOS Setup using the BIOS Setup program. Restart your...BIOS Updater. Entering BIOS Setup after POST To enter BIOS Setup after updating the BIOS file if you do not press , POST continues with its parameters. BIOS Updater checks the selected BIOS file and prompts you in using the first two options. The BIOS screens include navigation keys and brief online help to your computer. ASUS Q87M...
User Guide
Page 35
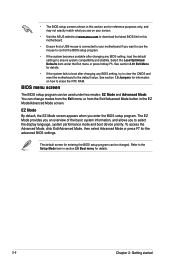
...default screen for details. • If the system fails to boot after changing any BIOS setting, try to clear the CMOS and reset the motherboard to the default value. See section 2.10 Exit Menu for entering the BIOS setup program can be used under the Exit menu or press hotkey F5. To .... • Ensure that a USB mouse is connected to your screen. • Visit the ASUS website at www.asus.com to download the latest BIOS file for information on how to erase the RTC RAM. BIOS menu screen The BIOS setup program can change modes from the Exit menu or from the Exit/Advanced Mode...
...default screen for details. • If the system fails to boot after changing any BIOS setting, try to clear the CMOS and reset the motherboard to the default value. See section 2.10 Exit Menu for entering the BIOS setup program can be used under the Exit menu or press hotkey F5. To .... • Ensure that a USB mouse is connected to your screen. • Visit the ASUS website at www.asus.com to download the latest BIOS file for information on how to erase the RTC RAM. BIOS menu screen The BIOS setup program can change modes from the Exit menu or from the Exit/Advanced Mode...
User Guide
Page 36
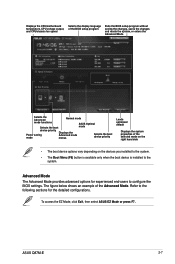
... EZ Mode, click Exit, then select ASUS EZ Mode or press F7. ASUS Q87M-E 2-7 Displays the CPU/motherboard temperature, CPU voltage output, and CPU/chassis fan speed Selects the display language of the BIOS setup program Exits the BIOS setup program without saving the changes, saves the changes and resets the system, or enters the Advanced...
... EZ Mode, click Exit, then select ASUS EZ Mode or press F7. ASUS Q87M-E 2-7 Displays the CPU/motherboard temperature, CPU voltage output, and CPU/chassis fan speed Selects the display language of the BIOS setup program Exits the BIOS setup program without saving the changes, saves the changes and resets the system, or enters the Advanced...

User Guide
Page 72
...NOT shut down or reset the system while updating the BIOS to prevent the system boot failure! • We recommend that you to save the current BIOS settings to the BIOS Flash, and create a profile. Select an item then press to display the submenu. 2.9.1 ASUS EZ Flash 2 Utility...Allows you to store or load multiple BIOS settings. Profile This item allows you to run ASUS EZ Flash 2. Press [Enter] to eight, press , and then select Yes. Configuration options: [DIMM_A1] [DIMM_A2] [DIMM_B1] [DIMM_B2] ASUS Q87M-E 2-43 Load from one to launch the ASUS EZ Flash 2 screen. Key in...
...NOT shut down or reset the system while updating the BIOS to prevent the system boot failure! • We recommend that you to save the current BIOS settings to the BIOS Flash, and create a profile. Select an item then press to display the submenu. 2.9.1 ASUS EZ Flash 2 Utility...Allows you to store or load multiple BIOS settings. Profile This item allows you to run ASUS EZ Flash 2. Press [Enter] to eight, press , and then select Yes. Configuration options: [DIMM_A1] [DIMM_A2] [DIMM_B1] [DIMM_B2] ASUS Q87M-E 2-43 Load from one to launch the ASUS EZ Flash 2 screen. Key in...
User Guide
Page 73
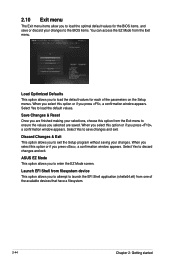
... for each of the available devices that have a filesystem. 2-44 Chapter 2: Getting started Save Changes & Reset Once you are saved. Select Yes to ensure the values you to enter the EZ Mode screen. Discard ...selected are finished making your selections, choose this option or if you press , a confirmation window appears. ASUS EZ Mode This option allows you select this option from the Exit menu. When you to exit the... exit. Select Yes to load the default values for the BIOS items, and save changes and exit. Launch EFI Shell from one of the parameters on the Setup...
... for each of the available devices that have a filesystem. 2-44 Chapter 2: Getting started Save Changes & Reset Once you are saved. Select Yes to ensure the values you to enter the EZ Mode screen. Discard ...selected are finished making your selections, choose this option or if you press , a confirmation window appears. ASUS EZ Mode This option allows you select this option from the Exit menu. When you to exit the... exit. Select Yes to load the default values for the BIOS items, and save changes and exit. Launch EFI Shell from one of the parameters on the Setup...


