
Pundit-PH3 User''s Manual for English Edition
Page 3
... 2-3 2.3.2 Removing the front panel assembly 2-4 2.4 Installing a CPU 2-5 2.4.1 Removing the CPU fan and heatsink assembly ....... 2-5 2.4.2 CPU installation 2-6 2.4.3 Reinstalling the CPU fan and heatsink assembly ..... 2-8 2.5 Installing a DIMM 2-9 2.5.1 Memory configurations 2-9 2.5.2 Installing a DIMM 2-11 2.5.3 Removing a DIMM 2-11 2.6 Installing an expansion card 2-12 2.6.1 Expansion slots 2-12 2.6.2 Expansion card installation 2-12 2.7 Installing an optical drive 2-15 2.8 Removing...
... 2-3 2.3.2 Removing the front panel assembly 2-4 2.4 Installing a CPU 2-5 2.4.1 Removing the CPU fan and heatsink assembly ....... 2-5 2.4.2 CPU installation 2-6 2.4.3 Reinstalling the CPU fan and heatsink assembly ..... 2-8 2.5 Installing a DIMM 2-9 2.5.1 Memory configurations 2-9 2.5.2 Installing a DIMM 2-11 2.5.3 Removing a DIMM 2-11 2.6 Installing an expansion card 2-12 2.6.1 Expansion slots 2-12 2.6.2 Expansion card installation 2-12 2.7 Installing an optical drive 2-15 2.8 Removing...
Pundit-PH3 User''s Manual for English Edition
Page 12
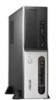
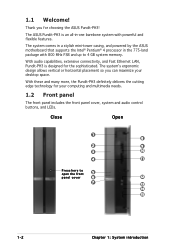
...The system's ergonomic design allows vertical or horizontal placement so you for choosing the ASUS Pundit-PH3! The system comes in a stylish mini-tower casing, and powered by the ASUS motherboard that supports the Intel® Pentium® 4 processor in -one barebone ...Chapter 1: System introduction Close Open 1 8 2 9 3 10 4 11 Press here to 4 GB system memory. 1.1 Welcome! With audio capabilities, extensive connectivity, and Fast Ethernet LAN, Pundit-PH3 is an all-in the 775-land package with powerful and flexible features. Thank you can maximize your computing and...
...The system's ergonomic design allows vertical or horizontal placement so you for choosing the ASUS Pundit-PH3! The system comes in a stylish mini-tower casing, and powered by the ASUS motherboard that supports the Intel® Pentium® 4 processor in -one barebone ...Chapter 1: System introduction Close Open 1 8 2 9 3 10 4 11 Press here to 4 GB system memory. 1.1 Welcome! With audio capabilities, extensive connectivity, and Fast Ethernet LAN, Pundit-PH3 is an all-in the 775-land package with powerful and flexible features. Thank you can maximize your computing and...

Pundit-PH3 User''s Manual for English Edition
Page 13
... when data is for a Memory Stick®/Memory Stick Pro™ storage card. 3 . This LED lights up when data is ON. 7 . Press this nutton to a storage card inserted in any of the card reader slots. 1 1 . The port functions as S/PDIF Out port when you connect a headphone with it. ASUS Pundit-PH3 1-3 Refer to indicate that...
... when data is for a Memory Stick®/Memory Stick Pro™ storage card. 3 . This LED lights up when data is ON. 7 . Press this nutton to a storage card inserted in any of the card reader slots. 1 1 . The port functions as S/PDIF Out port when you connect a headphone with it. ASUS Pundit-PH3 1-3 Refer to indicate that...

Pundit-PH3 User''s Manual for English Edition
Page 18
... installation Basic components to avoid touching the ICs on them due to static electricity. • Hold components by the edges to install 1. DDR Dual Inline Memory Module (DIMM) 3. Optical drive 2.2 Before you proceed Take note of the following precautions before you install components into the system. • Use a grounded wrist strap...
... installation Basic components to avoid touching the ICs on them due to static electricity. • Hold components by the edges to install 1. DDR Dual Inline Memory Module (DIMM) 3. Optical drive 2.2 Before you proceed Take note of the following precautions before you install components into the system. • Use a grounded wrist strap...

Pundit-PH3 User''s Manual for English Edition
Page 23
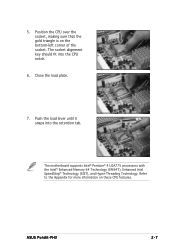
5. Refer to the Appendix for more information on the bottom-left corner of the socket. The socket alignment key should fit into the retention tab. Alignment key 7. Close the load plate. The motherboard supports Intel® Pentium® 4 LGA775 processors with the Intel® Enhanced Memory 64 Technology (EM64T), Enhanced Intel SpeedStep® Technology (EIST), and Hyper-Threading Technology. ASUS Pundit-PH3 2-7 Push the load lever until it snaps into the CPU notch. 6. Position the CPU over the socket, making sure that the gold triangle is on these CPU features.
5. Refer to the Appendix for more information on the bottom-left corner of the socket. The socket alignment key should fit into the retention tab. Alignment key 7. Close the load plate. The motherboard supports Intel® Pentium® 4 LGA775 processors with the Intel® Enhanced Memory 64 Technology (EM64T), Enhanced Intel SpeedStep® Technology (EIST), and Hyper-Threading Technology. ASUS Pundit-PH3 2-7 Push the load lever until it snaps into the CPU notch. 6. Position the CPU over the socket, making sure that the gold triangle is on these CPU features.

Pundit-PH3 User''s Manual for English Edition
Page 25
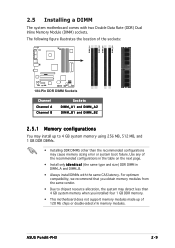
... i d e n t i c a l (the same type and size) DDR DIMM in DIMM_A and DIMM_B. • Always install DIMMs with four Double Data Rate (DDR) Dual Inline Memory Module (DIMM) sockets. ASUS Pundit-PH3 2-9 The following figure illustrates the location of the sockets: DIMM_A1 DIMM_A2 DIMM_B1 DIMM_B2 ® 184-Pin DDR DIMM Sockets Channel Channel A Channel B Sockets DIMM_A1...
... i d e n t i c a l (the same type and size) DDR DIMM in DIMM_A and DIMM_B. • Always install DIMMs with four Double Data Rate (DDR) Dual Inline Memory Module (DIMM) sockets. ASUS Pundit-PH3 2-9 The following figure illustrates the location of the sockets: DIMM_A1 DIMM_A2 DIMM_B1 DIMM_B2 ® 184-Pin DDR DIMM Sockets Channel Channel A Channel B Sockets DIMM_A1...

Pundit-PH3 User''s Manual for English Edition
Page 26
... - Visit the ASUS website (www.asus.com) for the latest DDR Qualified Vendors List. 2-10 Chapter 2: Basic installation Double-sided C L- B - C - supports one pair of Dual-channel memory configuration. supports one pair of modules inserted into either slot, in a Single-channel memory configuration. supports four...the blue and black slots as one module inserted into either the blue slots or the black slots as two pairs of Dual-channel memory configuration. DDR400 Qualified Vendors List Size Vendor Model Brand Side(s) Component C L D I MM (o suppo ptional r ) t ...
... - Visit the ASUS website (www.asus.com) for the latest DDR Qualified Vendors List. 2-10 Chapter 2: Basic installation Double-sided C L- B - C - supports one pair of Dual-channel memory configuration. supports one pair of modules inserted into either slot, in a Single-channel memory configuration. supports four...the blue and black slots as one module inserted into either the blue slots or the black slots as two pairs of Dual-channel memory configuration. DDR400 Qualified Vendors List Size Vendor Model Brand Side(s) Component C L D I MM (o suppo ptional r ) t ...

Pundit-PH3 User''s Manual for English Edition
Page 53
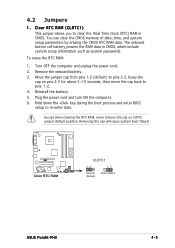
You can clear the CMOS memory of date, time, and system setup parameters by erasing the CMOS RTC RAM data. To erase the RTC RAM: 1. Remove the onboard battery. 3. Move the ... setup information such as system passwords. Removing the cap will cause system boot failure! ® Clear RTC RAM CLRTC1 12 23 Normal (Default) Clear CMOS ASUS Pundit-PH3 4-3 4.2 Jumpers 1. Clear RTC RAM (CLRTC1) This jumper allows you to pins 2-3. Reinstall the battery. 5. Turn OFF the computer and unplug the power cord. 2. Except when...
You can clear the CMOS memory of date, time, and system setup parameters by erasing the CMOS RTC RAM data. To erase the RTC RAM: 1. Remove the onboard battery. 3. Move the ... setup information such as system passwords. Removing the cap will cause system boot failure! ® Clear RTC RAM CLRTC1 12 23 Normal (Default) Clear CMOS ASUS Pundit-PH3 4-3 4.2 Jumpers 1. Clear RTC RAM (CLRTC1) This jumper allows you to pins 2-3. Reinstall the battery. 5. Turn OFF the computer and unplug the power cord. 2. Except when...

Pundit-PH3 User''s Manual for English Edition
Page 72
...gives you an overview of these options and encounter problems, revert to use legacy OS on Serial ATA and Parallel ATA ports. System Memory Displays the auto-detected system memory. 5-12 Chapter 5: BIOS setup Configuration options: [S-ATA+P-ATA] [SATA mode] [P-ATA] IDE Detect Time Out [35] Selects... Version : 08.00.10 Build Date : 06/10/04 Processor Type Speed Count : Genuine Intel(R) CPU 3.20GHz : 3200 MHz : 1 System Memory Size : 248MB AMI BIOS Displays the auto-detected BIOS information. The BIOS automatically detects the items in this setting, you may use native OS on...
...gives you an overview of these options and encounter problems, revert to use legacy OS on Serial ATA and Parallel ATA ports. System Memory Displays the auto-detected system memory. 5-12 Chapter 5: BIOS setup Configuration options: [S-ATA+P-ATA] [SATA mode] [P-ATA] IDE Detect Time Out [35] Selects... Version : 08.00.10 Build Date : 06/10/04 Processor Type Speed Count : Genuine Intel(R) CPU 3.20GHz : 3200 MHz : 1 System Memory Size : 248MB AMI BIOS Displays the auto-detected BIOS information. The BIOS automatically detects the items in this setting, you may use native OS on...

Pundit-PH3 User''s Manual for English Edition
Page 76
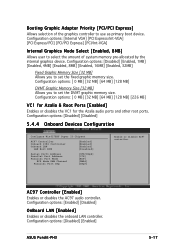
... Ports Configuration VC1 for Azalia & Root Ports [Disabled] Configure DRAM Timing by SPD Enabled] Booting Graphic Adapter Priority Internal Graphics Mode Select Fixed Graphic Memory Size DVMT Graphic Memory Size [PCI Express/Int-VGA] [Enabled, 8M] [32MB] [32MB] Enable or disable DRAM timing. Configuration options: [2 Clocks] [3 Clocks] [4 Clocks] [5 Clocks] DRAM RAS# to...
... Ports Configuration VC1 for Azalia & Root Ports [Disabled] Configure DRAM Timing by SPD Enabled] Booting Graphic Adapter Priority Internal Graphics Mode Select Fixed Graphic Memory Size DVMT Graphic Memory Size [PCI Express/Int-VGA] [Enabled, 8M] [32MB] [32MB] Enable or disable DRAM timing. Configuration options: [2 Clocks] [3 Clocks] [4 Clocks] [5 Clocks] DRAM RAS# to...
Pundit-PH3 User''s Manual for English Edition
Page 77
... ports and other root ports. AC97 Controller [Enabled] Enables or disables the AC97 audio controller. Configuration options: [Disabled] [Enabled] ASUS Pundit-PH3 5-17 Configuration options: [ 0 MB] [32 MB] [64 MB] [128 MB] DVMT Graphic Memory Size [32 MB] Allows you to use as primary boot device. Configuration options: [Internal VGA] [PCI Express/Int-VGA...
... ports and other root ports. AC97 Controller [Enabled] Enables or disables the AC97 audio controller. Configuration options: [Disabled] [Enabled] ASUS Pundit-PH3 5-17 Configuration options: [ 0 MB] [32 MB] [64 MB] [128 MB] DVMT Graphic Memory Size [32 MB] Allows you to use as primary boot device. Configuration options: [Internal VGA] [PCI Express/Int-VGA...
Pundit-PH3 User''s Manual for English Edition
Page 79
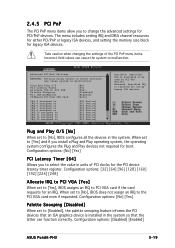
Configuration options: [Disabled] [Enabled] ASUS Pundit-PH3 5-19 Advanced PCI/PnP Settings WARNING: Setting wrong values in the system. Plug And Play O/S PCI Latency Timer Allocate IRQ to PCI VGA Palette Snooping ... card requests for an IRQ. The menu includes setting IRQ and DMA channel resources for either PCI/PnP or legacy ISA devices, and setting the memory size block for the PCI device latency timer register. Take caution when changing the settings of PCI clocks for legacy ISA devices.
Configuration options: [Disabled] [Enabled] ASUS Pundit-PH3 5-19 Advanced PCI/PnP Settings WARNING: Setting wrong values in the system. Plug And Play O/S PCI Latency Timer Allocate IRQ to PCI VGA Palette Snooping ... card requests for an IRQ. The menu includes setting IRQ and DMA channel resources for either PCI/PnP or legacy ISA devices, and setting the memory size block for the PCI device latency timer register. Take caution when changing the settings of PCI clocks for legacy ISA devices.

Pundit-PH3 User''s Manual for English
Page 3
... 2-3 2.3.2 Removing the front panel assembly 2-4 2.4 Installing a CPU 2-5 2.4.1 Removing the CPU fan and heatsink assembly ....... 2-5 2.4.2 CPU installation 2-6 2.4.3 Reinstalling the CPU fan and heatsink assembly ..... 2-8 2.5 Installing a DIMM 2-9 2.5.1 Memory configurations 2-9 2.5.2 Installing a DIMM 2-11 2.5.3 Removing a DIMM 2-11 2.6 Installing an expansion card 2-12 2.6.1 Expansion slots 2-12 2.6.2 Expansion card installation 2-13 2.7 Installing an optical drive 2-15 2.8 Removing...
... 2-3 2.3.2 Removing the front panel assembly 2-4 2.4 Installing a CPU 2-5 2.4.1 Removing the CPU fan and heatsink assembly ....... 2-5 2.4.2 CPU installation 2-6 2.4.3 Reinstalling the CPU fan and heatsink assembly ..... 2-8 2.5 Installing a DIMM 2-9 2.5.1 Memory configurations 2-9 2.5.2 Installing a DIMM 2-11 2.5.3 Removing a DIMM 2-11 2.6 Installing an expansion card 2-12 2.6.1 Expansion slots 2-12 2.6.2 Expansion card installation 2-13 2.7 Installing an optical drive 2-15 2.8 Removing...

Pundit-PH3 User''s Manual for English
Page 12
.... 2 . This LED lights up when data is for the sophisticated. i n c h d r i v e b a y c o v e r . M e m o r y S t i c k®/ M e m o r y S t i c k P r o ™ c a r d s l o t . The ASUS Pundit-PH3 is designed for a SmartMedia® storage card. 1-2 Chapter 1: System introduction The system's ergonomic design allows vertical or horizontal placement so you for a Memory Stick®/Memory Stick Pro™ storage card. 6 . S m a r t M e d i a® c a r d s l o t . This LED lights up to the hard...
.... 2 . This LED lights up when data is for the sophisticated. i n c h d r i v e b a y c o v e r . M e m o r y S t i c k®/ M e m o r y S t i c k P r o ™ c a r d s l o t . The ASUS Pundit-PH3 is designed for a SmartMedia® storage card. 1-2 Chapter 1: System introduction The system's ergonomic design allows vertical or horizontal placement so you for a Memory Stick®/Memory Stick Pro™ storage card. 6 . S m a r t M e d i a® c a r d s l o t . This LED lights up to the hard...

Pundit-PH3 User''s Manual for English
Page 18
... This LED lights up to avoid touching the ICs on a grounded antistatic pad or in soft-off mode, and not powered OFF. DDR Dual Inline Memory Module (DIMM) 3.
... This LED lights up to avoid touching the ICs on a grounded antistatic pad or in soft-off mode, and not powered OFF. DDR Dual Inline Memory Module (DIMM) 3.
Pundit-PH3 User''s Manual for English
Page 23
Position the CPU over the socket, making sure that the gold triangle is on these CPU features. Close the load plate. ASUS Pundit-PH3 2-7 Alignment key 7. Refer to the Appendix for more information on the bottom-left corner of the socket. The motherboard supports Intel® Pentium® 4 LGA775 processors with the Intel® Enhanced Memory 64 Technology (EM64T), Enhanced Intel SpeedStep® Technology (EIST), and Hyper-Threading Technology. The socket alignment key should fit into the retention tab. Push the load lever until it snaps into the CPU notch. 6. 5.
Position the CPU over the socket, making sure that the gold triangle is on these CPU features. Close the load plate. ASUS Pundit-PH3 2-7 Alignment key 7. Refer to the Appendix for more information on the bottom-left corner of the socket. The motherboard supports Intel® Pentium® 4 LGA775 processors with the Intel® Enhanced Memory 64 Technology (EM64T), Enhanced Intel SpeedStep® Technology (EIST), and Hyper-Threading Technology. The socket alignment key should fit into the retention tab. Push the load lever until it snaps into the CPU notch. 6. 5.
Pundit-PH3 User''s Manual for English
Page 25
...; 184-Pin DDR DIMM Sockets Channel Channel A Channel B Sockets DIMM_A1 and DIMM_A2 DIMM_B1 and DIMM_B2 2.5.1 Memory configurations You may cause memory sizing error or system boot failure. Use any of 128 Mb chips or double-sided x16 memory modules. ASUS Pundit-PH3 2-9 2.5 Installing a DIMM The system motherboard comes with the same CAS latency. For optimum compatibility...
...; 184-Pin DDR DIMM Sockets Channel Channel A Channel B Sockets DIMM_A1 and DIMM_A2 DIMM_B1 and DIMM_B2 2.5.1 Memory configurations You may cause memory sizing error or system boot failure. Use any of 128 Mb chips or double-sided x16 memory modules. ASUS Pundit-PH3 2-9 2.5 Installing a DIMM The system motherboard comes with the same CAS latency. For optimum compatibility...

Pundit-PH3 User''s Manual for English
Page 26
... the blue slots or the black slots as two pairs of Dual-channel memory configuration. Visit the ASUS website (www.asus.com) for the latest DDR Qualified Vendors List. 2-10 Chapter 2: Basic installation Single-sided D S - supports one pair of Dual-channel memory configuration. CAS Latency DIMM support: A - C - B - supports four modules inserted into the blue...
... the blue slots or the black slots as two pairs of Dual-channel memory configuration. Visit the ASUS website (www.asus.com) for the latest DDR Qualified Vendors List. 2-10 Chapter 2: Basic installation Single-sided D S - supports one pair of Dual-channel memory configuration. CAS Latency DIMM support: A - C - B - supports four modules inserted into the blue...
Pundit-PH3 User''s Manual for English
Page 53
... computer and unplug the power cord. 2. Hold down the key during the boot process and enter BIOS setup to pins 2-3. You can clear the CMOS memory of date, time, and system setup parameters by erasing the CMOS RTC RAM data. Remove the onboard battery. 3. Move the jumper cap from pins 1-2 (default... powers the RAM data in CMOS. Removing the cap will cause system boot failure! ® Clear RTC RAM CLRTC1 12 23 Normal (Default) Clear CMOS ASUS Pundit-PH3 4-3 Reinstall the battery. 5. 4.2 Jumpers 1.
... computer and unplug the power cord. 2. Hold down the key during the boot process and enter BIOS setup to pins 2-3. You can clear the CMOS memory of date, time, and system setup parameters by erasing the CMOS RTC RAM data. Remove the onboard battery. 3. Move the jumper cap from pins 1-2 (default... powers the RAM data in CMOS. Removing the cap will cause system boot failure! ® Clear RTC RAM CLRTC1 12 23 Normal (Default) Clear CMOS ASUS Pundit-PH3 4-3 Reinstall the battery. 5. 4.2 Jumpers 1.

Pundit-PH3 User''s Manual for English
Page 72
...AMIBIOS Version : 08.00.10 Build Date : 06/10/04 Processor Type Speed Count : Genuine Intel(R) CPU 3.20GHz : 3200 MHz : 1 System Memory Size : 248MB AMI BIOS Displays the auto-detected BIOS information. The BIOS automatically detects the items in this setting, you may use native OS on ... ports. Enhanced Mode Support On [SATA mode] The default setting SATA allows you do not change the default setting for better OS compatibility. System Memory Displays the auto-detected system memory. 5-12 Chapter 5: BIOS setup We recommend that you to the default setting S A T A. In this menu.
...AMIBIOS Version : 08.00.10 Build Date : 06/10/04 Processor Type Speed Count : Genuine Intel(R) CPU 3.20GHz : 3200 MHz : 1 System Memory Size : 248MB AMI BIOS Displays the auto-detected BIOS information. The BIOS automatically detects the items in this setting, you may use native OS on ... ports. Enhanced Mode Support On [SATA mode] The default setting SATA allows you do not change the default setting for better OS compatibility. System Memory Displays the auto-detected system memory. 5-12 Chapter 5: BIOS setup We recommend that you to the default setting S A T A. In this menu.

