P8Z77-V PREMIUM User's Manual
Page 3
... this guide...viii P8Z77-V PREMIUM Windows® OS restrictions x P8Z77-V PREMIUM specifications summary xi Package contents...xvi Installation tools and components xvii Chapter 1: Product introduction 1-1 1.1 Special features 1-1 1.1.1 Product highlights 1-1 1.1.2 Dual Intelligent Processors 3 with SMART DIGI+ Power Control 1-2 1.1.3 ASUS Exclusive Features 1-3 1.1.4 ASUS Quiet Thermal Solution 1-4 1.1.5 ASUS EZ DIY 1-4 1.1.6 Other special features 1-5 1.2 Motherboard overview 1-6 1.2.1 Before you proceed 1-6 1.2.2 Motherboard layout 1-7 1.2.3 Central Processing...
... this guide...viii P8Z77-V PREMIUM Windows® OS restrictions x P8Z77-V PREMIUM specifications summary xi Package contents...xvi Installation tools and components xvii Chapter 1: Product introduction 1-1 1.1 Special features 1-1 1.1.1 Product highlights 1-1 1.1.2 Dual Intelligent Processors 3 with SMART DIGI+ Power Control 1-2 1.1.3 ASUS Exclusive Features 1-3 1.1.4 ASUS Quiet Thermal Solution 1-4 1.1.5 ASUS EZ DIY 1-4 1.1.6 Other special features 1-5 1.2 Motherboard overview 1-6 1.2.1 Before you proceed 1-6 1.2.2 Motherboard layout 1-7 1.2.3 Central Processing...
P8Z77-V PREMIUM User's Manual
Page 4
2.2 BIOS update utility 2-14 2.2.1 USB BIOS Flashback 2-14 2.3 Motherboard rear and audio connections 2-15 2.3.1 Rear I/O connection 2-15 2.3.2 Audio I/O connections 2-17 2.4 Starting up for the first time 2-19 2.5 ...3-31 3.5.9 Network Stack 3-32 3.6 Monitor menu 3-33 3.7 Boot menu 3-36 3.8 Tools menu 3-38 3.8.1 ASUS EZ Flash 2 Utility 3-38 3.8.2 ASUS O.C. Profile 3-38 3.8.3 ASUS SPD Information 3-39 3.9 Exit menu 3-40 3.10 Updating BIOS 3-41 3.10.1 ASUS Update 3-41 3.10.2 ASUS EZ Flash 2 3-44 3.10.3 ASUS CrashFree BIOS 3 3-45 3.10.4 ASUS BIOS Updater 3-46 iv
2.2 BIOS update utility 2-14 2.2.1 USB BIOS Flashback 2-14 2.3 Motherboard rear and audio connections 2-15 2.3.1 Rear I/O connection 2-15 2.3.2 Audio I/O connections 2-17 2.4 Starting up for the first time 2-19 2.5 ...3-31 3.5.9 Network Stack 3-32 3.6 Monitor menu 3-33 3.7 Boot menu 3-36 3.8 Tools menu 3-38 3.8.1 ASUS EZ Flash 2 Utility 3-38 3.8.2 ASUS O.C. Profile 3-38 3.8.3 ASUS SPD Information 3-39 3.9 Exit menu 3-40 3.10 Updating BIOS 3-41 3.10.1 ASUS Update 3-41 3.10.2 ASUS EZ Flash 2 3-44 3.10.3 ASUS CrashFree BIOS 3 3-45 3.10.4 ASUS BIOS Updater 3-46 iv
P8Z77-V PREMIUM User's Manual
Page 7
... supply is broken, do not try to fix it , carefully read all power cables are not damaged. Operation safety • Before installing the motherboard and adding devices on a stable surface. • If you detect any area where it may become wet. • Place the product on ... If you are not sure about the voltage of the electrical outlet you add a device. • Before connecting or removing signal cables from the motherboard, ensure that all the manuals that came with the product, contact a qualified service technician or your dealer immediately. • To avoid short circuits...
... supply is broken, do not try to fix it , carefully read all power cables are not damaged. Operation safety • Before installing the motherboard and adding devices on a stable surface. • If you detect any area where it may become wet. • Place the product on ... If you are not sure about the voltage of the electrical outlet you add a device. • Before connecting or removing signal cables from the motherboard, ensure that all the manuals that came with the product, contact a qualified service technician or your dealer immediately. • To avoid short circuits...
P8Z77-V PREMIUM User's Manual
Page 8
... guide contains the following sources for additional information and for product and software updates. 1. ASUS websites The ASUS website provides updated information on the motherboard. • Chapter 2: Basic Installation This chapter lists the hardware setup procedures that comes with the motherboard package and the software. • Chapter 5: RAID support This chapter describes the RAID...
... guide contains the following sources for additional information and for product and software updates. 1. ASUS websites The ASUS website provides updated information on the motherboard. • Chapter 2: Basic Installation This chapter lists the hardware setup procedures that comes with the motherboard package and the software. • Chapter 5: RAID support This chapter describes the RAID...
P8Z77-V PREMIUM User's Manual
Page 16
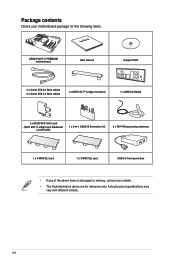
.... card (Wi-Fi 802.11 a/b/g/n and Bluetooth v4.0/3.0+HS) 1 x 2-in-1 ASUS Q-Connector kit 2 x Wi-Fi Ring moving antennas 1 x 4-WAY SLI card 1 x 3-WAY SLI card USB 3.0 front panel box • If any of the above are for the following items. User Manual ASUS P8Z77-V PREMIUM motherboard User manual Support DVD 4 x Serial ATA 6.0 Gb/s cables 2 x Serial ATA...
.... card (Wi-Fi 802.11 a/b/g/n and Bluetooth v4.0/3.0+HS) 1 x 2-in-1 ASUS Q-Connector kit 2 x Wi-Fi Ring moving antennas 1 x 4-WAY SLI card 1 x 3-WAY SLI card USB 3.0 front panel box • If any of the above are for the following items. User Manual ASUS P8Z77-V PREMIUM motherboard User manual Support DVD 4 x Serial ATA 6.0 Gb/s cables 2 x Serial ATA...
P8Z77-V PREMIUM User's Manual
Page 17
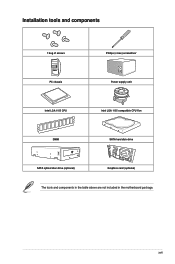
xvii Installation tools and components 1 bag of screws Philips (cross) screwdriver PC chassis Power supply unit Intel LGA 1155 CPU Intel LGA 1155 compatible CPU Fan DIMM SATA hard disk drive SATA optical disc drive (optional) Graphics card (optional) The tools and components in the table above are not included in the motherboard package.
xvii Installation tools and components 1 bag of screws Philips (cross) screwdriver PC chassis Power supply unit Intel LGA 1155 CPU Intel LGA 1155 compatible CPU Fan DIMM SATA hard disk drive SATA optical disc drive (optional) Graphics card (optional) The tools and components in the table above are not included in the motherboard package.
P8Z77-V PREMIUM User's Manual
Page 19
...GPU, dual-channel DDR3 memory slots, and PCI Express 2.0/3.0 expansion slots. C.) / 1866(O.C.) / 1600 / 1333 / 1066 MHz Support The motherboard supports the dual-channel DDR3 memory that provides twice the performance and speed of DDR3 2133/1866/1600 MHz. 4-WAY SLI and 3-WAY SLI...that supports the 1155 socket Intel® 2nd/3rd generation Core™ i7/i5/ i3, Pentium®, and Celeron® processors. Chapter 1 ASUS P8Z77-V PREMIUM 1-1 Intel® Z77 Express Chipset Intel® Z77 Express Chipset is the PCI Express bus standard that features data transfer rates of DDR3 2800...
...GPU, dual-channel DDR3 memory slots, and PCI Express 2.0/3.0 expansion slots. C.) / 1866(O.C.) / 1600 / 1333 / 1066 MHz Support The motherboard supports the dual-channel DDR3 memory that provides twice the performance and speed of DDR3 2133/1866/1600 MHz. 4-WAY SLI and 3-WAY SLI...that supports the 1155 socket Intel® 2nd/3rd generation Core™ i7/i5/ i3, Pentium®, and Celeron® processors. Chapter 1 ASUS P8Z77-V PREMIUM 1-1 Intel® Z77 Express Chipset Intel® Z77 Express Chipset is the PCI Express bus standard that features data transfer rates of DDR3 2800...
P8Z77-V PREMIUM User's Manual
Page 23
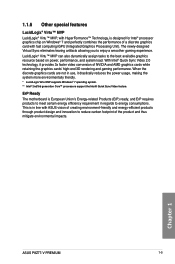
Chapter 1 ASUS P8Z77-V PREMIUM 1-5 LucidLogix® Virtu™ MVP can also dynamically assign tasks to enjoy a smoother gaming experience. ErP Ready The motherboard is designed for Intel® processor graphics chip on power, performance, and system load. When the discrete graphics cards are not in line with ASUS vision of creating environment-friendly and energy-efficient...
Chapter 1 ASUS P8Z77-V PREMIUM 1-5 LucidLogix® Virtu™ MVP can also dynamically assign tasks to enjoy a smoother gaming experience. ErP Ready The motherboard is designed for Intel® processor graphics chip on power, performance, and system load. When the discrete graphics cards are not in line with ASUS vision of creating environment-friendly and energy-efficient...
P8Z77-V PREMIUM User's Manual
Page 24
...severe damage to avoid touching the ICs on them due to static electricity. • Hold components by the edges to the motherboard, peripherals, or components. 1.2 Motherboard overview 1.2.1 Before you proceed Take note of the following precautions before you install or remove any component, ensure that the ... any component, place it on a grounded antistatic pad or in the bag that came with the component. • Before you install motherboard components or change any motherboard settings. • Unplug the power cord from the power supply. Chapter 1 1-6 Chapter 1: Product introduction
...severe damage to avoid touching the ICs on them due to static electricity. • Hold components by the edges to the motherboard, peripherals, or components. 1.2 Motherboard overview 1.2.1 Before you proceed Take note of the following precautions before you install or remove any component, ensure that the ... any component, place it on a grounded antistatic pad or in the bag that came with the component. • Before you install motherboard components or change any motherboard settings. • Unplug the power cord from the power supply. Chapter 1 1-6 Chapter 1: Product introduction
P8Z77-V PREMIUM User's Manual
Page 25
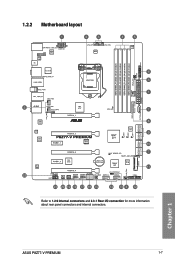
ASUS P8Z77-V PREMIUM 1-7 Chapter 1 1.2.2 Motherboard layout Marvell 9230 Refer to 1.2.9 Internal connectors and 2.3.1 Rear I/O connection for more information about rear panel connectors and internal connectors.
ASUS P8Z77-V PREMIUM 1-7 Chapter 1 1.2.2 Motherboard layout Marvell 9230 Refer to 1.2.9 Internal connectors and 2.3.1 Rear I/O connection for more information about rear panel connectors and internal connectors.
P8Z77-V PREMIUM User's Manual
Page 27
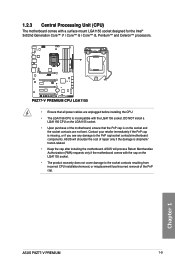
... CPU installation/removal, or misplacement/loss/incorrect removal of the PnP cap. Chapter 1 ASUS P8Z77-V PREMIUM 1-9 ASUS will process Return Merchandise Authorization (RMA) requests only if the motherboard comes with the cap on the socket and the socket contacts are unplugged before installing the...shipment/ transit-related. • Keep the cap after installing the motherboard. ASUS will shoulder the cost of the motherboard, ensure that all power cables are not bent. 1.2.3 Central Processing Unit (CPU) The motherboard comes with the LGA1155 socket. DO NOT install a LGA1156 CPU...
... CPU installation/removal, or misplacement/loss/incorrect removal of the PnP cap. Chapter 1 ASUS P8Z77-V PREMIUM 1-9 ASUS will process Return Merchandise Authorization (RMA) requests only if the motherboard comes with the cap on the socket and the socket contacts are unplugged before installing the...shipment/ transit-related. • Keep the cap after installing the motherboard. ASUS will shoulder the cost of the motherboard, ensure that all power cables are not bent. 1.2.3 Central Processing Unit (CPU) The motherboard comes with the LGA1155 socket. DO NOT install a LGA1156 CPU...
P8Z77-V PREMIUM User's Manual
Page 28
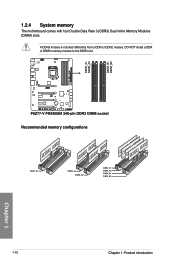
A DDR3 module is notched differently from a DDR or DDR2 module. Recommended memory configurations Chapter 1 1-10 Chapter 1: Product introduction DO NOT install a DDR or DDR2 memory module to the DDR3 slot. 1.2.4 System memory The motherboard comes with four Double Data Rate 3 (DDR3) Dual Inline Memory Modules (DIMM) slots.
A DDR3 module is notched differently from a DDR or DDR2 module. Recommended memory configurations Chapter 1 1-10 Chapter 1: Product introduction DO NOT install a DDR or DDR2 memory module to the DDR3 slot. 1.2.4 System memory The motherboard comes with four Double Data Rate 3 (DDR3) Dual Inline Memory Modules (DIMM) slots.
P8Z77-V PREMIUM User's Manual
Page 29
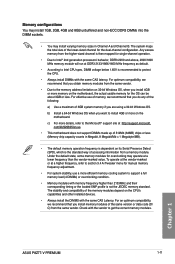
...varying memory sizes in Megabit, 8 Megabit/Mb = 1 Megabyte/MB). • The default memory operation frequency is dependent on the motherboard. For effective use a more memory on the CPU's capabilities and other installed devices. • Always install the DIMMS with memory ...Memory chip capacity counts in Channel A and Channel B. Chapter 1 ASUS P8Z77-V PREMIUM 1-11 com/kb/929605/en-us. • This motherboard does not support DIMMs made up of the memory modules depend on the motherboard, the actual usable memory for the dual-channel configuration. Memory configurations ...
...varying memory sizes in Megabit, 8 Megabit/Mb = 1 Megabyte/MB). • The default memory operation frequency is dependent on the motherboard. For effective use a more memory on the CPU's capabilities and other installed devices. • Always install the DIMMS with memory ...Memory chip capacity counts in Channel A and Channel B. Chapter 1 ASUS P8Z77-V PREMIUM 1-11 com/kb/929605/en-us. • This motherboard does not support DIMMs made up of the memory modules depend on the motherboard, the actual usable memory for the dual-channel configuration. Memory configurations ...
P8Z77-V PREMIUM User's Manual
Page 30
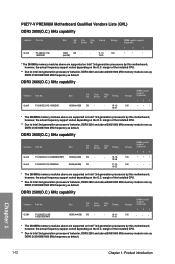
...of the installed CPU. ** Due to Intel 2nd generation processors' behavior, DDR3 2200 and above are supported on Intel® 3rd generation processors by this motherboard; margin of the installed CPU. ** Due to Intel 2nd generation processors' behavior, DDR3 2200 and above are supported on the O.C. Chapter 1 1-12 ...••• * The 2600MHz memory modules above /2000/1800 MHz memory module runs ay DDR3 2133/1866/1600 MHz frequency as default. P8Z77-V PREMIUM Motherboard Qualified Vendors Lists (QVL) DDR3 2800(O.C.) MHz capability Vendors Part No.
...of the installed CPU. ** Due to Intel 2nd generation processors' behavior, DDR3 2200 and above are supported on Intel® 3rd generation processors by this motherboard; margin of the installed CPU. ** Due to Intel 2nd generation processors' behavior, DDR3 2200 and above are supported on the O.C. Chapter 1 1-12 ...••• * The 2600MHz memory modules above /2000/1800 MHz memory module runs ay DDR3 2133/1866/1600 MHz frequency as default. P8Z77-V PREMIUM Motherboard Qualified Vendors Lists (QVL) DDR3 2800(O.C.) MHz capability Vendors Part No.
P8Z77-V PREMIUM User's Manual
Page 31
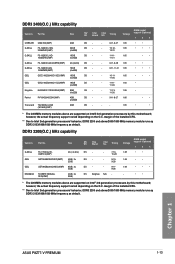
...capability Vendors Part No. DIMM socket Size SS/ DS Chip Brand Chip NO. DIMM socket Size SS/ Chip DS Brand Chip No. Chapter 1 ASUS P8Z77-V PREMIUM 1-13 DDR3 2400(O.C.) MHz capability Vendors Part No. Timing Voltage support (Optional) 1 2 4 G.SKILL F3-17600CL7D4GBFLS(XMP) 4G ( 2x 2G... - 2GB ) • • * The 2200MHz memory modules above are supported on Intel® 3rd generation processors by this motherboard; margin of the installed CPU. ** Due to Intel 2nd generation processors' behavior, DDR3 2200 and above /2000/1800 MHz memory module...
...capability Vendors Part No. DIMM socket Size SS/ DS Chip Brand Chip NO. DIMM socket Size SS/ Chip DS Brand Chip No. Chapter 1 ASUS P8Z77-V PREMIUM 1-13 DDR3 2400(O.C.) MHz capability Vendors Part No. Timing Voltage support (Optional) 1 2 4 G.SKILL F3-17600CL7D4GBFLS(XMP) 4G ( 2x 2G... - 2GB ) • • * The 2200MHz memory modules above are supported on Intel® 3rd generation processors by this motherboard; margin of the installed CPU. ** Due to Intel 2nd generation processors' behavior, DDR3 2200 and above /2000/1800 MHz memory module...
P8Z77-V PREMIUM User's Manual
Page 42
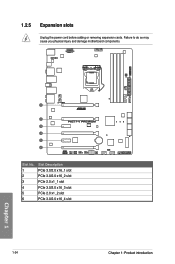
Chapter 1 Slot No. 1 2 3 4 5 6 Slot Description PCIe 3.0/2.0 x16_1 slot PCIe 3.0/2.0 x16_2 slot PCIe 2.0 x1_1 slot PCIe 3.0/2.0 x16_3 slot PCIe 2.0 x1_2 slot PCIe 3.0/2.0 x16_4 slot 1-24 Chapter 1: Product introduction Failure to do so may cause you physical injury and damage motherboard components. 1.2.5 Expansion slots Unplug the power cord before adding or removing expansion cards.
Chapter 1 Slot No. 1 2 3 4 5 6 Slot Description PCIe 3.0/2.0 x16_1 slot PCIe 3.0/2.0 x16_2 slot PCIe 2.0 x1_1 slot PCIe 3.0/2.0 x16_3 slot PCIe 2.0 x1_2 slot PCIe 3.0/2.0 x16_4 slot 1-24 Chapter 1: Product introduction Failure to do so may cause you physical injury and damage motherboard components. 1.2.5 Expansion slots Unplug the power cord before adding or removing expansion cards.
P8Z77-V PREMIUM User's Manual
Page 43
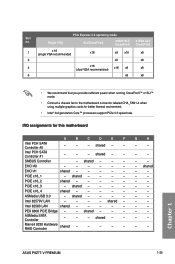
... - - shared - - - - - - - - - - - - - - - - - - - - - - EHCI #1 shared - - - - - shared - - - - PEX 8608 PCIE Bridge - - Chapter 1 ASUS P8Z77-V PREMIUM 1-25 Intel PCH SATA Controller #1 - - - PCIE x16_1 - ASMedia USB 3.0 - shared - - shared - - Single VGA SLI/CrossFireX 3-WAY SLI/ CrossFireX 4-WAY SLI/ CrossFireX 1 x 16 (single...or SLI™ mode. • Connect a chassis fan to the motherboard connector labeled CHA_FAN1-4 when using multiple graphics cards for this motherboard A B C D E F Intel PCH SATA Controller #0 - -...
... - - shared - - - - - - - - - - - - - - - - - - - - - - EHCI #1 shared - - - - - shared - - - - PEX 8608 PCIE Bridge - - Chapter 1 ASUS P8Z77-V PREMIUM 1-25 Intel PCH SATA Controller #1 - - - PCIE x16_1 - ASMedia USB 3.0 - shared - - shared - - Single VGA SLI/CrossFireX 3-WAY SLI/ CrossFireX 4-WAY SLI/ CrossFireX 1 x 16 (single...or SLI™ mode. • Connect a chassis fan to the motherboard connector labeled CHA_FAN1-4 when using multiple graphics cards for this motherboard A B C D E F Intel PCH SATA Controller #0 - -...
P8Z77-V PREMIUM User's Manual
Page 44
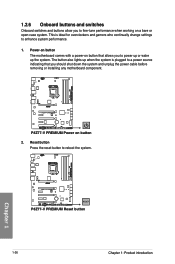
... fine-tune performance when working on button 2. P8Z77-V PREMIUM Reset button 1-26 Chapter 1: Product introduction Chapter 1 This is plugged to a power source indicating that allows you should shut down the system and unplug the power cable before removing or installing any motherboard component. Power-on button The motherboard comes with a power-on button that...
... fine-tune performance when working on button 2. P8Z77-V PREMIUM Reset button 1-26 Chapter 1: Product introduction Chapter 1 This is plugged to a power source indicating that allows you should shut down the system and unplug the power cable before removing or installing any motherboard component. Power-on button The motherboard comes with a power-on button that...
P8Z77-V PREMIUM User's Manual
Page 45
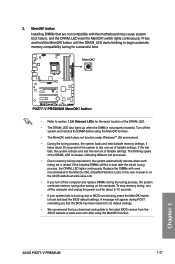
...to memory tuning requirement, the system automatically reboots when each timing set is not properly installed. 3. Replace the DIMMs with the motherboard may cause system boot failure, and the DRAM_LED near the MemOK! A message will appear during the tuning process, the system ...ASUS website at www.asus.com after turning on the computer. function. It takes about 5-10 seconds. • If your system fails to boot up when the DIMM is tested. MemOK! button Installing DIMMs that you turn off the system and reinstall the DIMM before using the MemOK! ASUS P8Z77-V PREMIUM...
...to memory tuning requirement, the system automatically reboots when each timing set is not properly installed. 3. Replace the DIMMs with the motherboard may cause system boot failure, and the DRAM_LED near the MemOK! A message will appear during the tuning process, the system ...ASUS website at www.asus.com after turning on the computer. function. It takes about 5-10 seconds. • If your system fails to boot up when the DIMM is tested. MemOK! button Installing DIMMs that you turn off the system and reinstall the DIMM before using the MemOK! ASUS P8Z77-V PREMIUM...

P8Z77-V PREMIUM User's Manual
Page 57
... the BIOS to [AHCI Mode]. ASUS P8Z77-V PREMIUM 1-39 If you intend to create a Serial ATA RAID set using Windows® XP SP3 or later versions. Refer to section 3.5.3 SATA Configuration for details. • Before creating a RAID set, refer to section 5.1 RAID configurations or the manual bundled in the motherboard support DVD. • When...
... the BIOS to [AHCI Mode]. ASUS P8Z77-V PREMIUM 1-39 If you intend to create a Serial ATA RAID set using Windows® XP SP3 or later versions. Refer to section 3.5.3 SATA Configuration for details. • Before creating a RAID set, refer to section 5.1 RAID configurations or the manual bundled in the motherboard support DVD. • When...


