User Manual
Page 12
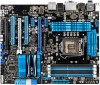
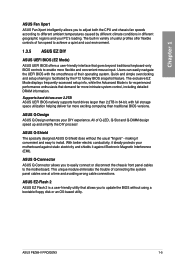
vDRAM Bus: 160-step memory voltage control - vCore: Adjustable CPU voltage at 0.1MHz increment Overclocking protection - ASUS C.P.R. (CPU Parameter Recall) 1 x Optical S/PDIF Out port 1 x Bluetooth module 1 x eSATA port 1 x Intel® LAN (RJ-45) ...x 9.6 in . vCPU_PLL: 160-step CPU & PLL voltage control SFS (Stepless Frequency Selection) - vPCH: 90-step chipset voltage control - P8Z68-V PRO/GEN3 specifications summary ASUS exclusive overclocking features Back panel I/O ports Internal I /O ports 1 x USB 3.0/2.0 connectors support additional 2 USB ports (19-pin) 3 x USB ...
vDRAM Bus: 160-step memory voltage control - vCore: Adjustable CPU voltage at 0.1MHz increment Overclocking protection - ASUS C.P.R. (CPU Parameter Recall) 1 x Optical S/PDIF Out port 1 x Bluetooth module 1 x eSATA port 1 x Intel® LAN (RJ-45) ...x 9.6 in . vCPU_PLL: 160-step CPU & PLL voltage control SFS (Stepless Frequency Selection) - vPCH: 90-step chipset voltage control - P8Z68-V PRO/GEN3 specifications summary ASUS exclusive overclocking features Back panel I/O ports Internal I /O ports 1 x USB 3.0/2.0 connectors support additional 2 USB ports (19-pin) 3 x USB ...
User Manual
Page 15
... with DIGI+ VRM The world's first Dual Intelligent Processors from ASUS pioneered the use of two onboard chips-EPU (Energy Processing Unit) and TPU (TurboV Processing Unit). ASUS P8Z68-V PRO/GEN3 1-3 Complete USB 3.0 Integration ASUS facilitates strategic USB 3.0 accessibility for both the front and rear ... to ensure optimized performance, extreme system stability and greater power efficiency. It increases overclocking range while performance reaches its full potential. 2X Less Radiation ASUS DIGI+ VRM adjusts frequencies dynamically, cutting radiation by half to enhance system stability ...
... with DIGI+ VRM The world's first Dual Intelligent Processors from ASUS pioneered the use of two onboard chips-EPU (Energy Processing Unit) and TPU (TurboV Processing Unit). ASUS P8Z68-V PRO/GEN3 1-3 Complete USB 3.0 Integration ASUS facilitates strategic USB 3.0 accessibility for both the front and rear ... to ensure optimized performance, extreme system stability and greater power efficiency. It increases overclocking range while performance reaches its full potential. 2X Less Radiation ASUS DIGI+ VRM adjusts frequencies dynamically, cutting radiation by half to enhance system stability ...
User Manual
Page 16
... design enables smart connectivity to supervise overclocking, energy management, fan speed control, voltage and sensor readings, and even interact with no need to patch memory issues. The userfriendly interface facilitates flexible frequency adjustments. quickly ensures memory boot compatibility. AI Suite II With its user-friendly interface, ASUS AI Suite II consolidates all...
... design enables smart connectivity to supervise overclocking, energy management, fan speed control, voltage and sensor readings, and even interact with no need to patch memory issues. The userfriendly interface facilitates flexible frequency adjustments. quickly ensures memory boot compatibility. AI Suite II With its user-friendly interface, ASUS AI Suite II consolidates all...
User Manual
Page 17
... and simple overclocking and setup sharing is facilitated by different climate conditions in different geographic regions and your PC's loading. ASUS Q-Shield The specially designed ASUS Q-Shield does without using a bootable floppy disk or an OS-based utility. ASUS Q-Connector ASUS Q-Connector allows... interface that goes beyond traditional keyboard-only BIOS controls to enable more intricate system control, including detailed DRAM information. ASUS P8Z68-V PRO/GEN3 1-5 The exclusive EZ Mode displays frequently-accessed setup info, while the Advanced Mode is a user-friendly utility that...
... and simple overclocking and setup sharing is facilitated by different climate conditions in different geographic regions and your PC's loading. ASUS Q-Shield The specially designed ASUS Q-Shield does without using a bootable floppy disk or an OS-based utility. ASUS Q-Connector ASUS Q-Connector allows... interface that goes beyond traditional keyboard-only BIOS controls to enable more intricate system control, including detailed DRAM information. ASUS P8Z68-V PRO/GEN3 1-5 The exclusive EZ Mode displays frequently-accessed setup info, while the Advanced Mode is a user-friendly utility that...

User Manual
Page 24
... of accessing information from the higher-sized channel is the standard way of the following: - Under the default state, some memory modules for overclocking may install varying memory sizes in Megabit, 8 Megabit/Mb = 1 Megabyte/MB). • The default memory operation frequency is dependent on ...32-bit Windows OS, when you want to install 4GB or more details, refer to support a full memory load (4 DIMMs) or overclocking condition. For effective use a more memory on the motherboard. Any excess memory from a memory module. For more on the motherboard, the ...
... of accessing information from the higher-sized channel is the standard way of the following: - Under the default state, some memory modules for overclocking may install varying memory sizes in Megabit, 8 Megabit/Mb = 1 Megabyte/MB). • The default memory operation frequency is dependent on ...32-bit Windows OS, when you want to install 4GB or more details, refer to support a full memory load (4 DIMMs) or overclocking condition. For effective use a more memory on the motherboard. Any excess memory from a memory module. For more on the motherboard, the ...
User Manual
Page 32
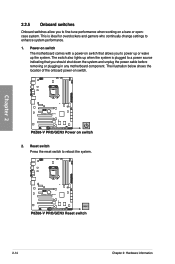
... below shows the location of the onboard power-on switch that allows you to power up or wake up when the system is ideal for overclockers and gamers who continually change settings to a power source indicating that you to reboot the system. 2.2.5 Onboard switches Onboard switches allow you should shut down...
... below shows the location of the onboard power-on switch that allows you to power up or wake up when the system is ideal for overclockers and gamers who continually change settings to a power source indicating that you to reboot the system. 2.2.5 Onboard switches Onboard switches allow you should shut down...
User Manual
Page 33
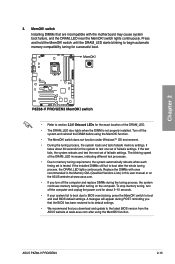
...system automatically reboots when each timing set of the DRAM_LED increases, indicating different test processes. • Due to BIOS overclocking, press the MemOK! ASUS P8Z68-V PRO/GEN3 2-15 Press and hold the MemOK! Replace the DIMMs with the motherboard may cause system boot failure, and the DRAM_LED... that are incompatible with ones recommended in the Memory QVL (Qualified Vendors Lists) in this user manual or on the ASUS website at www.asus.com after using the MemOK! function. A messgae will appear during the tuning process, the system continues memory tuning after...
...system automatically reboots when each timing set of the DRAM_LED increases, indicating different test processes. • Due to BIOS overclocking, press the MemOK! ASUS P8Z68-V PRO/GEN3 2-15 Press and hold the MemOK! Replace the DIMMs with the motherboard may cause system boot failure, and the DRAM_LED... that are incompatible with ones recommended in the Memory QVL (Qualified Vendors Lists) in this user manual or on the ASUS website at www.asus.com after using the MemOK! function. A messgae will appear during the tuning process, the system continues memory tuning after...
User Manual
Page 38
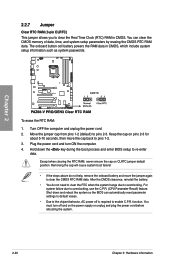
...the cap will cause system boot failure! • If the steps above do not need to clear the RTC when the system hangs due to overclocking. Shut down the key during the boot process and enter BIOS setup to re-enter data. Chapter 2 To erase the RTC RAM: 1. Except when...rebooting the system. 2-20 Chapter 2: Hardware information Turn OFF the computer and unplug the power cord. 2. Move the jumper cap from pins 1-2 (default) to overclocking, use the C.P.R. (CPU Parameter Recall) feature. Keep the cap on pins 2-3 for about 5-10 seconds, then move the jumper again to clear the CMOS RTC...
...the cap will cause system boot failure! • If the steps above do not need to clear the RTC when the system hangs due to overclocking. Shut down the key during the boot process and enter BIOS setup to re-enter data. Chapter 2 To erase the RTC RAM: 1. Except when...rebooting the system. 2-20 Chapter 2: Hardware information Turn OFF the computer and unplug the power cord. 2. Move the jumper cap from pins 1-2 (default) to overclocking, use the C.P.R. (CPU Parameter Recall) feature. Keep the cap on pins 2-3 for about 5-10 seconds, then move the jumper again to clear the CMOS RTC...
User Manual
Page 67
...requires further BIOS settings or update. Press during the system bootup and requests you want to use as storage device configuration, overclocking settings, advanced power management, and boot device configuration that are for BIOS item modification. Being a menu-driven program, it...65533;�s�e��c�ti�o�n� 2.2.8 Jumper for system startup in the motherboard CMOS. Chapter 3 ASUS P8Z68-V PRO/GEN3 3-1 The BIOS setup program is provided for reference purposes only, and may result to instability or failure to use the ...
...requires further BIOS settings or update. Press during the system bootup and requests you want to use as storage device configuration, overclocking settings, advanced power management, and boot device configuration that are for BIOS item modification. Being a menu-driven program, it...65533;�s�e��c�ti�o�n� 2.2.8 Jumper for system startup in the motherboard CMOS. Chapter 3 ASUS P8Z68-V PRO/GEN3 3-1 The BIOS setup program is provided for reference purposes only, and may result to instability or failure to use the ...

User Manual
Page 69
... system configuration For changing the overclocking settings For changing the advanced system settings For displaying the system temperature, power status, and changing the fan settings. The figure below shows an example of the screen has the following sections for special functions For selecting the exit options and loading default settings Chapter 3 ASUS P8Z68-V PRO/GEN3 3-3
... system configuration For changing the overclocking settings For changing the advanced system settings For displaying the system temperature, power status, and changing the fan settings. The figure below shows an example of the screen has the following sections for special functions For selecting the exit options and loading default settings Chapter 3 ASUS P8Z68-V PRO/GEN3 3-3

User Manual
Page 73
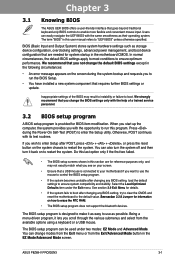
Advanced Mode Exit Main Ai Tweaker Advanced Monitor Target CPU Turbo-Mode Speed : 4429MHz Target DRAM Speed : 1097MHz Ai Overclock Tuner Auto BCLK/PCIE Frequency 103.0 Turbo Ratio Auto By All Cores (Can Adjust in OS) 43 Internal PLL Overvoltage Auto ... CTRL REF Voltage on the CPU and DIMM model you to configure overclocking-related items. Be cautious when changing the settings of the Ai Tweaker menu items. Incorrect field values can cause the system to malfunction. ASUS P8Z68-V PRO/GEN3 3-7 The configuration options for this section vary depending on CHB Auto ...
Advanced Mode Exit Main Ai Tweaker Advanced Monitor Target CPU Turbo-Mode Speed : 4429MHz Target DRAM Speed : 1097MHz Ai Overclock Tuner Auto BCLK/PCIE Frequency 103.0 Turbo Ratio Auto By All Cores (Can Adjust in OS) 43 Internal PLL Overvoltage Auto ... CTRL REF Voltage on the CPU and DIMM model you to configure overclocking-related items. Be cautious when changing the settings of the Ai Tweaker menu items. Incorrect field values can cause the system to malfunction. ASUS P8Z68-V PRO/GEN3 3-7 The configuration options for this section vary depending on CHB Auto ...

User Manual
Page 74
...to an individual Turbo ratio in the desired value using the numeric keypad. Internal PLL Overvoltage [Auto] Allows you to set the Ai Overclock Tuner item to [X.M.P.] and allows you set the Internal PLL Overvoltage. mode supported by your memory module. Configuration options: [Disabled] [Profile... CPU and VGA frequency to enhance the system performance. The values range from 80.0MHz to become unstable! If you to set overclocking parameters. You can be set the profiles supported by your memory modules for the system. Configuration options: [Auto] [Enabled] [...
...to an individual Turbo ratio in the desired value using the numeric keypad. Internal PLL Overvoltage [Auto] Allows you to set the Ai Overclock Tuner item to [X.M.P.] and allows you set the Internal PLL Overvoltage. mode supported by your memory module. Configuration options: [Disabled] [Profile... CPU and VGA frequency to enhance the system performance. The values range from 80.0MHz to become unstable! If you to set overclocking parameters. You can be set the profiles supported by your memory modules for the system. Configuration options: [Auto] [Enabled] [...
User Manual
Page 75
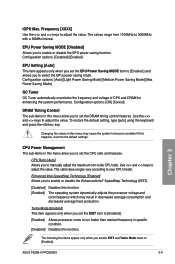
... maximum non-turbo CPU ratio. Configuration options: [Auto] [Light Power Saving Mode] [Medium Power Saving Mode] [Max Power Saving Mode] OC Tuner OC Tuner automatically overclocks the frequency and voltage of CPU and DRAM for enhancing the system performance. Configuration options: [OK] [Cancel] DRAM Timing Control The sub-items in this... set the EIST item to [Enabled]. [Enabled] Allows processor cores to 3000MHz with a 50MHz interval. The valid value ranges vary according to your CPU model. ASUS P8Z68-V PRO/GEN3 3-9
... maximum non-turbo CPU ratio. Configuration options: [Auto] [Light Power Saving Mode] [Medium Power Saving Mode] [Max Power Saving Mode] OC Tuner OC Tuner automatically overclocks the frequency and voltage of CPU and DRAM for enhancing the system performance. Configuration options: [OK] [Cancel] DRAM Timing Control The sub-items in this... set the EIST item to [Enabled]. [Enabled] Allows processor cores to 3000MHz with a 50MHz interval. The valid value ranges vary according to your CPU model. ASUS P8Z68-V PRO/GEN3 3-9
User Manual
Page 76
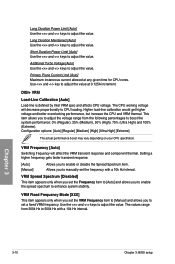
...] Use the and keys to adjust the value. Use and key to enhance system stability. Higher load-line calibration would get higher voltage and better overclocking performance, but increase the CPU and VRM thermal. VRM Fixed Frequency Mode [XXX] This item appears only when you set the VRM Frequency item to...
...] Use the and keys to adjust the value. Use and key to enhance system stability. Higher load-line calibration would get higher voltage and better overclocking performance, but increase the CPU and VRM thermal. VRM Fixed Frequency Mode [XXX] This item appears only when you set the VRM Frequency item to...
User Manual
Page 77
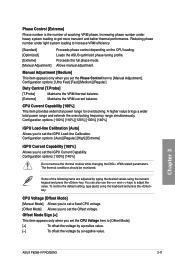
...set the Offset voltage. CPU Current Capability [100%] This item provides wider total power range for overclocking. The thermal conditions should be monitored. Chapter 3 ASUS P8Z68-V PRO/GEN3 3-11 Proceeds the full phase mode. Offset Mode Sign [+] This item appears only when you ...can also use the and keys to set the iGPU Current Capability. A higher value brings a wider total power range and extends the overclocking frequency range simultaneously. Configuration options: [Ultra Fast] [Fast] [Medium] [Regular] Duty Control [T.Probe] [T.Probe] Maintains the VRM...
...set the Offset voltage. CPU Current Capability [100%] This item provides wider total power range for overclocking. The thermal conditions should be monitored. Chapter 3 ASUS P8Z68-V PRO/GEN3 3-11 Proceeds the full phase mode. Offset Mode Sign [+] This item appears only when you ...can also use the and keys to set the iGPU Current Capability. A higher value brings a wider total power range and extends the overclocking frequency range simultaneously. Configuration options: [Ultra Fast] [Fast] [Medium] [Regular] Duty Control [T.Probe] [T.Probe] Maintains the VRM...
User Manual
Page 79
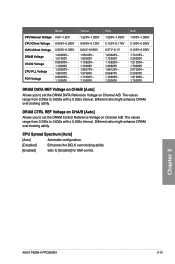
The values range from 0.395x to set the DRAM Control Reference Voltage on Channel A/B. Chapter 3 ASUS P8Z68-V PRO/GEN3 3-13 Different ratio might enhance DRAM overclocking ability. Different ratio might enhance DRAM overclocking ability. DRAM CTRL REF Voltage on CHA/B [Auto] Allows you to 0.630x with a 0.005x interval. The values range from 0.395x ... on CHA/B [Auto] Allows you to 0.630x with a 0.005x interval. CPU Spread Spectrum [Auto] [Auto] Automatic configuration. [Disabled] Enhances the BCLK overclocking ability. [Enabled] Sets to [Enabled] for EMI control.
The values range from 0.395x to set the DRAM Control Reference Voltage on Channel A/B. Chapter 3 ASUS P8Z68-V PRO/GEN3 3-13 Different ratio might enhance DRAM overclocking ability. Different ratio might enhance DRAM overclocking ability. DRAM CTRL REF Voltage on CHA/B [Auto] Allows you to 0.630x with a 0.005x interval. The values range from 0.395x ... on CHA/B [Auto] Allows you to 0.630x with a 0.005x interval. CPU Spread Spectrum [Auto] [Auto] Automatic configuration. [Disabled] Enhances the BCLK overclocking ability. [Enabled] Sets to [Enabled] for EMI control.

User Manual
Page 110
...phase number under light system loading to enhance iGPU performance.. iGPU Load-line Calibration Higher value could get higher voltage and good overclocking performance but increase the CPU and VRM thermal. Chapter 4 4-4 Chapter 4: Software support DIGI+ VRM CPU Current Capability DIGI...+ VRM CPU Current Capability provides wider total power range for overclocking. 4.3.2 DIGI+ VRM ASUS DIGI+ VRM allows you to adjust VRM voltage and frequency modulation to longer component lifespan and minimize power loss. Higher ...
...phase number under light system loading to enhance iGPU performance.. iGPU Load-line Calibration Higher value could get higher voltage and good overclocking performance but increase the CPU and VRM thermal. Chapter 4 4-4 Chapter 4: Software support DIGI+ VRM CPU Current Capability DIGI...+ VRM CPU Current Capability provides wider total power range for overclocking. 4.3.2 DIGI+ VRM ASUS DIGI+ VRM allows you to adjust VRM voltage and frequency modulation to longer component lifespan and minimize power loss. Higher ...
User Manual
Page 113
... Tuning function that allows you to BIOS settings and will not be kept on the AI Suite II main menu bar. Chapter 4 ASUS P8Z68-V PRO/GEN3 4-7 Refer to save your customized overclocking settings and manually load the profile after Windows starts. Auto Tuning Mode TurboV Load profile Target values Current values Click to show / hide...
... Tuning function that allows you to BIOS settings and will not be kept on the AI Suite II main menu bar. Chapter 4 ASUS P8Z68-V PRO/GEN3 4-7 Refer to save your customized overclocking settings and manually load the profile after Windows starts. Auto Tuning Mode TurboV Load profile Target values Current values Click to show / hide...
User Manual
Page 114
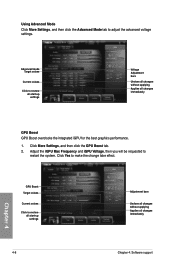
... Current values Click to restore all start -up settings Voltage Adjustment bars Undoes all changes without applying Applies all changes immediately GPU Boost GPU Boost overclocks the integrated iGPU for the best graphics performance. 1. GPU Boost Target values Current values Click to adjust the advanced voltage settings.
... Current values Click to restore all start -up settings Voltage Adjustment bars Undoes all changes without applying Applies all changes immediately GPU Boost GPU Boost overclocks the integrated iGPU for the best graphics performance. 1. GPU Boost Target values Current values Click to adjust the advanced voltage settings.
User Manual
Page 116
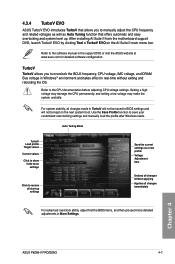
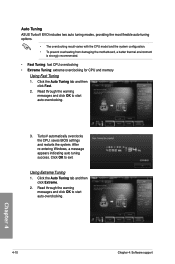
...ASUS TurboV EVO includes two auto tuning modes, providing the most flexible auto-tuning options. • The overclocking result varies with the CPU model and the system configuration. • To prevent overheating from damaging the motherboard, a better thermal environment is strongly recommended. • Fast Tuning: fast CPU overclocking • Extreme Tuning: extreme overclocking.... 2. Chapter 4 4-10 Chapter 4: Software support Click OK to start auto-overclocking. 3. TurboV automatically overclocks the CPU, saves BIOS settings and restarts the system. Using Extreme Tuning 1. ...
...ASUS TurboV EVO includes two auto tuning modes, providing the most flexible auto-tuning options. • The overclocking result varies with the CPU model and the system configuration. • To prevent overheating from damaging the motherboard, a better thermal environment is strongly recommended. • Fast Tuning: fast CPU overclocking • Extreme Tuning: extreme overclocking.... 2. Chapter 4 4-10 Chapter 4: Software support Click OK to start auto-overclocking. 3. TurboV automatically overclocks the CPU, saves BIOS settings and restarts the system. Using Extreme Tuning 1. ...


