User Manual
Page 38
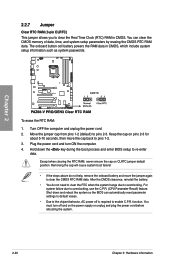
... jumper again to clear the CMOS RTC RAM data. Shut down the key during the boot process and enter BIOS setup to re-enter data. Hold down and reboot the system so the BIOS can clear the CMOS memory of date, time, and system setup parameters by erasing the CMOS RTC RAM... CMOS clearance, reinstall the battery. • You do not help, remove the onboard battery and move the cap back to pins 1-2. 3. function. You can automatically reset parameter settings to default values. • Due to the chipset behavior, AC power off and on the power supply or unplug and plug the power...
... jumper again to clear the CMOS RTC RAM data. Shut down the key during the boot process and enter BIOS setup to re-enter data. Hold down and reboot the system so the BIOS can clear the CMOS memory of date, time, and system setup parameters by erasing the CMOS RTC RAM... CMOS clearance, reinstall the battery. • You do not help, remove the onboard battery and move the cap back to pins 1-2. 3. function. You can automatically reset parameter settings to default values. • Due to the chipset behavior, AC power off and on the power supply or unplug and plug the power...
User Manual
Page 47
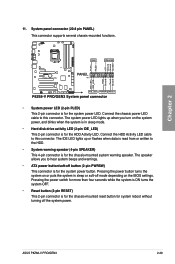
... ON turns the system OFF. • Reset button (2-pin RESET) This 2-pin connector is for the chassis-mounted reset button for system reboot without turning off button (2-pin PWRSW) This connector is for the HDD Activity LED. 11. The speaker allows you turn on the BIOS settings. ASUS P8Z68-V PRO/GEN3 2-29 Connect the chassis power LED cable...
... ON turns the system OFF. • Reset button (2-pin RESET) This 2-pin connector is for the chassis-mounted reset button for system reboot without turning off button (2-pin PWRSW) This connector is for the HDD Activity LED. 11. The speaker allows you turn on the BIOS settings. ASUS P8Z68-V PRO/GEN3 2-29 Connect the chassis power LED cable...
User Manual
Page 67
...your screen. • Ensure that requires further BIOS settings or update. Chapter 3 ASUS P8Z68-V PRO/GEN3 3-1 Select the Load Optimized Defaults item under two modes: EZ Mode and Advanced Mode. Chapter 3 Chapter 3: 3.1 Knowing BIOS BIOS setup The ASUS UEFI BIOS offers a user-friendly interface that goes beyond ...See section 3.9 Exit Menu for details. • If the system fails to boot after changing any BIOS setting, try to clear the CMOS and reset the motherboard to the default value. �S�e�e��s�e��c�ti�...
...your screen. • Ensure that requires further BIOS settings or update. Chapter 3 ASUS P8Z68-V PRO/GEN3 3-1 Select the Load Optimized Defaults item under two modes: EZ Mode and Advanced Mode. Chapter 3 Chapter 3: 3.1 Knowing BIOS BIOS setup The ASUS UEFI BIOS offers a user-friendly interface that goes beyond ...See section 3.9 Exit Menu for details. • If the system fails to boot after changing any BIOS setting, try to clear the CMOS and reset the motherboard to the default value. �S�e�e��s�e��c�ti�...

User Manual
Page 68
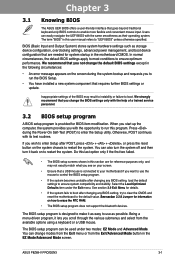
...screen for details. Selects the display language of the selected mode on the right hand side Normal mode ASUS Optimal mode Selects the boot device priority • The boot device options vary depending on the devices ...resets the system, or enters the Advanced Mode EFI BIOS Utility - Refer to decide the boot priority. Boot Menu(F8) Default(F5) Selects the boot device priority Power Saving mode Loads optimized default Displays the system properties of the BIOS setup program Clicks to the system. 3-2 Chapter 3: BIOS setup EZ Mode Monday [9/13/2010] P8Z68-V PRO/GEN3 BIOS...
...screen for details. Selects the display language of the selected mode on the right hand side Normal mode ASUS Optimal mode Selects the boot device priority • The boot device options vary depending on the devices ...resets the system, or enters the Advanced Mode EFI BIOS Utility - Refer to decide the boot priority. Boot Menu(F8) Default(F5) Selects the boot device priority Power Saving mode Loads optimized default Displays the system properties of the BIOS setup program Clicks to the system. 3-2 Chapter 3: BIOS setup EZ Mode Monday [9/13/2010] P8Z68-V PRO/GEN3 BIOS...

User Manual
Page 96
...65533;��p�r�o�f�i�le� number that saved your BIOS settings, press , and then select Yes. • DO NOT shut down or reset the system while updating the BIOS to eight, press , and then select Yes. Profile Configuration Setup Profile 1 Status... recommend that you update the BIOS file only coming from the same memory/CPU configuration and BIOS version. Advanced Mode Exit Main Back Ai Tweaker Tool\ ASUS O.C. 3.8.2. Load from Profile Allows you to load the previous BIOS settings saved in the BIOS Flash. �K�e�&#...
...65533;��p�r�o�f�i�le� number that saved your BIOS settings, press , and then select Yes. • DO NOT shut down or reset the system while updating the BIOS to eight, press , and then select Yes. Profile Configuration Setup Profile 1 Status... recommend that you update the BIOS file only coming from the same memory/CPU configuration and BIOS version. Advanced Mode Exit Main Back Ai Tweaker Tool\ ASUS O.C. 3.8.2. Load from Profile Allows you to load the previous BIOS settings saved in the BIOS Flash. �K�e�&#...

User Manual
Page 97
... window appears. Chapter 3 ASUS P8Z68-V PRO/GEN3 3-31 Save Changes & Reset Once you are saved. When you select this option from the Exit menu to exit the Setup program without saving your changes to enter the EZ Mode screen. ASUS EZ Mode This option allows you to the BIOS items. You can access ...each of the available filesystem devices. Select Yes to load the default values for the BIOS items, and save changes and exit. Exit Load Optimized Defaults Save Changes & Reset Discard Changes & Exit ASUS EZ Mode Launch EFI Shell from the Exit menu. Launch EFI Shell from one of...
... window appears. Chapter 3 ASUS P8Z68-V PRO/GEN3 3-31 Save Changes & Reset Once you are saved. When you select this option from the Exit menu to exit the Setup program without saving your changes to enter the EZ Mode screen. ASUS EZ Mode This option allows you to the BIOS items. You can access ...each of the available filesystem devices. Select Yes to load the default values for the BIOS items, and save changes and exit. Exit Load Optimized Defaults Save Changes & Reset Discard Changes & Exit ASUS EZ Mode Launch EFI Shell from the Exit menu. Launch EFI Shell from one of...

User Manual
Page 102
...the devices for details. 3.10.3 ASUS CrashFree BIOS 3 utility The ASUS CrashFree BIOS 3 utility is an auto recovery tool that allows you to enter BIOS Setup to load default BIOS values. Ensure to load the BIOS default settings to the USB port. 3. You can restore a corrupted BIOS file using the motherboard support DVD ...a USB flash disk with FAT 32/16 format and single partition only. • DO NOT shut down or reset the system while updating the BIOS! See section 3.9 Exit Menu for the BIOS file. DO NOT shut down or reset the system while updating the BIOS to a USB flash drive.
...the devices for details. 3.10.3 ASUS CrashFree BIOS 3 utility The ASUS CrashFree BIOS 3 utility is an auto recovery tool that allows you to enter BIOS Setup to load default BIOS values. Ensure to load the BIOS default settings to the USB port. 3. You can restore a corrupted BIOS file using the motherboard support DVD ...a USB flash disk with FAT 32/16 format and single partition only. • DO NOT shut down or reset the system while updating the BIOS! See section 3.9 Exit Menu for the BIOS file. DO NOT shut down or reset the system while updating the BIOS to a USB flash drive.

User Manual
Page 105
... you have disconnected them. When BIOS update is done, press to select the BIOS file and press . ASUS P8Z68-V PRO/GEN3 3-39 ASUSTek BIOS Updater for details. • Ensure to connect all SATA hard disk drives after updating BIOS. • Ensure to load the BIOS default settings to ensure system compatibility...use the keys to exit BIOS Updater. D:\>bupdater /pc /g 2. BIOS Updater checks the selected BIOS file and prompts you to update BIOS? DO NOT shut down or reset the system while updating the BIOS to prevent system boot failure! • For BIOS Updater version 1.04 or ...
... you have disconnected them. When BIOS update is done, press to select the BIOS file and press . ASUS P8Z68-V PRO/GEN3 3-39 ASUSTek BIOS Updater for details. • Ensure to connect all SATA hard disk drives after updating BIOS. • Ensure to load the BIOS default settings to ensure system compatibility...use the keys to exit BIOS Updater. D:\>bupdater /pc /g 2. BIOS Updater checks the selected BIOS file and prompts you to update BIOS? DO NOT shut down or reset the system while updating the BIOS to prevent system boot failure! • For BIOS Updater version 1.04 or ...

User Manual
Page 124
...Technology - Create RAID Volume 2. Install the SATA hard disks into the drive bays. 2. Enter the BIOS Setup during POST. 2. During POST, press + to Non-RAID 4. Option ROM - Delete RAID Volume 3. Reset Disks to display the utility main menu. Physical Devices: Port Device Model 0 ST3160812AS 1 ST3160812AS 2...[ESC]-Exit [ENTER]-Select Menu 4-18 Chapter 4: Software support To install the SATA hard disks for details on entering and navigating through the BIOS Setup. To do this: 1. Set the SATA Mode item to the Advanced menu > SATA Configuration, and then press . 3. All Rights ...
...Technology - Create RAID Volume 2. Install the SATA hard disks into the drive bays. 2. Enter the BIOS Setup during POST. 2. During POST, press + to Non-RAID 4. Option ROM - Delete RAID Volume 3. Reset Disks to display the utility main menu. Physical Devices: Port Device Model 0 ST3160812AS 1 ST3160812AS 2...[ESC]-Exit [ENTER]-Select Menu 4-18 Chapter 4: Software support To install the SATA hard disks for details on entering and navigating through the BIOS Setup. To do this: 1. Set the SATA Mode item to the Advanced menu > SATA Configuration, and then press . 3. All Rights ...


