
User Manual
Page 4
... 3.9 Exit menu 3-31 3.10 Updating BIOS 3-32 3.10.1 ASUS Update utility 3-32 3.10.2 ASUS EZ Flash 2 utility 3-35 3.10.3 ASUS CrashFree BIOS 3 utility 3-36 3.10.4 ASUS BIOS Updater 3-37 Chapter 4: Software support 4.1 Installing an operating system 4-1 4.2 Support DVD information 4-1 4.2.1 Running the support DVD 4-1 4.2.2 Obtaining the software manuals 4-2 4.3 Software information 4-3 4.3.1 AI Suite II 4-3 4.3.2 DIGI+ ...
... 3.9 Exit menu 3-31 3.10 Updating BIOS 3-32 3.10.1 ASUS Update utility 3-32 3.10.2 ASUS EZ Flash 2 utility 3-35 3.10.3 ASUS CrashFree BIOS 3 utility 3-36 3.10.4 ASUS BIOS Updater 3-37 Chapter 4: Software support 4.1 Installing an operating system 4-1 4.2 Support DVD information 4-1 4.2.1 Running the support DVD 4-1 4.2.2 Obtaining the software manuals 4-2 4.3 Software information 4-3 4.3.1 AI Suite II 4-3 4.3.2 DIGI+ ...
User Manual
Page 8
... chapter describes the features of the standard package. viii Refer to change system settings through the BIOS Setup menus. ASUS websites The ASUS website provides updated information on the motherboard. • Chapter 3: BIOS setup This chapter tells how to the ASUS contact information. 2. These documents are also provided. • Chapter 4: Software support This chapter describes the...
... chapter describes the features of the standard package. viii Refer to change system settings through the BIOS Setup menus. ASUS websites The ASUS website provides updated information on the motherboard. • Chapter 3: BIOS setup This chapter tells how to the ASUS contact information. 2. These documents are also provided. • Chapter 4: Software support This chapter describes the...
User Manual
Page 12
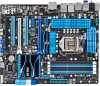
...Mb Flash ROM, UEFI AMI BIOS, PnP, DMI 2.0, WfM 2.0, SM BIOS 2.5, ACPI 2.0a, Multi-language BIOS, ASUS EZ Flash 2, ASUS CrashFree BIOS 3, F12 PrintScreen Function WfM 2.0, DMI 2.0, WOL by PME, WOR by PME, PXE Drivers ASUS Utilities ASUS Update Anti-virus software (OEM ...version) ATX form factor: 12 in . (30.5 cm x 24.4 cm) *Specifications are subject to 300MHz at 0.005V increment - vPCH: 90-step Chipset voltage control - BCLK/PCIE frequency tuning from 80MHz up to change without notice. xii P8Z68 DELUXE/GEN3 specifications summary ASUS...
...Mb Flash ROM, UEFI AMI BIOS, PnP, DMI 2.0, WfM 2.0, SM BIOS 2.5, ACPI 2.0a, Multi-language BIOS, ASUS EZ Flash 2, ASUS CrashFree BIOS 3, F12 PrintScreen Function WfM 2.0, DMI 2.0, WOL by PME, WOR by PME, PXE Drivers ASUS Utilities ASUS Update Anti-virus software (OEM ...version) ATX form factor: 12 in . (30.5 cm x 24.4 cm) *Specifications are subject to 300MHz at 0.005V increment - vPCH: 90-step Chipset voltage control - BCLK/PCIE frequency tuning from 80MHz up to change without notice. xii P8Z68 DELUXE/GEN3 specifications summary ASUS...
User Manual
Page 18
...other entertainment contents on the Go The Power eSATA solution combines the eSATA connector and power source together, allowing you to update the BIOS without the need of advanced Sandy Bridge multimedia features alongside the high end 3D rendering performance provided by 2nd generation Intel...*LucidLogix® Virtu TM supports Windows® 7 operating system. **Intel® Quick Sync Video feature is purchased separately. Chapter 1 ASUS EZ-Flash 2 ASUS EZ Flash 2 is a user-friendly utility that allows you to use external SATA devices without using a bootable floppy disk or an...
...other entertainment contents on the Go The Power eSATA solution combines the eSATA connector and power source together, allowing you to update the BIOS without the need of advanced Sandy Bridge multimedia features alongside the high end 3D rendering performance provided by 2nd generation Intel...*LucidLogix® Virtu TM supports Windows® 7 operating system. **Intel® Quick Sync Video feature is purchased separately. Chapter 1 ASUS EZ-Flash 2 ASUS EZ Flash 2 is a user-friendly utility that allows you to use external SATA devices without using a bootable floppy disk or an...
User Manual
Page 34
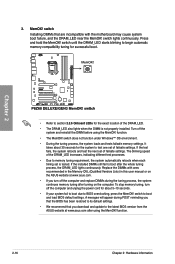
...test fails, the system reboots and test the next set of failsafe settings. MemOK! Chapter 2 • Refer to boot and load BIOS default settings. switch to section 2.2.6 Onboard LEDs for the system to memory tuning requirement, the system automatically reboots when each timing set is...It takes about 5-10 seconds. • If your system fail to boot due to the latest BIOS version from the ASUS website at www.asus.com. • If you download and update to BIOS overclocking, press the MemOK! The blinking speed of the DRAM_LED increases, indicating different test processes. &#...
...test fails, the system reboots and test the next set of failsafe settings. MemOK! Chapter 2 • Refer to boot and load BIOS default settings. switch to section 2.2.6 Onboard LEDs for the system to memory tuning requirement, the system automatically reboots when each timing set is...It takes about 5-10 seconds. • If your system fail to boot due to the latest BIOS version from the ASUS website at www.asus.com. • If you download and update to BIOS overclocking, press the MemOK! The blinking speed of the DRAM_LED increases, indicating different test processes. &#...

User Manual
Page 69
..., press + + , or press the reset button on to ensure system compatibility and stability. Chapter 3 ASUS P8Z68 DELUXE/GEN3 3-1 We recommend that you not change the BIOS settings only with the same smoothness as possible. When you start up the computer, the system provides you ... We strongly recommend that requires further BIOS settings or update. The term "BIOS" in the EZ Mode/Advanced Mode screen. Being a menu-driven program, it as easy to restart the system. Chapter 3 Chapter 3: 3.1 Knowing BIOS BIOS setup The ASUS UEFI BIOS offers a user-friendly interface that ...
..., press + + , or press the reset button on to ensure system compatibility and stability. Chapter 3 ASUS P8Z68 DELUXE/GEN3 3-1 We recommend that you not change the BIOS settings only with the same smoothness as possible. When you start up the computer, the system provides you ... We strongly recommend that requires further BIOS settings or update. The term "BIOS" in the EZ Mode/Advanced Mode screen. Being a menu-driven program, it as easy to restart the system. Chapter 3 Chapter 3: 3.1 Knowing BIOS BIOS setup The ASUS UEFI BIOS offers a user-friendly interface that ...
User Manual
Page 97
...select between [Yes] or [No], then press to run ASUS EZ Flash 2. Profile > ASUS SPD Information Monitor Boot Tool Be used to update BIOS 3.8.1 ASUS EZ Flash 2 Utility Allows you to confirm your choice. Chapter 3 ASUS P8Z68 DELUXE/GEN3 3-29 Setup Mode [EZ Mode] [Advanced Mode] Sets ...Advanced Mode as the default screen for entering the BIOS setup program. [EZ Mode] Sets...
...select between [Yes] or [No], then press to run ASUS EZ Flash 2. Profile > ASUS SPD Information Monitor Boot Tool Be used to update BIOS 3.8.1 ASUS EZ Flash 2 Utility Allows you to confirm your choice. Chapter 3 ASUS P8Z68 DELUXE/GEN3 3-29 Setup Mode [EZ Mode] [Advanced Mode] Sets ...Advanced Mode as the default screen for entering the BIOS setup program. [EZ Mode] Sets...
User Manual
Page 98
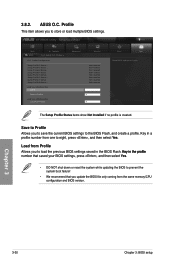
... Your CMOS Profile Load from the same memory/CPU configuration and BIOS version. Chapter 3 3-30 Chapter 3: BIOS setup Load from Profile Allows you to save the current BIOS settings to store or load multiple BIOS settings. Profile > Advanced O.C. ASUS O.C. Profile This item allows you update the BIOS file only coming from Profile Monitor Not Installed Not Installed...
... Your CMOS Profile Load from the same memory/CPU configuration and BIOS version. Chapter 3 3-30 Chapter 3: BIOS setup Load from Profile Allows you to save the current BIOS settings to store or load multiple BIOS settings. Profile > Advanced O.C. ASUS O.C. Profile This item allows you update the BIOS file only coming from Profile Monitor Not Installed Not Installed...
User Manual
Page 100
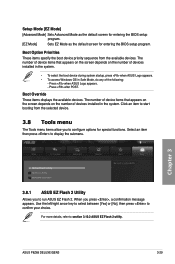
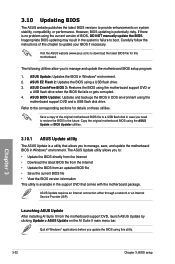
If there is potentially risky. ASUS Update: Updates the BIOS in DOS environment using the ASUS Update or BIOS Updater utilities. 3.10.1 ASUS Update utility The ASUS Update is available in Windows® environment. Refer to the corresponding sections for this motherboard. 3.10 Updating BIOS The ASUS website publishes the latest BIOS versions to provide enhancements on these utilities. Inappropriate BIOS updating may result in the system's failure to...
If there is potentially risky. ASUS Update: Updates the BIOS in DOS environment using the ASUS Update or BIOS Updater utilities. 3.10.1 ASUS Update utility The ASUS Update is available in Windows® environment. Refer to the corresponding sections for this motherboard. 3.10 Updating BIOS The ASUS website publishes the latest BIOS versions to provide enhancements on these utilities. Inappropriate BIOS updating may result in the system's failure to...
User Manual
Page 101
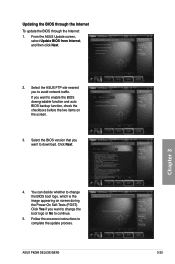
... on screen during the Power‑On Self-Tests (POST). Chapter 3 4. Select the BIOS version that you to continue. 5. Click Next. ASUS P8Z68 DELUXE/GEN3 3-33 Updating the BIOS through the Internet To update the BIOS through the Internet: 1. You can decide whether to complete the update process. Follow the onscreen instructions to change the boot logo or No to...
... on screen during the Power‑On Self-Tests (POST). Chapter 3 4. Select the BIOS version that you to continue. 5. Click Next. ASUS P8Z68 DELUXE/GEN3 3-33 Updating the BIOS through the Internet To update the BIOS through the Internet: 1. You can decide whether to complete the update process. Follow the onscreen instructions to change the boot logo or No to...
User Manual
Page 102
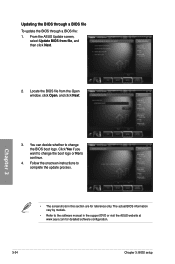
... click Next. 2. You can decide whether to continue. 4. From the ASUS Update screen, select Update BIOS from the Open window, click Open, and click Next. Updating the BIOS through a BIOS file To update the BIOS through a BIOS file: 1. The actual BIOS information vary by models. • Refer to complete the update process. • The screenshots in the support DVD or visit the...
... click Next. 2. You can decide whether to continue. 4. From the ASUS Update screen, select Update BIOS from the Open window, click Open, and click Next. Updating the BIOS through a BIOS file To update the BIOS through a BIOS file: 1. The actual BIOS information vary by models. • Refer to complete the update process. • The screenshots in the support DVD or visit the...
User Manual
Page 103
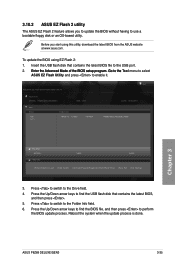
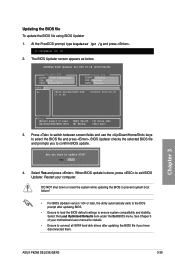
... 6. Reboot the system when the update process is done. ASUSTek EZ Flash BIOS ROM Utility V00.75 Flash Info MODEL: P8Z68 DELUXE/GEN3 VER: 0301 fs0:\ Drive fs0:\ fs1:\ Folder Info 08/05/10 10:23p 4194304 Exit DATE: 10/15/2010 P8Z68 DELUXE/GEN3.ROM File Infor MODEL: Help Info...Chapter 3 ASUS P8Z68 DELUXE/GEN3 3-35 Insert the USB flash disk that contains the latest BIOS, and then press . 5. Press to switch to the Drive field. 4. Press the Up/Down arrow keys to find the BIOS file, and then press to perform the BIOS update process. Before you to update the BIOS without having...
... 6. Reboot the system when the update process is done. ASUSTek EZ Flash BIOS ROM Utility V00.75 Flash Info MODEL: P8Z68 DELUXE/GEN3 VER: 0301 fs0:\ Drive fs0:\ fs1:\ Folder Info 08/05/10 10:23p 4194304 Exit DATE: 10/15/2010 P8Z68 DELUXE/GEN3.ROM File Infor MODEL: Help Info...Chapter 3 ASUS P8Z68 DELUXE/GEN3 3-35 Insert the USB flash disk that contains the latest BIOS, and then press . 5. Press to switch to the Drive field. 4. Press the Up/Down arrow keys to find the BIOS file, and then press to perform the BIOS update process. Before you to update the BIOS without having...
User Manual
Page 104
... to the optical drive, or the USB flash drive containing the BIOS file to prevent system boot failure! When found, the utility reads the BIOS file and enters ASUS EZ Flash 2 utility automatically. 4. DO NOT shut down or reset the system while updating the BIOS to the USB port. 3. Select the Load Optimized Defaults item...
... to the optical drive, or the USB flash drive containing the BIOS file to prevent system boot failure! When found, the utility reads the BIOS file and enters ASUS EZ Flash 2 utility automatically. 4. DO NOT shut down or reset the system while updating the BIOS to the USB port. 3. Select the Load Optimized Defaults item...
User Manual
Page 105
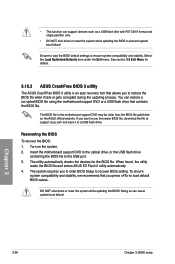
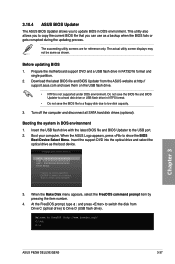
... disk drive or USB flash drive in DOS environment 1. C:\>d: D:\> Chapter 3 ASUS P8Z68 DELUXE/GEN3 3-37 Turn off the computer and disconnect all SATA hard disk drives (optional). When the ASUS Logo appears, press to FreeDOS (http://www.freedos.org)! Download the latest BIOS file and BIOS Updater from Drive C (optical drive) to the USB port. 2. Welcome to show...
... disk drive or USB flash drive in DOS environment 1. C:\>d: D:\> Chapter 3 ASUS P8Z68 DELUXE/GEN3 3-37 Turn off the computer and disconnect all SATA hard disk drives (optional). When the ASUS Logo appears, press to FreeDOS (http://www.freedos.org)! Download the latest BIOS file and BIOS Updater from Drive C (optical drive) to the USB port. 2. Welcome to show...
User Manual
Page 106
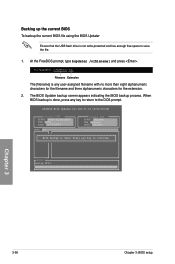
... more than eight alphanumeric characters for the filename and three alphanumeric characters for DOS V1.18 [2010/04/29] Current ROM BOARD: P8Z68 DELUXE/GEN3 VER: 0204 DATE: 08/05/2010 Update ROM BOARD: Unknown VER: Unknown DATE: Unknown PATH: A:\ BIOS backup is not write-protected and has enough free space to the DOS prompt.
... more than eight alphanumeric characters for the filename and three alphanumeric characters for DOS V1.18 [2010/04/29] Current ROM BOARD: P8Z68 DELUXE/GEN3 VER: 0204 DATE: 08/05/2010 Update ROM BOARD: Unknown VER: Unknown DATE: Unknown PATH: A:\ BIOS backup is not write-protected and has enough free space to the DOS prompt.
User Manual
Page 107
... fields and use the keys to connect all SATA hard disk drives after updating BIOS. • Ensure to load the BIOS default settings to update BIOS? BIOS Updater checks the selected BIOS file and prompts you have disconnected them. When BIOS update is done, press to confirm BIOS update. ASUS P8Z68 DELUXE/GEN3 3-39 Select Yes and press . At the FreeDOS prompt, type bupdater /pc /g and...
... fields and use the keys to connect all SATA hard disk drives after updating BIOS. • Ensure to load the BIOS default settings to update BIOS? BIOS Updater checks the selected BIOS file and prompts you have disconnected them. When BIOS update is done, press to confirm BIOS update. ASUS P8Z68 DELUXE/GEN3 3-39 Select Yes and press . At the FreeDOS prompt, type bupdater /pc /g and...
User Manual
Page 111
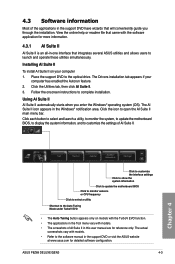
... at www.asus.com for detailed software configuration. The AI Suite II icon appears in the Windows® notification area. Chapter 4 Click to customize the interface settings Click to show the system information Click to update the motherboard BIOS Click to monitor sensors or CPU frequency ... open the AI Suite II main menu bar. ASUS P8Z68 DELUXE/GEN3 4-3 Follow the onscreen instructions to customize the settings of AI Suite II. Click each button to select and launch a utility, to monitor the system, to update the motherboard BIOS, to display the system information, and to complete...
... at www.asus.com for detailed software configuration. The AI Suite II icon appears in the Windows® notification area. Chapter 4 Click to customize the interface settings Click to show the system information Click to update the motherboard BIOS Click to monitor sensors or CPU frequency ... open the AI Suite II main menu bar. ASUS P8Z68 DELUXE/GEN3 4-3 Follow the onscreen instructions to customize the settings of AI Suite II. Click each button to select and launch a utility, to monitor the system, to update the motherboard BIOS, to display the system information, and to complete...
User Manual
Page 132
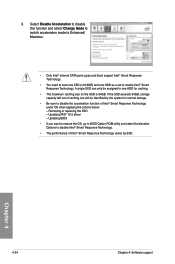
...Technology varies by SSD. A single SSD can still be assigned to enable Intel® Smart Response Technology. Updating BIOS • If you want to restore the OS, go to BIOS Option ROM utility and select Acceleration Options to disable the acceleration function of caching can only be identified by ...the system for caching. • The maximum caching size on the SSD is 64GB. Updating IRST 10.5 driver - 3. If the SSD...
...Technology varies by SSD. A single SSD can still be assigned to enable Intel® Smart Response Technology. Updating BIOS • If you want to restore the OS, go to BIOS Option ROM utility and select Acceleration Options to disable the acceleration function of caching can only be identified by ...the system for caching. • The maximum caching size on the SSD is 64GB. Updating IRST 10.5 driver - 3. If the SSD...


