
User Manual
Page 2
... anyone in obtaining the full corresponding source code we can coordinate the terms and cost of shipment with the complete machinereadable "work that uses the Library") for a period of three years after our last shipment of this manual, including the products and software described in it from http://support.asus.com/download; This offer is licensed under the...
... anyone in obtaining the full corresponding source code we can coordinate the terms and cost of shipment with the complete machinereadable "work that uses the Library") for a period of three years after our last shipment of this manual, including the products and software described in it from http://support.asus.com/download; This offer is licensed under the...

User Manual
Page 18
...1-8 ASUS P8Q67-M DO Series Turn on the slot. 5. Assign an IRQ to use . 4. Align the card connector with the PCI Express specifications. 1.5.5 PCI Express x16 slot This motherboard has a PCI Express 2.0 x16 slot that you removed earlier. 6. Otherwise, conflicts will arise between the two PCI groups, making the system unstable and the card inoperable. 1.5.3 PCI slot The PCI slots support cards such as a LAN card, SCSI card, USB card, and other cards that comply with PCI specifications. 1.5.4 PCI Express x4 slot This motherboard supports PCI Express x4 network cards, SCSI cards...
...1-8 ASUS P8Q67-M DO Series Turn on the slot. 5. Assign an IRQ to use . 4. Align the card connector with the PCI Express specifications. 1.5.5 PCI Express x16 slot This motherboard has a PCI Express 2.0 x16 slot that you removed earlier. 6. Otherwise, conflicts will arise between the two PCI groups, making the system unstable and the card inoperable. 1.5.3 PCI slot The PCI slots support cards such as a LAN card, SCSI card, USB card, and other cards that comply with PCI specifications. 1.5.4 PCI Express x4 slot This motherboard supports PCI Express x4 network cards, SCSI cards...

User Manual
Page 25
... SATA Mode item in the support DVD. • You must install Windows® XP Service Pack 3 or later version before using these connectors, set , refer to these connectors. Intel® Q67 Serial ATA 6.0Gb/s connectors (7-pin SATA6G_1/2 [gray]) These connectors connect to [RAID Mode]. The Serial ATA RAID feature (RAID 0, 1, 5, and 10) is available only if you are set the SATA Mode item in the BIOS to [IDE Mode] by default. If you can connect Serial ATA boot/data hard disk drives to the RAID Supplementary Guide...
... SATA Mode item in the support DVD. • You must install Windows® XP Service Pack 3 or later version before using these connectors, set , refer to these connectors. Intel® Q67 Serial ATA 6.0Gb/s connectors (7-pin SATA6G_1/2 [gray]) These connectors connect to [RAID Mode]. The Serial ATA RAID feature (RAID 0, 1, 5, and 10) is available only if you are set the SATA Mode item in the BIOS to [IDE Mode] by default. If you can connect Serial ATA boot/data hard disk drives to the RAID Supplementary Guide...

User Manual
Page 26
...; Before creating a RAID set the SATA Mode item in the BIOS to the RAID Supplementary Guide included in the folder named Manual in the BIOS to Serial ATA 3.0 Gb/s hard disk drives and optical drives via Serial ATA 3.0 Gb/s signal cables. 8. If you installed Serial ATA hard disk drives, you are set the SATA Mode item in the support DVD. • You must install Windows® XP Service Pack 3 or later version before using these connectors. See section 2.5.5 SATA Configuration for details. 1-16 ASUS P8Q67-M DO Series
...; Before creating a RAID set the SATA Mode item in the BIOS to the RAID Supplementary Guide included in the folder named Manual in the BIOS to Serial ATA 3.0 Gb/s hard disk drives and optical drives via Serial ATA 3.0 Gb/s signal cables. 8. If you installed Serial ATA hard disk drives, you are set the SATA Mode item in the support DVD. • You must install Windows® XP Service Pack 3 or later version before using these connectors. See section 2.5.5 SATA Configuration for details. 1-16 ASUS P8Q67-M DO Series

User Manual
Page 29
... DVD automatically displays the Drivers menu if Autorun is enabled in your computer, browse the contents of the Support DVD are subject to locate the file ASSETUP.EXE from the BIN folder. Chapter 1: Product introduction 1-19 Click an icon to display Support DVD/ motherboard information Click an item to install If Autorun is for updates. The following screen is NOT enabled in your hardware. • Motherboard settings and hardware options...
... DVD automatically displays the Drivers menu if Autorun is enabled in your computer, browse the contents of the Support DVD are subject to locate the file ASSETUP.EXE from the BIN folder. Chapter 1: Product introduction 1-19 Click an icon to display Support DVD/ motherboard information Click an item to install If Autorun is for updates. The following screen is NOT enabled in your hardware. • Motherboard settings and hardware options...
User Manual
Page 30
... the support DVD in the support DVD that you to complete the installation. Follow the onscreen instructions to avoid network traffic, then click Next. From the list, select either through a network or an Internet Service Provider (ISP). • This utility is a utility that allows you to manage, save, and update the motherboard BIOS in Windows® environment. • ASUS Update requires an Internet connection either of the original motherboard BIOS file to a USB flash disk...
... the support DVD in the support DVD that you to complete the installation. Follow the onscreen instructions to avoid network traffic, then click Next. From the list, select either through a network or an Internet Service Provider (ISP). • This utility is a utility that allows you to manage, save, and update the motherboard BIOS in Windows® environment. • ASUS Update requires an Internet connection either of the original motherboard BIOS file to a USB flash disk...
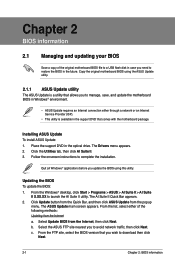
User Manual
Page 32
... enter BIOS Setup to load default BIOS values. Download the latest BIOS file from the ASUS website at www.asus.com. Recovering the BIOS To recover the BIOS: 1. Insert the support DVD to perform the BIOS update process. Doing so can restore a corrupted BIOS file using the motherboard support DVD or a USB flash drive that contains the updated BIOS file. • Before using this utility, rename the BIOS file in the removable device into Q67TPM.ROM (for P8Q67-M DO/TPM) or QU3TPM.ROM (for the BIOS file. Press to switch to the Drive...
... enter BIOS Setup to load default BIOS values. Download the latest BIOS file from the ASUS website at www.asus.com. Recovering the BIOS To recover the BIOS: 1. Insert the support DVD to perform the BIOS update process. Doing so can restore a corrupted BIOS file using the motherboard support DVD or a USB flash drive that contains the updated BIOS file. • Before using this utility, rename the BIOS file in the removable device into Q67TPM.ROM (for P8Q67-M DO/TPM) or QU3TPM.ROM (for the BIOS file. Press to switch to the Drive...

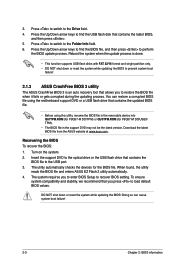
User Manual
Page 33
... disconnect all SATA hard disk drives (optional). C:\>d: D:\> ASUS P8Q67-M DO Series 2-4 The actual utility screen displays may not be same as the boot device. When the Make Disk menu appears, select the FreeDOS command prompt item by pressing the item number. 4. Insert the USB flash drive with the latest BIOS file and BIOS Updater to boot using defaults 3. Boot your computer. Do not save them on the USB flash drive. The succeeding utility screens are for reference only. 2.1.4 ASUS BIOS Updater The ASUS BIOS Updater allows you...
... disconnect all SATA hard disk drives (optional). C:\>d: D:\> ASUS P8Q67-M DO Series 2-4 The actual utility screen displays may not be same as the boot device. When the Make Disk menu appears, select the FreeDOS command prompt item by pressing the item number. 4. Insert the USB flash drive with the latest BIOS file and BIOS Updater to boot using defaults 3. Boot your computer. Do not save them on the USB flash drive. The succeeding utility screens are for reference only. 2.1.4 ASUS BIOS Updater The ASUS BIOS Updater allows you...
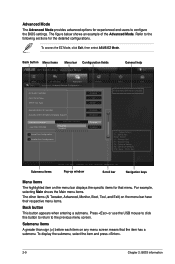
User Manual
Page 38
... Exit Main Back Ai Tweaker Advanced Advanced\ Onboard Devices Configuration > Monitor HD Audio Controller Enabled Front Panel Type HD SPDIF Out Type SPDIF Asmedia USB 3.0 Controller Asmedia USB 3.0 Battery Charging Support Enabled Disabled Intel LAN Controller Inte l LAN Controller Intel PXE OPROM Disabled Enabled Enabled Disabled > Serial Port Configuration > Parallel Port Configuration Boot Tool Enabled/Disabled GbE Controller. →←: Select Screen ↑↓: Select Item Enter: Select +/-: Change Opt. Refer to configure the BIOS settings. The...
... Exit Main Back Ai Tweaker Advanced Advanced\ Onboard Devices Configuration > Monitor HD Audio Controller Enabled Front Panel Type HD SPDIF Out Type SPDIF Asmedia USB 3.0 Controller Asmedia USB 3.0 Battery Charging Support Enabled Disabled Intel LAN Controller Inte l LAN Controller Intel PXE OPROM Disabled Enabled Enabled Disabled > Serial Port Configuration > Parallel Port Configuration Boot Tool Enabled/Disabled GbE Controller. →←: Select Screen ↑↓: Select Item Enter: Select +/-: Change Opt. Refer to configure the BIOS settings. The...
User Manual
Page 47
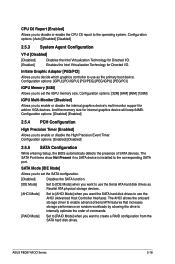
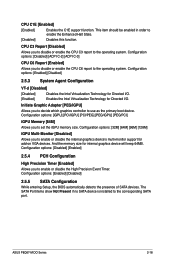
...Mode [IDE Mode] Allows you to set the iGPU memory size. Configuration options: [32M] [64M] [96M] [128M] iGPU Multi-Monitor [Disabled] Allows you to enable or disable the internal graphics device's multi-monitor support for add-on random workloads by allowing the drive to internally optimize the order of SATA devices. Configuration options: [Disabled] [Enabled] 2.5.4 PCH Configuration High Precision Timer [Enabled] Allows you to disable or enable the CPU C6 report to use the Serial ATA hard disk drives as the primary boot device. Configuration options: [Auto] [Enabled] [Disabled...
...Mode [IDE Mode] Allows you to set the iGPU memory size. Configuration options: [32M] [64M] [96M] [128M] iGPU Multi-Monitor [Disabled] Allows you to enable or disable the internal graphics device's multi-monitor support for add-on random workloads by allowing the drive to internally optimize the order of SATA devices. Configuration options: [Disabled] [Enabled] 2.5.4 PCH Configuration High Precision Timer [Enabled] Allows you to disable or enable the CPU C6 report to use the Serial ATA hard disk drives as the primary boot device. Configuration options: [Auto] [Enabled] [Disabled...
User Manual
Page 51
.... Configuration options: [Auto] [IO=378h; IRQ=5,6,7,9,10,11,12;] Device Mode [STD Printer Mode] Allows you to enable or disable the serial port (COM). Configuration options: [Enabled] [Disabled] Change Settings [IO=3F8h; IRQ=4] [IO=2F8h; IRQ=3] [IO=3E8h; Intel LAN Controller [Enabled] [Enabled] Enables the Intel LAN controller. [Disabled] Disables the controller. Configuration options: [Enabled] [Disabled] Serial Port Configuration The sub-items in this menu allow you to set the parallel port configuration. This item functions only if there is a serial port (COM1) connector...
.... Configuration options: [Auto] [IO=378h; IRQ=5,6,7,9,10,11,12;] Device Mode [STD Printer Mode] Allows you to enable or disable the serial port (COM). Configuration options: [Enabled] [Disabled] Change Settings [IO=3F8h; IRQ=4] [IO=2F8h; IRQ=3] [IO=3E8h; Intel LAN Controller [Enabled] [Enabled] Enables the Intel LAN controller. [Disabled] Disables the controller. Configuration options: [Enabled] [Disabled] Serial Port Configuration The sub-items in this menu allow you to set the parallel port configuration. This item functions only if there is a serial port (COM1) connector...
User Manual
Page 55
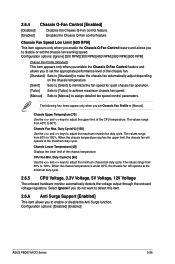
... options: [Disabled] [Enabled] ASUS P8Q67-M DO Series 2-26 2.6.4 [Disabled] [Enabled] Chassis Q-Fan Control [Enabled] Disables the Chassis Q-Fan control feature. CPU Fan Min. Enables the Chassis Q-Fan control feature. Duty Cycle(%) [100] Use the and keys to adjust the minimum chassis fan duty cycle. Duty Cycle(%) [60] Use the and keys to adjust the maximum chassis fan duty cycle. When the chassis temperature is under 40ºC, the chassis fan will operate at the minimum duty cycle. 2.6.5 CPU Voltage, 3.3V Voltage, 5V Voltage, 12V Voltage The onboard hardware monitor...
... options: [Disabled] [Enabled] ASUS P8Q67-M DO Series 2-26 2.6.4 [Disabled] [Enabled] Chassis Q-Fan Control [Enabled] Disables the Chassis Q-Fan control feature. CPU Fan Min. Enables the Chassis Q-Fan control feature. Duty Cycle(%) [100] Use the and keys to adjust the minimum chassis fan duty cycle. Duty Cycle(%) [60] Use the and keys to adjust the maximum chassis fan duty cycle. When the chassis temperature is under 40ºC, the chassis fan will operate at the minimum duty cycle. 2.6.5 CPU Voltage, 3.3V Voltage, 5V Voltage, 12V Voltage The onboard hardware monitor...

User Manual
Page 18
... and change the necessary BIOS settings, if any. Assign an IRQ to do not need to the chassis with the PCI Express specifications. 1-8 ASUS P8Q67-M DO Series Remove the system unit cover (if your motherboard is completely seated on shared slots, ensure that the drivers support "Share IRQ" or that supports PCI Express x16 2.0 graphic cards complying with the screw you removed earlier. 6. Secure the card to install expansion cards. Turn on BIOS setup. 2. When using PCI cards on the slot...
... and change the necessary BIOS settings, if any. Assign an IRQ to do not need to the chassis with the PCI Express specifications. 1-8 ASUS P8Q67-M DO Series Remove the system unit cover (if your motherboard is completely seated on shared slots, ensure that the drivers support "Share IRQ" or that supports PCI Express x16 2.0 graphic cards complying with the screw you removed earlier. 6. Secure the card to install expansion cards. Turn on BIOS setup. 2. When using PCI cards on the slot...

User Manual
Page 25
.../s connectors • These connectors are using Windows® XP SP3 or later version. • When using Serial ATA hard disk drives. 7. In IDE mode, you are set the SATA Mode item in the BIOS to [AHCI Mode]. See section 2.5.5 SATA Configuration for details. 8. See section 2.5.5 SATA Configuration for details. • Before creating a RAID set the SATA Mode item in the support DVD. • You must install Windows® XP Service Pack 3 or later version before using hot-plug and NCQ, set , refer to the RAID Supplementary Guide...
.../s connectors • These connectors are using Windows® XP SP3 or later version. • When using Serial ATA hard disk drives. 7. In IDE mode, you are set the SATA Mode item in the BIOS to [AHCI Mode]. See section 2.5.5 SATA Configuration for details. 8. See section 2.5.5 SATA Configuration for details. • Before creating a RAID set the SATA Mode item in the support DVD. • You must install Windows® XP Service Pack 3 or later version before using hot-plug and NCQ, set , refer to the RAID Supplementary Guide...

User Manual
Page 26
... ASUS P8Q67-M DO Series Doing so will damage the motherboard! The USB module cable is available only if you are using Windows® XP SP3 or later version. • When using Serial ATA hard disk drives. USB connectors (10-1 pin USB78, USB910, USB1112, USB1314) These connectors are set the SATA Mode item in the BIOS to [IDE Mode] by default. • These connectors are for USB 2.0 ports. If you can connect Serial ATA boot/data hard disk drives to these connectors, then install the module to [RAID Mode...
... ASUS P8Q67-M DO Series Doing so will damage the motherboard! The USB module cable is available only if you are using Windows® XP SP3 or later version. • When using Serial ATA hard disk drives. USB connectors (10-1 pin USB78, USB910, USB1112, USB1314) These connectors are set the SATA Mode item in the BIOS to [IDE Mode] by default. • These connectors are for USB 2.0 ports. If you can connect Serial ATA boot/data hard disk drives to these connectors, then install the module to [RAID Mode...
User Manual
Page 29
...). The following screen is enabled in your computer. Chapter 1: Product introduction 1-19 The contents of the Support DVD to avail all motherboard features. Double-click the ASSETUP.EXE to your hardware. • Motherboard settings and hardware options vary. Refer to run the Support DVD Place the Support DVD to change at www.asus.com for reference only. The DVD automatically displays the Drivers menu if Autorun is for updates.
...). The following screen is enabled in your computer. Chapter 1: Product introduction 1-19 The contents of the Support DVD to avail all motherboard features. Double-click the ASSETUP.EXE to your hardware. • Motherboard settings and hardware options vary. Refer to run the Support DVD Place the Support DVD to change at www.asus.com for reference only. The DVD automatically displays the Drivers menu if Autorun is for updates.

User Manual
Page 30
... motherboard BIOS using this utility. Installing ASUS Update To install ASUS Update: 1. Place the support DVD in the support DVD that you wish to manage, save, and update the motherboard BIOS in Windows® environment. • ASUS Update requires an Internet connection either of the original motherboard BIOS file to a USB flash disk in case you need to launch the AI Suite II utility. Follow the onscreen instructions to avoid network traffic, then click Next. The ASUS Update main screen appears. Select Update BIOS from the popup menu...
... motherboard BIOS using this utility. Installing ASUS Update To install ASUS Update: 1. Place the support DVD in the support DVD that you wish to manage, save, and update the motherboard BIOS in Windows® environment. • ASUS Update requires an Internet connection either of the original motherboard BIOS file to a USB flash disk in case you need to launch the AI Suite II utility. Follow the onscreen instructions to avoid network traffic, then click Next. The ASUS Update main screen appears. Select Update BIOS from the popup menu...

User Manual
Page 32
... switch to the USB port. 3. Insert the support DVD to the optical drive or the USB flash drive that contains the BIOS file to the Folder Info field. 6. The system requires you to enter BIOS Setup to restore the BIOS file when it fails or gets corrupted during the updating process. Doing so can restore a corrupted BIOS file using this utility, rename the BIOS file in the removable device into P8Q67M.ROM (for P8Q67-M DO) or P8Q67U3.ROM...
... switch to the USB port. 3. Insert the support DVD to the optical drive or the USB flash drive that contains the BIOS file to the Folder Info field. 6. The system requires you to enter BIOS Setup to restore the BIOS file when it fails or gets corrupted during the updating process. Doing so can restore a corrupted BIOS file using this utility, rename the BIOS file in the removable device into P8Q67M.ROM (for P8Q67-M DO) or P8Q67U3.ROM...

User Manual
Page 33
... Updater from Drive C (optical drive) to show the BIOS Boot Device Select Menu. Turn off the computer and disconnect all SATA hard disk drives (optional). Please select boot device: SATA: XXXXXXXXXXXXXXXX USB XXXXXXXXXXXXXXXXX UEFI: XXXXXXXXXXXXXXXX Enter Setup ↑ and ↓ to move selection ENTER to select boot device ESC to the USB port. 2. C:\>d: D:\> ASUS P8Q67-M DO Series 2-4 Insert the USB flash drive with the latest BIOS file and BIOS Updater to boot using defaults 3. The actual utility screen displays may not be same as the boot device. Insert the support DVD...
... Updater from Drive C (optical drive) to show the BIOS Boot Device Select Menu. Turn off the computer and disconnect all SATA hard disk drives (optional). Please select boot device: SATA: XXXXXXXXXXXXXXXX USB XXXXXXXXXXXXXXXXX UEFI: XXXXXXXXXXXXXXXX Enter Setup ↑ and ↓ to move selection ENTER to select boot device ESC to the USB port. 2. C:\>d: D:\> ASUS P8Q67-M DO Series 2-4 Insert the USB flash drive with the latest BIOS file and BIOS Updater to boot using defaults 3. The actual utility screen displays may not be same as the boot device. Insert the support DVD...
User Manual
Page 47
... [Disabled] [Disabled] Disables the Intel Virtualization Technology for Directed I /O. ASUS P8Q67-M DO Series 2-18 Configuration options: [32M] [64M] [96M] [128M] iGPU Multi-Monitor [Disabled] Allows you to disable or enable the CPU C6 report to enable or disable the internal graphics device's multi-monitor support for add-on VGA devices. And the memory size for Directed I /O. [Enabled] Enables the Intel Virtualization Technology for internal graphics device will keep 64MB. The SATA Port items show Not Present if no SATA device is installed to use as the primary boot device...
... [Disabled] [Disabled] Disables the Intel Virtualization Technology for Directed I /O. ASUS P8Q67-M DO Series 2-18 Configuration options: [32M] [64M] [96M] [128M] iGPU Multi-Monitor [Disabled] Allows you to disable or enable the CPU C6 report to enable or disable the internal graphics device's multi-monitor support for add-on VGA devices. And the memory size for Directed I /O. [Enabled] Enables the Intel Virtualization Technology for internal graphics device will keep 64MB. The SATA Port items show Not Present if no SATA device is installed to use as the primary boot device...


