
User Manual
Page 5
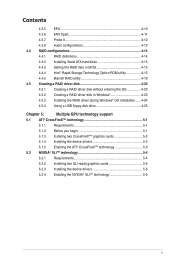
Contents 4.3.5 EPU 4-10 4.3.6 FAN Xpert 4-11 4.3.7 Probe II 4-12 4.3.8 Audio configurations 4-13 4.4 RAID configurations 4-14 4.4.1 RAID definitions 4-14 4.4.2 Installing Serial ATA hard disks 4-15 4.4.3 Setting the RAID item in BIOS 4-15 4.4.4 Intel® Rapid Storage Technology Option ROM utility 4-15 4.4.5 ...Marvell RAID utility 4-19 4.5 Creating a RAID driver disk 4-23 4.5.1 Creating a RAID driver disk without entering the OS 4-23 4.5.2 Creating a RAID driver ...
Contents 4.3.5 EPU 4-10 4.3.6 FAN Xpert 4-11 4.3.7 Probe II 4-12 4.3.8 Audio configurations 4-13 4.4 RAID configurations 4-14 4.4.1 RAID definitions 4-14 4.4.2 Installing Serial ATA hard disks 4-15 4.4.3 Setting the RAID item in BIOS 4-15 4.4.4 Intel® Rapid Storage Technology Option ROM utility 4-15 4.4.5 ...Marvell RAID utility 4-19 4.5 Creating a RAID driver disk 4-23 4.5.1 Creating a RAID driver disk without entering the OS 4-23 4.5.2 Creating a RAID driver ...
User Manual
Page 34
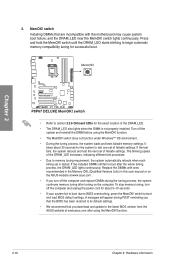
... system boot failure, and the DRAM_LED near the MemOK! MemOK! switch until the DRAM_LED starts blinking to the latest BIOS version from the ASUS website at www.asus.com after using the MemOK! function. • The MemOK! switch to boot after turning on the computer. Press...switch lights continuously. switch does not function under Windows™ OS environment. • During the tuning process, the system loads and tests failsafe memory settings. Chapter 2 • Refer to BIOS overclocking, press the MemOK! It takes about 5-10 seconds. • If your system fail to boot due to...
... system boot failure, and the DRAM_LED near the MemOK! MemOK! switch until the DRAM_LED starts blinking to the latest BIOS version from the ASUS website at www.asus.com after using the MemOK! function. • The MemOK! switch to boot after turning on the computer. Press...switch lights continuously. switch does not function under Windows™ OS environment. • During the tuning process, the system loads and tests failsafe memory settings. Chapter 2 • Refer to BIOS overclocking, press the MemOK! It takes about 5-10 seconds. • If your system fail to boot due to...
User Manual
Page 65
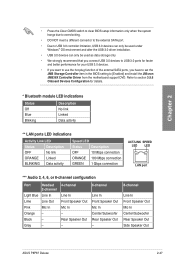
... Mic In Center/Subwoofer Rear Speaker Out Side Speaker Out ASUS P8P67 Deluxe 2-47 Refer to section 3.5.6 Onboard Devices Configuration for your... link ORANGE Linked BLINKING Data activity Speed LED Status Description OFF 10 Mbps connection ORANGE 100 Mbps connection GREEN 1 Gbps connection ACT... Chapter 2 • Press the Clear CMOS switch to clear BIOS setup information only when the system hangs due to overclocking. •...controller limitation, USB 3.0 devices can only be used under Windows® OS environment and after the USB 3.0 driver installation. • USB 3.0 ...
... Mic In Center/Subwoofer Rear Speaker Out Side Speaker Out ASUS P8P67 Deluxe 2-47 Refer to section 3.5.6 Onboard Devices Configuration for your... link ORANGE Linked BLINKING Data activity Speed LED Status Description OFF 10 Mbps connection ORANGE 100 Mbps connection GREEN 1 Gbps connection ACT... Chapter 2 • Press the Clear CMOS switch to clear BIOS setup information only when the system hangs due to overclocking. •...controller limitation, USB 3.0 devices can only be used under Windows® OS environment and after the USB 3.0 driver installation. • USB 3.0 ...
User Manual
Page 95
...functions. For more details, refer to display the submenu. Boot Override These items displays the available devices. EFI BIOS Utility - Select an item then press to section 3.10.2 ASUS EZ Flash 2 utility. When you to confirm your choice. The number of device items that appears on the... the boot device during system startup, press when ASUS Logo appears. • To access Windows OS in Safe Mode, do any of devices installed in the system. Use the left/right arrow key to select between [Yes] or [No], then press to run ASUS EZ Flash 2. Chapter 3 ASUS P8P67 Deluxe 3-27
...functions. For more details, refer to display the submenu. Boot Override These items displays the available devices. EFI BIOS Utility - Select an item then press to section 3.10.2 ASUS EZ Flash 2 utility. When you to confirm your choice. The number of device items that appears on the... the boot device during system startup, press when ASUS Logo appears. • To access Windows OS in Safe Mode, do any of devices installed in the system. Use the left/right arrow key to select between [Yes] or [No], then press to run ASUS EZ Flash 2. Chapter 3 ASUS P8P67 Deluxe 3-27
User Manual
Page 102
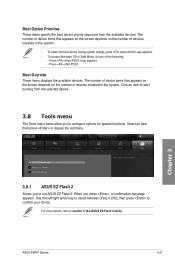
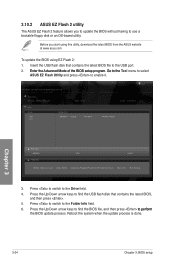
... or an OS‑based utility. Reboot the system when the update process is done. 3.10.2 ASUS EZ Flash 2 utility The ASUS EZ Flash 2 feature allows you start using EZ Flash 2: 1. Press to switch to the Folder Info field. 6. Chapter 3 3-34 Chapter 3: BIOS setup ASUSTek EZ Flash 2 BIOS ROM Utility V00.75 Flash Info MODEL: P8P67 DELUXE fs0...
... or an OS‑based utility. Reboot the system when the update process is done. 3.10.2 ASUS EZ Flash 2 utility The ASUS EZ Flash 2 feature allows you start using EZ Flash 2: 1. Press to switch to the Folder Info field. 6. Chapter 3 3-34 Chapter 3: BIOS setup ASUSTek EZ Flash 2 BIOS ROM Utility V00.75 Flash Info MODEL: P8P67 DELUXE fs0...


