
User Manual
Page 12
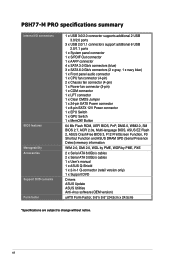
... 2 x Serial ATA 6.0Gb/s cables 2 x Serial ATA 3.0Gb/s cables 1 x User's manual 1 x ASUS Q-Shield 1 x 2-in-1 Q-connector (retail version only) 1 x Support DVD Drivers ASUS Update ASUS Utilities Anti-virus software (OEM version) uATX Form Factor, 9.6"x 9.6" (24.5cm x 24.5cm) *Specifications are subject to change without notice. xii P8H77-M PRO specifications summary Internal I/O connectors BIOS features Manageability Accessories Support DVD...
... 2 x Serial ATA 6.0Gb/s cables 2 x Serial ATA 3.0Gb/s cables 1 x User's manual 1 x ASUS Q-Shield 1 x 2-in-1 Q-connector (retail version only) 1 x Support DVD Drivers ASUS Update ASUS Utilities Anti-virus software (OEM version) uATX Form Factor, 9.6"x 9.6" (24.5cm x 24.5cm) *Specifications are subject to change without notice. xii P8H77-M PRO specifications summary Internal I/O connectors BIOS features Manageability Accessories Support DVD...

User Manual
Page 13
... 1 Chapter 1: Chapter 1 Product introduction 1.1 Welcome! ASUS P8H77-M PRO 1-1 Actual product specifications may vary. Before you for the following items. User Manual ASUS P8H77-M PRO motherboard User manual Support DVD 2 x Serial ATA 6.0 Gb/s cables 2 x Serial ATA 3.0 Gb/s cables 1 x ASUS Q-Shield 1 x 2-in-1 ASUS Q-Connector kit • If any of ASUS quality motherboards! The motherboard delivers a host of new ...the items in the long line of the above items is damaged or missing, contact your motherboard package for buying an ASUS® P8H77-M PRO motherboard!
... 1 Chapter 1: Chapter 1 Product introduction 1.1 Welcome! ASUS P8H77-M PRO 1-1 Actual product specifications may vary. Before you for the following items. User Manual ASUS P8H77-M PRO motherboard User manual Support DVD 2 x Serial ATA 6.0 Gb/s cables 2 x Serial ATA 3.0 Gb/s cables 1 x ASUS Q-Shield 1 x 2-in-1 ASUS Q-Connector kit • If any of ASUS quality motherboards! The motherboard delivers a host of new ...the items in the long line of the above items is damaged or missing, contact your motherboard package for buying an ASUS® P8H77-M PRO motherboard!

User Manual
Page 24
...a more memory on the motherboard, the actual usable memory for the OS is about 3GB or less. Visit the ASUS website www.asus.com for the dual-channel configuration. P8H77-M PRO Motherboard Qualified Vendors Lists (QVL) DDR3 2400 MHz capability Vendors Part No. Size SS/ Chip Chip NO. GEIL GET34GB2400C9DC...ECC DDR3 DIMMs into the DIMM sockets. • You may operate at a higher frequency, refer to section 3.4 Ai Tweaker menu for manual memory frequency adjustment. • For system stability, use of memory, we recommend that you obtain memory modules from the higher-sized channel is...
...a more memory on the motherboard, the actual usable memory for the OS is about 3GB or less. Visit the ASUS website www.asus.com for the dual-channel configuration. P8H77-M PRO Motherboard Qualified Vendors Lists (QVL) DDR3 2400 MHz capability Vendors Part No. Size SS/ Chip Chip NO. GEIL GET34GB2400C9DC...ECC DDR3 DIMMs into the DIMM sockets. • You may operate at a higher frequency, refer to section 3.4 Ai Tweaker menu for manual memory frequency adjustment. • For system stability, use of memory, we recommend that you obtain memory modules from the higher-sized channel is...

User Manual
Page 35
... incompatible with ones recommended in the Memory QVL (Qualified Vendors Lists) in this user manual or on the ASUS website at www.asus.com after the whole tuning process, the DRAM_LED remains lit. ASUS P8H77-M PRO 2-17 If the installed DIMMs still fail to boot after using the MemOK! 2.2.6... Onboard switches Onboard switches allow you download and update to the latest BIOS version from the ASUS website at www.asus.com. • If you turn...
... incompatible with ones recommended in the Memory QVL (Qualified Vendors Lists) in this user manual or on the ASUS website at www.asus.com after the whole tuning process, the DRAM_LED remains lit. ASUS P8H77-M PRO 2-17 If the installed DIMMs still fail to boot after using the MemOK! 2.2.6... Onboard switches Onboard switches allow you download and update to the latest BIOS version from the ASUS website at www.asus.com. • If you turn...

User Manual
Page 39
...versions before using NCQ, set using Windows® XP SP3 or later versions. Refer to section 4.5 RAID configurations or the manual bundled in the motherboard support DVD. • When using Serial ATA hard disk drives. The Serial ATA RAID feature is available...a RAID 0, 1, 5, and 10 configuration with the Intel® Rapid Storage Technology through the onboard Intel® H77 chipset. P8H77-M PRO SATA6G_2 SATA6G_1 P8H77-M PRO Intel® SATA 6.0Gb/s connectors GND RSATA_RXP2 RSATA_RXN2 GND RSATA_TXN2 RSATA_TXP2 GND GND RSATA_RXP1 RSATA_RXN1 GND RSATA_TXN1 RSATA_TXP1 GND Chapter 2 &#...
...versions before using NCQ, set using Windows® XP SP3 or later versions. Refer to section 4.5 RAID configurations or the manual bundled in the motherboard support DVD. • When using Serial ATA hard disk drives. The Serial ATA RAID feature is available...a RAID 0, 1, 5, and 10 configuration with the Intel® Rapid Storage Technology through the onboard Intel® H77 chipset. P8H77-M PRO SATA6G_2 SATA6G_1 P8H77-M PRO Intel® SATA 6.0Gb/s connectors GND RSATA_RXP2 RSATA_RXN2 GND RSATA_TXN2 RSATA_TXP2 GND GND RSATA_RXP1 RSATA_RXN1 GND RSATA_TXN1 RSATA_TXP1 GND Chapter 2 &#...

User Manual
Page 40
... information Refer to section 3.5.3 SATA Configuration for details. • Before creating a RAID set, refer to section 4.5 RAID configurations or the manual bundled in the motherboard support DVD. • When using Serial ATA hard disk drives. If you can create a RAID 0, 1, 5,... RSATA_RXN2 GND RSATA_TXN2 RSATA_TXP2 GND GND RSATA_RXP3 RSATA_RXN3 GND RSATA_TXN3 RSATA_TXP3 GND GND RSATA_RXP4 RSATA_RXN4 GND RSATA_TXN4 RSATA_TXP4 GND P8H77-M PRO SATA3G_3 SATA3G_4 P8H77-M PRO Intel® SATA 3.0Gb/s connectors • These connectors are using these connectors, set to Serial ATA ...
... information Refer to section 3.5.3 SATA Configuration for details. • Before creating a RAID set, refer to section 4.5 RAID configurations or the manual bundled in the motherboard support DVD. • When using Serial ATA hard disk drives. If you can create a RAID 0, 1, 5,... RSATA_RXN2 GND RSATA_TXN2 RSATA_TXP2 GND GND RSATA_RXP3 RSATA_RXN3 GND RSATA_TXN3 RSATA_TXP3 GND GND RSATA_RXP4 RSATA_RXN4 GND RSATA_TXN4 RSATA_TXP4 GND P8H77-M PRO SATA3G_3 SATA3G_4 P8H77-M PRO Intel® SATA 3.0Gb/s connectors • These connectors are using these connectors, set to Serial ATA ...

User Manual
Page 64
...system off and then turn it back on the BIOS may not exactly match what you want to "UEFI BIOS" unless otherwise specified. Chapter 3 ASUS P8H77-M PRO 3-1 The BIOS setup program is connected to your motherboard if you see on the screen during the Power-On Self-Test (POST) to erase the... shown in this section are needed for BIOS item modification. Being a menu-driven program, it as possible. The term "BIOS" in this user manual refers to use as easy to use the mouse to control the BIOS setup program. • If the system becomes unstable after changing any BIOS...
...system off and then turn it back on the BIOS may not exactly match what you want to "UEFI BIOS" unless otherwise specified. Chapter 3 ASUS P8H77-M PRO 3-1 The BIOS setup program is connected to your motherboard if you see on the screen during the Power-On Self-Test (POST) to erase the... shown in this section are needed for BIOS item modification. Being a menu-driven program, it as possible. The term "BIOS" in this user manual refers to use as easy to use the mouse to control the BIOS setup program. • If the system becomes unstable after changing any BIOS...

User Manual
Page 74
...a 0.005V interval. Setting a high voltage may damage the CPU permanently, and setting a low voltage may make the system unstable. CPU Voltage [Offset Mode] [Manual Mode] Allows you to set a fixed CPU voltage. [Offset Mode] Allows you to set the CPU Voltage item to [Offset Mode]. [+] To offset the ... values range from 0.800V to [Offset Mode]. [+] To offset the voltage by a positive value. [-] To offset the voltage by a positive or negative value. [Manual Mode] Allows you to [Offset Mode] and allows you set the iGPU Offset voltage. Chapter 3 ASUS P8H77-M PRO 3-11
...a 0.005V interval. Setting a high voltage may damage the CPU permanently, and setting a low voltage may make the system unstable. CPU Voltage [Offset Mode] [Manual Mode] Allows you to set a fixed CPU voltage. [Offset Mode] Allows you to set the CPU Voltage item to [Offset Mode]. [+] To offset the ... values range from 0.800V to [Offset Mode]. [+] To offset the voltage by a positive value. [-] To offset the voltage by a positive or negative value. [Manual Mode] Allows you to [Offset Mode] and allows you set the iGPU Offset voltage. Chapter 3 ASUS P8H77-M PRO 3-11

User Manual
Page 88
... speed for quiet CPU fan operation. [Turbo] Sets to [Turbo] to achieve maximum CPU fan speed. [Manual] Sets to [Manual] to set CPU Fan Profile to display the detected speed. CPU Voltage, 3.3V Voltage, 5V Voltage, 12V... Voltage The onboard hardware monitor automatically detects the voltage output through the onboard voltage regulators. Duty Cycle(%) [100] Use the and keys to ��t�h�e� motherboard, the field shows N/A. Chapter 3 ASUS P8H77-M PRO...
... speed for quiet CPU fan operation. [Turbo] Sets to [Turbo] to achieve maximum CPU fan speed. [Manual] Sets to [Manual] to set CPU Fan Profile to display the detected speed. CPU Voltage, 3.3V Voltage, 5V Voltage, 12V... Voltage The onboard hardware monitor automatically detects the voltage output through the onboard voltage regulators. Duty Cycle(%) [100] Use the and keys to ��t�h�e� motherboard, the field shows N/A. Chapter 3 ASUS P8H77-M PRO...

User Manual
Page 97
C:\Users\English\Desktop\P8H77-M PRO.CAP 3. Chapter 3 2. Locate the BIOS file from file, and then click Next. The ...to change the BIOS boot logo. Follow the onscreen instructions to change the boot logo or No to the software manual in this section are for detailed software configuration. 3-34 Chapter 3: BIOS setup You can decide whether to complete ...the update process. • The screenshots in the support DVD or visit the ASUS website at www.asus.com for reference only. From the ASUS Update screen, select Update BIOS from the Open window, click Open, and click Next....
C:\Users\English\Desktop\P8H77-M PRO.CAP 3. Chapter 3 2. Locate the BIOS file from file, and then click Next. The ...to change the BIOS boot logo. Follow the onscreen instructions to change the boot logo or No to the software manual in this section are for detailed software configuration. 3-34 Chapter 3: BIOS setup You can decide whether to complete ...the update process. • The screenshots in the support DVD or visit the ASUS website at www.asus.com for reference only. From the ASUS Update screen, select Update BIOS from the Open window, click Open, and click Next....

User Manual
Page 101
... BIOS file using BIOS Updater 1. At the FreeDOS prompt, type bupdater /pc /g and press . D:\>bupdater /pc /g 2. Restart your motherboard user manual for DOS V1.18 [2010/04/29] Current ROM BOARD: P8H77-M PRO VER: 0311 DATE: 01/04/2012 Update ROM BOARD: Unknown VER: Unknown DATE: Unknown PATH: A:\ A: P8H77MP.CAP 17:30:48...
... BIOS file using BIOS Updater 1. At the FreeDOS prompt, type bupdater /pc /g and press . D:\>bupdater /pc /g 2. Restart your motherboard user manual for DOS V1.18 [2010/04/29] Current ROM BOARD: P8H77-M PRO VER: 0311 DATE: 01/04/2012 Update ROM BOARD: Unknown VER: Unknown DATE: Unknown PATH: A:\ A: P8H77MP.CAP 17:30:48...

User Manual
Page 103
... folder. Always install the latest OS version and corresponding updates to maximize the features of the support DVD to open the folder of supplementary user manuals. The Utilities menu shows the applications and other software that you want to show more items If Autorun is enabled in this chapter for better... motherboard package contains the drivers, software applications, and utilities that the motherboard supports. Click an icon to display DVD/ motherboard information Click to install. Chapter 4 ASUS P8H77-M PRO 4-1 Click the Contact tab to run the DVD.
... folder. Always install the latest OS version and corresponding updates to maximize the features of the support DVD to open the folder of supplementary user manuals. The Utilities menu shows the applications and other software that you want to show more items If Autorun is enabled in this chapter for better... motherboard package contains the drivers, software applications, and utilities that the motherboard supports. Click an icon to display DVD/ motherboard information Click to install. Chapter 4 ASUS P8H77-M PRO 4-1 Click the Contact tab to run the DVD.

User Manual
Page 105
...to complete installation. Place the support DVD to open the AI Suite II main menu bar. Click the icon to the optical drive. ASUS P8H77-M PRO 4-3 Chapter 4 Click to customize the interface settings Click to show the system information Click to update the motherboard BIOS Click to monitor...more information. 4.3.1 AI Suite II AI Suite II is an all-in-one interface that integrates several ASUS utilities and allows users to the software manual in this user manual are for detailed software configuration. Using AI Suite II AI Suite II automatically starts when you through the...
...to complete installation. Place the support DVD to open the AI Suite II main menu bar. Click the icon to the optical drive. ASUS P8H77-M PRO 4-3 Chapter 4 Click to customize the interface settings Click to show the system information Click to update the motherboard BIOS Click to monitor...more information. 4.3.1 AI Suite II AI Suite II is an all-in-one interface that integrates several ASUS utilities and allows users to the software manual in this user manual are for detailed software configuration. Using AI Suite II AI Suite II automatically starts when you through the...

User Manual
Page 107
... Voltage Adjustment bars Undoes all changes immediately GPU Boost Allows you use GPU Boost, go to [Manual Mode]. 1. Click Apply to adjust the iGPU Max Frequency or the iGPU Voltage. 3. The first time you to manually set the iGPU voltage item to AI Tweaker in BIOS and set the GPU Boost. Click... to make the change take effect. Using Advanced Mode Click More Settings, and then click the Advanced Mode tab to restore all start -up settings ASUS P8H77-M PRO Applies all changes immediately Undoes all changes without applying Applies all changes without applying 4-5 Chapter 4
... Voltage Adjustment bars Undoes all changes immediately GPU Boost Allows you use GPU Boost, go to [Manual Mode]. 1. Click Apply to adjust the iGPU Max Frequency or the iGPU Voltage. 3. The first time you to manually set the iGPU voltage item to AI Tweaker in BIOS and set the GPU Boost. Click... to make the change take effect. Using Advanced Mode Click More Settings, and then click the Advanced Mode tab to restore all start -up settings ASUS P8H77-M PRO Applies all changes immediately Undoes all changes without applying Applies all changes without applying 4-5 Chapter 4

User Manual
Page 109
...-line Calibration 1 It allows you to increase VRM efficiency. CPU Voltage Frequency 3 Switching frequency will decrease proportionally to the software manual in the support DVD or visit the ASUS website at www.asus.com for overclocking. The thermal conditions should be monitored. Higher load-line calibration could get more transient and better thermal... VRM thermal conditions. CPU Power Phase Control 6 Increase phase number under light system loading to adjust the voltage settings and control the system temperature. Chapter 4 ASUS P8H77-M PRO 4-7
...-line Calibration 1 It allows you to increase VRM efficiency. CPU Voltage Frequency 3 Switching frequency will decrease proportionally to the software manual in the support DVD or visit the ASUS website at www.asus.com for overclocking. The thermal conditions should be monitored. Higher load-line calibration could get more transient and better thermal... VRM thermal conditions. CPU Power Phase Control 6 Increase phase number under light system loading to adjust the voltage settings and control the system temperature. Chapter 4 ASUS P8H77-M PRO 4-7

User Manual
Page 111
... on the AI Suite II main menu bar. Refer to select a preset mode for detailed software configuration. ASUS P8H77-M PRO 4-9 Using FAN Xpert Click Fan Name to select a fan and then click Setting to the software manual in variety of useful profiles offer flexible controls of fan speed to achieve a quiet and cool environment...
... on the AI Suite II main menu bar. Refer to select a preset mode for detailed software configuration. ASUS P8H77-M PRO 4-9 Using FAN Xpert Click Fan Name to select a fan and then click Setting to the software manual in variety of useful profiles offer flexible controls of fan speed to achieve a quiet and cool environment...

User Manual
Page 113
... Intel® chipset limitation, Intel® USB 3.0 ports do not support ASUS 3.0 Boost in the support DVD or visit the ASUS website at any time. Configuring USB 3.0 Boost 1. With USB 3.0 Boost, you can manually switch the USB 3.0 mode back to -date support of your USB 3.0 ...detects the property of the connected device and switches to the USB 3.0 port. 2. ASUS P8H77-M PRO 4-11 You can accelerate the transfer speed of USB Attached SCSI Protocol (UASP). Chapter 4 • Refer to the software manual in Windows® XP operating system. • Use the USB 3.0 devices for...
... Intel® chipset limitation, Intel® USB 3.0 ports do not support ASUS 3.0 Boost in the support DVD or visit the ASUS website at any time. Configuring USB 3.0 Boost 1. With USB 3.0 Boost, you can manually switch the USB 3.0 mode back to -date support of your USB 3.0 ...detects the property of the connected device and switches to the USB 3.0 port. 2. ASUS P8H77-M PRO 4-11 You can accelerate the transfer speed of USB Attached SCSI Protocol (UASP). Chapter 4 • Refer to the software manual in Windows® XP operating system. • Use the USB 3.0 devices for...

User Manual
Page 117
.... At least one HDD (Hard Disk Drive) for the Intel® 2012 Desktop responsiveness, you must meet the following requirements: 1. Chapter 4 ASUS P8H77-M PRO 4-15 SSD: 4. HDD: Intel® 3rd/2nd generation Core Processor family Windows® 7 operating systems One dedicated SSD (Solid State Disk)... enable Intel® Rapid Start Technology, DRAM size smaller than 8GB is necessary. Refer to the software manual in the support DVD or visit the ASUS website at www.asus.com for detailed software configuration. 4.4 Introduction to support Intel® Smart Response and Intel ® Rapid...
.... At least one HDD (Hard Disk Drive) for the Intel® 2012 Desktop responsiveness, you must meet the following requirements: 1. Chapter 4 ASUS P8H77-M PRO 4-15 SSD: 4. HDD: Intel® 3rd/2nd generation Core Processor family Windows® 7 operating systems One dedicated SSD (Solid State Disk)... enable Intel® Rapid Start Technology, DRAM size smaller than 8GB is necessary. Refer to the software manual in the support DVD or visit the ASUS website at www.asus.com for detailed software configuration. 4.4 Introduction to support Intel® Smart Response and Intel ® Rapid...

