

User Manual
Page 2
... FOR ANY ERRORS OR INACCURACIES THAT MAY APPEAR IN THIS MANUAL, INCLUDING THE PRODUCTS AND SOFTWARE DESCRIBED IN IT. SPECIFICATIONS AND INFORMATION CONTAINED IN THIS MANUAL ARE FURNISHED FOR INFORMATIONAL USE ONLY, AND ARE SUBJECT TO CHANGE AT ANY TIME WITHOUT NOTICE, AND SHOULD NOT BE CONSTRUED AS A COMMITMENT BY ASUS. This offer is distributed without any problems in...
... FOR ANY ERRORS OR INACCURACIES THAT MAY APPEAR IN THIS MANUAL, INCLUDING THE PRODUCTS AND SOFTWARE DESCRIBED IN IT. SPECIFICATIONS AND INFORMATION CONTAINED IN THIS MANUAL ARE FURNISHED FOR INFORMATIONAL USE ONLY, AND ARE SUBJECT TO CHANGE AT ANY TIME WITHOUT NOTICE, AND SHOULD NOT BE CONSTRUED AS A COMMITMENT BY ASUS. This offer is distributed without any problems in...

User Manual
Page 5
... 4.4.4 Intel® Smart Connect Technology 4-24 4.5 RAID configurations 4-27 4.5.1 RAID definitions 4-27 4.5.2 Installing Serial ATA hard disks 4-28 4.5.3 Setting the RAID item in BIOS 4-28 4.5.4 Intel® Rapid Storage Technology Option ROM utility 4-28 4.6 Creating a RAID driver disk 4-32 4.6.1 Creating a RAID driver disk without entering the OS 4-32 4.6.2 Creating a RAID driver disk in Windows 4-32 4.6.3 Installing the RAID driver during Windows® OS installation....... 4-33 4.6.4 Using a USB floppy disk drive 4-34 Chapter 5: Multiple GPU technology support 5.1 ATI®...
... 4.4.4 Intel® Smart Connect Technology 4-24 4.5 RAID configurations 4-27 4.5.1 RAID definitions 4-27 4.5.2 Installing Serial ATA hard disks 4-28 4.5.3 Setting the RAID item in BIOS 4-28 4.5.4 Intel® Rapid Storage Technology Option ROM utility 4-28 4.6 Creating a RAID driver disk 4-32 4.6.1 Creating a RAID driver disk without entering the OS 4-32 4.6.2 Creating a RAID driver disk in Windows 4-32 4.6.3 Installing the RAID driver during Windows® OS installation....... 4-33 4.6.4 Using a USB floppy disk drive 4-34 Chapter 5: Multiple GPU technology support 5.1 ATI®...
User Manual
Page 12
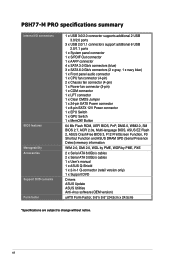
...) memory information WfM 2.0, DMI 2.0, WOL by PME, WOR by PME, PXE 2 x Serial ATA 6.0Gb/s cables 2 x Serial ATA 3.0Gb/s cables 1 x User's manual 1 x ASUS Q-Shield 1 x 2-in-1 Q-connector (retail version only) 1 x Support DVD Drivers ASUS Update ASUS Utilities Anti-virus software (OEM version) uATX Form Factor, 9.6"x 9.6" (24.5cm x 24.5cm) *Specifications are subject to change without notice. P8H77-M PRO specifications summary Internal I/O connectors BIOS features Manageability Accessories Support DVD contents Form factor 1 x USB 3.0/2.0 connector supports additional 2 USB 3.0/2.0 ports...
...) memory information WfM 2.0, DMI 2.0, WOL by PME, WOR by PME, PXE 2 x Serial ATA 6.0Gb/s cables 2 x Serial ATA 3.0Gb/s cables 1 x User's manual 1 x ASUS Q-Shield 1 x 2-in-1 Q-connector (retail version only) 1 x Support DVD Drivers ASUS Update ASUS Utilities Anti-virus software (OEM version) uATX Form Factor, 9.6"x 9.6" (24.5cm x 24.5cm) *Specifications are subject to change without notice. P8H77-M PRO specifications summary Internal I/O connectors BIOS features Manageability Accessories Support DVD contents Form factor 1 x USB 3.0/2.0 connector supports additional 2 USB 3.0/2.0 ports...

User Manual
Page 15
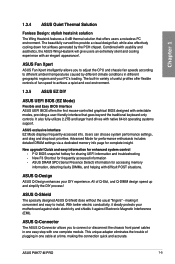
... stable CPU Vcore voltages. Users are notified when audio devices are plugged into the world's first real-time PC power saving chip through UEFI BIOS tuning or the exclusive ASUS interface. ASUS EPU Energy Efficiency All Around Tap into the audio I/O jacks. Chapter 1 Gigabit LAN solution The onboard LAN controller is an integrated Gb LAN controller. It's enhanced with an ACPI management function to provide efficient power management for various overclocking scenarios...
... stable CPU Vcore voltages. Users are notified when audio devices are plugged into the world's first real-time PC power saving chip through UEFI BIOS tuning or the exclusive ASUS interface. ASUS EPU Energy Efficiency All Around Tap into the audio I/O jacks. Chapter 1 Gigabit LAN solution The onboard LAN controller is an integrated Gb LAN controller. It's enhanced with an ACPI management function to provide efficient power management for various overclocking scenarios...
User Manual
Page 17
Advanced Mode for performance enthusiasts includes detailed DRAM settings via a dedicated memory info page for sharing UEFI information and troubleshooting - New upgrade! F12 BIOS snapshot hotkey for complete insight. With better electric conductivity, it ideally protects your PC's loading. ASUS Q-Connector The ASUS Q-Connector allows you to adjust the CPU and chassis fan speeds according to connect or disconnect the chassis front panel cables in different geographic regions and your motherboard against Electronic...
Advanced Mode for performance enthusiasts includes detailed DRAM settings via a dedicated memory info page for sharing UEFI information and troubleshooting - New upgrade! F12 BIOS snapshot hotkey for complete insight. With better electric conductivity, it ideally protects your PC's loading. ASUS Q-Connector The ASUS Q-Connector allows you to adjust the CPU and chassis fan speeds according to connect or disconnect the chassis front panel cables in different geographic regions and your motherboard against Electronic...

User Manual
Page 24
... a memory module. For effective use a more memory on the motherboard, the actual usable memory for overclocking may install varying memory sizes in Megabit, 8 Megabit/Mb = 1 Megabyte/MB). • The default memory operation frequency is recommended to support a full memory load (4 DIMMs) or overclocking condition. To operate at the vendor-marked frequency or at a higher frequency, refer to section 3.4 Ai Tweaker menu for single-channel operation. • According to Intel CPU specifications, DIMM voltage...
... a memory module. For effective use a more memory on the motherboard, the actual usable memory for overclocking may install varying memory sizes in Megabit, 8 Megabit/Mb = 1 Megabyte/MB). • The default memory operation frequency is recommended to support a full memory load (4 DIMMs) or overclocking condition. To operate at the vendor-marked frequency or at a higher frequency, refer to section 3.4 Ai Tweaker menu for single-channel operation. • According to Intel CPU specifications, DIMM voltage...

User Manual
Page 35
2.2.6 Onboard switches Onboard switches allow you to boot and load BIOS default settings. switch until the DRAM_LED starts blinking to begin automatic memory compatibility tuning for about 30 seconds for overclockers and gamers who continually change settings to boot after using the MemOK! switch • Refer to section 2.2.7 Onboard LEDs for the exact location of the DRAM_LED increases, indicating different test processes. • Due to the latest BIOS version from the ASUS website at www.asus.com...
2.2.6 Onboard switches Onboard switches allow you to boot and load BIOS default settings. switch until the DRAM_LED starts blinking to begin automatic memory compatibility tuning for about 30 seconds for overclockers and gamers who continually change settings to boot after using the MemOK! switch • Refer to section 2.2.7 Onboard LEDs for the exact location of the DRAM_LED increases, indicating different test processes. • Due to the latest BIOS version from the ASUS website at www.asus.com...

User Manual
Page 64
...) stores system hardware settings such as storage device configuration, overclocking settings, advanced power management, and boot device configuration that a USB mouse is connected to your motherboard if you see on your screen. • Ensure that are for information on the system chassis to restart the system. When you start up the computer, the system provides you wish to enter Setup after POST, press + + , or press the reset button on how to...
...) stores system hardware settings such as storage device configuration, overclocking settings, advanced power management, and boot device configuration that a USB mouse is connected to your motherboard if you see on your screen. • Ensure that are for information on the system chassis to restart the system. When you start up the computer, the system provides you wish to enter Setup after POST, press + + , or press the reset button on how to...

User Manual
Page 71
... CPU and VGA frequency to select the EPU power saving mode. Changing the values in this menu allow you to set the CPU bus speed to become unstable! Select any of CPU and DRAM for the system. CPU Power Management The sub-items in the desired value using the keyboard and press the key. Configuration options: [Auto] [Light Power Saving Mode] [Medium Power Saving Mode] [Max Power Saving Mode] GPU Boost GPU Boost automatically overclocks the frequency and voltage of these preset overclocking configuration options: [Auto] [Manual] Loads...
... CPU and VGA frequency to select the EPU power saving mode. Changing the values in this menu allow you to set the CPU bus speed to become unstable! Select any of CPU and DRAM for the system. CPU Power Management The sub-items in the desired value using the keyboard and press the key. Configuration options: [Auto] [Light Power Saving Mode] [Medium Power Saving Mode] [Max Power Saving Mode] GPU Boost GPU Boost automatically overclocks the frequency and voltage of these preset overclocking configuration options: [Auto] [Manual] Loads...
User Manual
Page 81
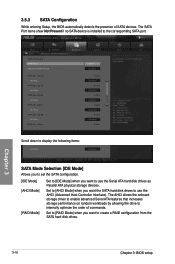
... General Help F2: Previous Values F3: Shortcut F5: Optimized Defaults F10: Save ESC: Exit F12: Print Screen Scroll down to use the AHCI (Advanced Host Controller Interface). UEFI BIOS Utility - Advanced Mode Exit Main Back Ai Tweaker Advanced Advanced\ SATA Configuration > Monitor SATA Configuration SATA Mode AHCI S.M.A.R.T. SATA Mode Selection [IDE Mode] Allows you to set the SATA configuration. [IDE Mode] [AHCI Mode] [RAID Mode] Set to [IDE Mode] when you want to display the following items: Hot Plug Disabled Version 2.00.1201. Chapter 3 3-18 Chapter 3: BIOS setup
... General Help F2: Previous Values F3: Shortcut F5: Optimized Defaults F10: Save ESC: Exit F12: Print Screen Scroll down to use the AHCI (Advanced Host Controller Interface). UEFI BIOS Utility - Advanced Mode Exit Main Back Ai Tweaker Advanced Advanced\ SATA Configuration > Monitor SATA Configuration SATA Mode AHCI S.M.A.R.T. SATA Mode Selection [IDE Mode] Allows you to set the SATA configuration. [IDE Mode] [AHCI Mode] [RAID Mode] Set to [IDE Mode] when you want to display the following items: Hot Plug Disabled Version 2.00.1201. Chapter 3 3-18 Chapter 3: BIOS setup
User Manual
Page 82
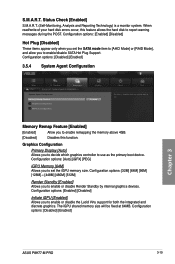
... graphics controller to enable/disable SATA Hot Plug Support. Configuration options: [Enabled] [Disabled] Hot Plug [Disabled] These items appear only when you to use as the primary boot device. Configuration options: [Disabled] [Enabled] Chapter 3 ASUS P8H77-M PRO 3-19 Configuration options: [Auto] [iGFX] [PEG] iGPU Memory [64M] Allows you to set the SATA mode item to report warning messages during the POST. The iGPU shared memory size will be fixed at 64MB. Configuration options: [Disabled] [Enabled] 3.5.4 System Agent Configuration UEFI BIOS Utility - Advanced Mode Main...
... graphics controller to enable/disable SATA Hot Plug Support. Configuration options: [Enabled] [Disabled] Hot Plug [Disabled] These items appear only when you to use as the primary boot device. Configuration options: [Disabled] [Enabled] Chapter 3 ASUS P8H77-M PRO 3-19 Configuration options: [Auto] [iGFX] [PEG] iGPU Memory [64M] Allows you to set the SATA mode item to report warning messages during the POST. The iGPU shared memory size will be fixed at 64MB. Configuration options: [Disabled] [Enabled] 3.5.4 System Agent Configuration UEFI BIOS Utility - Advanced Mode Main...

User Manual
Page 83
...function. UEFI BIOS Utility - If no USB device is detected, the legacy USB support is enabled. The USB Devices item shows the auto-detected values. Intel xHCI Mode [Smart Auto] Allows you to change the USB-related features. PCIE X16_1 Link Speed [Auto] Allows you to configure the NB PCI Express settings. AUTO option disables legacy support if no USB devices are connected. If detected, the USB controller legacy mode is disabled. Advanced Mode Exit Main Back Ai Tweaker Advanced Advanced\ USB Configuration > Monitor USB Configuration USB Devices: 1 Keyboard, 1 Mouse...
...function. UEFI BIOS Utility - If no USB device is detected, the legacy USB support is enabled. The USB Devices item shows the auto-detected values. Intel xHCI Mode [Smart Auto] Allows you to change the USB-related features. PCIE X16_1 Link Speed [Auto] Allows you to configure the NB PCI Express settings. AUTO option disables legacy support if no USB devices are connected. If detected, the USB controller legacy mode is disabled. Advanced Mode Exit Main Back Ai Tweaker Advanced Advanced\ USB Configuration > Monitor USB Configuration USB Devices: 1 Keyboard, 1 Mouse...
User Manual
Page 87
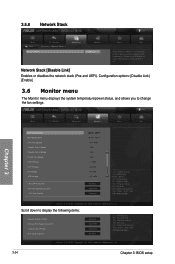
... Advanced Monitor Disabl Link Boot Tool Allow BIOS yo switch off . Configuration options: [Disable Link] [Enable] 3.6 Monitor menu The Monitor menu displays the system temperature/power status, and allows you to display the following items: Chassis Q-Fan Control Enabled Chassis Fan Speed Low Limit 600 RPM Chassis Fan Profile Standard Anti Surge Support Enabled +/-: Change Opt. F1: General Help F2: Previous Values F3: Shortcut F5: Optimized Defaults F10: Save ESC: Exit F12: Print Screen Version 2.10.1208. UEFI BIOS Utility - 3.5.8 Network Stack UEFI BIOS Utility...
... Advanced Monitor Disabl Link Boot Tool Allow BIOS yo switch off . Configuration options: [Disable Link] [Enable] 3.6 Monitor menu The Monitor menu displays the system temperature/power status, and allows you to display the following items: Chassis Q-Fan Control Enabled Chassis Fan Speed Low Limit 600 RPM Chassis Fan Profile Standard Anti Surge Support Enabled +/-: Change Opt. F1: General Help F2: Previous Values F3: Shortcut F5: Optimized Defaults F10: Save ESC: Exit F12: Print Screen Version 2.10.1208. UEFI BIOS Utility - 3.5.8 Network Stack UEFI BIOS Utility...
User Manual
Page 95
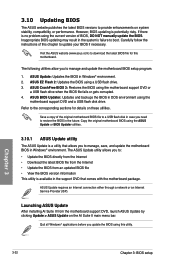
.... ASUS BIOS Updater: Updates and backups the BIOS in the system's failure to provide enhancements on the AI Suite II main menu bar. ASUS Update requires an Internet connection either through a network or an Internet Service Provider (ISP). Quit all Windows® applications before you to manage and update the motherboard BIOS setup program. 1. 3.10 Updating BIOS The ASUS website publishes the latest BIOS versions to boot. The following utilities allow you update the BIOS using a USB flash drive. 3. ASUS EZ Flash 2: Updates the BIOS using...
.... ASUS BIOS Updater: Updates and backups the BIOS in the system's failure to provide enhancements on the AI Suite II main menu bar. ASUS Update requires an Internet connection either through a network or an Internet Service Provider (ISP). Quit all Windows® applications before you to manage and update the motherboard BIOS setup program. 1. 3.10 Updating BIOS The ASUS website publishes the latest BIOS versions to boot. The following utilities allow you update the BIOS using a USB flash drive. 3. ASUS EZ Flash 2: Updates the BIOS using...

User Manual
Page 100
... updating BIOS 1. Insert the USB flash drive with the latest BIOS file and BIOS Updater to FreeDOS (http://www.freedos.org)! Prepare the motherboard support DVD and a USB flash drive in DOS environment 1. When the Make Disk menu appears, select the FreeDOS command prompt item by pressing the item number. 4. C:\>d: D:\> Chapter 3 ASUS P8H77-M PRO 3-37 Turn off the computer and disconnect all SATA hard disk drives (optional). When the ASUS Logo appears, press to boot using defaults 3. Insert the support DVD into...
... updating BIOS 1. Insert the USB flash drive with the latest BIOS file and BIOS Updater to FreeDOS (http://www.freedos.org)! Prepare the motherboard support DVD and a USB flash drive in DOS environment 1. When the Make Disk menu appears, select the FreeDOS command prompt item by pressing the item number. 4. C:\>d: D:\> Chapter 3 ASUS P8H77-M PRO 3-37 Turn off the computer and disconnect all SATA hard disk drives (optional). When the ASUS Logo appears, press to boot using defaults 3. Insert the support DVD into...

User Manual
Page 103
... the RAID/AHCI driver disk. Click an item to install The Make Disk menu contains items to use the devices. Chapter 4 ASUS P8H77-M PRO 4-1 The Drivers menu shows the available device drivers if the system detects installed devices. The Utilities menu shows the applications and other software that you install the Windows® XP Service Pack 3 or Windows® 64-bit XP /7 / 64-bit 7 / operating systems before installing the drivers for reference only. Always install the latest OS version and corresponding updates...
... the RAID/AHCI driver disk. Click an item to install The Make Disk menu contains items to use the devices. Chapter 4 ASUS P8H77-M PRO 4-1 The Drivers menu shows the available device drivers if the system detects installed devices. The Utilities menu shows the applications and other software that you install the Windows® XP Service Pack 3 or Windows® 64-bit XP /7 / 64-bit 7 / operating systems before installing the drivers for reference only. Always install the latest OS version and corresponding updates...

User Manual
Page 130
...the drive bays. 2. Connect a SATA power cable to Chapter 3 for a RAID configuration: 1. Delete RAID Volume 3. 4.5.2 Installing Serial ATA hard disks The motherboard supports Serial ATA hard disk drives. For optimal performance, install identical drives of SATA ports to chipset limitation, when set (s) using SATA HDDs. Reset Disks to display the utility main menu. Turn on entering and navigating through the BIOS Setup. Enter the BIOS Setup during POST. 2. Due to RAID mode, all SATA ports run at RAID mode together. 4.5.4 Intel® Rapid Storage Technology Option ROM utility To...
...the drive bays. 2. Connect a SATA power cable to Chapter 3 for a RAID configuration: 1. Delete RAID Volume 3. 4.5.2 Installing Serial ATA hard disks The motherboard supports Serial ATA hard disk drives. For optimal performance, install identical drives of SATA ports to chipset limitation, when set (s) using SATA HDDs. Reset Disks to display the utility main menu. Turn on entering and navigating through the BIOS Setup. Enter the BIOS Setup during POST. 2. Due to RAID mode, all SATA ports run at RAID mode together. 4.5.4 Intel® Rapid Storage Technology Option ROM utility To...

User Manual
Page 134
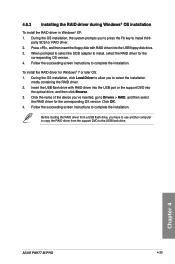
... Make Disk menu, and then click Intel AHCI/RAID Driver Disk to enter the BIOS setup utility. 3. Select USB floppy disk drive as the primary boot device. 4. When the Make Disk menu appears, press to avoid a computer virus infection. Write-protect the floppy disk to create a RAID driver disk. 7. To work around this OS limitation, refer to complete the process. 4.6.2 Creating a RAID driver disk in Windows® To create a RAID driver disk in a RAID set. • The motherboard does not provide a floppy drive connector. Place the motherboard support DVD into...
... Make Disk menu, and then click Intel AHCI/RAID Driver Disk to enter the BIOS setup utility. 3. Select USB floppy disk drive as the primary boot device. 4. When the Make Disk menu appears, press to avoid a computer virus infection. Write-protect the floppy disk to create a RAID driver disk. 7. To work around this OS limitation, refer to complete the process. 4.6.2 Creating a RAID driver disk in Windows® To create a RAID driver disk in a RAID set. • The motherboard does not provide a floppy drive connector. Place the motherboard support DVD into...
User Manual
Page 135
... to use another computer to copy the RAID driver from the support DVD to install third- Press , and then insert the floppy disk with RAID driver into the USB port or the support DVD into the USB floppy disk drive. 3. To install the RAID driver for the corresponding OS version. 4. Insert the USB flash drive with RAID driver into the optical drive, and then click Browse. 3. Before loading the RAID driver from a USB flash drive, you to press the F6 key to the USB flash drive. Chapter 4 ASUS P8H77-M PRO 4-33...
... to use another computer to copy the RAID driver from the support DVD to install third- Press , and then insert the floppy disk with RAID driver into the USB port or the support DVD into the USB floppy disk drive. 3. To install the RAID driver for the corresponding OS version. 4. Insert the USB flash drive with RAID driver into the optical drive, and then click Browse. 3. Before loading the RAID driver from a USB flash drive, you to press the F6 key to the USB flash drive. Chapter 4 ASUS P8H77-M PRO 4-33...
User Manual
Page 136
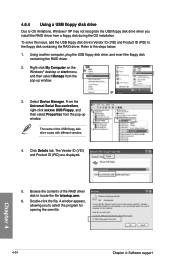
... Universal Serial Bus controllers, right-click xxxxxx USB Floppy, and then select Properties from the pop-up window. Chapter 4 4-34 Chapter 4: Software support Click Details tab. Double-click the file. To solve this issue, add the USB floppy disk drive's Vendor ID (VID) and Product ID (PID) to select the program for opening the oem file. Using another computer, plug the USB floppy disk drive, and insert the floppy disk containing the RAID driver. 2. A window...
... Universal Serial Bus controllers, right-click xxxxxx USB Floppy, and then select Properties from the pop-up window. Chapter 4 4-34 Chapter 4: Software support Click Details tab. Double-click the file. To solve this issue, add the USB floppy disk drive's Vendor ID (VID) and Product ID (PID) to select the program for opening the oem file. Using another computer, plug the USB floppy disk drive, and insert the floppy disk containing the RAID driver. 2. A window...


