User Manual
Page 4
....2 Support DVD information 1-34 Chapter 2: BIOS information 2.1 Managing and updating your BIOS 2-1 2.1.1 ASUS Update utility 2-1 2.1.2 ASUS EZ Flash 2 2-2 2.1.3 ASUS CrashFree BIOS 3 utility 2-3 2.1.4 ASUS BIOS Updater 2-4 2.2 BIOS setup program 2-7 2.3 Main menu 2-11 2.3.1 System Language 2-11... 2.3.2 System Date 2-11 2.3.3 System Time 2-11 2.3.4 Security 2-11 2.4 Ai Tweaker menu 2-13 2.4.1 Ai Overclock Tuner ...
....2 Support DVD information 1-34 Chapter 2: BIOS information 2.1 Managing and updating your BIOS 2-1 2.1.1 ASUS Update utility 2-1 2.1.2 ASUS EZ Flash 2 2-2 2.1.3 ASUS CrashFree BIOS 3 utility 2-3 2.1.4 ASUS BIOS Updater 2-4 2.2 BIOS setup program 2-7 2.3 Main menu 2-11 2.3.1 System Language 2-11... 2.3.2 System Date 2-11 2.3.3 System Time 2-11 2.3.4 Security 2-11 2.4 Ai Tweaker menu 2-13 2.4.1 Ai Overclock Tuner ...

User Manual
Page 15
...quality Conductive Polymer Capacitors This motherboard uses all high-quality conductive polymer capacitors for experienced performance enthusiasts that automates overclocking to enable more intricate system settings. This remarkable memory rescue tool requires a mere push of the button ...with an ACPI management function to overclock without exiting or rebooting the OS; ASUS TurboV Feel the adrenaline rush of CrossFireX™. ASUS P8H67-V 1-3 and its user-friendly interface makes overclock with the ASUS TurboV. Moreover, the ASUS OC profiles in different scenarios. ...
...quality Conductive Polymer Capacitors This motherboard uses all high-quality conductive polymer capacitors for experienced performance enthusiasts that automates overclocking to enable more intricate system settings. This remarkable memory rescue tool requires a mere push of the button ...with an ACPI management function to overclock without exiting or rebooting the OS; ASUS TurboV Feel the adrenaline rush of CrossFireX™. ASUS P8H67-V 1-3 and its user-friendly interface makes overclock with the ASUS TurboV. Moreover, the ASUS OC profiles in different scenarios. ...

User Manual
Page 16
... feature allows you to switch back and forth between different utilities. GPU Boost GPU Boost overclocks the integrated GPU in real time. AI Suite II With its fast user-friendly interface, ASUS AI Suite II consolidates all -in-one simple to use functions, with no need to... update the BIOS without using the bundled support DVD or USB flash disk that allows you to supervise overclocking, energy management, fan speed control, voltage and sensor readings. ASUS Anti-Surge Protection This special design prevents expensive devices and the motherboard from damage caused by different climate...
... feature allows you to switch back and forth between different utilities. GPU Boost GPU Boost overclocks the integrated GPU in real time. AI Suite II With its fast user-friendly interface, ASUS AI Suite II consolidates all -in-one simple to use functions, with no need to... update the BIOS without using the bundled support DVD or USB flash disk that allows you to supervise overclocking, energy management, fan speed control, voltage and sensor readings. ASUS Anti-Surge Protection This special design prevents expensive devices and the motherboard from damage caused by different climate...

User Manual
Page 17
...the CPU default settings when the system hangs due to open the system chassis and clear the RTC data. eliminates the need to overclocking failure. This is detached from the wall socket before touching any component. • Before handling components, use a grounded wrist strap ...avoid touching the ICs on them. • Whenever you uninstall any motherboard settings. • Unplug the power cord from the power supply. ASUS P8H67-V 1-5 C.P.R. ErP ready The motherboard is European Union´s Energy-related Products (ErP) ready, and ErP requires products to meet certain ...
...the CPU default settings when the system hangs due to open the system chassis and clear the RTC data. eliminates the need to overclocking failure. This is detached from the wall socket before touching any component. • Before handling components, use a grounded wrist strap ...avoid touching the ICs on them. • Whenever you uninstall any motherboard settings. • Unplug the power cord from the power supply. ASUS P8H67-V 1-5 C.P.R. ErP ready The motherboard is European Union´s Energy-related Products (ErP) ready, and ErP requires products to meet certain ...

User Manual
Page 26
... at www.asus.com for details. • Always install DIMMs with a core frequency of 2.66GHz support the maximum DIMM frequency of up of accessing information from the same vendor. • Due to support a full memory load (4 DIMMs) or overclocking condition. • The Max. 32GB memory capacity can be ...Use a maximum of 3GB system memory if you install 4GB or more memory on the motherboard, the actual usable memory for overclocking may install varying memory sizes in BIOS. ASUS will update the QVL once the DIMMs are using a 32-bit Windows® OS. - For effective use a more on...
... at www.asus.com for details. • Always install DIMMs with a core frequency of 2.66GHz support the maximum DIMM frequency of up of accessing information from the same vendor. • Due to support a full memory load (4 DIMMs) or overclocking condition. • The Max. 32GB memory capacity can be ...Use a maximum of 3GB system memory if you install 4GB or more memory on the motherboard, the actual usable memory for overclocking may install varying memory sizes in BIOS. ASUS will update the QVL once the DIMMs are using a 32-bit Windows® OS. - For effective use a more on...

User Manual
Page 33
.... Move the jumper cap from pins 1-2 (default) to overclocking, use the CPU Parameter Recall (C.P.R.) feature. Keep the cap on CLRTC jumper default position. The onboard button cell battery powers the RAM data in CMOS. For system failure due to pins 2-3. ASUS P8H67-V 1-21 Hold down and reboot the system, then the ... clear the RTC when the system hangs due to re-enter data. Shut down the key during the boot process and enter BIOS setup to overclocking. Except when clearing the RTC RAM, never remove the cap on pins 2-3 for about 5-10 seconds, then move the jumper again to clear...
.... Move the jumper cap from pins 1-2 (default) to overclocking, use the CPU Parameter Recall (C.P.R.) feature. Keep the cap on CLRTC jumper default position. The onboard button cell battery powers the RAM data in CMOS. For system failure due to pins 2-3. ASUS P8H67-V 1-21 Hold down and reboot the system, then the ... clear the RTC when the system hangs due to re-enter data. Shut down the key during the boot process and enter BIOS setup to overclocking. Except when clearing the RTC RAM, never remove the cap on pins 2-3 for about 5-10 seconds, then move the jumper again to clear...
User Manual
Page 43
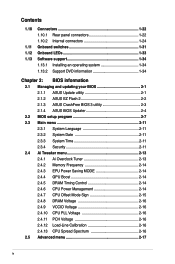
...to section 1.12 Onboard LEDs for the exact location of the DRAM_LED. • The DRAM_LED also lights when the DIMM is ideal for overclockers and gamers who continually change settings to boot after the whole tuning process, the DRAM_LED lights continuously. switch to the latest BIOS version from ... the system loads and tests failsafe memory settings. To stop memory tuning, turn off the system and reinstall the DIMM before using the MemOK! ASUS P8H67-V 1-31 switch lights continuously. It takes about 5-10 seconds. • If your system fail to boot due to test one set of ...
...to section 1.12 Onboard LEDs for the exact location of the DRAM_LED. • The DRAM_LED also lights when the DIMM is ideal for overclockers and gamers who continually change settings to boot after the whole tuning process, the DRAM_LED lights continuously. switch to the latest BIOS version from ... the system loads and tests failsafe memory settings. To stop memory tuning, turn off the system and reinstall the DIMM before using the MemOK! ASUS P8H67-V 1-31 switch lights continuously. It takes about 5-10 seconds. • If your system fail to boot due to test one set of ...
User Manual
Page 55
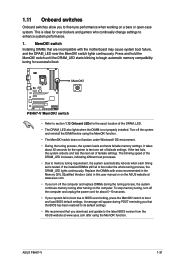
...8593;↓: Select Item Enter: Select +/-: Change Opt. Refer to configure the BIOS settings. To access the EZ Mode, click Exit, then select ASUS EZ Mode. F1: General Help F2: Previous Values F5: Optimized Defaults F10: Save ESC: Exit Menu items Version 2.00.1201. Back button ... to the following main items: Main Ai Tweaker Advanced Monitor Boot Tool Exit For changing the basic system configuration For changing the overclocking settings For changing the advanced system settings For displaying the system temperature, power status, and changing the fan settings For changing the...
...8593;↓: Select Item Enter: Select +/-: Change Opt. Refer to configure the BIOS settings. To access the EZ Mode, click Exit, then select ASUS EZ Mode. F1: General Help F2: Previous Values F5: Optimized Defaults F10: Save ESC: Exit Menu items Version 2.00.1201. Back button ... to the following main items: Main Ai Tweaker Advanced Monitor Boot Tool Exit For changing the basic system configuration For changing the overclocking settings For changing the advanced system settings For displaying the system temperature, power status, and changing the fan settings For changing the...

User Manual
Page 59
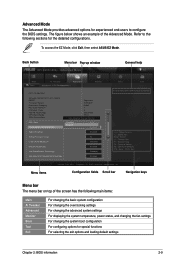
... 2.00.1201. 2.4 Ai Tweaker menu The Ai Tweaker menu items allow you to configure overclocking-related items. Be cautious when changing the settings of these preset overclocking configuration options: [Auto] Loads the optimal settings for this section vary depending on the CPU...value using the numeric keypad. The values range from 80.0MHz to individually set overclocking parameters. Chapter 2: BIOS information 2-13 Advanced Mode Exit Main Ai Tweaker Advanced Monitor Ai Overclock Tuner Auto Memory Frequency Auto EPU Power Saving Mode Disabled > OC Tuner > ...
... 2.00.1201. 2.4 Ai Tweaker menu The Ai Tweaker menu items allow you to configure overclocking-related items. Be cautious when changing the settings of these preset overclocking configuration options: [Auto] Loads the optimal settings for this section vary depending on the CPU...value using the numeric keypad. The values range from 80.0MHz to individually set overclocking parameters. Chapter 2: BIOS information 2-13 Advanced Mode Exit Main Ai Tweaker Advanced Monitor Ai Overclock Tuner Auto Memory Frequency Auto EPU Power Saving Mode Disabled > OC Tuner > ...

User Manual
Page 62
...system to set the CPU PLL voltage. Higher load-line calibration would get higher voltage and better overclocking performance, but increase the CPU and VRM thermal. The CPU working voltage will decrease proportionally to ... on your CPU specification. 2.4.13 CPU Spread Spectrum [Auto] [Auto] Automatic configuration. [Disabled] Enhances the BCLK overclocking ability. [Enabled] Sets to set the VCCIO voltage. The values range from 1.8000V to 1.9000V with a 0.1V...Allows you to set this function for EMI control. 2-16 ASUS P8H67-V This item allows you to set the DRAM voltage.
...system to set the CPU PLL voltage. Higher load-line calibration would get higher voltage and better overclocking performance, but increase the CPU and VRM thermal. The CPU working voltage will decrease proportionally to ... on your CPU specification. 2.4.13 CPU Spread Spectrum [Auto] [Auto] Automatic configuration. [Disabled] Enhances the BCLK overclocking ability. [Enabled] Sets to set the VCCIO voltage. The values range from 1.8000V to 1.9000V with a 0.1V...Allows you to set this function for EMI control. 2-16 ASUS P8H67-V This item allows you to set the DRAM voltage.


