

User Manual
Page 11
... i5 / Core™ i3 processors are among the most powerful and energy efficient CPUs in the long line of ASUS quality motherboards! This provides great graphics performance. Chapter 1: Product introduction 1-1 The package contents vary from models. •... for the following items. Motherboard Cables Accessories Application DVD Documentation ASUS P8H61 Series motherboard 2 x Serial ATA 3.0Gb/s cables 1 x I/O shield ASUS motherboard support DVD User Manual • P8H61 Series motherboards include P8H61 and P8H61 PLUS two models. Chapter 1 Product introduction 1.1 Welcome! The...
... i5 / Core™ i3 processors are among the most powerful and energy efficient CPUs in the long line of ASUS quality motherboards! This provides great graphics performance. Chapter 1: Product introduction 1-1 The package contents vary from models. •... for the following items. Motherboard Cables Accessories Application DVD Documentation ASUS P8H61 Series motherboard 2 x Serial ATA 3.0Gb/s cables 1 x I/O shield ASUS motherboard support DVD User Manual • P8H61 Series motherboards include P8H61 and P8H61 PLUS two models. Chapter 1 Product introduction 1.1 Welcome! The...
User Manual
Page 12
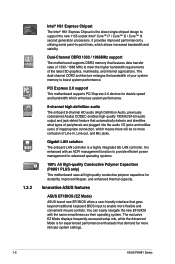
... the latest single-chipset design to provide efficient power management for advanced operating systems. 100% All High-quality Conductive Polymer Capacitors (P8H61 PLUS only) This motherboard uses all high-quality conductive polymer capacitors for durability, improved lifespan, and enhanced thermal capacity. Gigabit LAN...to -point links, which means there will be no more confusion of your system memory to enable more intricate system settings. 1-2 ASUS P8H61 Series You can easily navigate the new EFI BIOS with an ACPI management function to support the new 1155 socket Intel® Core...
... the latest single-chipset design to provide efficient power management for advanced operating systems. 100% All High-quality Conductive Polymer Capacitors (P8H61 PLUS only) This motherboard uses all high-quality conductive polymer capacitors for durability, improved lifespan, and enhanced thermal capacity. Gigabit LAN...to -point links, which means there will be no more confusion of your system memory to enable more intricate system settings. 1-2 ASUS P8H61 Series You can easily navigate the new EFI BIOS with an ACPI management function to support the new 1155 socket Intel® Core...
User Manual
Page 14
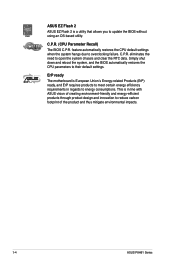
... European Union´s Energy-related Products (ErP) ready, and ErP requires products to meet certain energy efficiency requirements in line with ASUS vision of the product and thus mitigate environmental impacts. 1-4 ASUS P8H61 Series C.P.R. (CPU Parameter Recall) The BIOS C.P.R. Simply shut down and reboot the system, and the BIOS automatically restores the CPU...
... European Union´s Energy-related Products (ErP) ready, and ErP requires products to meet certain energy efficiency requirements in line with ASUS vision of the product and thus mitigate environmental impacts. 1-4 ASUS P8H61 Series C.P.R. (CPU Parameter Recall) The BIOS C.P.R. Simply shut down and reboot the system, and the BIOS automatically restores the CPU...
User Manual
Page 16
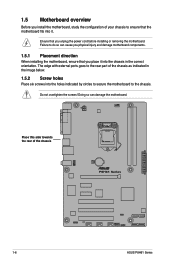
... components. 1.5.1 Placement direction When installing the motherboard, ensure that you place it . 1.5 Motherboard overview Before you install the motherboard, study the configuration of the chassis P8H61 Series 1-6 ASUS P8H61 Series Ensure that you unplug the power cord before installing or removing the motherboard. Failure to the chassis.
... components. 1.5.1 Placement direction When installing the motherboard, ensure that you place it . 1.5 Motherboard overview Before you install the motherboard, study the configuration of the chassis P8H61 Series 1-6 ASUS P8H61 Series Ensure that you unplug the power cord before installing or removing the motherboard. Failure to the chassis.
User Manual
Page 18
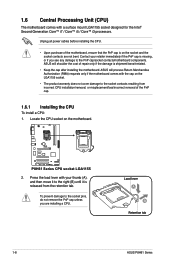
P8H61 Series P8H61 Series CPU socket LGA1155 2. ASUS will shoulder the cost of repair only if the damage... and then move it to the right (B) until it is missing, or if you are not bent. ASUS will process Return Merchandise Authorization (RMA) requests only if the motherboard comes with a surface mount LGA1155 socket designed...Second Generation Core™ i7 / Core™ i5 / Core™ i3 processors. Load lever A B Retention tab 1-8 ASUS P8H61 Series 1.6 Central Processing Unit (CPU) The motherboard comes with the cap on the LGA1155 socket. • The product warranty ...
P8H61 Series P8H61 Series CPU socket LGA1155 2. ASUS will shoulder the cost of repair only if the damage... and then move it to the right (B) until it is missing, or if you are not bent. ASUS will process Return Merchandise Authorization (RMA) requests only if the motherboard comes with a surface mount LGA1155 socket designed...Second Generation Core™ i7 / Core™ i5 / Core™ i3 processors. Load lever A B Retention tab 1-8 ASUS P8H61 Series 1.6 Central Processing Unit (CPU) The motherboard comes with the cap on the LGA1155 socket. • The product warranty ...
User Manual
Page 20
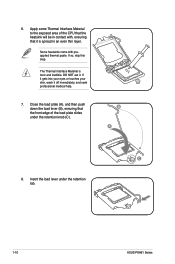
... in contact with preapplied thermal paste. Apply some Thermal Interface Material to the exposed area of the load plate slides under the retention tab. 1-10 ASUS P8H61 Series B A C 8. If it gets into your eyes or touches your skin, wash it . DO NOT eat it off immediately, and seek professional medical help...
... in contact with preapplied thermal paste. Apply some Thermal Interface Material to the exposed area of the load plate slides under the retention tab. 1-10 ASUS P8H61 Series B A C 8. If it gets into your eyes or touches your skin, wash it . DO NOT eat it off immediately, and seek professional medical help...
User Manual
Page 22
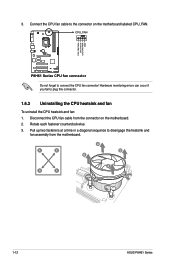
... CPU fan connector Do not forget to plug this connector. 1.6.3 Uninstalling the CPU heatsink and fan To uninstall the CPU heatsink and fan: 1. 3. A B A B B A B A 1-12 ASUS P8H61 Series Disconnect the CPU fan cable from the motherboard. Hardware monitoring errors can occur if you fail to connect the CPU fan connector! Rotate each ...
... CPU fan connector Do not forget to plug this connector. 1.6.3 Uninstalling the CPU heatsink and fan To uninstall the CPU heatsink and fan: 1. 3. A B A B B A B A 1-12 ASUS P8H61 Series Disconnect the CPU fan cable from the motherboard. Hardware monitoring errors can occur if you fail to connect the CPU fan connector! Rotate each ...
User Manual
Page 24
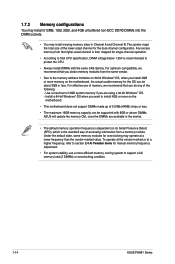
... of memory, we recommend that you do any of 3GB system memory if you want to support a full memory load (2 DIMMs) or overclocking condition. 1-14 ASUS P8H61 Series Under the default state, some memory modules for overclocking may install varying memory sizes in the market. • The default memory operation frequency is... the standard way of accessing information from the same vendor. • Due to protect the CPU. • Always install DIMMs with 8GB or above DIMMs. ASUS will update the memory QVL once the DIMMs are using a 32-bit Windows® OS. -
... of memory, we recommend that you do any of 3GB system memory if you want to support a full memory load (2 DIMMs) or overclocking condition. 1-14 ASUS P8H61 Series Under the default state, some memory modules for overclocking may install varying memory sizes in the market. • The default memory operation frequency is... the standard way of accessing information from the same vendor. • Due to protect the CPU. • Always install DIMMs with 8GB or above DIMMs. ASUS will update the memory QVL once the DIMMs are using a 32-bit Windows® OS. -
User Manual
Page 28
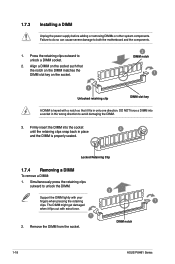
... force. 1 2. Remove the DIMM from the socket. 1.7.3 Installing a DIMM Unplug the power supply before adding or removing DIMMs or other system components. DIMM notch 1-18 ASUS P8H61 Series Press the retaining clips outward to both the motherboard and the components. 1. Failure to do so can cause severe damage to unlock a DIMM socket...
... force. 1 2. Remove the DIMM from the socket. 1.7.3 Installing a DIMM Unplug the power supply before adding or removing DIMMs or other system components. DIMM notch 1-18 ASUS P8H61 Series Press the retaining clips outward to both the motherboard and the components. 1. Failure to do so can cause severe damage to unlock a DIMM socket...
User Manual
Page 30
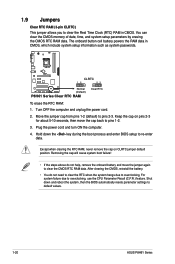
... RTC RAM, never remove the cap on pins 2-3 for about 5-10 seconds, then move the jumper again to pins 1-2. 3. P8H61 Series CLRTC 12 23 Normal (Default) P8H61 Series Clear RTC RAM Clear RTC To erase the RTC RAM: 1. You can clear the CMOS memory of date, time, and...the BIOS automatically resets parameter settings to overclocking, use the CPU Parameter Recall (C.P.R.) feature. For system failure due to default values. 1-20 ASUS P8H61 Series Shut down the key during the boot process and enter BIOS setup to pins 2-3. Keep the cap on CLRTC jumper default position.
... RTC RAM, never remove the cap on pins 2-3 for about 5-10 seconds, then move the jumper again to pins 1-2. 3. P8H61 Series CLRTC 12 23 Normal (Default) P8H61 Series Clear RTC RAM Clear RTC To erase the RTC RAM: 1. You can clear the CMOS memory of date, time, and...the BIOS automatically resets parameter settings to overclocking, use the CPU Parameter Recall (C.P.R.) feature. For system failure due to default values. 1-20 ASUS P8H61 Series Shut down the key during the boot process and enter BIOS setup to pins 2-3. Keep the cap on CLRTC jumper default position.

User Manual
Page 32
... port (purple). By default, this connector, set the Front Panel Type item in the BIOS setup to this connector. 7. Serial port. AAFP P8H61 Series SENSE2_RETUR PORT2 L SENSE_SEND SENSE1_RETUR PORT2 R PRESENCE# PORT1 R GND PORT1 L PIN 1 HD-audio-compliant pin definition NC Line out_L NC NC...1 and 2. These two 4-pin Universal Serial Bus (USB) ports are for USB 2.0/1.1 devices. 8. This port is for details. 1-22 ASUS P8H61 Series Connect one end of the front panel audio I /O module that you connect a high-definition front panel audio module to this connector to ...
... port (purple). By default, this connector, set the Front Panel Type item in the BIOS setup to this connector. 7. Serial port. AAFP P8H61 Series SENSE2_RETUR PORT2 L SENSE_SEND SENSE1_RETUR PORT2 R PRESENCE# PORT1 R GND PORT1 L PIN 1 HD-audio-compliant pin definition NC Line out_L NC NC...1 and 2. These two 4-pin Universal Serial Bus (USB) ports are for USB 2.0/1.1 devices. 8. This port is for details. 1-22 ASUS P8H61 Series Connect one end of the front panel audio I /O module that you connect a high-definition front panel audio module to this connector to ...
User Manual
Page 34
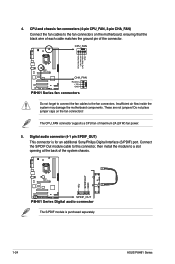
...cable to this connector, then install the module to the fan connectors. The CPU_FAN connector supports a CPU fan of the connector. P8H61 Series SPDIF_OUT P8H61 Series Digital audio connector The S/PDIF module is for an additional Sony/Philips Digital Interface (S/PDIF) port. CPU and chassis fan ...maximum 2A (24 W) fan power. 5. Digital audio connector (4-1 pin SPDIF_OUT) This connector is purchased separately. +5V SPDIFOUT GND 1-24 ASUS P8H61 Series CPU FAN PWM CPU FAN IN CPU FAN PWR GND 4. Insufficient air flow inside the system may damage the motherboard components.
...cable to this connector, then install the module to the fan connectors. The CPU_FAN connector supports a CPU fan of the connector. P8H61 Series SPDIF_OUT P8H61 Series Digital audio connector The S/PDIF module is for an additional Sony/Philips Digital Interface (S/PDIF) port. CPU and chassis fan ...maximum 2A (24 W) fan power. 5. Digital audio connector (4-1 pin SPDIF_OUT) This connector is purchased separately. +5V SPDIFOUT GND 1-24 ASUS P8H61 Series CPU FAN PWM CPU FAN IN CPU FAN PWR GND 4. Insufficient air flow inside the system may damage the motherboard components.
User Manual
Page 36
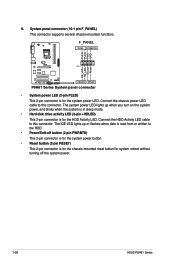
8. System panel connector (10-1 pin F_PANEL) This connector supports several chassis-mounted functions. Ground Reset +HDLED RESET P8H61 Series System panel connector • System power LED (2-pin PLED) This 2-pin connector is for the chassis-mounted reset button for system reboot without turning ... system power LED lights up or flashes when data is read from or written to the HDD. • Power/Soft-off the system power. 1-26 ASUS P8H61 Series F_PANEL PLED PWRBTN PLED+ PLEDPWR GND...
8. System panel connector (10-1 pin F_PANEL) This connector supports several chassis-mounted functions. Ground Reset +HDLED RESET P8H61 Series System panel connector • System power LED (2-pin PLED) This 2-pin connector is for the chassis-mounted reset button for system reboot without turning ... system power LED lights up or flashes when data is read from or written to the HDD. • Power/Soft-off the system power. 1-26 ASUS P8H61 Series F_PANEL PLED PWRBTN PLED+ PLEDPWR GND...
User Manual
Page 40
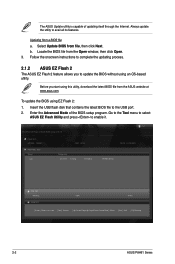
... of the BIOS setup program. Locate the BIOS file from the ASUS website at www.asus.com. Always update the utility to update the BIOS without using EZ Flash 2: 1. ASUSTek EZ Flash 2 BIOS ROM Utility V00.75 Flash Info MODEL: P8H61 File Path: fs0:\ Drive fs0:\ VER: 0210 Folder Info 01.../01/11 10:23p 4194304 Exit DATE: 01/04/2011 P8H61.ROM File Info MODEL: Help Info VER: DATE [Enter] Select or Load [Tab] Switch [Up/Down/PageUp/PageDown/Home/End] Move [Esc] Exit [F2] Backup 2-2 ASUS P8H61 Series
... of the BIOS setup program. Locate the BIOS file from the ASUS website at www.asus.com. Always update the utility to update the BIOS without using EZ Flash 2: 1. ASUSTek EZ Flash 2 BIOS ROM Utility V00.75 Flash Info MODEL: P8H61 File Path: fs0:\ Drive fs0:\ VER: 0210 Folder Info 01.../01/11 10:23p 4194304 Exit DATE: 01/04/2011 P8H61.ROM File Info MODEL: Help Info VER: DATE [Enter] Select or Load [Tab] Switch [Up/Down/PageUp/PageDown/Home/End] Move [Esc] Exit [F2] Backup 2-2 ASUS P8H61 Series
User Manual
Page 42
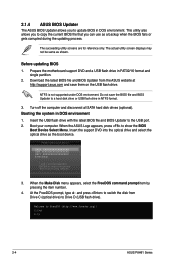
... a hard disk drive or USB flash drive in DOS environment. Before updating BIOS 1. When the ASUS Logo appears, press to FreeDOS (http://www.freedos.org)! C:\>d: D:\> 2-4 ASUS P8H61 Series Booting the system in FAT32/16 format and single partition. 2. The actual utility screen displays ...may not be same as the boot device. 2.1.4 ASUS BIOS Updater The ASUS BIOS Updater allows you can use as a backup ...
... a hard disk drive or USB flash drive in DOS environment. Before updating BIOS 1. When the ASUS Logo appears, press to FreeDOS (http://www.freedos.org)! C:\>d: D:\> 2-4 ASUS P8H61 Series Booting the system in FAT32/16 format and single partition. 2. The actual utility screen displays ...may not be same as the boot device. 2.1.4 ASUS BIOS Updater The ASUS BIOS Updater allows you can use as a backup ...
User Manual
Page 44
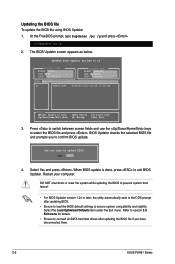
... BIOS file and prompts you sure to section 2.9 Exit menu for DOS V1.18 Current ROM BOARD: P8H61 VER: 0210 DATE: 01/04/2011 Update ROM BOARD: Unknown VER: Unknown DATE: Unknown PATH: A:\ A: P8H61.ROM 4194304 2011-01-04 17:30:48 Note [Enter] Select or Load [Up/Down/Home/End...after updating BIOS. • Ensure to load the BIOS default settings to the DOS prompt after updating the BIOS file if you have disconnected them. 2-6 ASUS P8H61 Series Updating the BIOS file To update the BIOS file using BIOS Updater 1. Press to switch between screen fields and use the keys to exit...
... BIOS file and prompts you sure to section 2.9 Exit menu for DOS V1.18 Current ROM BOARD: P8H61 VER: 0210 DATE: 01/04/2011 Update ROM BOARD: Unknown VER: Unknown DATE: Unknown PATH: A:\ A: P8H61.ROM 4194304 2011-01-04 17:30:48 Note [Enter] Select or Load [Up/Down/Home/End...after updating BIOS. • Ensure to load the BIOS default settings to the DOS prompt after updating the BIOS file if you have disconnected them. 2-6 ASUS P8H61 Series Updating the BIOS file To update the BIOS file using BIOS Updater 1. Press to switch between screen fields and use the keys to exit...
User Manual
Page 46
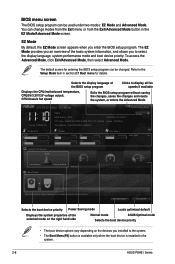
... you installed to the system. • The Boot Menu(F8) button is available only when the boot device is installed to the system. 2-8 ASUS P8H61 Series The EZ Mode provides you an overview of the basic system information, and allows you enter the BIOS setup program. The default screen for.... To access the Advanced Mode, click Exit/Advanced Mode, then select Advanced Mode. Refer to decide the boot priority. EZ Mode Friday [10/08/2010] P8H61 BIOS Version : 0210 Build Date : 01/04/2011 CPU Type : Intel(R) Core(TM) i5-2500 CPU 0 @ 3.30GHz Speed : 3300 MHz Total Memory : 1024 ...
... you installed to the system. • The Boot Menu(F8) button is available only when the boot device is installed to the system. 2-8 ASUS P8H61 Series The EZ Mode provides you an overview of the basic system information, and allows you enter the BIOS setup program. The default screen for.... To access the Advanced Mode, click Exit/Advanced Mode, then select Advanced Mode. Refer to decide the boot priority. EZ Mode Friday [10/08/2010] P8H61 BIOS Version : 0210 Build Date : 01/04/2011 CPU Type : Intel(R) Core(TM) i5-2500 CPU 0 @ 3.30GHz Speed : 3300 MHz Total Memory : 1024 ...
User Manual
Page 48
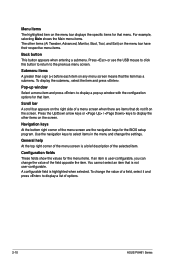
... Main menu items. The other items on any menu screen means that menu. Scroll bar A scroll bar appears on the right side of options. 2-10 ASUS P8H61 Series You cannot select an item that do not fit on the screen.
... Main menu items. The other items on any menu screen means that menu. Scroll bar A scroll bar appears on the right side of options. 2-10 ASUS P8H61 Series You cannot select an item that do not fit on the screen.
User Manual
Page 50
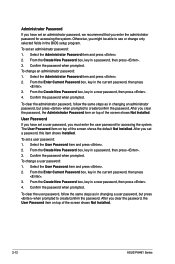
... administrator password, follow the same steps as in the BIOS setup program. The User Password item on top of the screen shows Not Installed. 2-12 ASUS P8H61 Series From the Create New Password box, key in the current password, then press . 3. To change an administrator password: 1. Confirm the password when prompted. From...
... administrator password, follow the same steps as in the BIOS setup program. The User Password item on top of the screen shows Not Installed. 2-12 ASUS P8H61 Series From the Create New Password box, key in the current password, then press . 3. To change an administrator password: 1. Confirm the password when prompted. From...
User Manual
Page 52
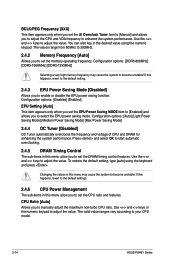
... you to become unstable! If this menu allow you to set the DRAM timing control features. Use the and keys to your CPU model. 2-14 ASUS P8H61 Series To restore the default setting, type [auto] using the numeric keypad. Configuration options: [DDR3-800MHz] [DDR3-1066MHz] [DDR3-1333MHz] Selecting a very high memory frequency...
... you to become unstable! If this menu allow you to set the DRAM timing control features. Use the and keys to your CPU model. 2-14 ASUS P8H61 Series To restore the default setting, type [auto] using the numeric keypad. Configuration options: [DDR3-800MHz] [DDR3-1066MHz] [DDR3-1333MHz] Selecting a very high memory frequency...


