
User Manual
Page 4
Contents 1.11 Software support 1-27 1.11.1 Installing an operating system 1-27 1.11.2 Support DVD information 1-27 Chapter 2: BIOS information 2.1 Managing and updating your BIOS 2-1 2.1.1 ASUS Update utility 2-1 2.1.2 ASUS EZ Flash 2 2-2 2.1.3 ASUS CrashFree BIOS 3 utility 2-3 2.1.4 ASUS BIOS Updater 2-4 2.2 BIOS setup program 2-7 2.3 Main menu 2-11 2.3.1 System Language 2-11 2.3.2 System Date 2-11 2.3.3 System Time 2-11 2.3.4 Security 2-11 2.4 Ai Tweaker menu 2-13 2.4.1 Ai Overclock...
Contents 1.11 Software support 1-27 1.11.1 Installing an operating system 1-27 1.11.2 Support DVD information 1-27 Chapter 2: BIOS information 2.1 Managing and updating your BIOS 2-1 2.1.1 ASUS Update utility 2-1 2.1.2 ASUS EZ Flash 2 2-2 2.1.3 ASUS CrashFree BIOS 3 utility 2-3 2.1.4 ASUS BIOS Updater 2-4 2.2 BIOS setup program 2-7 2.3 Main menu 2-11 2.3.1 System Language 2-11 2.3.2 System Date 2-11 2.3.3 System Time 2-11 2.3.4 Security 2-11 2.4 Ai Tweaker menu 2-13 2.4.1 Ai Overclock...

User Manual
Page 7
.... • If the power supply is broken, do not try to fix it supports. • Chapter 2: BIOS information This chapter tells how to change system settings through the BIOS Setup menus. Detailed descriptions of the BIOS parameters are unplugged before using an adapter or extension cord. How this guide This user guide contains...
.... • If the power supply is broken, do not try to fix it supports. • Chapter 2: BIOS information This chapter tells how to change system settings through the BIOS Setup menus. Detailed descriptions of the BIOS parameters are unplugged before using an adapter or extension cord. How this guide This user guide contains...
User Manual
Page 9
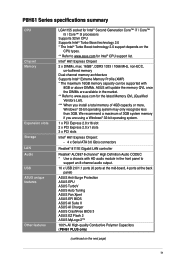
.... 10 x USB 2.0/1.1 ports (6 ports at the mid-board, 4 ports at the back panel) ASUS Anti-Surge Protection ASUS EPU ASUS TurboV ASUS Auto Tuning ASUS Fan Xpert ASUS EFI BIOS ASUS AI Suite II ASUS AI Charger ASUS CrashFree BIOS 3 ASUS EZ Flash 2 ASUS MyLogo 2™ 100% All High-quality Conductive Polymer Capacitors (P8H61 PLUS only) (continued on the CPU types. ** Refer to www...
.... 10 x USB 2.0/1.1 ports (6 ports at the mid-board, 4 ports at the back panel) ASUS Anti-Surge Protection ASUS EPU ASUS TurboV ASUS Auto Tuning ASUS Fan Xpert ASUS EFI BIOS ASUS AI Suite II ASUS AI Charger ASUS CrashFree BIOS 3 ASUS EZ Flash 2 ASUS MyLogo 2™ 100% All High-quality Conductive Polymer Capacitors (P8H61 PLUS only) (continued on the CPU types. ** Refer to www...
User Manual
Page 10
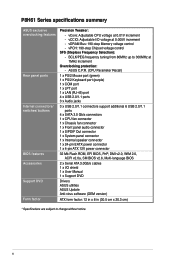
... ATA 3.0Gb/s cables 1 x I /O voltage at 0.005V increment - vCore: Adjustable CPU voltage at 1MHz increment Overclocking protection: - P8H61 Series specifications summary ASUS exclusive overclocking features Rear panel ports Internal connectors/ switches/ buttons BIOS features Accessories Support DVD Form factor Precision Tweaker: - vDRAM Bus: 190-step Memory voltage control - BCLK/PEG frequency tuning from 80MHz...
... ATA 3.0Gb/s cables 1 x I /O voltage at 0.005V increment - vCore: Adjustable CPU voltage at 1MHz increment Overclocking protection: - P8H61 Series specifications summary ASUS exclusive overclocking features Rear panel ports Internal connectors/ switches/ buttons BIOS features Accessories Support DVD Form factor Precision Tweaker: - vDRAM Bus: 190-step Memory voltage control - BCLK/PEG frequency tuning from 80MHz...
User Manual
Page 12
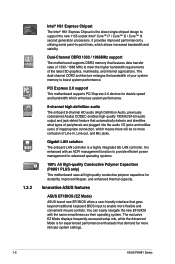
Innovative ASUS features ASUS EFI BIOS (EZ Mode) ASUS brand new EFI BIOS offers a user-friendly interface that demand far more intricate system settings. 1-2 ASUS P8H61 Series The exclusive EZ Mode displays frequently-accessed setup info, while the Advanced Mode is enhanced ...users of your system memory to provide efficient power management for advanced operating systems. 100% All High-quality Conductive Polymer Capacitors (P8H61 PLUS only) This motherboard uses all high-quality conductive polymer capacitors for double speed and bandwidth which enhances system performance. 8-channel...
Innovative ASUS features ASUS EFI BIOS (EZ Mode) ASUS brand new EFI BIOS offers a user-friendly interface that demand far more intricate system settings. 1-2 ASUS P8H61 Series The exclusive EZ Mode displays frequently-accessed setup info, while the Advanced Mode is enhanced ...users of your system memory to provide efficient power management for advanced operating systems. 100% All High-quality Conductive Polymer Capacitors (P8H61 PLUS only) This motherboard uses all high-quality conductive polymer capacitors for double speed and bandwidth which enhances system performance. 8-channel...

User Manual
Page 13
.... This tool also provides stability testing. Even O.C. It allows you to overclock without exiting or rebooting the OS; ASUS CrashFree BIOS 3 ASUS CrashFree BIOS 3 is an auto-recovery tool that allows you to restore a corrupted BIOS file using the bundled support DVD or USB flash disk that detects the current system loadings and adjusts the...
.... This tool also provides stability testing. Even O.C. It allows you to overclock without exiting or rebooting the OS; ASUS CrashFree BIOS 3 ASUS CrashFree BIOS 3 is an auto-recovery tool that allows you to restore a corrupted BIOS file using the bundled support DVD or USB flash disk that detects the current system loadings and adjusts the...
User Manual
Page 14
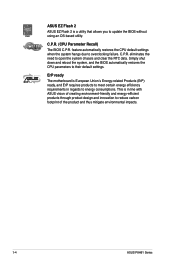
...CPU parameters to energy consumptions. ErP ready The motherboard is a utility that allows you to update the BIOS without using an OS-based utility. ASUS EZ Flash 2 ASUS EZ Flash 2 is European Union´s Energy-related Products (ErP) ready, and ErP requires products ...to meet certain energy efficiency requirements in line with ASUS vision of creating environment-friendly and energy-efficient products through product design and innovation to reduce carbon footprint of the product and thus mitigate environmental impacts. 1-4 ASUS P8H61 Series This is in regards to their default ...
...CPU parameters to energy consumptions. ErP ready The motherboard is a utility that allows you to update the BIOS without using an OS-based utility. ASUS EZ Flash 2 ASUS EZ Flash 2 is European Union´s Energy-related Products (ErP) ready, and ErP requires products ...to meet certain energy efficiency requirements in line with ASUS vision of creating environment-friendly and energy-efficient products through product design and innovation to reduce carbon footprint of the product and thus mitigate environmental impacts. 1-4 ASUS P8H61 Series This is in regards to their default ...
User Manual
Page 17
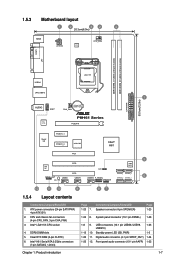
... module) USB34 LGA1155 30.5cm(12.0in) LAN_USB12 1 AUDIO AAFP CHA_FAN Lithium Cell CMOS Power EATXPWR P8H61 Series RTL 8111E PCIEX16 Super I/O PCIEX1_1 PCIEX1_2 ASM 1083 Intel® H61 PCI1 PCI2 ALC 887 CLRTC 5 32Mb BIOS PCI3 SATA3G_4 SATA3G_3 SPDIF_OUT USB56 USB78 USB910 F_PANEL 6 SATA3G_2 SATA3G_1 SB_PWR SPEAKER 12 11 10 9 87...
... module) USB34 LGA1155 30.5cm(12.0in) LAN_USB12 1 AUDIO AAFP CHA_FAN Lithium Cell CMOS Power EATXPWR P8H61 Series RTL 8111E PCIEX16 Super I/O PCIEX1_1 PCIEX1_2 ASM 1083 Intel® H61 PCI1 PCI2 ALC 887 CLRTC 5 32Mb BIOS PCI3 SATA3G_4 SATA3G_3 SPDIF_OUT USB56 USB78 USB910 F_PANEL 6 SATA3G_2 SATA3G_1 SB_PWR SPEAKER 12 11 10 9 87...
User Manual
Page 29
...(if your motherboard is completely seated on shared slots, ensure that the drivers support "Share IRQ" or that you removed earlier. 6. Turn on BIOS setup. 2. When using PCI cards on the slot. 5. Otherwise, conflicts will arise between the two PCI groups, making the system unstable and the...slot that the cards do so may cause you may need IRQ assignments. Keep the screw for information on the system and change the necessary BIOS settings, if any. Secure the card to the card. 3. Replace the system cover. 1.8.2 Configuring an expansion card After installing the expansion ...
...(if your motherboard is completely seated on shared slots, ensure that the drivers support "Share IRQ" or that you removed earlier. 6. Turn on BIOS setup. 2. When using PCI cards on the slot. 5. Otherwise, conflicts will arise between the two PCI groups, making the system unstable and the...slot that the cards do so may cause you may need IRQ assignments. Keep the screw for information on the system and change the necessary BIOS settings, if any. Secure the card to the card. 3. Replace the system cover. 1.8.2 Configuring an expansion card After installing the expansion ...
User Manual
Page 30
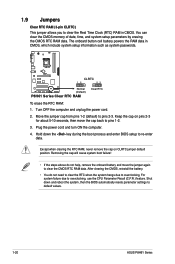
... boot failure! • If the steps above do not need to clear the RTC when the system hangs due to overclocking. P8H61 Series CLRTC 12 23 Normal (Default) P8H61 Series Clear RTC RAM Clear RTC To erase the RTC RAM: 1. Move the jumper cap from pins 1-2 (default) to overclocking...re-enter data. Turn OFF the computer and unplug the power cord. 2. Hold down and reboot the system, then the BIOS automatically resets parameter settings to default values. 1-20 ASUS P8H61 Series 1.9 Jumpers Clear RTC RAM (3-pin CLRTC) This jumper allows you to clear the Real Time Clock (RTC) RAM...
... boot failure! • If the steps above do not need to clear the RTC when the system hangs due to overclocking. P8H61 Series CLRTC 12 23 Normal (Default) P8H61 Series Clear RTC RAM Clear RTC To erase the RTC RAM: 1. Move the jumper cap from pins 1-2 (default) to overclocking...re-enter data. Turn OFF the computer and unplug the power cord. 2. Hold down and reboot the system, then the BIOS automatically resets parameter settings to default values. 1-20 ASUS P8H61 Series 1.9 Jumpers Clear RTC RAM (3-pin CLRTC) This jumper allows you to clear the Real Time Clock (RTC) RAM...

User Manual
Page 32
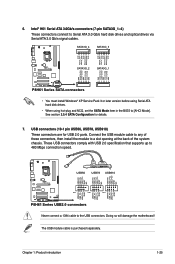
...USB 2.0/1.1 devices. 9. By default, this connector. These two 4-pin Universal Serial Bus (USB) ports are for pointing devices or other serial devices. 10. AAFP P8H61 Series SENSE2_RETUR PORT2 L SENSE_SEND SENSE1_RETUR PORT2 R PRESENCE# PORT1 R GND PORT1 L PIN 1 HD-audio-compliant pin definition NC Line out_L NC NC Line out_R NC ...AC97]. If you want to connect an AC'97 front panel audio module to this connector, set the Front Panel Type item in the BIOS setup to [HD]. These two 4-pin Universal Serial Bus (USB) ports are for details. 1-22 ASUS P8H61 Series
...USB 2.0/1.1 devices. 9. By default, this connector. These two 4-pin Universal Serial Bus (USB) ports are for pointing devices or other serial devices. 10. AAFP P8H61 Series SENSE2_RETUR PORT2 L SENSE_SEND SENSE1_RETUR PORT2 R PRESENCE# PORT1 R GND PORT1 L PIN 1 HD-audio-compliant pin definition NC Line out_L NC NC Line out_R NC ...AC97]. If you want to connect an AC'97 front panel audio module to this connector, set the Front Panel Type item in the BIOS setup to [HD]. These two 4-pin Universal Serial Bus (USB) ports are for details. 1-22 ASUS P8H61 Series
User Manual
Page 35
... GND RSATA_TXP2 RSATA_TXN2 GND RSATA_RXP2 RSATA_RXN2 GND P8H61 Series SATA connectors • You must install Windows® XP Service Pack 3 or later version before using Serial ATA hard disk drives. • When using hot-plug and NCQ, set the SATA Mode item in the BIOS to a slot opening at the back of... with USB 2.0 specification that supports up to the USB connectors. USB+5V USB_P6USB_P6+ GND NC USB+5V USB_P8USB_P8+ GND NC USB+5V USB_P10USB_P10+ GND NC P8H61 Series USB56 USB78 USB910 PIN 1 PIN 1 PIN 1 USB+5V USB_P5USB_P5+ GND USB+5V USB_P7USB_P7+ GND USB+5V USB_P9USB_P9+ GND...
... GND RSATA_TXP2 RSATA_TXN2 GND RSATA_RXP2 RSATA_RXN2 GND P8H61 Series SATA connectors • You must install Windows® XP Service Pack 3 or later version before using Serial ATA hard disk drives. • When using hot-plug and NCQ, set the SATA Mode item in the BIOS to a slot opening at the back of... with USB 2.0 specification that supports up to the USB connectors. USB+5V USB_P6USB_P6+ GND NC USB+5V USB_P8USB_P8+ GND NC USB+5V USB_P10USB_P10+ GND NC P8H61 Series USB56 USB78 USB910 PIN 1 PIN 1 PIN 1 USB+5V USB_P5USB_P5+ GND USB+5V USB_P7USB_P7+ GND USB+5V USB_P9USB_P9+ GND...
User Manual
Page 39
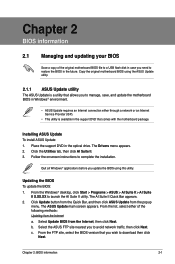
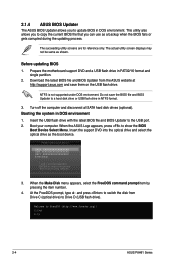
.... The AI Suite II Quick Bar appears. 2. c. Updating the BIOS To update the BIOS: 1. The ASUS Update main screen appears. Copy the original motherboard BIOS using this utility. Select Update BIOS from the popup menu. Place the support DVD in the optical drive.... b. Select the ASUS FTP site nearest you update the BIOS using the ASUS Update utility. 2.1.1 ASUS Update utility The ASUS Update is a utility that comes with the motherboard package. Installing ASUS Update To install ASUS Update: 1. Chapter 2 BIOS information 2.1 Managing and updating your BIOS Save a copy of...
.... The AI Suite II Quick Bar appears. 2. c. Updating the BIOS To update the BIOS: 1. The ASUS Update main screen appears. Copy the original motherboard BIOS using this utility. Select Update BIOS from the popup menu. Place the support DVD in the optical drive.... b. Select the ASUS FTP site nearest you update the BIOS using the ASUS Update utility. 2.1.1 ASUS Update utility The ASUS Update is a utility that comes with the motherboard package. Installing ASUS Update To install ASUS Update: 1. Chapter 2 BIOS information 2.1 Managing and updating your BIOS Save a copy of...
User Manual
Page 40
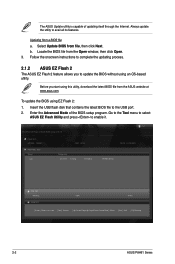
...23p 4194304 Exit DATE: 01/04/2011 P8H61.ROM File Info MODEL: Help Info VER: DATE [Enter] Select or Load [Tab] Switch [Up/Down/PageUp/PageDown/Home/End] Move [Esc] Exit [F2] Backup 2-2 ASUS P8H61 Series Select Update BIOS from a BIOS file a. Insert the USB flash disk... that contains the latest BIOS file to complete the updating process. 2.1.2 ASUS EZ Flash 2 The ASUS EZ Flash 2 feature allows you start using this utility, download the ...
...23p 4194304 Exit DATE: 01/04/2011 P8H61.ROM File Info MODEL: Help Info VER: DATE [Enter] Select or Load [Tab] Switch [Up/Down/PageUp/PageDown/Home/End] Move [Esc] Exit [F2] Backup 2-2 ASUS P8H61 Series Select Update BIOS from a BIOS file a. Insert the USB flash disk... that contains the latest BIOS file to complete the updating process. 2.1.2 ASUS EZ Flash 2 The ASUS EZ Flash 2 feature allows you start using this utility, download the ...
User Manual
Page 41
...arrow keys to find the USB flash disk that contains the latest BIOS, and then press . 5. Download the latest BIOS file from the ASUS website at www.asus.com. The utility automatically checks the devices for P8H61 PLUS). • The BIOS file in the support DVD may not be the latest version.... DO NOT shut down or reset the system while updating the BIOS to perform the BIOS update process. ...
...arrow keys to find the USB flash disk that contains the latest BIOS, and then press . 5. Download the latest BIOS file from the ASUS website at www.asus.com. The utility automatically checks the devices for P8H61 PLUS). • The BIOS file in the support DVD may not be the latest version.... DO NOT shut down or reset the system while updating the BIOS to perform the BIOS update process. ...
User Manual
Page 42
... you to copy the current BIOS file that you to update BIOS in NTFS format. 3. Prepare the motherboard support DVD and a USB flash drive in DOS environment 1. Do not save them on the USB flash drive. Boot your computer. C:\>d: D:\> 2-4 ASUS P8H61 Series When the Make Disk ...menu appears, select the FreeDOS command prompt item by pressing the item number. 4. Download the latest BIOS file and BIOS Updater from Drive C (optical drive) to a hard disk drive or ...
... you to copy the current BIOS file that you to update BIOS in NTFS format. 3. Prepare the motherboard support DVD and a USB flash drive in DOS environment 1. Do not save them on the USB flash drive. Boot your computer. C:\>d: D:\> 2-4 ASUS P8H61 Series When the Make Disk ...menu appears, select the FreeDOS command prompt item by pressing the item number. 4. Download the latest BIOS file and BIOS Updater from Drive C (optical drive) to a hard disk drive or ...
User Manual
Page 43
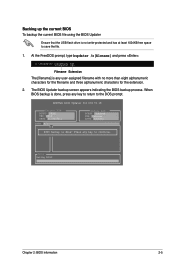
... is any key to return to continue. Backing up the current BIOS To backup the current BIOS file using the BIOS Updater Ensure that the USB flash drive is done! At the FreeDOS prompt, type bupdater /o[filename] and press . D:\>bupdater /oOLDBIOS1.rom Filename Extension The [...than eight alphanumeric characters for the filename and three alphanumeric characters for DOS V1.18 Current ROM BOARD: P8H61 VER: 0210 DATE: 01/04/2011 Update ROM BOARD: Unknown VER: Unknown DATE: Unknown PATH: A:\ BIOS backup is not write-protected and has at least 1024KB free space to save the file. 1. ...
... is any key to return to continue. Backing up the current BIOS To backup the current BIOS file using the BIOS Updater Ensure that the USB flash drive is done! At the FreeDOS prompt, type bupdater /o[filename] and press . D:\>bupdater /oOLDBIOS1.rom Filename Extension The [...than eight alphanumeric characters for the filename and three alphanumeric characters for DOS V1.18 Current ROM BOARD: P8H61 VER: 0210 DATE: 01/04/2011 Update ROM BOARD: Unknown VER: Unknown DATE: Unknown PATH: A:\ BIOS backup is not write-protected and has at least 1024KB free space to save the file. 1. ...
User Manual
Page 44
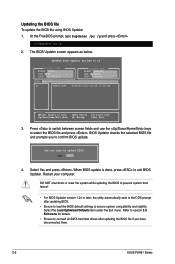
.../g and press . Restart your computer. BIOS Updater checks the selected BIOS file and prompts you sure to the DOS prompt after updating the BIOS file if you have disconnected them. 2-6 ASUS P8H61 Series Updating the BIOS file To update the BIOS file using BIOS Updater 1. DO NOT shut down or ...reset the system while updating the BIOS to prevent system boot failure! • For BIOS Updater version 1.04 ...
.../g and press . Restart your computer. BIOS Updater checks the selected BIOS file and prompts you sure to the DOS prompt after updating the BIOS file if you have disconnected them. 2-6 ASUS P8H61 Series Updating the BIOS file To update the BIOS file using BIOS Updater 1. DO NOT shut down or ...reset the system while updating the BIOS to prevent system boot failure! • For BIOS Updater version 1.04 ...
User Manual
Page 45
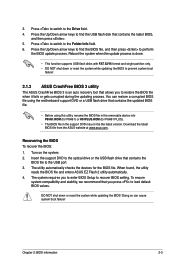
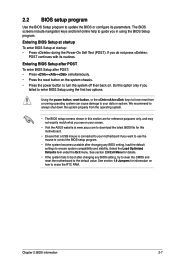
... you do not press , POST continues with its parameters. 2.2 BIOS setup program Use the BIOS Setup program to update the BIOS or configure its routines. Entering BIOS Setup at startup To enter BIOS Setup at www.asus.com to download the latest BIOS file for details. • If the system fails to boot... system properly from a running operating system can cause damage to your screen. • Visit the ASUS website at startup: • Press during the Power-On Self Test (POST). The BIOS screens include navigation keys and brief online help to guide you failed to erase the RTC RAM. ...
... you do not press , POST continues with its parameters. 2.2 BIOS setup program Use the BIOS Setup program to update the BIOS or configure its routines. Entering BIOS Setup at startup To enter BIOS Setup at www.asus.com to download the latest BIOS file for details. • If the system fails to boot... system properly from a running operating system can cause damage to your screen. • Visit the ASUS website at startup: • Press during the Power-On Self Test (POST). The BIOS screens include navigation keys and brief online help to guide you failed to erase the RTC RAM. ...
User Manual
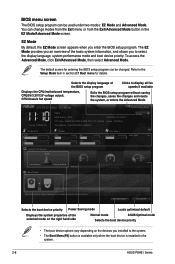
Page 46
... installed to the system. • The Boot Menu(F8) button is available only when the boot device is installed to the system. 2-8 ASUS P8H61 Series To access the Advanced Mode, click Exit/Advanced Mode, then select Advanced Mode. Boot Menu(F8) Default(F5) Selects the boot device... Power Saving mode Loads optimized default Displays the system properties of the basic system information, and allows you enter the BIOS setup program. BIOS menu screen The BIOS setup program can be used under two modes: EZ Mode and Advanced Mode. The default screen for details. Refer ...
... installed to the system. • The Boot Menu(F8) button is available only when the boot device is installed to the system. 2-8 ASUS P8H61 Series To access the Advanced Mode, click Exit/Advanced Mode, then select Advanced Mode. Boot Menu(F8) Default(F5) Selects the boot device... Power Saving mode Loads optimized default Displays the system properties of the basic system information, and allows you enter the BIOS setup program. BIOS menu screen The BIOS setup program can be used under two modes: EZ Mode and Advanced Mode. The default screen for details. Refer ...


