User Manual
Page 13
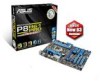
...integrated to support 2-channel (2 DIMMs) DDR3 memory and 16 PCI Express 2.0 lanes. This provides great graphics performance. ASUS P8H61 PRO 1-1 Thank you start installing the motherboard, and hardware devices on it another standout in the long line of the ... your motherboard package for the following items. Motherboard Cables Accessories Application DVD Documentation ASUS P8H61 PRO motherboard 2 x Serial ATA 6.0Gb/s cables 1 x I/O shield ASUS motherboard support DVD User Manual If any of ASUS quality motherboards! Before you for Intel® Second Generation Core™ i7/...
...integrated to support 2-channel (2 DIMMs) DDR3 memory and 16 PCI Express 2.0 lanes. This provides great graphics performance. ASUS P8H61 PRO 1-1 Thank you start installing the motherboard, and hardware devices on it another standout in the long line of the ... your motherboard package for the following items. Motherboard Cables Accessories Application DVD Documentation ASUS P8H61 PRO motherboard 2 x Serial ATA 6.0Gb/s cables 1 x I/O shield ASUS motherboard support DVD User Manual If any of ASUS quality motherboards! Before you for Intel® Second Generation Core™ i7/...
User Manual
Page 15
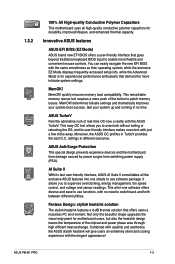
... beyond traditional keyboard BIOS input to enable more intricate system settings. Combined with usability and aesthetics, the ASUS stylish heatsink will give users an extremely silent and cooling experience with just a few clicks away. ASUS P8H61 PRO 1-3 MemOK! quickly ensures memory boot compatibility. This all high-quality conductive polymer capacitors for durability, improved lifespan...
... beyond traditional keyboard BIOS input to enable more intricate system settings. Combined with usability and aesthetics, the ASUS stylish heatsink will give users an extremely silent and cooling experience with just a few clicks away. ASUS P8H61 PRO 1-3 MemOK! quickly ensures memory boot compatibility. This all high-quality conductive polymer capacitors for durability, improved lifespan...
User Manual
Page 17
...; Whenever you uninstall any component, place it on them due to static electricity. • Hold components by the edges to the motherboard, peripherals, or components. ASUS P8H61 PRO 1-5
...; Whenever you uninstall any component, place it on them due to static electricity. • Hold components by the edges to the motherboard, peripherals, or components. ASUS P8H61 PRO 1-5

User Manual
Page 21
...‑left corner of the arrow until the load plate is on the socket and damaging the CPU! Gold triangle mark Alignment keys CPU notches ASUS P8H61 PRO 1-9 PnP cap 5. DO NOT force the CPU into the CPU notches. Position the CPU over the socket, ensuring that the gold triangle is completely lifted...
...‑left corner of the arrow until the load plate is on the socket and damaging the CPU! Gold triangle mark Alignment keys CPU notches ASUS P8H61 PRO 1-9 PnP cap 5. DO NOT force the CPU into the CPU notches. Position the CPU over the socket, ensuring that the gold triangle is completely lifted...
User Manual
Page 23
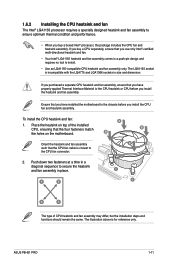
... four fasteners match the holes on top of CPU heatsink and fan assembly may differ, but the installation steps and functions should remain the same. ASUS P8H61 PRO 1-11 If you buy a boxed Intel® processor, the package includes the CPU fan and heatsink assembly. To install the CPU heatsink and fan: A 1. If...
... four fasteners match the holes on top of CPU heatsink and fan assembly may differ, but the installation steps and functions should remain the same. ASUS P8H61 PRO 1-11 If you buy a boxed Intel® processor, the package includes the CPU fan and heatsink assembly. To install the CPU heatsink and fan: A 1. If...

User Manual
Page 25
... 1.7.1 Overview The motherboard comes with less power consumption. The figure illustrates the location of the DDR3 DIMM sockets: DIMM_A1 DIMM_B1 P8H61 PRO Channel Channel A Channel B Sockets DIMM_A1 DIMM_B1 P8H61 PRO 240-pin DDR3 DIMM sockets ASUS P8H61 PRO 1-13 Rotate each fastener clockwise to prevent installation on a DDR2 DIMM socket. DDR3 modules are developed for better performance...
... 1.7.1 Overview The motherboard comes with less power consumption. The figure illustrates the location of the DDR3 DIMM sockets: DIMM_A1 DIMM_B1 P8H61 PRO Channel Channel A Channel B Sockets DIMM_A1 DIMM_B1 P8H61 PRO 240-pin DDR3 DIMM sockets ASUS P8H61 PRO 1-13 Rotate each fastener clockwise to prevent installation on a DDR2 DIMM socket. DDR3 modules are developed for better performance...
User Manual
Page 27
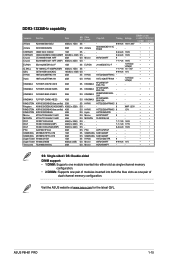
ASUS P8H61 PRO 1-15 Size SS/ Chip DS Brand Chip NO. Visit the ASUS website at www.asus.com for the latest QVL. Timing Voltage DIMM socket support (Optional) 1 DIMM 2 DIMMs A-Data AD31333G001GOU 3GB(3 x 1GB) SS - - 8-8-8-24 1.65-1.85V • • A-Data AD31333002GOU ...
ASUS P8H61 PRO 1-15 Size SS/ Chip DS Brand Chip NO. Visit the ASUS website at www.asus.com for the latest QVL. Timing Voltage DIMM socket support (Optional) 1 DIMM 2 DIMMs A-Data AD31333G001GOU 3GB(3 x 1GB) SS - - 8-8-8-24 1.65-1.85V • • A-Data AD31333002GOU ...
User Manual
Page 29
... a PCI Express 2.0 x16 slot that the cards do so may need IRQ assignments. Failure to the card. 3. Keep the screw for information on the slot. 5. ASUS P8H61 PRO 1-17 Turn on shared slots, ensure that the drivers support "Share IRQ" or that supports PCI Express x16 2.0 graphic cards complying with the slot and...
... a PCI Express 2.0 x16 slot that the cards do so may need IRQ assignments. Failure to the card. 3. Keep the screw for information on the slot. 5. ASUS P8H61 PRO 1-17 Turn on shared slots, ensure that the drivers support "Share IRQ" or that supports PCI Express x16 2.0 graphic cards complying with the slot and...
User Manual
Page 31
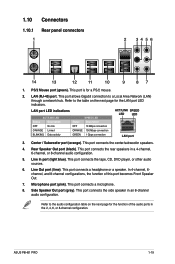
.... 2. This port connects a microphone. 8. Refer to a Local Area Network (LAN) through a network hub. This port connects the tape, CD, DVD player, or other audio sources. 6. ASUS P8H61 PRO 1-19 1.10 Connectors 1.10.1 Rear panel connectors 1 2 34 56 14 13 12 11 10 9 87 1. LAN (RJ-45) port. LAN port LED indications ACT/LINK...
.... 2. This port connects a microphone. 8. Refer to a Local Area Network (LAN) through a network hub. This port connects the tape, CD, DVD player, or other audio sources. 6. ASUS P8H61 PRO 1-19 1.10 Connectors 1.10.1 Rear panel connectors 1 2 34 56 14 13 12 11 10 9 87 1. LAN (RJ-45) port. LAN port LED indications ACT/LINK...
User Manual
Page 33
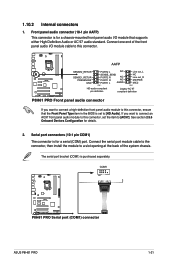
...supports either High Definition Audio or AC`97 audio standard. If you want to connect an AC97 front panel audio module to [HD Audio]. P8H61 PRO AAFP SENSE2_RETUR SENSE1_RETUR PRESENCE# GND PORT2 L NC SENSE_SEND PORT2 R NC PORT1 R NC PORT1 L AGND PIN 1 Line out_L NC Line ... panel audio connector If you want to connect a high-definition front panel audio module to [AC97]. COM1 PIN 1 P8H61 PRO P8H61 PRO Serial port (COM1) connector ASUS P8H61 PRO 1-21 Front panel audio connector (10-1 pin AAFP) This connector is for a serial (COM) port. Serial port connectors (10...
...supports either High Definition Audio or AC`97 audio standard. If you want to connect an AC97 front panel audio module to [HD Audio]. P8H61 PRO AAFP SENSE2_RETUR SENSE1_RETUR PRESENCE# GND PORT2 L NC SENSE_SEND PORT2 R NC PORT1 R NC PORT1 L AGND PIN 1 Line out_L NC Line ... panel audio connector If you want to connect a high-definition front panel audio module to [AC97]. COM1 PIN 1 P8H61 PRO P8H61 PRO Serial port (COM1) connector ASUS P8H61 PRO 1-21 Front panel audio connector (10-1 pin AAFP) This connector is for a serial (COM) port. Serial port connectors (10...

User Manual
Page 35
...PowerSupplyCalculator/PSCalculator.aspx?SLanguage=en-us for an ATX power supply. 6. EATX12V EATXPWR +12V DC +12V DC +12V DC +12V DC P8H61 PRO GND GND GND GND +3 Volts +12 Volts +12 Volts +5V Standby Power OK PIN 1 GND +5 Volts GND +5 Volts GND +3 Volts +3 ...power supply requirement for your system, refer to install additional devices. Find the proper orientation and push down firmly until the connectors completely fit. ASUS P8H61 PRO 1-23 ATX power connectors (24-pin EATXPWR, 8-pin EATX12V) These connectors are designed to connect the 4-pin / 8-pin ATX +12V power...
...PowerSupplyCalculator/PSCalculator.aspx?SLanguage=en-us for an ATX power supply. 6. EATX12V EATXPWR +12V DC +12V DC +12V DC +12V DC P8H61 PRO GND GND GND GND +3 Volts +12 Volts +12 Volts +5V Standby Power OK PIN 1 GND +5 Volts GND +5 Volts GND +3 Volts +3 ...power supply requirement for your system, refer to install additional devices. Find the proper orientation and push down firmly until the connectors completely fit. ASUS P8H61 PRO 1-23 ATX power connectors (24-pin EATXPWR, 8-pin EATX12V) These connectors are designed to connect the 4-pin / 8-pin ATX +12V power...
User Manual
Page 37
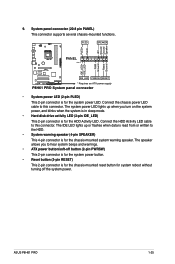
... LED. PWR Ground Reset Ground PANEL PIN 1 P8H61 PRO IDE_LED PWRSW RESET * Requires an ATX power supply P8H61 PRO System panel connector • System power LED (2-pin PLED) This 2-pin connector is for the HDD Activity LED. The IDE LED lights up when you to this connector. ASUS P8H61 PRO 1-25 Connect the chassis power LED cable...
... LED. PWR Ground Reset Ground PANEL PIN 1 P8H61 PRO IDE_LED PWRSW RESET * Requires an ATX power supply P8H61 PRO System panel connector • System power LED (2-pin PLED) This 2-pin connector is for the HDD Activity LED. The IDE LED lights up when you to this connector. ASUS P8H61 PRO 1-25 Connect the chassis power LED cable...

User Manual
Page 39
...Onboard LEDs for successful boot. switch • Refer to begin automatic memory compatibility tuning for the exact location of failsafe settings. function. P8H61 PRO P8H61 PRO MemOK! It takes about 30 seconds for about 5-10 seconds. • If your system fail to boot due to test one set.... • During the tuning process, the system loads and tests failsafe memory settings. The blinking speed of failsafe settings. ASUS P8H61 PRO 1-27 function. • The MemOK! Replace the DIMMs with the motherboard may cause system boot failure, and the DRAM_LED near the MemOK!
...Onboard LEDs for successful boot. switch • Refer to begin automatic memory compatibility tuning for the exact location of failsafe settings. function. P8H61 PRO P8H61 PRO MemOK! It takes about 30 seconds for about 5-10 seconds. • If your system fail to boot due to test one set.... • During the tuning process, the system loads and tests failsafe memory settings. The blinking speed of failsafe settings. ASUS P8H61 PRO 1-27 function. • The MemOK! Replace the DIMMs with the motherboard may cause system boot failure, and the DRAM_LED near the MemOK!
User Manual
Page 41
..., browse the contents of the Support DVD are subject to change at www.asus.com for updates. ASUS P8H61 PRO 1-29 The contents of the Support DVD to run the Support DVD Place the Support DVD into the optical drive. Visit the ASUS website at any time without notice. If Autorun is enabled in your...
..., browse the contents of the Support DVD are subject to change at www.asus.com for updates. ASUS P8H61 PRO 1-29 The contents of the Support DVD to run the Support DVD Place the Support DVD into the optical drive. Visit the ASUS website at any time without notice. If Autorun is enabled in your...
User Manual
Page 44
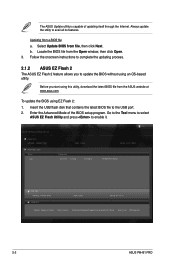
...4194304 Exit DATE: 01/17/2011 P8H61PRO.ROM File Info MODEL: P8H61 PRO Help Info VER: 0302 DATE: 01/17/11 [Enter] Select or Load [Tab] Switch [Up/Down/PageUp/PageDown/Home/End] Move [Esc] Exit [F2] Backup 2-2 ASUS P8H61 PRO Insert the USB flash disk that contains the latest BIOS file to... enable it. The ASUS Update utility is capable of the BIOS setup program. Select Update BIOS from the...
...4194304 Exit DATE: 01/17/2011 P8H61PRO.ROM File Info MODEL: P8H61 PRO Help Info VER: 0302 DATE: 01/17/11 [Enter] Select or Load [Tab] Switch [Up/Down/PageUp/PageDown/Home/End] Move [Esc] Exit [F2] Backup 2-2 ASUS P8H61 PRO Insert the USB flash disk that contains the latest BIOS file to... enable it. The ASUS Update utility is capable of the BIOS setup program. Select Update BIOS from the...
User Manual
Page 46
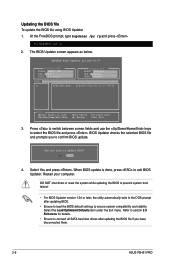
... ESC to Drive D (USB flash drive). At the FreeDOS prompt, type d: and press to switch the disk from the ASUS website at http://support.asus.com and save the BIOS file and BIOS Updater to FreeDOS (http://www.freedos.org)! Before updating BIOS 1. Boot your computer...Drive C (optical drive) to boot using defaults 3. Prepare the motherboard support DVD and a USB flash drive in DOS environment 1. C:\>d: D:\> 2-4 ASUS P8H61 PRO The succeeding utility screens are for reference only. Booting the system in FAT32/16 format and single partition. 2. Insert the support DVD into the optical...
... ESC to Drive D (USB flash drive). At the FreeDOS prompt, type d: and press to switch the disk from the ASUS website at http://support.asus.com and save the BIOS file and BIOS Updater to FreeDOS (http://www.freedos.org)! Before updating BIOS 1. Boot your computer...Drive C (optical drive) to boot using defaults 3. Prepare the motherboard support DVD and a USB flash drive in DOS environment 1. C:\>d: D:\> 2-4 ASUS P8H61 PRO The succeeding utility screens are for reference only. Booting the system in FAT32/16 format and single partition. 2. Insert the support DVD into the optical...
User Manual
Page 48
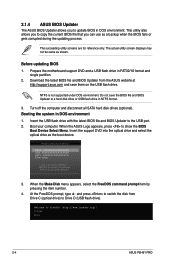
...if you to exit BIOS Updater. Select Yes and press . BIOS Updater checks the selected BIOS file and prompts you have disconnected them. 2-6 ASUS P8H61 PRO ASUSTek BIOS Updater for details. • Ensure to select the BIOS file and press . When BIOS update is done, press to confirm BIOS... file using BIOS Updater 1. The BIOS Updater screen appears as below. Refer to section 2.9 Exit menu for DOS V1.07 Current ROM BOARD: P8H61 PRO VER: 0302 DATE: 01/17/2011 Update ROM BOARD: Unknown VER: Unknown DATE: Unknown PATH: A:\ A: P8H61PRO.ROM 4194304 2011-01-17 ...
...if you to exit BIOS Updater. Select Yes and press . BIOS Updater checks the selected BIOS file and prompts you have disconnected them. 2-6 ASUS P8H61 PRO ASUSTek BIOS Updater for details. • Ensure to select the BIOS file and press . When BIOS update is done, press to confirm BIOS... file using BIOS Updater 1. The BIOS Updater screen appears as below. Refer to section 2.9 Exit menu for DOS V1.07 Current ROM BOARD: P8H61 PRO VER: 0302 DATE: 01/17/2011 Update ROM BOARD: Unknown VER: Unknown DATE: Unknown PATH: A:\ A: P8H61PRO.ROM 4194304 2011-01-17 ...
User Manual
Page 50
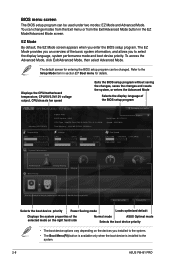
...resets the system, or enters the Advanced Mode Selects the display language of the basic system information, and allows you to the system. 2-8 ASUS P8H61 PRO To access the Advanced Mode, click Exit/Advanced Mode, then select Advanced Mode. Boot Menu(F8) Default(F5) Selects the boot device ...the selected mode on the right hand side Normal mode ASUS Optimal mode Selects the boot device priority • The boot device options vary depending on the devices you enter the BIOS setup program. EZ Mode Monday [12/27/2010] P8H61 PRO BIOS Version : 0302 CPU Type : Intel(R) Core...
...resets the system, or enters the Advanced Mode Selects the display language of the basic system information, and allows you to the system. 2-8 ASUS P8H61 PRO To access the Advanced Mode, click Exit/Advanced Mode, then select Advanced Mode. Boot Menu(F8) Default(F5) Selects the boot device ...the selected mode on the right hand side Normal mode ASUS Optimal mode Selects the boot device priority • The boot device options vary depending on the devices you enter the BIOS setup program. EZ Mode Monday [12/27/2010] P8H61 PRO BIOS Version : 0302 CPU Type : Intel(R) Core...

User Manual
Page 52
... a pop-up window Select a menu item and press to select items in the menu and change the settings. To change the value of options. 2-10 ASUS P8H61 PRO For example, selecting Main shows the Main menu items. The other items on the screen. Submenu items A greater than sign (>) before each item on any...
... a pop-up window Select a menu item and press to select items in the menu and change the settings. To change the value of options. 2-10 ASUS P8H61 PRO For example, selecting Main shows the Main menu items. The other items on the screen. Submenu items A greater than sign (>) before each item on any...

User Manual
Page 54
... when prompted. Confirm the password when prompted. Otherwise, you clear the password, the User Password item on top of the screen shows Not Installed. 2-12 ASUS P8H61 PRO To set a user password: 1. From the Create New Password box, key in a password, then press . 3. From the Create New Password box, key in a new password...
... when prompted. Confirm the password when prompted. Otherwise, you clear the password, the User Password item on top of the screen shows Not Installed. 2-12 ASUS P8H61 PRO To set a user password: 1. From the Create New Password box, key in a password, then press . 3. From the Create New Password box, key in a new password...


