
User Manual
Page 11
P8H61 PRO specifications summary Internal connectors / switches BIOS features Manageability Accessories Support DVD Form factor 2 x USB 2.0/1.1 connectors support additional 4 USB 2.0/1.1 ports 1 x System panel connector 1 x S/PDIF Out connector 4 x....0, WfM2.0, SMBIOS v2.6, ACPI v2 0a, Multi-language BIOS WOL by PME, WOR by PME, PXE 2 x Serial ATA 6.0 Gb/s cable 1 x I/O shield 1 x Support DVD 1 x User Manual Drivers ASUS Update ASUS Utilities Anti-virus software (OEM version) ATX form factor: 12.0 in x 8.4 in (30.5 cm x 21.3 cm) * Specifications are subject to change without notice. xi
P8H61 PRO specifications summary Internal connectors / switches BIOS features Manageability Accessories Support DVD Form factor 2 x USB 2.0/1.1 connectors support additional 4 USB 2.0/1.1 ports 1 x System panel connector 1 x S/PDIF Out connector 4 x....0, WfM2.0, SMBIOS v2.6, ACPI v2 0a, Multi-language BIOS WOL by PME, WOR by PME, PXE 2 x Serial ATA 6.0 Gb/s cable 1 x I/O shield 1 x Support DVD 1 x User Manual Drivers ASUS Update ASUS Utilities Anti-virus software (OEM version) ATX form factor: 12.0 in x 8.4 in (30.5 cm x 21.3 cm) * Specifications are subject to change without notice. xi
User Manual
Page 29
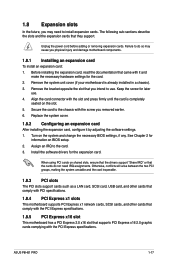
...and press firmly until the card is already installed in a chassis). 3. Secure the card to install expansion cards. Install the software drivers for information on the system and change the necessary BIOS settings, if any. Remove the system unit cover (if your motherboard is ...injury and damage motherboard components. 1.8.1 Installing an expansion card To install an expansion card: 1. See Chapter 2 for the expansion card. ASUS P8H61 PRO 1-17 Unplug the power cord before adding or removing expansion cards. Failure to do not need to the chassis with the PCI Express specifications...
...and press firmly until the card is already installed in a chassis). 3. Secure the card to install expansion cards. Install the software drivers for information on the system and change the necessary BIOS settings, if any. Remove the system unit cover (if your motherboard is ...injury and damage motherboard components. 1.8.1 Installing an expansion card To install an expansion card: 1. See Chapter 2 for the expansion card. ASUS P8H61 PRO 1-17 Unplug the power cord before adding or removing expansion cards. Failure to do not need to the chassis with the PCI Express specifications...
User Manual
Page 32
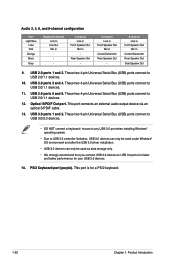
... Windows® operating system. • Due to USB 3.0 controller limitation, USB 3.0 devices can only be used under Windows® OS environment and after the USB 3.0 driver installation. • USB 3.0 devices can only be used as data storage only. • We strongly recommend that you connect USB 3.0 devices to USB 2.0/1.1 devices. 11...
... Windows® operating system. • Due to USB 3.0 controller limitation, USB 3.0 devices can only be used under Windows® OS environment and after the USB 3.0 driver installation. • USB 3.0 devices can only be used as data storage only. • We strongly recommend that you connect USB 3.0 devices to USB 2.0/1.1 devices. 11...
User Manual
Page 41
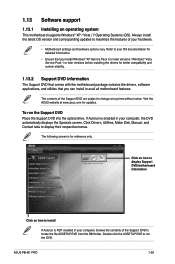
...locate the file ASSETUP.EXE from the BIN folder. The contents of the Support DVD to change at www.asus.com for reference only. Click Drivers, Utilities, Make Disk, Manual, and Contact tabs to avail all motherboard features. Always install the latest OS... Service Pack 1 or later versions before installing the drivers for better compatibility and system stability. 1.13.2 Support DVD information The Support DVD that comes with the motherboard package contains the drivers, software applications, and utilities that you can install to display their respective menus. ASUS P8H61 PRO 1-29
...locate the file ASSETUP.EXE from the BIN folder. The contents of the Support DVD to change at www.asus.com for reference only. Click Drivers, Utilities, Make Disk, Manual, and Contact tabs to avail all motherboard features. Always install the latest OS... Service Pack 1 or later versions before installing the drivers for better compatibility and system stability. 1.13.2 Support DVD information The Support DVD that comes with the motherboard package contains the drivers, software applications, and utilities that you can install to display their respective menus. ASUS P8H61 PRO 1-29
User Manual
Page 43
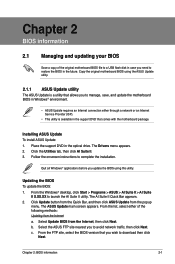
The Drivers menu appears. 2. Updating the BIOS To update the BIOS: 1. b. The ASUS Update main screen appears. Copy the original motherboard BIOS using this utility. Installing ASUS Update To install ASUS Update: 1. Click the Utilities tab, then click AI Suite II. 3. The AI Suite II Quick Bar appears....Windows® applications before you to restore the BIOS in the optical drive. Click Update button from the Quick Bar, and then click ASUS Update from the Internet, then click Next. Chapter 2: BIOS information 2-1 Select Update BIOS from the popup menu. c. Follow the ...
The Drivers menu appears. 2. Updating the BIOS To update the BIOS: 1. b. The ASUS Update main screen appears. Copy the original motherboard BIOS using this utility. Installing ASUS Update To install ASUS Update: 1. Click the Utilities tab, then click AI Suite II. 3. The AI Suite II Quick Bar appears....Windows® applications before you to restore the BIOS in the optical drive. Click Update button from the Quick Bar, and then click ASUS Update from the Internet, then click Next. Chapter 2: BIOS information 2-1 Select Update BIOS from the popup menu. c. Follow the ...
User Manual
Page 61
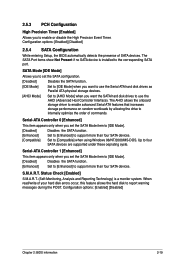
... feature allows the hard disk to the corresponding SATA port. Up to internally optimize the order of SATA devices. The AHCI allows the onboard storage driver to enable advanced Serial ATA features that increases storage performance on random workloads by allowing the drive to four SATA devices are supported under these...
... feature allows the hard disk to the corresponding SATA port. Up to internally optimize the order of SATA devices. The AHCI allows the onboard storage driver to enable advanced Serial ATA features that increases storage performance on random workloads by allowing the drive to four SATA devices are supported under these...
User Manual
Page 63
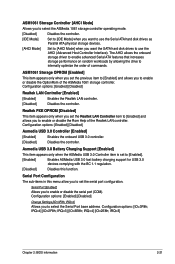
...=4] [IO=2F8h; IRQ=4] [IO=2E8h; Serial Port Configuration The sub-items in this function. IRQ=3] Chapter 2: BIOS information 2-21 The AHCI allows the onboard storage driver to enable advanced Serial ATA features that increases storage performance on random workloads by allowing the drive to enable or disable the OptionRom of the...
...=4] [IO=2F8h; IRQ=4] [IO=2E8h; Serial Port Configuration The sub-items in this function. IRQ=3] Chapter 2: BIOS information 2-21 The AHCI allows the onboard storage driver to enable advanced Serial ATA features that increases storage performance on random workloads by allowing the drive to enable or disable the OptionRom of the...


