
User Manual
Page 1
P8H61 PRO Motherboard
P8H61 PRO Motherboard
User Manual
Page 3
Contents Notices...vi Safety information vii About this guide vii P8H61 PRO specifications summary ix Chapter 1: Product introduction 1.1 Welcome 1-1 1.2 Package contents 1-1 1.3 Special features 1-1 1.3.1 Product highlights 1-1 1.3.2 Innovative ASUS features 1-3 1.4 Before you proceed 1-5 1.5 Motherboard overview 1-6 1.5.1 Placement direction 1-6 1.5.2 Screw holes 1-6 1.5.3 Motherboard layout 1-7 1.5.4 Layout contents 1-7 1.6 Central Processing Unit (CPU 1-8 1.6.1 Installing the CPU 1-8 1.6.2 Installing the CPU heatsink and fan 1-11 1.6.3 Uninstalling...
Contents Notices...vi Safety information vii About this guide vii P8H61 PRO specifications summary ix Chapter 1: Product introduction 1.1 Welcome 1-1 1.2 Package contents 1-1 1.3 Special features 1-1 1.3.1 Product highlights 1-1 1.3.2 Innovative ASUS features 1-3 1.4 Before you proceed 1-5 1.5 Motherboard overview 1-6 1.5.1 Placement direction 1-6 1.5.2 Screw holes 1-6 1.5.3 Motherboard layout 1-7 1.5.4 Layout contents 1-7 1.6 Central Processing Unit (CPU 1-8 1.6.1 Installing the CPU 1-8 1.6.2 Installing the CPU heatsink and fan 1-11 1.6.3 Uninstalling...
User Manual
Page 6
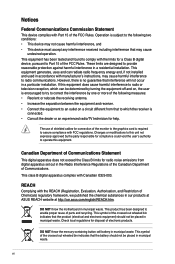
...radio or television reception, which can radiate radio frequency energy and, if not installed and used in our products at ASUS REACH website at http://csr.asus.com/english/REACH.htm. Check local regulations for disposal of parts and recycling. vi These limits are designed to provide... approved by turning the equipment off and on a circuit different from digital apparatus set out in municipal waste. DO NOT throw the motherboard in municipal waste. This symbol of the FCC Rules. If this equipment. Notices Federal Communications Commission Statement This device complies with Part ...
...radio or television reception, which can radiate radio frequency energy and, if not installed and used in our products at ASUS REACH website at http://csr.asus.com/english/REACH.htm. Check local regulations for disposal of parts and recycling. vi These limits are designed to provide... approved by turning the equipment off and on a circuit different from digital apparatus set out in municipal waste. DO NOT throw the motherboard in municipal waste. This symbol of the FCC Rules. If this equipment. Notices Federal Communications Commission Statement This device complies with Part ...
User Manual
Page 7
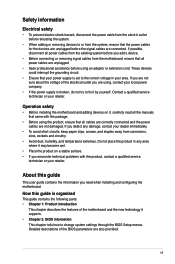
... away from connectors, slots, sockets and circuitry. • Avoid dust, humidity, and temperature extremes. If you need when installing and configuring the motherboard. vii How this guide This user guide contains the information you detect any area where it may become wet. • Place the product on... cables for the devices are unplugged before using an adapter or extension cord. If you are not sure about the voltage of the motherboard and the new technology it , carefully read all power cables are unplugged. • Seek professional assistance before the signal cables are also...
... away from connectors, slots, sockets and circuitry. • Avoid dust, humidity, and temperature extremes. If you need when installing and configuring the motherboard. vii How this guide This user guide contains the information you detect any area where it may become wet. • Place the product on... cables for the devices are unplugged before using an adapter or extension cord. If you are not sure about the voltage of the motherboard and the new technology it , carefully read all power cables are unplugged. • Seek professional assistance before the signal cables are also...
User Manual
Page 13
This provides great graphics performance. Chapter 1 Product introduction 1.1 Welcome! ASUS P8H61 PRO 1-1 Before you for the following items. Motherboard Cables Accessories Application DVD Documentation ASUS P8H61 PRO motherboard 2 x Serial ATA 6.0Gb/s cables 1 x I/O shield ASUS motherboard support DVD User Manual If any of ASUS quality motherboards! Intel® Second Generation Core™ i7/ Core™ i5/ Core™ i3 processors are among the most...
This provides great graphics performance. Chapter 1 Product introduction 1.1 Welcome! ASUS P8H61 PRO 1-1 Before you for the following items. Motherboard Cables Accessories Application DVD Documentation ASUS P8H61 PRO motherboard 2 x Serial ATA 6.0Gb/s cables 1 x I/O shield ASUS motherboard support DVD User Manual If any of ASUS quality motherboards! Intel® Second Generation Core™ i7/ Core™ i5/ Core™ i3 processors are among the most...
User Manual
Page 14
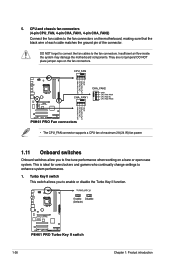
...identifies what types of peripherals are plugged into the audio I/O jacks and notifies users of inappropriate connection, which enhances system performance. PCI Express 2.0 support This motherboard supports PCI Express 2.0 devices for advanced operating systems. 1-2 Chapter 1: Product introduction The dual-channel DDR3 architecture enlarges the bandwidth of current bus systems. ... your system memory to -point links, allowing increased bandwidth and stability. S/PDIF out connector at the back I /O. True Serial ATA 6Gb/s support ASUS provides extra SATA 6.0Gb/s ports with USB 3.0 -
...identifies what types of peripherals are plugged into the audio I/O jacks and notifies users of inappropriate connection, which enhances system performance. PCI Express 2.0 support This motherboard supports PCI Express 2.0 devices for advanced operating systems. 1-2 Chapter 1: Product introduction The dual-channel DDR3 architecture enlarges the bandwidth of current bus systems. ... your system memory to -point links, allowing increased bandwidth and stability. S/PDIF out connector at the back I /O. True Serial ATA 6Gb/s support ASUS provides extra SATA 6.0Gb/s ports with USB 3.0 -
User Manual
Page 15
...0-dB thermal solution that goes beyond traditional keyboard BIOS input to switch back and forth between different utilities. ASUS P8H61 PRO 1-3 Get your system boot success. Moreover, the ASUS OC profiles in no need to enable more intricate system settings. MemOK! MemOK! quickly ensures memory boot ... the new EFI BIOS with just a few clicks away. and its fast user-friendly interface, ASUS AI Suite II consolidates all high-quality conductive polymer capacitors for motherboard users, but also the heatsink design lowers the temperature of real-time OC-now a reality with...
...0-dB thermal solution that goes beyond traditional keyboard BIOS input to switch back and forth between different utilities. ASUS P8H61 PRO 1-3 Get your system boot success. Moreover, the ASUS OC profiles in no need to enable more intricate system settings. MemOK! MemOK! quickly ensures memory boot ... the new EFI BIOS with just a few clicks away. and its fast user-friendly interface, ASUS AI Suite II consolidates all high-quality conductive polymer capacitors for motherboard users, but also the heatsink design lowers the temperature of real-time OC-now a reality with...
User Manual
Page 16
... The built-in regards to reduce carbon footprint of the product and thus mitigate environmental impacts. 1-4 Chapter 1: Product introduction ASUS MyLogo2™ This feature allows you to adjust the CPU and chassis fan speeds according to different ambient temperatures caused by ...different climate conditions in line with ASUS vision of fan speed to overclocking failure. C.P.R. (CPU Parameter Recall) The BIOS C.P.R. C.P.R. ErP ready The motherboard is in different geographic regions and your screen. Simply shut down and reboot...
... The built-in regards to reduce carbon footprint of the product and thus mitigate environmental impacts. 1-4 Chapter 1: Product introduction ASUS MyLogo2™ This feature allows you to adjust the CPU and chassis fan speeds according to different ambient temperatures caused by ...different climate conditions in line with ASUS vision of fan speed to overclocking failure. C.P.R. (CPU Parameter Recall) The BIOS C.P.R. C.P.R. ErP ready The motherboard is in different geographic regions and your screen. Simply shut down and reboot...
User Manual
Page 17
ASUS P8H61 PRO 1-5 Failure to do so may cause severe damage to avoid touching the ICs on them. • Whenever you uninstall ...the power cord is detached from the power supply. 1.4 Before you proceed Take note of the following precautions before you install motherboard components or change any motherboard settings. • Unplug the power cord from the wall socket before touching any component. • Before handling components, use... power supply case, to avoid damaging them due to static electricity. • Hold components by the edges to the motherboard, peripherals, or components.
ASUS P8H61 PRO 1-5 Failure to do so may cause severe damage to avoid touching the ICs on them. • Whenever you uninstall ...the power cord is detached from the power supply. 1.4 Before you proceed Take note of the following precautions before you install motherboard components or change any motherboard settings. • Unplug the power cord from the wall socket before touching any component. • Before handling components, use... power supply case, to avoid damaging them due to static electricity. • Hold components by the edges to the motherboard, peripherals, or components.
User Manual
Page 18
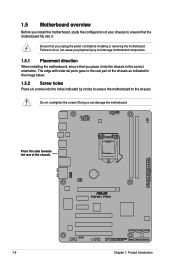
Failure to the rear part of the chassis P8H61 PRO 1-6 Chapter 1: Product introduction The edge with external ports goes to do so can damage the motherboard. Place this side towards the rear of the chassis as indicated in the image below. 1.5.2 Screw holes Place six screws into the holes indicated... by circles to secure the motherboard to ensure that the motherboard fits into it into the chassis in the correct orientation. Doing so can cause you physical injury and damage...
Failure to the rear part of the chassis P8H61 PRO 1-6 Chapter 1: Product introduction The edge with external ports goes to do so can damage the motherboard. Place this side towards the rear of the chassis as indicated in the image below. 1.5.2 Screw holes Place six screws into the holes indicated... by circles to secure the motherboard to ensure that the motherboard fits into it into the chassis in the correct orientation. Doing so can cause you physical injury and damage...
User Manual
Page 20
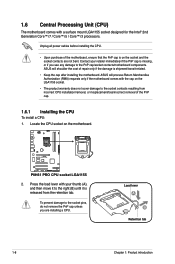
.... Locate the CPU socket on the motherboard. Load lever A B Retention tab 1-8 Chapter 1: Product introduction P8H61 PRO P8H61 PRO CPU socket LGA1155 2. Unplug all power cables before installing the CPU. • Upon purchase of the motherboard, ensure that the PnP cap is shipment/transit-related. • Keep the cap after installing the motherboard. ASUS will process Return Merchandise Authorization...
.... Locate the CPU socket on the motherboard. Load lever A B Retention tab 1-8 Chapter 1: Product introduction P8H61 PRO P8H61 PRO CPU socket LGA1155 2. Unplug all power cables before installing the CPU. • Upon purchase of the motherboard, ensure that the PnP cap is shipment/transit-related. • Keep the cap after installing the motherboard. ASUS will process Return Merchandise Authorization...
User Manual
Page 23
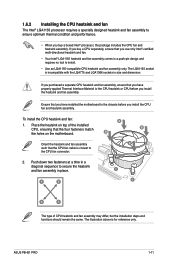
... illustration above is closest to the CPU fan connector. 2. ASUS P8H61 PRO 1-11 If you purchased a separate CPU heatsink and fan assembly, ensure that you have installed the motherboard to the chassis before you buy a CPU separately, ensure that the four fasteners match the holes on top of CPU heatsink and fan assembly may...
... illustration above is closest to the CPU fan connector. 2. ASUS P8H61 PRO 1-11 If you purchased a separate CPU heatsink and fan assembly, ensure that you have installed the motherboard to the chassis before you buy a CPU separately, ensure that the four fasteners match the holes on top of CPU heatsink and fan assembly may...
User Manual
Page 24
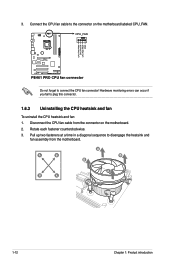
...GND P8H61 PRO P8H61 PRO CPU fan connector Do not forget to plug this connector. 1.6.3 Uninstalling the CPU heatsink and fan To uninstall the CPU heatsink and fan: 1. Pull up two fasteners at a time in a diagonal sequence to the connector on the motherboard. ...2. Disconnect the CPU fan cable from the motherboard. Rotate each fastener counterclockwise. 3. Hardware monitoring errors can occur if you fail to connect the CPU fan connector! 3. A ...
...GND P8H61 PRO P8H61 PRO CPU fan connector Do not forget to plug this connector. 1.6.3 Uninstalling the CPU heatsink and fan To uninstall the CPU heatsink and fan: 1. Pull up two fasteners at a time in a diagonal sequence to the connector on the motherboard. ...2. Disconnect the CPU fan cable from the motherboard. Rotate each fastener counterclockwise. 3. Hardware monitoring errors can occur if you fail to connect the CPU fan connector! 3. A ...

User Manual
Page 25
... of the DDR3 DIMM sockets: DIMM_A1 DIMM_B1 P8H61 PRO Channel Channel A Channel B Sockets DIMM_A1 DIMM_B1 P8H61 PRO 240-pin DDR3 DIMM sockets ASUS P8H61 PRO 1-13 A DDR3 module has the same physical dimensions as a DDR2 DIMM but is notched differently to ensure correct orientation when reinstalling. 1.7 System memory 1.7.1 Overview The motherboard comes with less power consumption. Carefully remove...
... of the DDR3 DIMM sockets: DIMM_A1 DIMM_B1 P8H61 PRO Channel Channel A Channel B Sockets DIMM_A1 DIMM_B1 P8H61 PRO 240-pin DDR3 DIMM sockets ASUS P8H61 PRO 1-13 A DDR3 module has the same physical dimensions as a DDR2 DIMM but is notched differently to ensure correct orientation when reinstalling. 1.7 System memory 1.7.1 Overview The motherboard comes with less power consumption. Carefully remove...
User Manual
Page 26
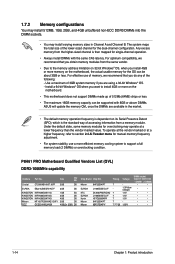
...maps the total size of 512Mb (64MB) chips or less. • The maximum 16GB memory capacity can be supported with 8GB or above DIMMs. ASUS will update the memory QVL once the DIMMs are using a 32-bit Windows® OS. - For effective use a more efficient memory cooling system...install varying memory sizes in the market. • The default memory operation frequency is dependent on the motherboard, the actual usable memory for the OS can be about 3GB or less. P8H61 PRO Motherboard Qualified Vendors List (QVL) DDR3-1066MHz capability Vendors Part No. To operate at the vendor-marked or...
...maps the total size of 512Mb (64MB) chips or less. • The maximum 16GB memory capacity can be supported with 8GB or above DIMMs. ASUS will update the memory QVL once the DIMMs are using a 32-bit Windows® OS. - For effective use a more efficient memory cooling system...install varying memory sizes in the market. • The default memory operation frequency is dependent on the motherboard, the actual usable memory for the OS can be about 3GB or less. P8H61 PRO Motherboard Qualified Vendors List (QVL) DDR3-1066MHz capability Vendors Part No. To operate at the vendor-marked or...
User Manual
Page 28
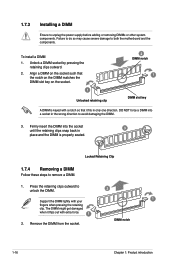
... to unplug the power supply before adding or removing DIMMs or other system components. Locked Retaining Clip 1.7.4 Removing a DIMM Follow these steps to both the motherboard and the components. Firmly insert the DIMM into a socket in 3 place and the DIMM is keyed with a notch so that the notch on the DIMM...
... to unplug the power supply before adding or removing DIMMs or other system components. Locked Retaining Clip 1.7.4 Removing a DIMM Follow these steps to both the motherboard and the components. Firmly insert the DIMM into a socket in 3 place and the DIMM is keyed with a notch so that the notch on the DIMM...
User Manual
Page 29
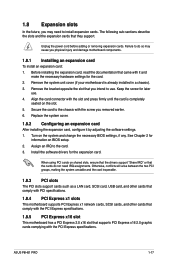
...it and make the necessary hardware settings for later use . Assign an IRQ to the chassis with it by adjusting the software settings. 1. ASUS P8H61 PRO 1-17 Unplug the power cord before adding or removing expansion cards. When using PCI cards on the slot. 5. Secure the card to the...system and change the necessary BIOS settings, if any. 1.8 Expansion slots In the future, you may cause you physical injury and damage motherboard components. 1.8.1 Installing an expansion card To install an expansion card: 1. The following sub‑sections describe the slots and the expansion ...
...it and make the necessary hardware settings for later use . Assign an IRQ to the chassis with it by adjusting the software settings. 1. ASUS P8H61 PRO 1-17 Unplug the power cord before adding or removing expansion cards. When using PCI cards on the slot. 5. Secure the card to the...system and change the necessary BIOS settings, if any. 1.8 Expansion slots In the future, you may cause you physical injury and damage motherboard components. 1.8.1 Installing an expansion card To install an expansion card: 1. The following sub‑sections describe the slots and the expansion ...
User Manual
Page 36
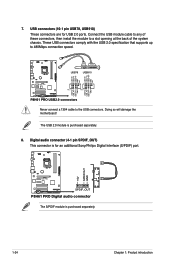
... damage the motherboard! These USB connectors comply with the USB 2.0 specification that supports up to a slot opening at the back of these connectors, then install the module to 480Mbps connection speed. USB78 USB910 USB+5V USB_P8USB_P8+ GND NC USB+5V USB_P10USB_P10+ GND NC P8H61 PRO PIN 1 ...PIN 1 USB+5V USB_P7USB_P7+ GND USB+5V USB_P9USB_P9+ GND P8H61 PRO USB2.0 connectors Never connect a 1394 cable to the USB connectors. USB connectors (10-1 pin USB78, ...
... damage the motherboard! These USB connectors comply with the USB 2.0 specification that supports up to a slot opening at the back of these connectors, then install the module to 480Mbps connection speed. USB78 USB910 USB+5V USB_P8USB_P8+ GND NC USB+5V USB_P10USB_P10+ GND NC P8H61 PRO PIN 1 ...PIN 1 USB+5V USB_P7USB_P7+ GND USB+5V USB_P9USB_P9+ GND P8H61 PRO USB2.0 connectors Never connect a 1394 cable to the USB connectors. USB connectors (10-1 pin USB78, ...
User Manual
Page 38
... PWM CPU FAN PWM CPU FAN IN CPU FAN PWR GND P8H61 PRO Fan connectors • The CPU_FAN connector supports a CPU fan of the connector. P8H61 PRO P8H61 PRO Turbo Key II switch 1-26 Chapter 1: Product introduction Insufficient air flow inside the system may damage the motherboard components. Turbo Key II switch This switch allows you to...
... PWM CPU FAN PWM CPU FAN IN CPU FAN PWR GND P8H61 PRO Fan connectors • The CPU_FAN connector supports a CPU fan of the connector. P8H61 PRO P8H61 PRO Turbo Key II switch 1-26 Chapter 1: Product introduction Insufficient air flow inside the system may damage the motherboard components. Turbo Key II switch This switch allows you to...

User Manual
Page 39
... motherboard may cause system boot failure, and the DRAM_LED near the MemOK! switch to test one set of failsafe settings. A message will appear during the tuning process, the system continues memory tuning after the whole tuning process, the DRAM_LED lights continuously. function. ASUS P8H61 PRO ...1-27 If the test fails, the system reboots and test the next set is not properly installed. To stop memory tuning, turn off the system and reinstall the DIMM before using the MemOK! 2. P8H61 PRO P8H61 PRO MemOK! Turn off the ...
... motherboard may cause system boot failure, and the DRAM_LED near the MemOK! switch to test one set of failsafe settings. A message will appear during the tuning process, the system continues memory tuning after the whole tuning process, the DRAM_LED lights continuously. function. ASUS P8H61 PRO ...1-27 If the test fails, the system reboots and test the next set is not properly installed. To stop memory tuning, turn off the system and reinstall the DIMM before using the MemOK! 2. P8H61 PRO P8H61 PRO MemOK! Turn off the ...


